 How to fly DJI Mavic Mini
Here, we introduce how to fly DJI Mavic Mini.
Click
here
for more information on DJI Mavic Mini.
DJI Mavic Mini / 2.7K aerial video mini drone weighing 249g
このページを日本語で見る
Table of contents
Suppress screen rotation and notification
 Suppress iPhone screen rotation and notifications before the flight.
Otherwise, the screen may rotate during the flight and drone flies away, or you may receive a phone call and lose control.
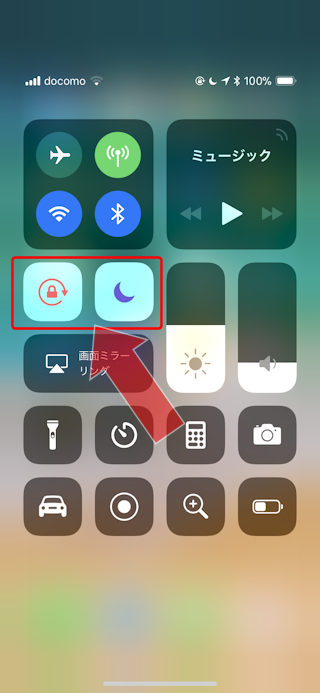
Screen rotation and notification suppression can be set with one touch from the control center.
To suppress notifications, set “
Focus
” mode to ON.
Just open the Control Center and tap on the two icons shown in the figure.
Suppress iPhone screen rotation and notifications before the flight.
Otherwise, the screen may rotate during the flight and drone flies away, or you may receive a phone call and lose control.
Screen rotation and notification suppression can be set with one touch from the control center.
To suppress notifications, set “
Focus
” mode to ON.
Just open the Control Center and tap on the two icons shown in the figure.
Also, use the Guided Access function to prevent switching to apps other than the DJI Fly app due to operational mistakes during flight.
How to use the Control Center (Japanese)
Enable only one app: How to use the Guided Access (Japanese)
How to use the app
When finish the Prepare DJI Mavic Mini for flight , the screen of the DJI Fly app will look like this.
| No. | Description |
|---|---|
| 1 | Tap “<” to return to the home screen. See How to use DJI Fly app page for how to use the home screen. |
| 2 | View and change the flight mode. Each tap switches to [S] ports - [C] ineSmooth - [P] osition mode. See the DJI Mavic Mini knowledge page for these three flight modes. |
| 3 |
Aircraft status such as “In Flight” and various messages are displayed here.
Tap here to check and change the Auto RTH Altitude, Max Altitude and Max Distance limit, and to check the remaining capacity of the SD card. |
| 4 | This shows battery level of the drone. |
| 5 | Here you can see drone flight remaining time, battery temperature, battery voltage, etc. |
| 6 | Wi-Fi signal strength between the drone and the controller is displayed. |
| 7 | The number and signal strength of GPS satellites that the drone is receiving are displayed. When this area turns white, home position is recorded and the RTH (Return to Home) function can be used. See the DJI Mavic Mini knowledge page for the Return to Home feature. |
| 8 | Tap here to open the settings screen. |
| 9 | Tap here to start Auto take-off / Auto landing / RTH (return to home) function. |
| 10 |
Switches the shooting format.
Single shot / interval shooting can be selected in the photography mode. In video mode, you can switch between resolution and frame rate. 2.7k resolution 25/30 fps, 1080p resolution 25/30/50/60 fps can be selected. The quick shot (Rocket / Circle / Dronie / Helix) is also started from here. |
| 11 |
This is a shutter button.
In photography mode (white), tap to take a photo. In video mode (red), recording will start / end each time you tap. |
| 12 | Switch to the playback screen. You can play back the photos and videos you have taken. See Enjoy photos and videos taken with DJI drone / How to use DJI Mimo function page for detailed operation. Let's operate after landing the drone. |
| 13 | Each time you tap this, you can show / hide the map of the current location. |
| 14 | The lower number indicates the altitude relative to the home point (takeoff point), and the upper number indicates the current ascent / descent speed. |
| 15 | The lower number indicates the distance from the home point (takeoff point), and the upper number indicates the current horizontal speed. |
| 16 | Radar : Displays the flight direction of the drone. GPS and compass of iPhone and drone are used to display drone's position and flight direction with respect to direction pilot is facing. |
| 17 | Displays current photo / video format and remaining capacity / recordable number / time for it. Tap to switch display of capacity, number of photos / recording time. |
| 18 |
Tap to change EV value (Exposure Value) when in the Photo and [Auto] mode.
In [Manual] mode, shutter speed can be displayed and changed. |
| 19 |
Tap to change AE (Auto Exposure) lock / release when in the Photo and [Auto] mode.
In [Manual] mode, ISO sensitivity can be displayed and changed. |
| 20 | Tap to change [Auto] / [Manual] mode in the Photo mode. |
Preparation for takeoff
Then wait for the home point to be recorded. If GPS is enabled, after a while, the status indicator will flash green quickly to notify you that the home point has been recorded. Once the home point is recorded, you can use the Return to Home function.
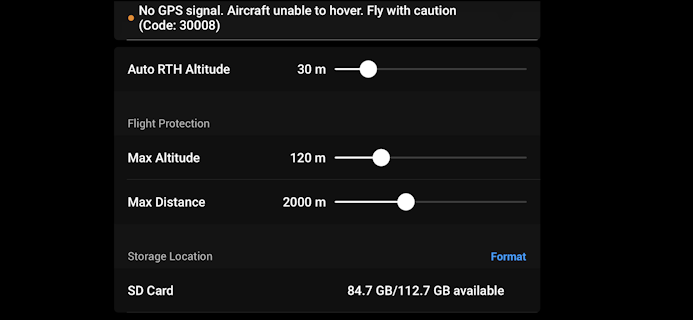
When you tap the message display at the top left of the camera view screen (No.3 position on the “How to use the app” above), the screen becomes as shown in the figure, and you can check and change the Auto RTH Altitude, Max Altitude, and Max Distance limit. Let's set an appropriate value.
See DJI Mavic Mini specifications page for the status indicator colors and the meaning of blinking. And see DJI Mavic Mini knowledge page for the Return to Home feature.
DJI Mavic Mini specifications
DJI Mavic Mini knowledge
Precautions when temperature is low
When the temperature drops below 5 degrees Celsius (below 41 degrees Fahrenheit), battery performance drops significantly. If you need to fly in such an environment, be sure to fully charge it before flying, hover for a while to warm the battery, and then start flying.Take off
There are two ways to take off the Mavic Mini: Auto take-off and Manual take-off. And depending on the location and conditions of takeoff, a warning may be displayed.Auto take-off
 Open the camera view screen of the DJI Fly app and tap the
Manual take-off
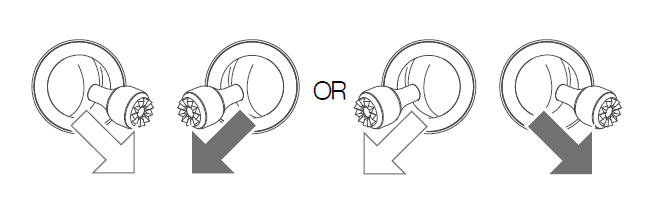 First, start the Mavic Mini motor.
To do this, use the controller Combination Stick Command (CSC).
Tilt both sticks downward inside or outside at the same time to start the motor.
When the motor starts, lift your fingers from both sticks.
First, start the Mavic Mini motor.
To do this, use the controller Combination Stick Command (CSC).
Tilt both sticks downward inside or outside at the same time to start the motor.
When the motor starts, lift your fingers from both sticks.
Then push the throttle stick (left stick) slowly forward. And the rotation speed of the motor will increase and eventually take off.
Takeoff warning
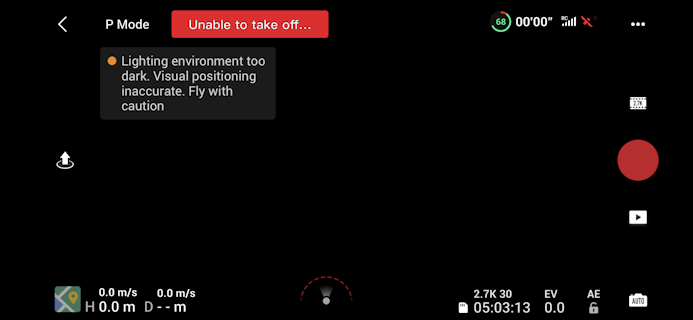 Depending on the flight location and conditions, “Unable to take off” may be displayed in a red box like this.
In such a case, tap this “Unable to take off” message.
Depending on the flight location and conditions, “Unable to take off” may be displayed in a red box like this.
In such a case, tap this “Unable to take off” message.
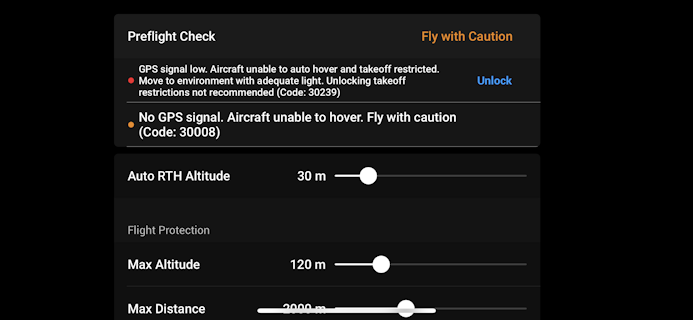 Then you can see the reason for the warning.
If there is no problem, tap “Unlock” to the right of the warning text.
Then a confirmation screen is displayed, so you can cancel the warning by tapping “Agree”.
Then you can see the reason for the warning.
If there is no problem, tap “Unlock” to the right of the warning text.
Then a confirmation screen is displayed, so you can cancel the warning by tapping “Agree”.
However, the warning cannot be canceled if the aircraft is in a no-fly zone, which is prohibited by drone flight rules.
Control method
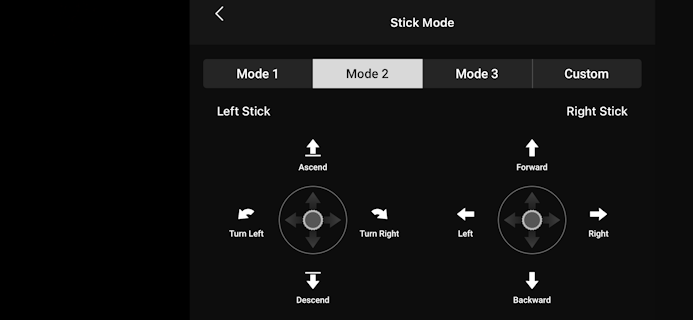
To switch modes, tap the
Drone operation method / practice method and flight technique
Landing
There are two ways to land the Mavic Mini: Auto landing and Manual landing.Auto landing
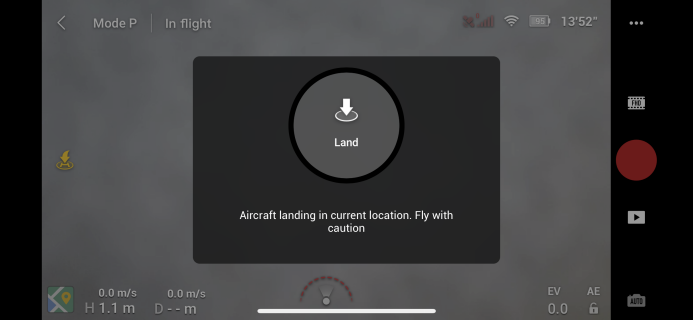 Tap the
Manual landing
For more information on landing protection, see DJI Mavic Mini knowledge .
DJI Mavic Mini knowledge
Motor stop
There are two ways to stop the Mavic Mini motor.The first is to use only the throttle stick. After landing the drone on the ground, keep pulling the throttle stick (left stick) toward you. Then, the motor stops after about 3 seconds.
The other is to use CSC, just like at the start. After landing the drone on the ground, first pull the throttle stick (left stick) toward you, then tilt both sticks downward inside or outside at the same time to stop the motor. When the motor stops, lift your fingers from both sticks.
Emergency stop in flight
The motor can be brought to an emergency stop during flight, such as when control is lost. Immediately drop the drone on the spot.As with motor start, CSC can be used to make an emergency stop. Tilt both sticks downward inside or outside at the same time to stop the motor.
Pause / RTH button
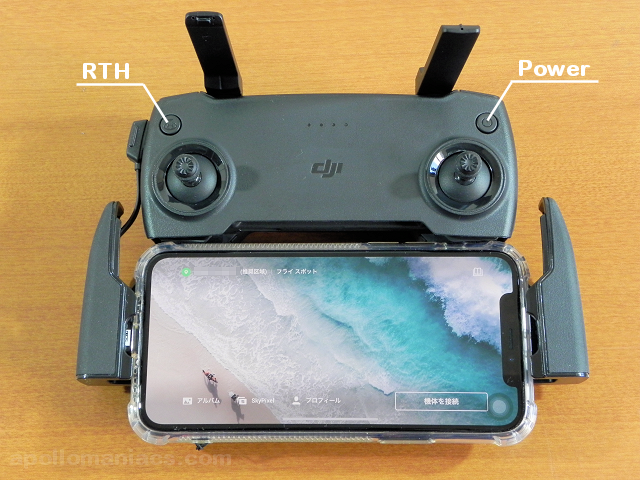
Press and hold this button to start the RTH (Return to Home) function. For more information on the RTH function, see DJI Mavic Mini knowledge .
DJI Mavic Mini knowledge

Taking a video / photo
The following page introduces how to take videos and photos with DJI Mavic Mini. Please refer to it.Drone flight techniques
The following page introduces drone flight techniques. Please refer to it.To know more about iPhone