MODELSEL screen explanation / Create / move / copy / delete model
This section describes how to use MODELSEL screen of OpenTX / EdgeTX radio.
On the MODELSEL screen, you can create / move / copy / delete MODEL.
このページを日本語で見る
Table of contents
MODELSEL screen explanation (monochrome display model)
Press [MDL] key e.t.c. on the main screen to enter "MODEL menu". Normally, MODELSEL screen is the first to appear when you enter MODEL menu. If MODELSEL screen is not displayed, press [PAGE] key to switch the screen.Creating a new MODEL
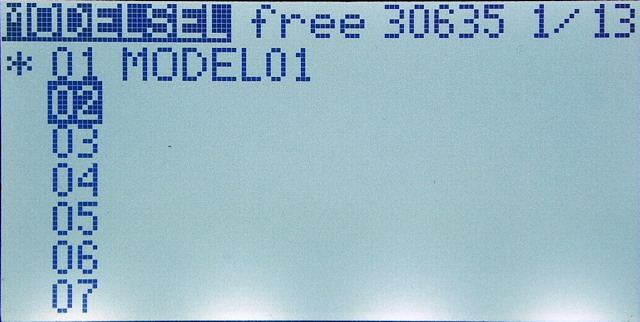 If you enter "MODEL menu" from the main screen, you will see a screen like this.
You can register aircraft information of 60 aircraft as "MODEL" here.
In this example, sample aircraft information "MODEL01" is registered in the first area.
There is an "*" mark to the left of the currently selected (maneuvering) model name.
If you enter "MODEL menu" from the main screen, you will see a screen like this.
You can register aircraft information of 60 aircraft as "MODEL" here.
In this example, sample aircraft information "MODEL01" is registered in the first area.
There is an "*" mark to the left of the currently selected (maneuvering) model name.
Depending on the product, multiple models may be registered as samples. To set MODEL, you can edit the sample model that has already been registered.
 To make detailed settings for a MODEL, the MODEL must be selected ("*" is displayed to the left of the MODEL name).
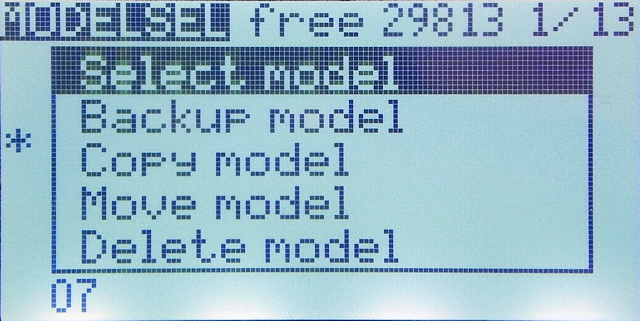
Move cursor to the MODEL you want to edit and press and hold [ENTER] key to display a menu like this.
Select "Select Model" to select that MODEL.
To make detailed settings for a MODEL, the MODEL must be selected ("*" is displayed to the left of the MODEL name).
Move cursor to the MODEL you want to edit and press and hold [ENTER] key to display a menu like this.
Select "Select Model" to select that MODEL.
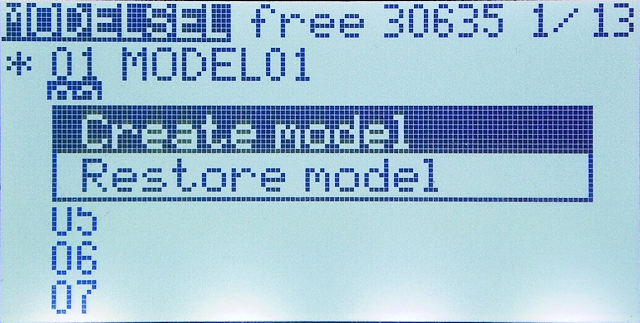 To add a new MODEL to a blank line, move the cursor to the blank line and press and hold [ENTER] key.
A menu like this will appear, select "Create model".
This will generate a new MODEL input area on a blank line.
To add a new MODEL to a blank line, move the cursor to the blank line and press and hold [ENTER] key.
A menu like this will appear, select "Create model".
This will generate a new MODEL input area on a blank line.
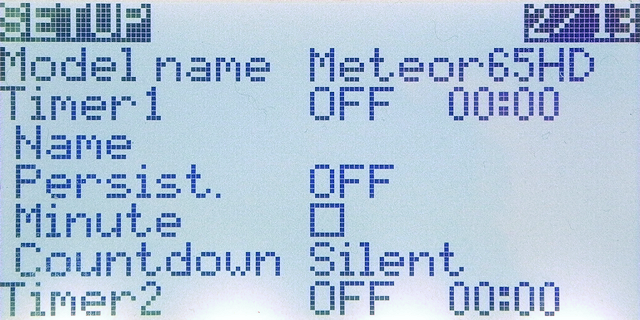 After selecting the MODEL to edit, press [PAGE] key e.t.c. to open
MODEL SETUP screen
and start editing.
After selecting the MODEL to edit, press [PAGE] key e.t.c. to open
MODEL SETUP screen
and start editing.
Please see the following pages for detailed model settings.
Create a new MODEL / setting on radio
Create a new MODEL / setting on PC
Wizard screen
On the wizard screen, simply follow the instructions on the screen to complete the assignment of sticks, Arms, Beepers, and Modes.For OpenTX, select "Create model" menu to open wizard screen first. The Wizard screen allows you to automatically assign channels to the stick and Arm, Beeper, Mode (part of MIXES screen settings).
For EdgeTX, selecting "Create model" menu does not open the wizard screen. If you want to use the wizard, open [SCRIPTS]-[WIZARD] from "SD-HC CARD" or "SD CARD" screen, press and hold "wizard.lua" and select [Execute].
 This is the wizard screen.
Press [EXIIT] when not using the wizard.
This is the wizard screen.
Press [EXIIT] when not using the wizard.
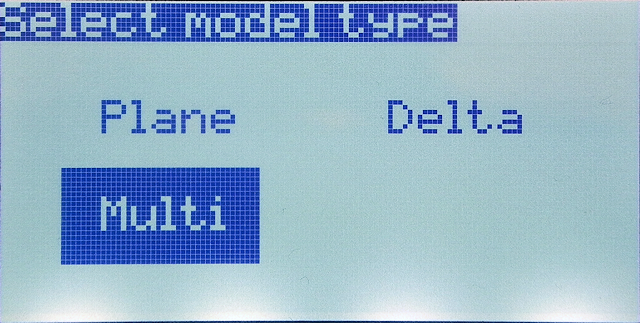
When using the wizard, select the type of model to fly from "Plane", "Delta", and "Multi". For FPV drones, select "Multi (Multicopter)". Move the cursor to [Multi] and press [ENTER] key.
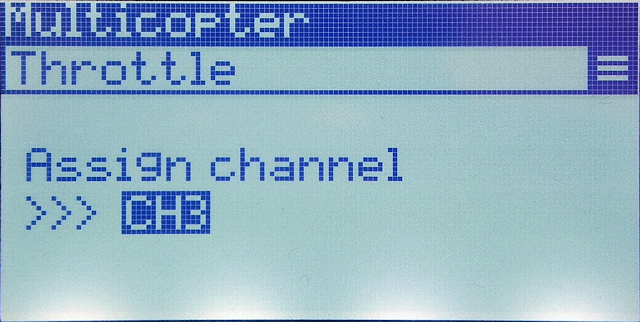 Continue to assign channels such as sticks.
First is throttle assignment.
If you want to change the channel, press [ENTER] and press cursor keys, etc,.
Press [PAGE] key, etc, to proceed to next item.
Continue to assign channels such as sticks.
First is throttle assignment.
If you want to change the channel, press [ENTER] and press cursor keys, etc,.
Press [PAGE] key, etc, to proceed to next item.
With Arm, Beeper, Mode function, you may not be able to select desired channel. In such a case, set an appropriate value and change / delete it later.
| Behavior name | Name of control |
|---|---|
| Throttle | - |
| Roll | Aileron |
| Pitch | Elevator |
| Yaw | Rudder |
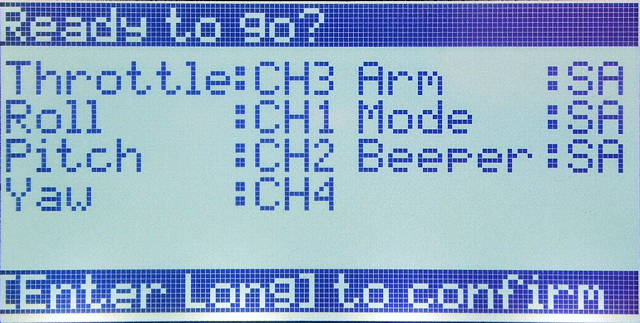 End of the wizard screen looks like this.
Press and hold [ENTER] key to confirm.
Press [EXIT] key to exit the wizard without setting.
End of the wizard screen looks like this.
Press and hold [ENTER] key to confirm.
Press [EXIT] key to exit the wizard without setting.
Move / copy / delete MODEL
Place cursor on any model name on MODELSEL screen and press and hold [ENTER] key to display a menu like this.
You can call the following functions.
- Select Model
- Select MODEL to be edit / maneuver. An "*" mark is added to the left of the MODEL name at the cursor position.
- Backup model
- Back up MODEL at the cursor position to "MODELS" folder of microSD card in radio in ".bin" format.
- Restore model
- MODEL information backed up to microSD card in the past is read at the cursor position. A list of backups saved on microSD card will be displayed, so select from them. The line at the cursor position must be blank.
- Copy model
- Copy MODEL at the cursor position to the first blank line. You cannot overwrite a line that MODEL has already defined..
- Move model
- Moves MODEL at the cursor position to another line. You can change the display order of MODELs. If you move a MODEL to a line that has already been defined, MODELs after that line will move down one line.
- Delete model
- Delete MODEL at the cursor position. The line at the cursor position will be a blank line.
MODELSEL screen explanation (color display / touch panel model)
Here, using EdgeTX Ver2.8 or later as an example, we will explain how to operate the color display/touch panel model. The screen layout and operation methods change depending on OpenTX and EdgeTX, and each version.Creating a new MODEL
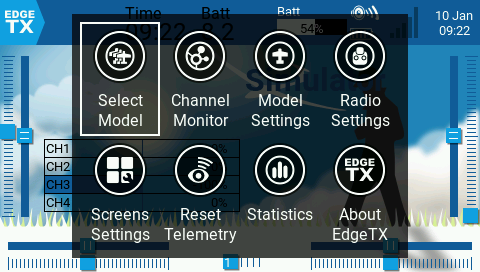 If you tap the top bar (touch panel model) or click [ENTER] key on the main screen, a menu like this (main navigation menu) will appear.
Select "Select Model".
Or press and hold [MDL] key on the main screen.
If you tap the top bar (touch panel model) or click [ENTER] key on the main screen, a menu like this (main navigation menu) will appear.
Select "Select Model".
Or press and hold [MDL] key on the main screen.
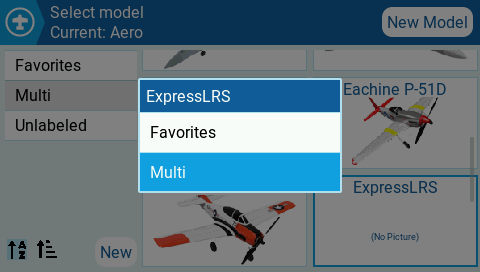
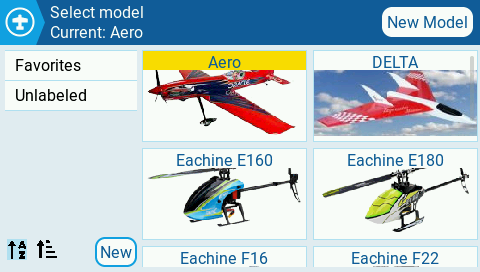 If you press and hold [MDL] key on the main screen, or select "Select Model" on the screen above, you will see a screen like this.
You can register aircraft information of 60 aircraft as a "MODEL" here.
In this example, some sample aircraft informations are registered starting with "Aero".
Currently selected (maneuvering) model has a different background color in its name ("Aero" in this example).
Depending on the product, multiple models may be registered as samples.
If you press and hold [MDL] key on the main screen, or select "Select Model" on the screen above, you will see a screen like this.
You can register aircraft information of 60 aircraft as a "MODEL" here.
In this example, some sample aircraft informations are registered starting with "Aero".
Currently selected (maneuvering) model has a different background color in its name ("Aero" in this example).
Depending on the product, multiple models may be registered as samples.
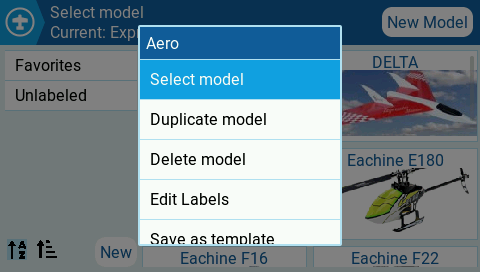 To make detailed settings for a MODEL, the MODEL must be selected (background color of the name has changed).
Move cursor to the MODEL you want to edit and press and hold [ENTER] key to display a menu like this.
Select "Select Model" to select that MODEL.
To make detailed settings for a MODEL, the MODEL must be selected (background color of the name has changed).
Move cursor to the MODEL you want to edit and press and hold [ENTER] key to display a menu like this.
Select "Select Model" to select that MODEL.
Then press [MDL] key e.t.c. to open MODEL SETUP screen and start editing.
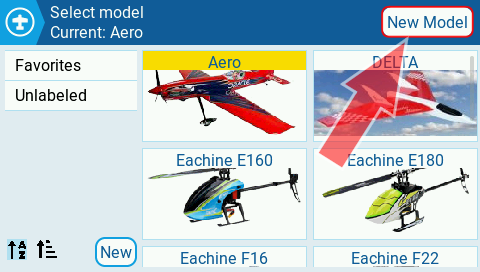 To add a new MODEL, select "New Model" at the top right of the MODELSEL screen.
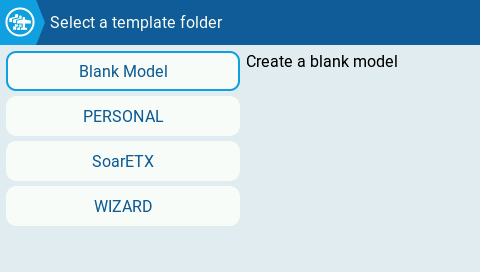 Then the screen will look like this.
A list of templates for creating a new MODEL is displayed.
Then the screen will look like this.
A list of templates for creating a new MODEL is displayed.
"Blank Model" will generate a new MODEL with empty contents.
"PERSONAL" displays a list of models that you have registered as "templates" in the past (described later).
"WIZARD" opens a wizard screen .
If you have another template saved in the "TEMPLATES" folder of the microSD card, it will also be displayed in this list ("SoarETX" in this screen example).
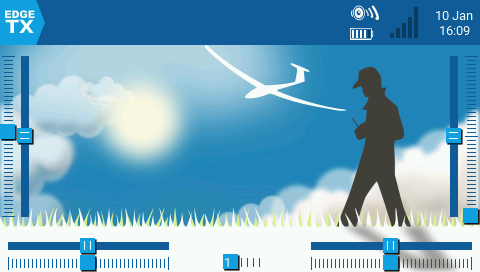 If you select "Blank Model" on the screen above or press [EXIT] key, a new MODEL will be created and you will return to the main screen with it selected.
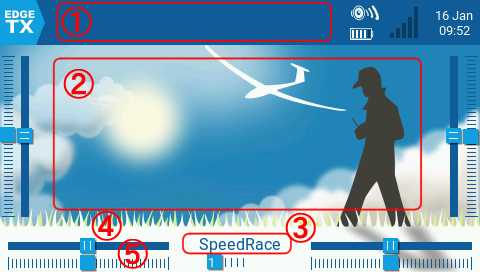 For color display/touch panel models, you can set the main screen and model image.
See below for details.
For color display/touch panel models, you can set the main screen and model image.
See below for details.
 After selecting the MODEL to edit, first press [EXIT] key to return to the main screen.
Then press [MDL] key e.t.c. to open
MODEL SETUP screen
and start editing.
After selecting the MODEL to edit, first press [EXIT] key to return to the main screen.
Then press [MDL] key e.t.c. to open
MODEL SETUP screen
and start editing.
Please see the following pages for detailed model settings.
Create a new MODEL / setting on radio
Create a new MODEL / setting on PC
Switching and creating new labels (categories)
Each model can be given a "label" and used to categorize it. Labeling the models makes it easier to find them when there are many models.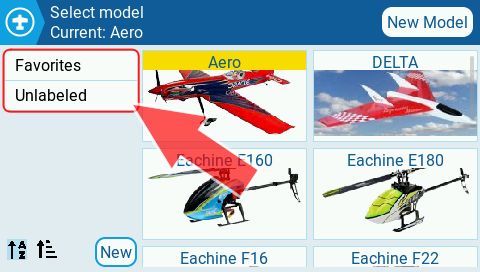 A list of defined labels (categories) is displayed on the left side of the MODELSEL screen.
When you press the [PAGE] key or select a label with the cursor or touch panel, the model with that label will be picked up.
A list of defined labels (categories) is displayed on the left side of the MODELSEL screen.
When you press the [PAGE] key or select a label with the cursor or touch panel, the model with that label will be picked up.
Multiple labels can be selected at the same time for pickup. Also, you can attach multiple labels to one model. Multiple labels can be used to filter models with complex conditions.
Labels can be added or changed in the model using "Edit Labels" menu (described later).
 Models can only have predefined labels.
Before adding labels to the model, first define new labels.
Models can only have predefined labels.
Before adding labels to the model, first define new labels.
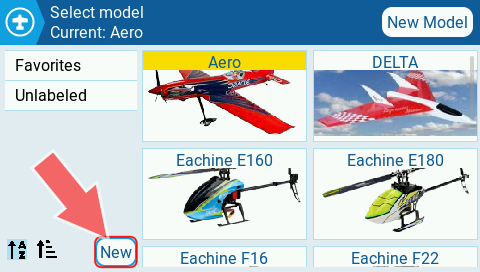
To define a new label, select "NEW" at the bottom left of the screen.
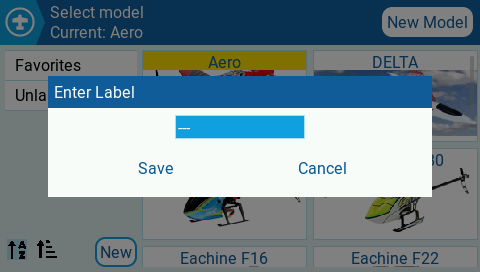 Then you will see a screen like this, so enter your favorite label and select "Save".
The saved label will be added to the list of defined labels on the left side of the screen above.
To modify, delete, or change the display order of created labels, select the label in the label list and press and hold [ENTER], or press and hold the touch panel.
Then you will see a screen like this, so enter your favorite label and select "Save".
The saved label will be added to the list of defined labels on the left side of the screen above.
To modify, delete, or change the display order of created labels, select the label in the label list and press and hold [ENTER], or press and hold the touch panel.
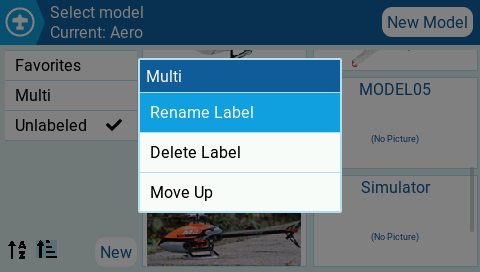 A menu like this will appear.
You can modify, delete, or change the display order of the selected label.
A menu like this will appear.
You can modify, delete, or change the display order of the selected label.
Copy/delete model, label model
Place cursor on any model name on MODELSEL screen and press and hold [ENTER] key to display a menu like this.
You can call the following functions.
- Select Model
- Select MODEL to be edit / maneuver. Background color of the name at the cursor position changes.
- Duplicate model
- Copy MODEL at the cursor position. Another MODEL with the same content will be generated.
- Delete model
- Delete MODEL at the cursor position.
- Edit Labels
- Adds/changes/deletes labels to the model at the cursor position.
- Save as template
- Saves the model at the cursor position as a template. When creating a new model, this model will appear in the template list.
 If you select "Edit Labels" in the menu above, you will see a screen like this.
Select labels you want to add to the selected model, then there will be added with a check mark.
A single model can have multiple labels.
Press [EXIT] key to finish adding/deleting labels.
If you select "Edit Labels" in the menu above, you will see a screen like this.
Select labels you want to add to the selected model, then there will be added with a check mark.
A single model can have multiple labels.
Press [EXIT] key to finish adding/deleting labels.
 You can also add/delete labels to/from the model on
MODEL SETUP screen
.
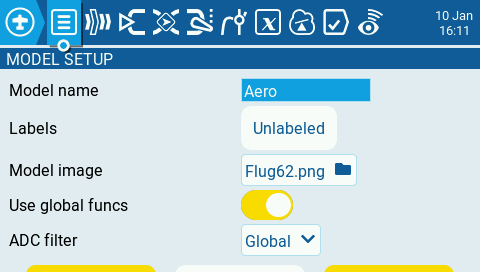
Select a model, press [MDL] key, etc. to open the MODEL SETUP screen, and select "Labels" column to add/delete labels.
You can also add/delete labels to/from the model on
MODEL SETUP screen
.
Select a model, press [MDL] key, etc. to open the MODEL SETUP screen, and select "Labels" column to add/delete labels.
Wizard screen
On the wizard screen, simply follow the instructions on the screen to complete the assignment of sticks, Arms, Beepers, and Modes.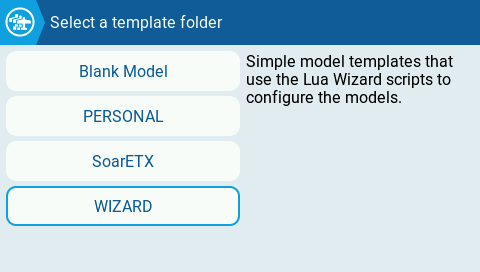 If you want to use the wizard, select "WIZARD" from the menu that appears when you select "New Model" on the MODELSEL screen.
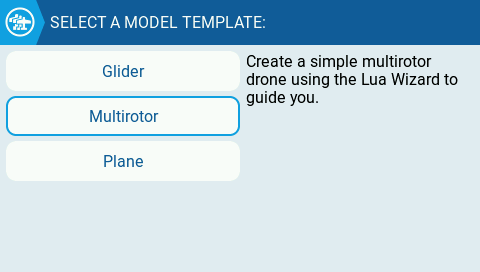 Then the screen will look like this.
Select the type of model to fly from "Glider", "Multirotor", and "Plane".
For FPV drones, select "Multirotor".
Then the screen will look like this.
Select the type of model to fly from "Glider", "Multirotor", and "Plane".
For FPV drones, select "Multirotor".
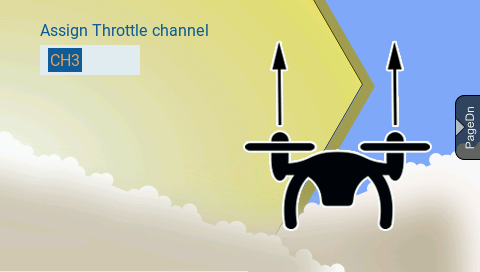 Now let's assign the sticks to the channels.
First is the throttle.
If you want to change the channel, press [ENTER] and use the cursor keys to change it.
Now let's assign the sticks to the channels.
First is the throttle.
If you want to change the channel, press [ENTER] and use the cursor keys to change it.
Press [PAGE] key to advance to the next item. Proceed to the Roll, Pitch, Yaw allocation screen.
| Behavior name | Name of control |
|---|---|
| Throttle | - |
| Roll | Aileron |
| Pitch | Elevator |
| Yaw | Rudder |
 When the stick channel assignment is completed, the switch assignment screen will appear.
Proceed to Arm, Beeper and Mode assignments.
When the stick channel assignment is completed, the switch assignment screen will appear.
Proceed to Arm, Beeper and Mode assignments.
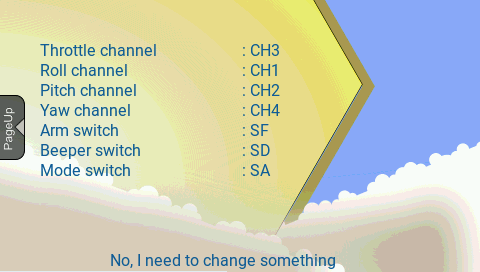 The final wizard screen looks like this.
Press the [PAGE] key to return to the previous screen.
At the bottom of the screen it says "No, I need to change something".
When you press a cursor key, etc...
The final wizard screen looks like this.
Press the [PAGE] key to return to the previous screen.
At the bottom of the screen it says "No, I need to change something".
When you press a cursor key, etc...
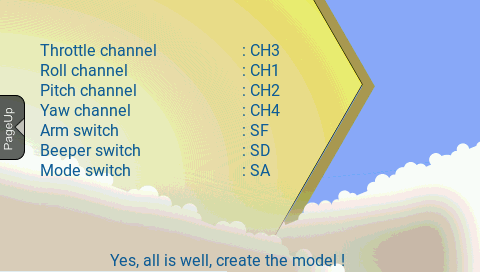 At the bottom of the screen you will see "Yes, all is well, create the model!"
If you press the [ENTER] key in this state, a new model will be generated.
The model name will be "Multirotor".
Make additional channel assignments, etc., as necessary.
At the bottom of the screen you will see "Yes, all is well, create the model!"
If you press the [ENTER] key in this state, a new model will be generated.
The model name will be "Multirotor".
Make additional channel assignments, etc., as necessary.
To know more about How to Fly Hobby Drone
To know more about iPhone