MODEL CURVES screen explanation / How to use curves
This section describes how to use curves of OpenTX / EdgeTX radio.
このページを日本語で見る
Table of contents
What is a curve: MODEL CURVES screen function
"Curves" in OpenTX / EdgeTX are function (reaction curve) used to convert input values. Input value is converted according to defined "curve" and then output. You can set a "curve" for any input device, including the so-called "throttle curve".In Curve section of INPUTS screen and MIXES screen , there are preset Curves that can be easily set. MODEL CURVES screen also allows you to define more complex, user-specific custom curves (reaction curves). You can define 32 types of custom curves from CV1 to CV32. Curves defined here can also be used on INPUTS screen and MIXES screen.
Explanation of preset Curve

The default value for Curve is type Expo and argument 0.
| type | option | description |
|---|---|---|
| Expo (Exponential) | argument |
The output value for the input value is changed exponentially.
Increasing the argument will result in a gentle slope (weak response) near the median (0). Decreasing the argument will result in a steep slope (strong response) near the median (0). With an argument of 0, the reaction will be linear. Specify the argument in the range of +100 to -100. |
| Diff (Differential) | argument |
Multiplies only the range above or below the median (0) by the specified argument (%).
Gives the same effect as Weight only to the upper or lower half.
It is used when it is necessary to change the effect between up and down, such as the aileron of a fixed-wing aircraft.
If the argument is greater than 0, the slope will be gentle (weaker) in the range below the median (0). If the argument is less than 0, the slope will be gentle (weaker) in the range above the median (0). With an argument of 0, the reaction will be linear. Specify the argument in the range of +100 to -100. |
| Func (Function) | --- | The reaction will be linear. |
| X>0 | The range below the median (0) is always 0. Above the median (0), the reaction is linear. | |
| X<0 | The range above the median (0) is always 0. Below the median (0), the reaction is linear. | |
| |X| | The range above the median (0), the reaction is linear. The sign is inverted in the range below the median (0). The curve draws a V-shaped graph. | |
| f>0 | The range above the median (0) is always +100. The range below the median (0) is always 0. The output value will always be either 0 or +100. | |
| f<0 | The range above the median (0) is always 0. The range below the median (0) is always -100. The output value will always be either 0 or -100. | |
| |f| | The range above the median (0) is always +100. The range below the median (0) is always -100. The output value will always be either +100 or -100. | |
| Cstm (Custom) | number | Specify the custom curve set on CURVES screen of MODEL menu. Select from a total of 64 types, CV1 to CV32 and their inversions. |
Explanation of MODEL CURVES screen
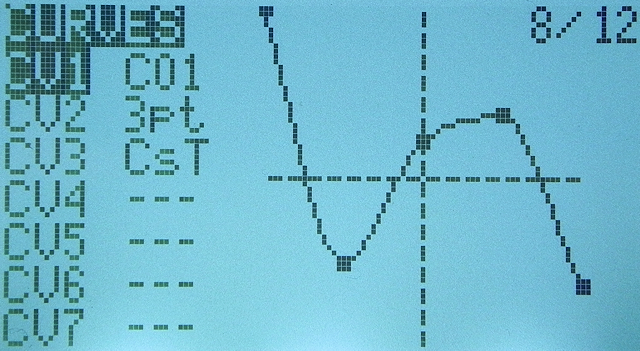 Open "CURVES" screen from "MODEL menu", you will see a screen like this.
On CURVES screen, you can set up to 32 types of custom curves from CV1 to CV32. The right part of the screen shows a graph of the currently selected (cursor over) custom curve.
The meaning of each field is as shown in the table below, starting from the left.
| field | item | description |
|---|---|---|
| 1 | Default Name | Number of the custom curve. |
| 2 | Custom Name | Name given to this custom curve. If you have not given a name,'---' will be displayed. |
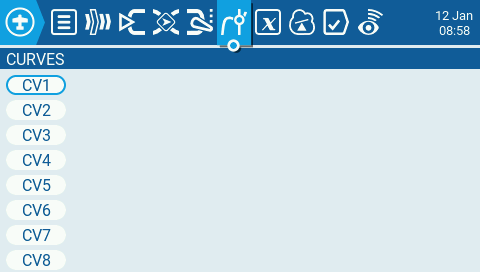 On color display/touch panel model, if you open "CURVES" screen, it will look like this.
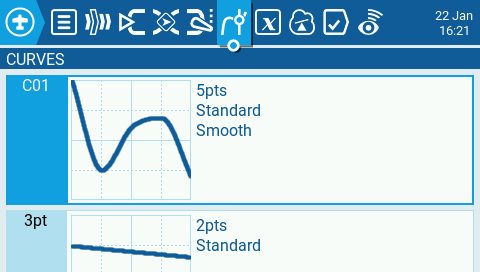 After setting a custom curve for each entry, the screen changes like this.
A graph of the curve set for each entry and some parameters are displayed.
After setting a custom curve for each entry, the screen changes like this.
A graph of the curve set for each entry and some parameters are displayed.
 Move cursor to any curve on "CURVES" screen and press [ENTER] key to display the menu shown in this figure.
Select "Edit" to edit this curve.
Select "Mirror" to reversed horizontally this curve.
Select "Clear" to erase this curve.
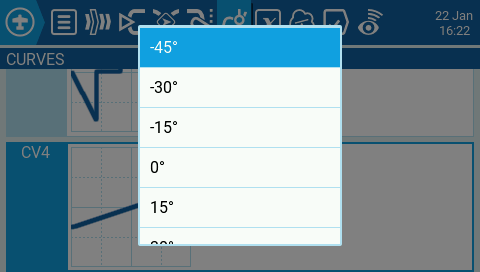 When you select "Preset..." on the screen above, the menu shown in this figure will be displayed.
You can get a curve with a specific tilt angle.
When you select "Preset..." on the screen above, the menu shown in this figure will be displayed.
You can get a curve with a specific tilt angle.
Explanation of MODEL CURVES setting items

| item | description |
|---|---|
| Name |
You can name this custom curve. Enter up to 3 alphanumers, spaces, and hyphens.
|
| Type |
Select the type of custom curve from 'Standard' and 'Custom'.
If you select Standard, the position of the control points can be moved only in the vertical direction. The horizontal position is automatically set evenly spaced. If you select Custom, you can move the position of the control point up, down, left, or right. |
| Count | Specifies the number of control points to shape the custom curve. You can specify from a minimum of 2 points to a maximum of 17 points. |
| Smooth | Specify whether to connect control points with straight lines or curved lines smoothly. If you check here, control points will be connected by curves. |
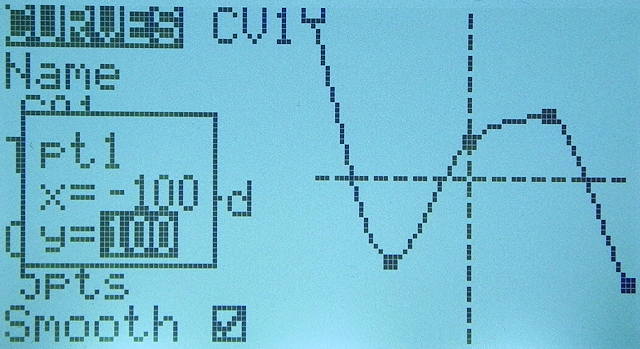 When you finish typing in Smooth field and move the cursor down, a window like this will appear.
This is the control point coordinate input screen.
When you finish typing in Smooth field and move the cursor down, a window like this will appear.
This is the control point coordinate input screen.
The currently selected control point is displayed as a white square on the graph. In the figure, "pt1" is displayed as the number of currently selected control point.
Move the cursor down to switch to the input screen for the next control point. Move the cursor up to switch to the input screen of the previous control point.
For Standard type curves, only the y coordinate can be edited. For Custom type curves, both x and y coordinates can be edited.
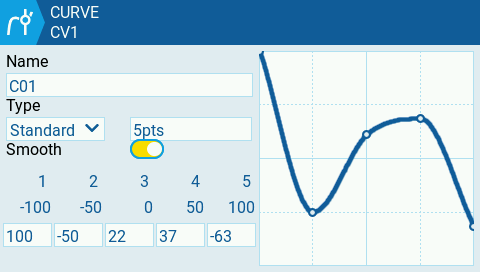 You can set color display / touch panel model in the same way.
The input area for each control point is lined up at the bottom left of the screen. The top row is the x-coordinate input area, and the bottom row is the y-coordinate input area. If you specify more than 5 control points, this part will be able to scroll left and right.
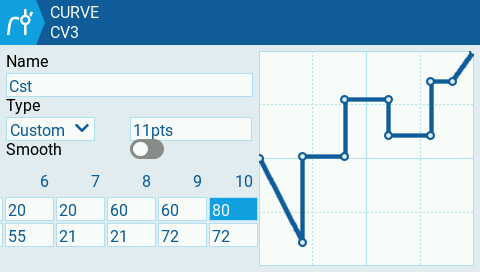 With a Custom type curve, you can also create a curve that bends at a right angle by making the x or y coordinates of multiple control points the same.
To know more about How to Fly Hobby Drone
To know more about iPhone