RADIO SETUP setting items explanation
This section describes the setting items on the RADIO SETUP screen of OpenTX / EdgeTX radio.
The screen design differs between the monochrome display model and the color display model, but the items that can be set are almost the same.
The value in "Initial value" column is initial value for Jumper T12 Pro (OpenTX Version 2.3.4 2019-12-27 17:12:20).
このページを日本語で見る
Table of contents
Date / time / battery voltage range

| menu | function | Initial value |
|---|---|---|
| Date | Set today's date. This information is used when collecting logs. Log collection settings are made in "SD Logs" action in Special Functions/Global Functions . | 2000-05-26 |
| Time | Set the current time. This information is used when collecting logs. Log collection settings are made in "SD Logs" action in Special Functions/Global Functions . | 00:00:00 |
| Batt.range (Battery meter range) |
Set the battery voltage range. Set the minimum and maximum battery voltage. This information is used to display the battery level on the main screen. For 2s LiPo battery or two 18650 / 18350 type batteries, 6.6-8.4 is fine. For color display models, this item is located on [HARDWARE] screen. | 6.0-8.0 |
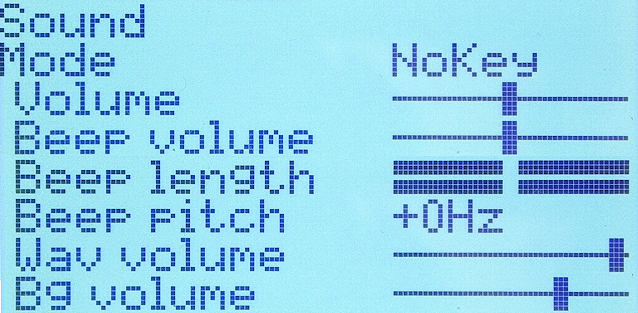
Sound menu
| menu | function | Initial value |
|---|---|---|
| Mode | Specifies how to play sound. [All]: Play all sounds. [NoKey]: Play with all but key operations. [Alarm]: Only play warning sound. [Quiet]: No sound. | NoKey |
| Volume | Specify master volume. Specifies maximum volume of Beep, Wav, and Bg sound specified below. | (center) |
| Beep Volume | Specifies volume of beep sound. | (center) |
| Beep Length | Specifies beep ringing time. | (center) |
| Beep Pitch | Specifies pitch of beep. Specify by adding frequency to the base value. It can be specified in 15Hz units and can be set in the range of 0 to + 300Hz. | +0Hz |
| Wav Volume | Specifies volume of Wav sound (talking voice). Wav sound play settings are made in "Play Track" action in Special Functions/Global Functions . | (about 90%) |
| Bg Volume (Background Volume) | Specify volume of BGM. BGM play settings are made in "Background Music" action in Special Functions/Global Functions . | (about 75%) |
Variometer menu
Here, specify how to play warning sound when aircraft has a Variometer that detects its ascent and descent. Variometers are used in radio-controlled gliders mainly.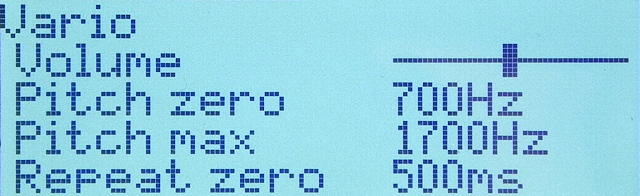
| menu | function | Initial value |
|---|---|---|
| Volume | Specifies volume of Variometer alert sound. | (center) |
| Pitch zero | Pitch (Hz) of beep that is played when vertical velocity is between Sink Min and Climb Min (Center) defined on TELEMETRY screen . It can be set in the range of 300Hz to 1100Hz. | 700Hz |
| Pitch max | Pitch at maximum vertical velocity defined by Climb Max (Range Max) on TELEMETRY screen . It can be set in the range of 700Hz to 2900Hz. As the rate of increase increases, the beep frequency increases linearly from the value specified in [Pitch zero] to the maximum value specified here. This maximum value must be greater than value specified by [Pitch zero]. | 1700Hz |
| Repeat zero | Specifies beep ringing interval in milliseconds. It can be specified in the range of 200 (5 beeps / sec) to 1000 (1 beep / sec). | 500ms |
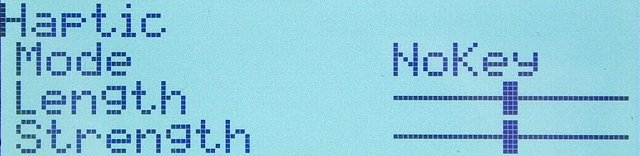
Haptic menu
| menu | function | Initial value |
|---|---|---|
| Mode | Specify how to vibrate radio. [All]: Vibrates when all sounds are played. [NoKey]: Vibrates with everything except key operation. [Alarm]: Only warning sound vibrates. [Quiet]: Does not vibrate. | NoKey |
| Length | Specifies length of vibration. | (center) |
| Strength | Specifies strength of vibration. | (center) |
Contrast menu

| menu | function | Initial value |
|---|---|---|
| Contrast | Specifies screen contrast. Specify in the range of 10 to 30. | 20 |
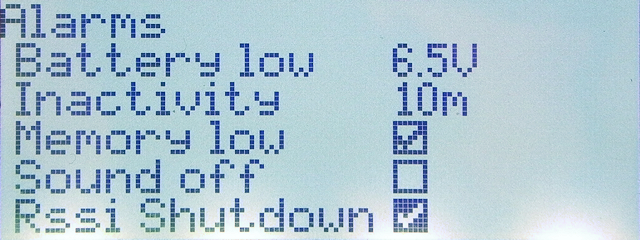
Alarms menu
| menu | function | Initial value |
|---|---|---|
| Battery Low | Specifies alarm sound when battery of radio is low. Alarm sounds when voltage drops to the value specified here. | 6.5V |
| Inactivity | Specifies an alarm when radio is not operated for a long time. If you do not operate for the time (in minutes) specified here, the alarm will sound. If you specify zero, alarm will not sound. | 10 minutes |
| Memory Low | Specifies whether to sound an alarm when memory becomes insufficient when using LUA script. | ON |
| Sound Off | Specifies whether or not to sound an alarm when all sounds are set to off (Mode is Quiet in the Sound menu) when turning on the radio power. | OFF |
| RSSI Shutdown (Check RSSI on shutdown) | Specifies whether to sound an alarm when receiving RSSI (Receiver Signal Strength Indicator) from the aircraft when turning off the radio power. | ON |
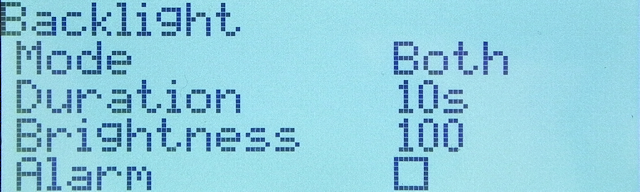
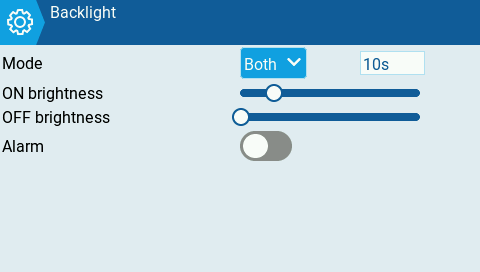
Backlight settings
| menu | function | Initial value |
|---|---|---|
| Mode | Specify conditions for turning on backlight. [OFF]: Always turns off. [Keys]: Lights when you push any of screen operation keys. [Ctrl]: Lights when sticks or switches is operated. [Both]: Lights when screen operation key, sticks or switches is operated. [ON]: Always lit. | Both |
| Duration | Specify lighting time of backlight in "seconds". | 10 seconds |
| Brightness | Specify brightness of backlight in the range of 0 to 100. | 100 |
| ON Brightness | Specify brightness in the range of 0 to 100 when the backlight is on. | 100 |
| OFF Brightness | Specify brightness in the range of 0 to 100 when the backlight is off. | 100 |
| Alarm | Specifies whether to turn on backlight when an alarm occurs. | OFF |
 If you set radio backlight to a darker setting than usual, you can prevent power consumption.
To do so, set the "Mode" field to "Both", the "Duration" field to "10s", the "ON brightness" field to about 10%, and the "OFF brightness" field to about 1%.
If you set radio backlight to a darker setting than usual, you can prevent power consumption.
To do so, set the "Mode" field to "Both", the "Duration" field to "10s", the "ON brightness" field to about 10%, and the "OFF brightness" field to about 1%.
Various time settings

| menu | function | Initial value |
|---|---|---|
| Splash Screen | Specify time to display startup screen (OpenTX/EdgeTX logo screen in Initial value) in "seconds". | 4 seconds |
| Pwr On delay | Specifies long press time of power button required to turn on power of radio. It can be specified in 0 to 3 seconds. If you specify 0 seconds, it will start instantly when you push power button. | 2 seconds |
| Pwr Off delay | Specifies long press time of power button required to turn off power of radio. It can be specified in 0 to 3 seconds. If you specify 0 seconds, it will stop instantly when you push power button. | 2 seconds |
GPS settings

| menu | function | Initial value |
|---|---|---|
| Time zone | For radios equipped with GPS receivers, specify time zone required to use GPS by difference (integer from -12 to 12) from UTC (Coordinated Universal Time). | 0 |
| Adjust RTC | For radios equipped with GPS receivers, specify whether to correct clock of radio with information received from GPS satellites. | OFF |
| GPS Coords | For radios equipped with GPS receivers, specify GPS coordinate display format. [DMS]: Displayed in Degree Minutes Second. [NMEA]: Displayed in minutes by degrees and decimal points (NMEA: National Marine Electronics Association format) | DMS |
Various environment settings
| menu | function | Initial value |
|---|---|---|
| Owner ID | Custom registration ID required when using FrSky ACCESS ISRM(internal RF) modules. | 99KRVP- |
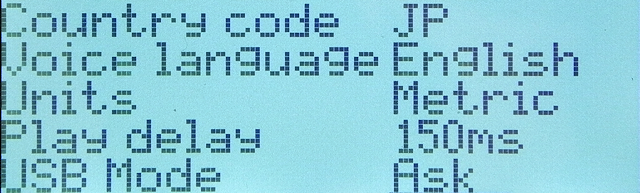
| Country code | Select region where you want to use the radio from US (USA), JP (Japan), and EU (Europe). This information is used to make built-in transmitter module comply with local radio regulations. | US |
| Voice language | Select language of audio to play with alarms, etc. Specify which folder to use under "SOUNDS" folder on microSD card. | English |
| Units | Select unit used for telemetry display from Metric or Imperial. | Metric |
| Play delay (sw. mid pos) | Specifies time, in milliseconds, before playing audio assigned to center of three-position switch. If this is too short, the audio in center position will also be played when three position switch is switched from end to end. | 150msec |
| USB Mode | Specify the behavior when the radio is turned on and connected to a computer with a USB cable.
[Joystick]: Operates as a "USB joystick (HID device)". [Storage]: Acts as a "USB storage device". From PC, you can access microSD card built into radio and EEPROM that stores model information. [Serial]: Connect with VCP (virtual COM port). Connect with the radio's CPU (STM32 microprocessor) via COM port. [Ask]: Screen will give you a choice of which mode to work with. | Ask |
| Rotary Encoder Mode | Specifies the direction of scroll wheel rotation. Normally, select [Normal], and select [Inverted] when you want to invert. | Normal |
Various channel settings

| menu | function | Initial value |
|---|---|---|
| RX channel ord (Default channel order) | When creating a new model, specify order in which Aileron, Elevator, Throttle, and Rudder are assigned to virtual channels 1 to 4 on INPUTS screen . You don't have to worry too much about this setting as you can freely change assignment to physical channel on MIXES screen . Also, changing this will not affect models that have already been created. | AETR |
| Mode |
Select stick assignment, from 1 to 4. It seems that mode 2 is often used by drone pilots and RC users in the United States, and mode 1 is often used by RC users in Europe and Japan. Drone products and instructions are based on Mode 2. If you are just starting out, we recommend practicing in mode 2.
When switching here, it is also necessary to change setting or swap the left and right sticks (gimbals). | 1 or 2 (Select at the time of purchase) |
To know more about How to Fly Hobby Drone
To know more about iPhone