Generate 3DCG model from drone aerial video / How to use Meshroom and blender

Meshroom official site
Free software that lets your drone scan the world (dronedj)
Free software that lets your drone scan the world (Part II) (dronedj)
このページを日本語で見る
Table of contents
- What you need
- Introducing procedure with video
- Extract still images from a video
- How to install Meshroom
- Make photos into 3DCG model with Meshroom
- Easy display using 3D viewer
- How to install blender
- Read obj file with blender
- Move / rotate objects with blender
- Remove unnecessary polygons with blender
What you need

Drone is DJI Mini2 that even beginners can use. I used 4K resolution 30 FPS frame rate aerial video.
The better the performance of personal computer, the faster the processing will be completed. However, PC used this time was built in 2011, with CORE i7-2600 CPU, 8GB memory and graphic board equipped with NVIDIA GeForce GTX 1060 (3GB). Now when process 613 photos with Meshroom, it took about 24 hours to generate 3D model.
And only three free softwares you need, to break video into jpeg images: VLC media player , Meshroom and 3D modeling software blender . Generated model can be visualized from any direction as 3DCG, or can be three-dimensionalized using 3D printer. The target for 3D modeling this time is Japan's first Antarctic observation ship, "Soya" (following video).
DJI Mini 2 / DJI Mini 4K instructions. 4K aerial video mini drone weighing 249g
Japan's first Antarctic observation ship, "Soya"
Watch on YouTube
Introducing procedure with video
First of all, please have a look at the video that briefly introduced this procedure.
Generate 3DCG model from drone aerial video
Watch on YouTube
Extract still images from a video
Still images are required for Meshroom input. Drone video shot should be split into still images. You can use free video player: VLC media player for this. See below for more information on this procedure. Settings of scene filter used this time are as follows.| item | value |
|---|---|
| Image format | jpg |
| Image width | 3840 |
| Image height | 2160 |
| Recording ratio | 30 |
In addition, parts where the position and shape are difficult to determine, such as mirror surfaces like the sea (water surface), parts that reflect light and are overexposed, and parts that are blackened by shadows, are not modeled correctly.
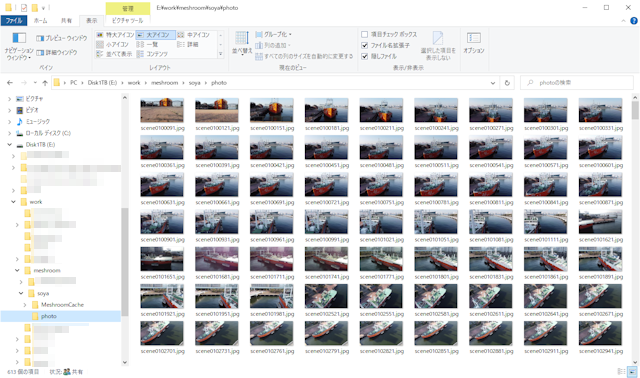
This time, I used a total of 13 minutes of aerial video taken at 4K / 30FPS and converted it to a 3840x2160 pixel jpeg image. I deleted photos that didn't show subject well, and used remaining 613 photos in total.
VLC media player official site
How to install Meshroom
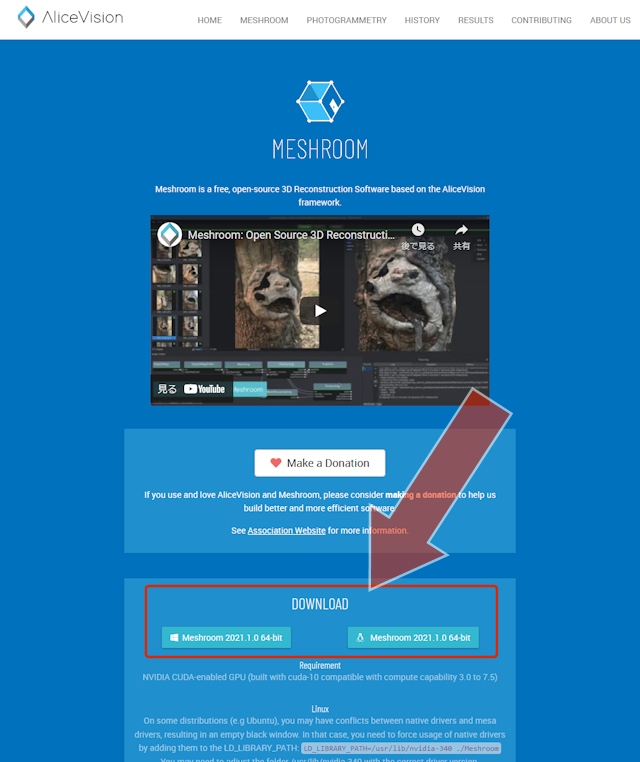 Download Meshroom from the
official site
. Supported OS are Windows (64bit) and Linux (64bit).
Download Meshroom from the
official site
. Supported OS are Windows (64bit) and Linux (64bit).
Also, for Meshroom to work, your PC must have a video card that supports NVIDIA CUDA (cuda-10 / compute capability 3.0-7.5). Worked with NVIDIA GeForce GTX 960 video cards manufactured in 2015, so I think it's okay if you have any recent NVIDIA video card.
There is no installer for Meshroom. If you download Meshroom, you will get a file such as "Meshroom-2021.1.0-win64.zip". Just unzip this in any folder and the installation is complete.
Meshroom official site
Make photos into 3DCG model with Meshroom
First, let's convert photos to 3DCG model with a minimum of steps.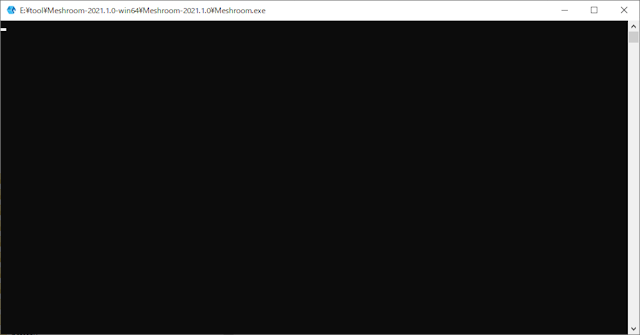 Double-click "Meshroom.exe" in the folder where you unzipped Meshroom to start it.
First, a console screen like this will be launched.
Leave it open and wait for a while.
Double-click "Meshroom.exe" in the folder where you unzipped Meshroom to start it.
First, a console screen like this will be launched.
Leave it open and wait for a while.
Please do not close this console screen until the end.
 Then wait a few seconds and Meshroom GUI screen will launch.
Drag and drop all image files captured from aerial video to the place where "Drop Image Files / Folders" is written on the left side of the screen.
Then wait a few seconds and Meshroom GUI screen will launch.
Drag and drop all image files captured from aerial video to the place where "Drop Image Files / Folders" is written on the left side of the screen.
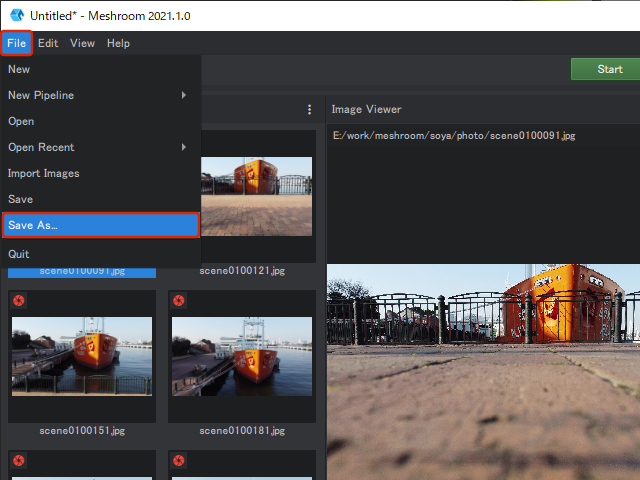 Then select [File]-[Save As ...] from the menu.
A file save dialog box will be displayed.
Save this project as ".mg" format in any folder.
Processing result of Meshroom will be stored under the folder specified here.
Then select [File]-[Save As ...] from the menu.
A file save dialog box will be displayed.
Save this project as ".mg" format in any folder.
Processing result of Meshroom will be stored under the folder specified here.
Then click green "Start" button at the top center of the screen to start process.
Output capacity of the processing result data varies depending on number of photos to be processed, and is about 3GB for 41 photos and about 30GB for 613 photos.
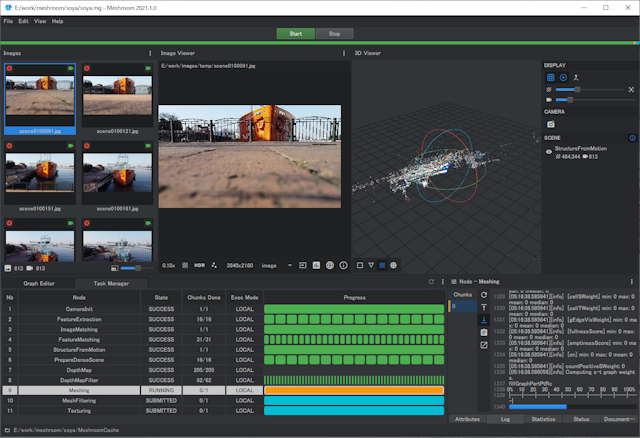 You will see a screen like this during processing.
Below the "Start" button at the top of the screen, progress is displayed as a bar graph.
When all of this changes from light blue to green, you're done.
Click "Task Manager" tab at the bottom of the screen to see more detailed progress graph in "Progress" field.
Running tasks are displayed in orange and completed tasks are displayed in green.
Click on a running task to see more detailed information at the bottom right of the screen.
You will see a screen like this during processing.
Below the "Start" button at the top of the screen, progress is displayed as a bar graph.
When all of this changes from light blue to green, you're done.
Click "Task Manager" tab at the bottom of the screen to see more detailed progress graph in "Progress" field.
Running tasks are displayed in orange and completed tasks are displayed in green.
Click on a running task to see more detailed information at the bottom right of the screen.
Meshroom online manual
 After that, just wait for the process to finish.
The processing time of Meshroom is about 50 minutes with
sample data (dataset_monstree)
(4032x3024 pixels, 41 images) available from the official site,
about 12 hours with aerial image of DJI Mini2 (3840x2160 pixels, 261 images),
and this time, it took about 24 hours for captured image (3840x2160 pixels, 613 images).
After that, just wait for the process to finish.
The processing time of Meshroom is about 50 minutes with
sample data (dataset_monstree)
(4032x3024 pixels, 41 images) available from the official site,
about 12 hours with aerial image of DJI Mini2 (3840x2160 pixels, 261 images),
and this time, it took about 24 hours for captured image (3840x2160 pixels, 613 images).
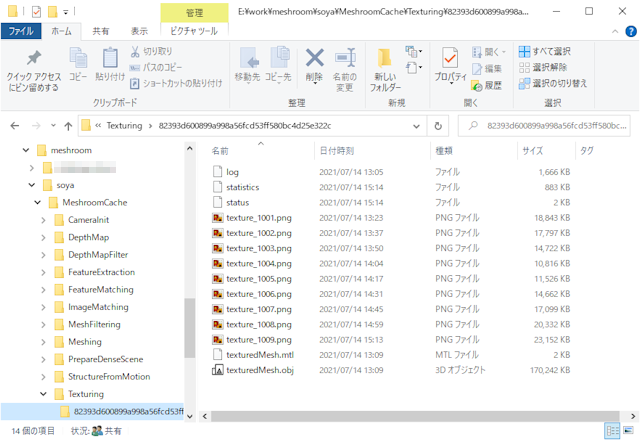
Processing result is stored under "MeshroomCache/Texturing/[symbol folder]" under the folder where project (".mg" format file) is saved. 3D model (polygon data) will be saved in ".obj" format text file, material (information about texture file name and UV coordinates) is in ".mtl" format text file, and texture images are in multiple ".png" format files.
Easy display using 3D viewer
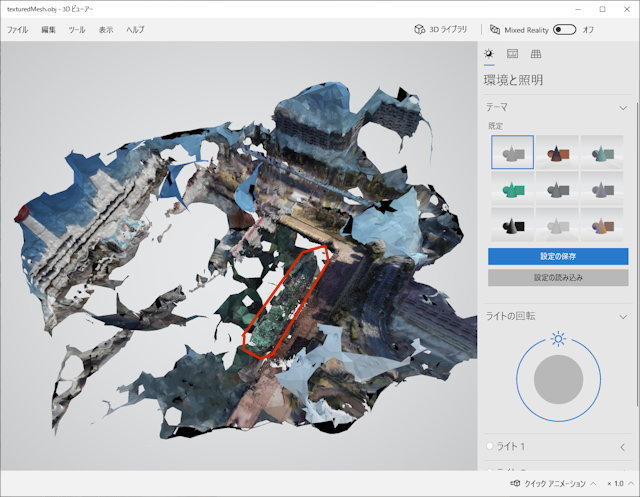
3D models in ".obj" format can be displayed in "3D Viewer" Windows10 standard application.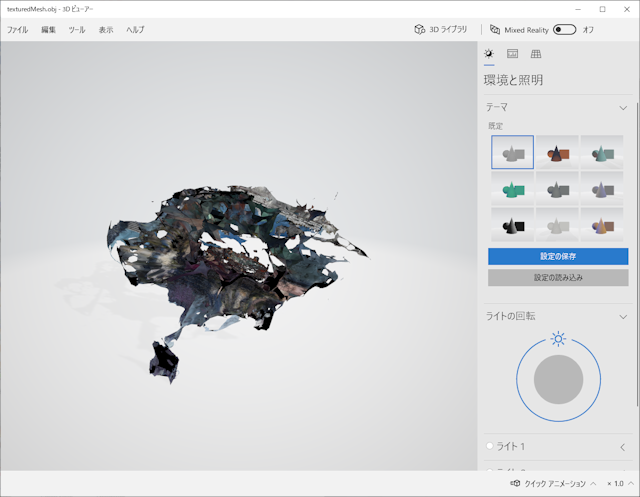 This figure is just after loading ".obj" file generated by Meshroom into 3D viewer.
The shape is difficult to understand because the model is upside down and surrounding buildings are also modeled.
This figure is just after loading ".obj" file generated by Meshroom into 3D viewer.
The shape is difficult to understand because the model is upside down and surrounding buildings are also modeled.
 You can rotate the model by dragging mouse.
You can also zoom in / out by scrolling mouse wheel.
The part surrounded by red line in the lower right are polygons of Antarctic observation ship "Soya".
Various objects of what was shown in the video, such as surrounding buildings, trees, and piers, are also modeled.
You can rotate the model by dragging mouse.
You can also zoom in / out by scrolling mouse wheel.
The part surrounded by red line in the lower right are polygons of Antarctic observation ship "Soya".
Various objects of what was shown in the video, such as surrounding buildings, trees, and piers, are also modeled.
Next, use 3D modeling software: blender to remove unnecessary polygons.
How to install blender
 bender can be downloaded from the
official site
. Supported OS are Windows10, Mac (Intel / M1), Linux.
bender can be downloaded from the
official site
. Supported OS are Windows10, Mac (Intel / M1), Linux.
If you download blender installer, you will get a file such as "blender-2.93.1-windows-x64.msi". Double-click on it to install. There are no special precautions to take when installing. All you have to do is follow the instructions on the screen
blender official site
blender download page
 Click the
 Then, a screen like this will be displayed.
Select each menu to create a new file, open a recently created 3D model, or open a manual e.t.c..
Then, a screen like this will be displayed.
Select each menu to create a new file, open a recently created 3D model, or open a manual e.t.c..
This screen disappears when you press [ESC] key or click outside of this dialog box. Now you are ready to use blender.
blender online manual
Read obj file with blender
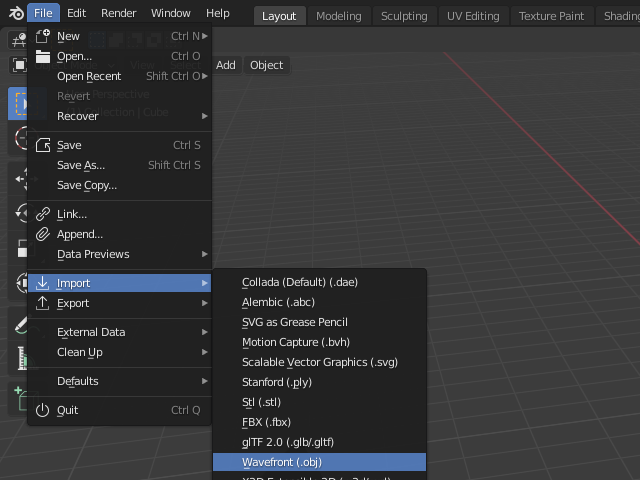 To import obj file, select [File]-[Import]-[Wavefront (.obj)] from menu.
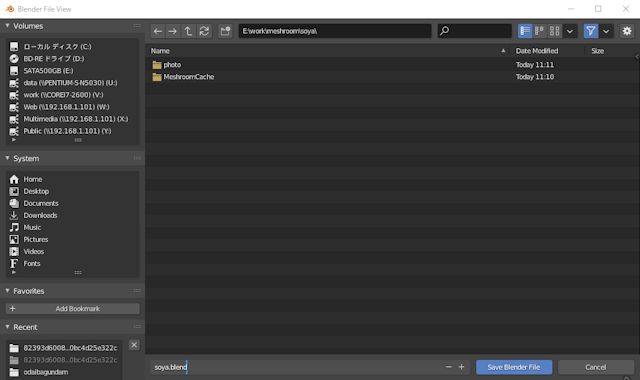
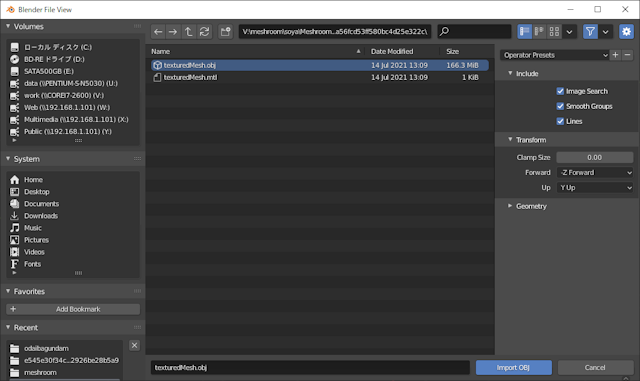 Then a dialog like this will be displayed.
Select obj file and click "Import OBJ" button.
Then a dialog like this will be displayed.
Select obj file and click "Import OBJ" button.
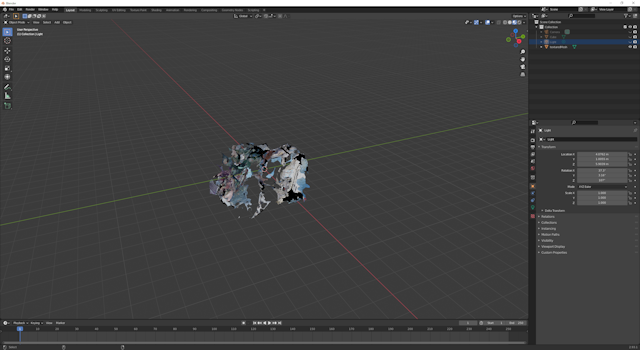
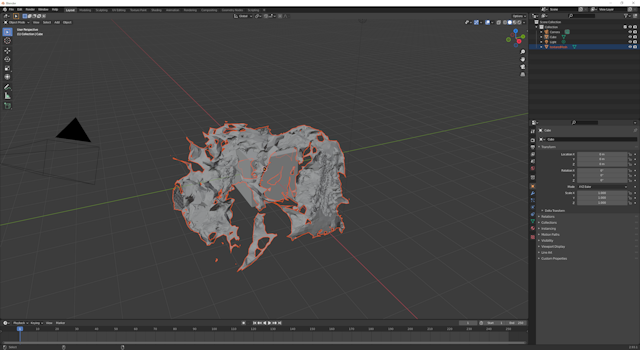 Then you will see a screen like this.
Depending on the number of polygons in the object file, it may take up to one minute to load.
Then you will see a screen like this.
Depending on the number of polygons in the object file, it may take up to one minute to load.
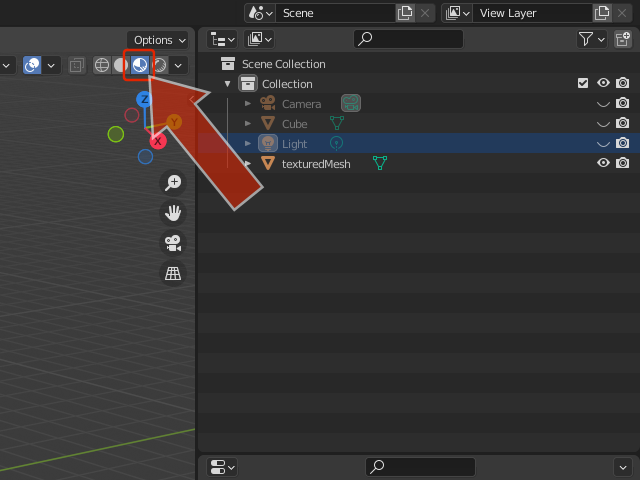
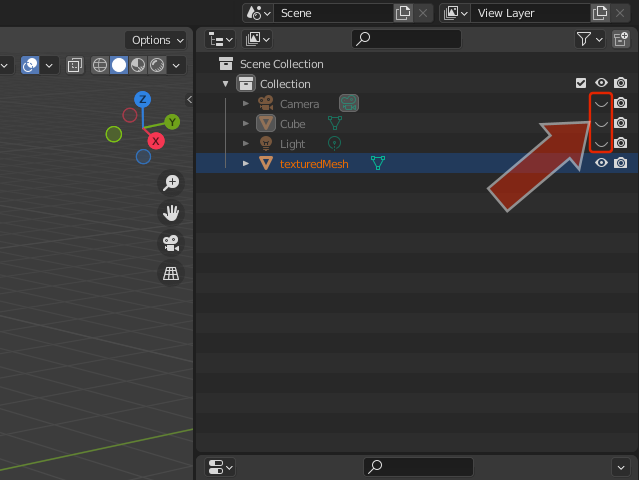 In the Scene Collection screen at the top right of the screen, hide cube object, camera, and light source that are prepared by default.
You can also delete each element by right-clicking on it and select "Delete" menu.
In the Scene Collection screen at the top right of the screen, hide cube object, camera, and light source that are prepared by default.
You can also delete each element by right-clicking on it and select "Delete" menu.
 Click the icon at the top right of the screen to switch shading method...
 Object is displayed with texture attached.
From now on, we will move and rotate the object to remove unnecessary polygons.
Object is displayed with texture attached.
From now on, we will move and rotate the object to remove unnecessary polygons.
You can zoom in / out by scrolling mouse wheel. You can also change display position of object by holding down [Shift] key while dragging. You can rotate viewpoint by holding down mouse click wheel and dragging.
 In the middle of the work, select [File]-[Save As ../ Save] from time to time to save object in blender (".blend") format.
Move / rotate objects with blender
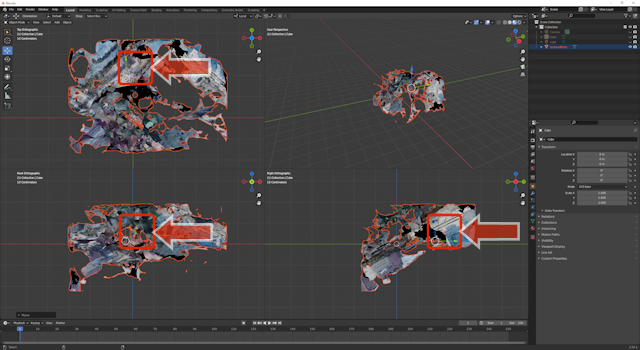
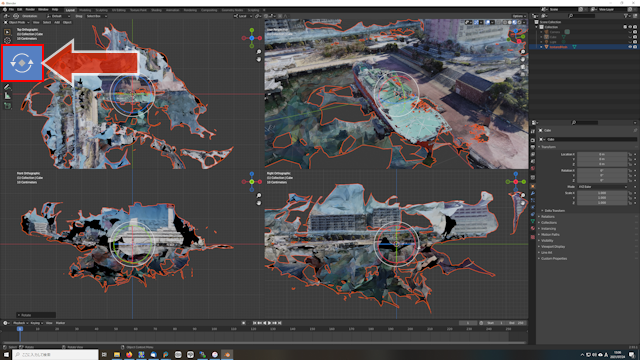
Move flipped object to the center of the world coordinate system and rotate it along X, Y, Z axes.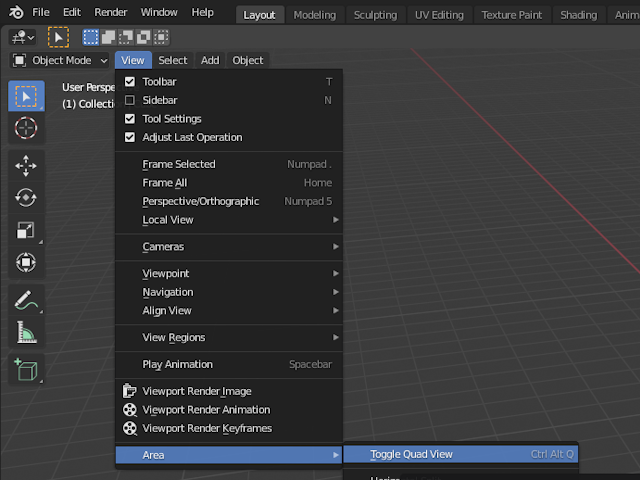 It is convenient to work in "Quad View" for accurate alignment.
Select [View]-[Area]-[Toggle Quad View].
Each time you select this menu, "Quad View" will be shown / hidden.
It is convenient to work in "Quad View" for accurate alignment.
Select [View]-[Area]-[Toggle Quad View].
Each time you select this menu, "Quad View" will be shown / hidden.
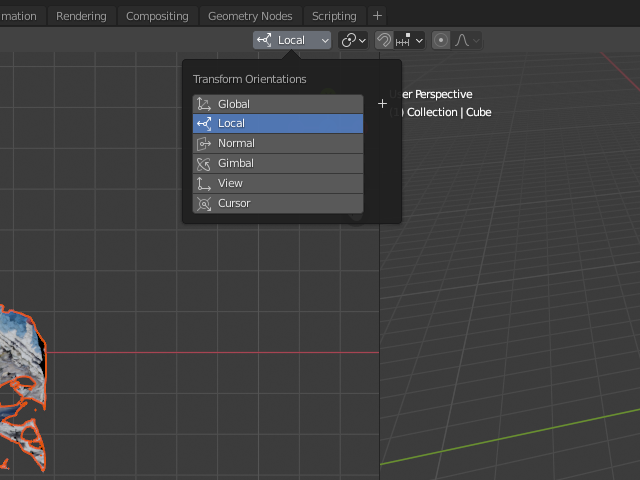 Do object alignment with local coordinate system.
Switch coordinate system to "Local".
Do object alignment with local coordinate system.
Switch coordinate system to "Local".
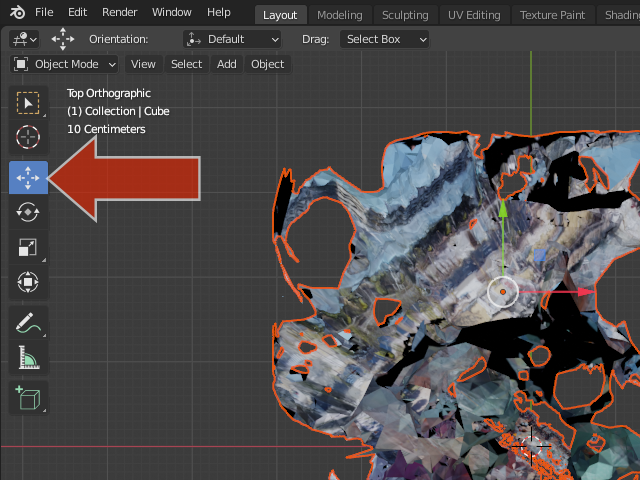 Select "Move" from the icons on the left, then you can translate selected object.
 It's hard to see in this figure, but you can move the object by dragging icon of white circle with three-colored arrow (Pivot Point) displayed on each side.
Move polygon group you are looking for (here, polygon group that makes up Antarctic research ship) to the center of the world coordinates.
It's hard to see in this figure, but you can move the object by dragging icon of white circle with three-colored arrow (Pivot Point) displayed on each side.
Move polygon group you are looking for (here, polygon group that makes up Antarctic research ship) to the center of the world coordinates.
You can zoom in / out by scrolling mouse wheel. You can also change display position of object by holding down [Shift] key while dragging. You can rotate viewpoint by holding down mouse click wheel and dragging.
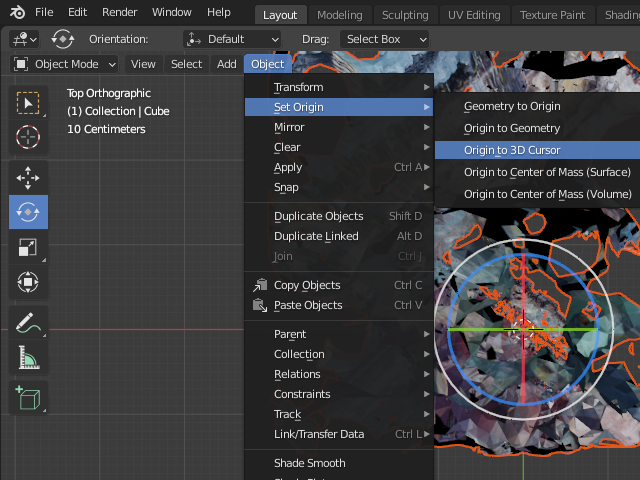 After moving object position, move the center of local coordinates (Pivot Point) to the center of world coordinates.
With 3D cursor in the center of the world coordinates, select [Object]-[Set Origin]-[Origin to 3D Cursor] to move Pivot Point to the position of the 3D cursor.
After moving object position, move the center of local coordinates (Pivot Point) to the center of world coordinates.
With 3D cursor in the center of the world coordinates, select [Object]-[Set Origin]-[Origin to 3D Cursor] to move Pivot Point to the position of the 3D cursor.
 Next, let's rotate the object within local coordinates.
Select "Rotate" from the icons on the left and rotate object so that it faces the desired direction.
Next, let's rotate the object within local coordinates.
Select "Rotate" from the icons on the left and rotate object so that it faces the desired direction.
If necessary, repeat above steps to adjust target polygons in object to center of world coordinates.
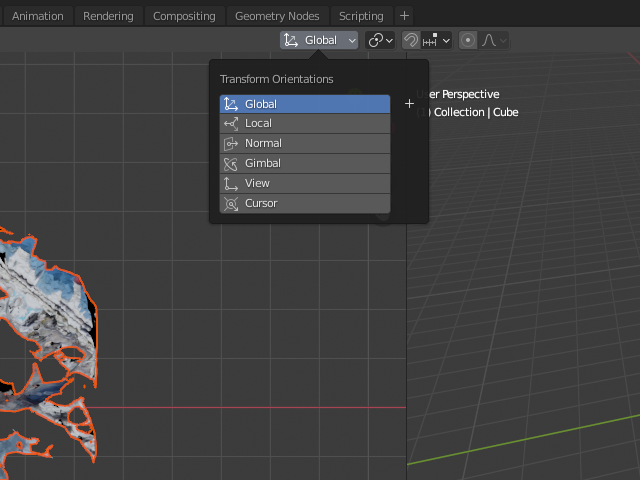 After positioning, set the coordinate system back to "Global".
Remove unnecessary polygons with blender
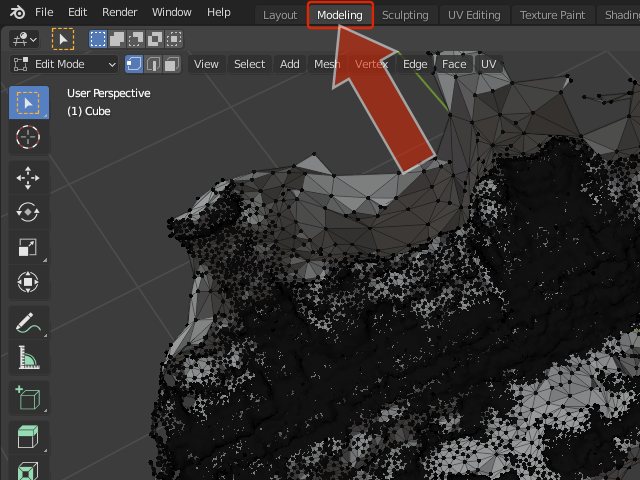 To edit polygons (vertices), switch the mode from [Layout] to [Modeling].
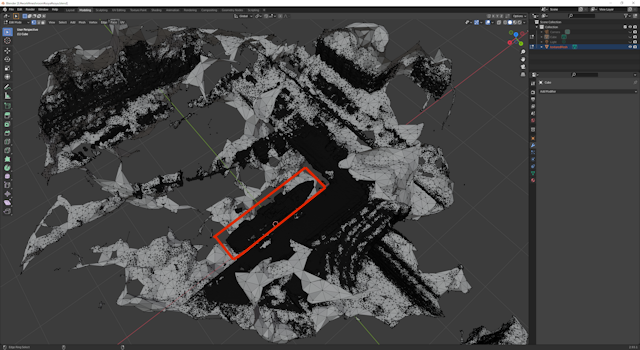 Then you will see a screen like this.
Polygons of the Antarctic observation ship are in the part surrounded by red frame.
We will delete all other polygons (vertices).
Then you will see a screen like this.
Polygons of the Antarctic observation ship are in the part surrounded by red frame.
We will delete all other polygons (vertices).
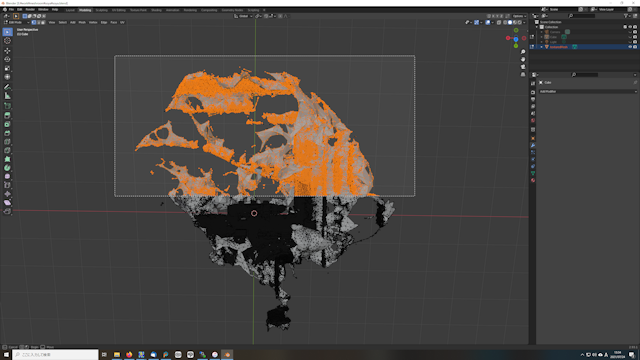 Drag mouse to display rubber band.
Then, vertices surrounded by the rubber band turns orange, and it is in the "selected" state.
Drag mouse to display rubber band.
Then, vertices surrounded by the rubber band turns orange, and it is in the "selected" state.
 Then select "Delete Vertices" from right-click menu to delete them.
Since overlapping vertices will remain from your viewpoint, select same range and delete over and over again.
Then select "Delete Vertices" from right-click menu to delete them.
Since overlapping vertices will remain from your viewpoint, select same range and delete over and over again.
You can zoom in / out by scrolling mouse wheel. You can also change display position of object by holding down [Shift] key while dragging. You can rotate viewpoint by holding down mouse click wheel and dragging.
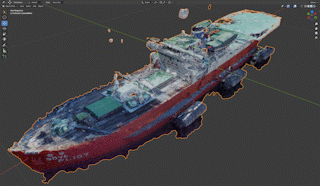 Then completed!!
Since it is originally video shot without thinking about converting to 3DCG in Meshroom, there are some parts that have not been shot, and there are holes in polygons.
Then completed!!
Since it is originally video shot without thinking about converting to 3DCG in Meshroom, there are some parts that have not been shot, and there are holes in polygons.
If holes are closed, you can print it with 3D printer to make it three-dimensional. Please refer to the following site
Free software that lets your drone scan the world (dronedj)
Free software that lets your drone scan the world (Part II) (dronedj)
Drone shooting Odaiba Gundam Unicorn 4K
Watch on YouTube
To know more about How to Fly Hobby Drone
To know more about iPhone