How to use Jumper T12 Pro
Here, we will introduce and explain How to use Jumper T12 Pro OpenTX radio.
このページを日本語で見る
Table of contents
-
Jumper T12 Pro Radio Transmitter Hall Gimbal 2.4G 16CH Open Source Multi-Protocol RC Transmitter

Jumper USD129.99
On-board firmware:OpenTX
Comes with a R1F receiver, no need for you to find another compatible receiver, more convenient for fpv drone zealots like you. JP4-in-1 Multi-protocal module includes. DSM2/X, FrSKY, SFHSS, Flysky, Flysky AFHDS2A, Hubsan and more.
 (US)
(UK)
(US)
(UK)
Introducing Jumper T12 Pro
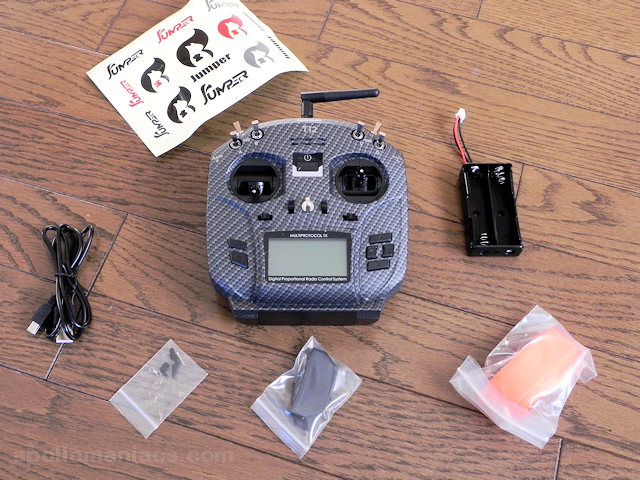 This is a list of items included in Jumper T12 Pro.
On the right side of the body is a battery box that can hold two 18650 type lithium-ion batteries.
The left side of the body is a USB cable for connecting to PC.
The type of connector is a rare "
USB miniB (Amazon.com)
" nowadays.
This is a list of items included in Jumper T12 Pro.
On the right side of the body is a battery box that can hold two 18650 type lithium-ion batteries.
The left side of the body is a USB cable for connecting to PC.
The type of connector is a rare "
USB miniB (Amazon.com)
" nowadays.
Below the body, from the left, there are parts for changing throttle to center position, parts that improve sound quality(?) of the speaker, And an orange neck strap. Sticker is visible above the body.
Also, apart from this, there is an English quick start guide that folds A4 paper, but it didn't say much.
Gimbal is compatible with RadioMaster TX12 series and RadioMaster Zorro. It is possible to use the same parts.
Buy 18650 type battery (Amazon.com)
Buy 18650 type battery (Amazon.co.uk)
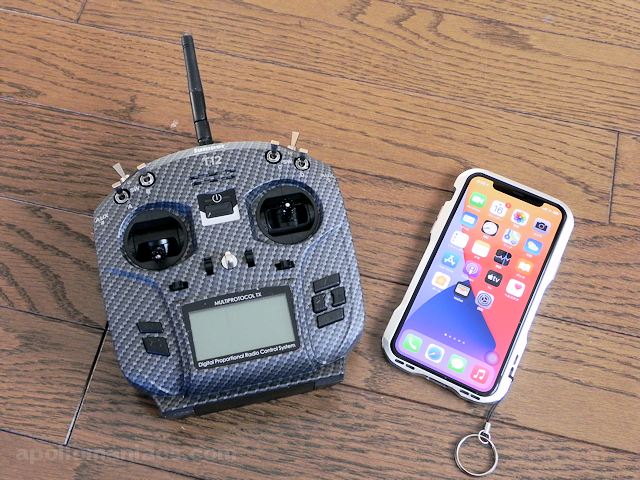 Size comparison with iPhone.
Dimention is 158mm x 150mm x 58mm, which fits comfortably in both hands.
Weight is 342g.
Size comparison with iPhone.
Dimention is 158mm x 150mm x 58mm, which fits comfortably in both hands.
Weight is 342g.
Battery setting and charging
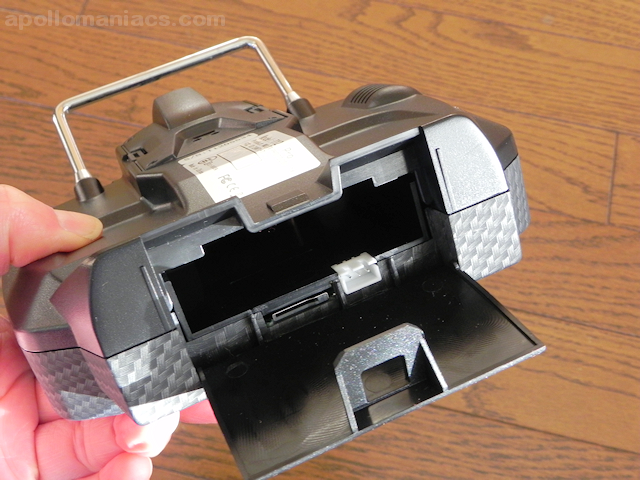 You can insert battery by opening lid on the bottom.
White one is connector for battery, which is the same as the barance charging connector for general 2S LiPo batteries ( 3 pin JST-XH connector ).
Left of the connector is microSD card slot.
You can insert battery by opening lid on the bottom.
White one is connector for battery, which is the same as the barance charging connector for general 2S LiPo batteries ( 3 pin JST-XH connector ).
Left of the connector is microSD card slot.
Internal dimensions of battery bay is approximately 63mm wide x 17mm high x 66mm deep. A fairly large battery can be inserted. On the other hand, attached 18650 battery box is barely tall and may be difficult to put in and out.
 Batteries are sold separately for Jumper T12 Pro.
I didn't know the size of the bay, so I chose
Hubsan H501S-25 2s 1300mAh LiPo battery
, which Amazon recommends with Jumper T12 Pro.
Size is about 30mm wide x about 14mm high x about 66mm deep.
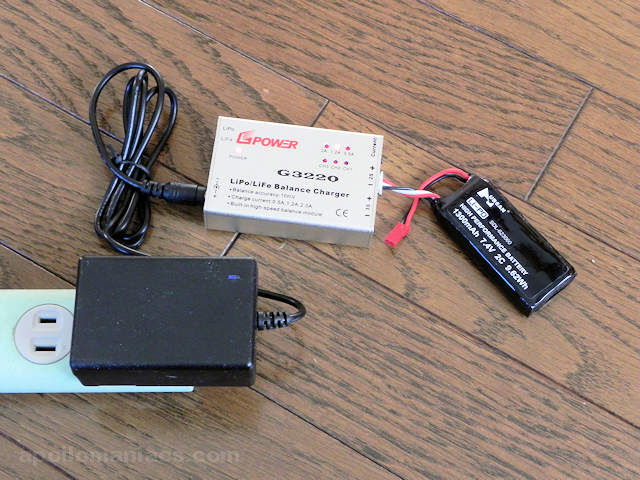
Fully charge using the balanced charger for 2s LiPo.
Batteries are sold separately for Jumper T12 Pro.
I didn't know the size of the bay, so I chose
Hubsan H501S-25 2s 1300mAh LiPo battery
, which Amazon recommends with Jumper T12 Pro.
Size is about 30mm wide x about 14mm high x about 66mm deep.
Fully charge using the balanced charger for 2s LiPo.
Jumper T12 Pro supports DC 5V to 9V as input voltage. Use of 2S LiPo batteries is recommended.
Buy 2S LiPo battery (Amazon.com)
Buy 2S LiPo battery (Amazon.co.uk)
 Although the capacity is slightly smaller, the
URGENEX 7.4V 1000mAh Lipo Battery 2S 35C Lipo Batteries with JST Plug (Amazon)
also fits in the Jumper T12 Pro's battery bay.
However, you will need to remove the translucent protective cover on the balance connector.
Although the capacity is slightly smaller, the
URGENEX 7.4V 1000mAh Lipo Battery 2S 35C Lipo Batteries with JST Plug (Amazon)
also fits in the Jumper T12 Pro's battery bay.
However, you will need to remove the translucent protective cover on the balance connector.
Buy URGENEX 7.4V 1000mAh Lipo Battery (Amazon.com)
Get a microSD card image
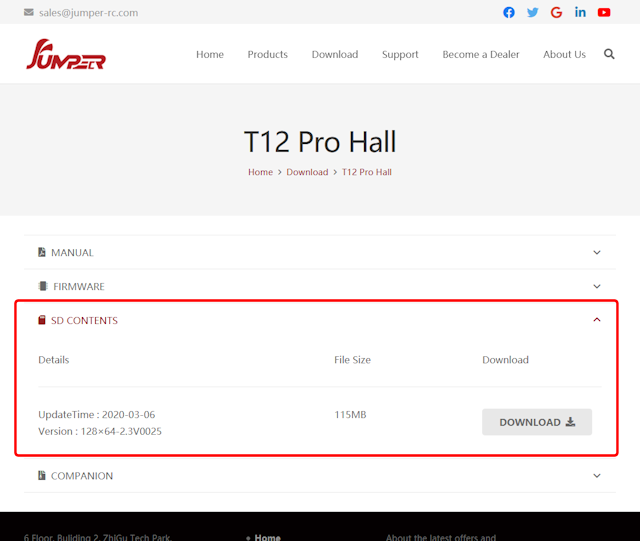 The data stored in microSD card in advance can be downloaded from radio manufacturer official website.
For Jumper T12 Pro, you can download it by clicking "DOWNLOAD" in "SD CONTENTS" column on
Jumper's T12 Pro download page
.
You can get a file such as "sdcard-128x64-2.3V0025.zip", so unzip it to any folder on your computer.
The data stored in microSD card in advance can be downloaded from radio manufacturer official website.
For Jumper T12 Pro, you can download it by clicking "DOWNLOAD" in "SD CONTENTS" column on
Jumper's T12 Pro download page
.
You can get a file such as "sdcard-128x64-2.3V0025.zip", so unzip it to any folder on your computer.
You can also download OpenTX Companion and others on this page.
For the procedure to prepare the microSD card, see OpenTX/EdgeTX radio initial setup procedure .
Screen navigation
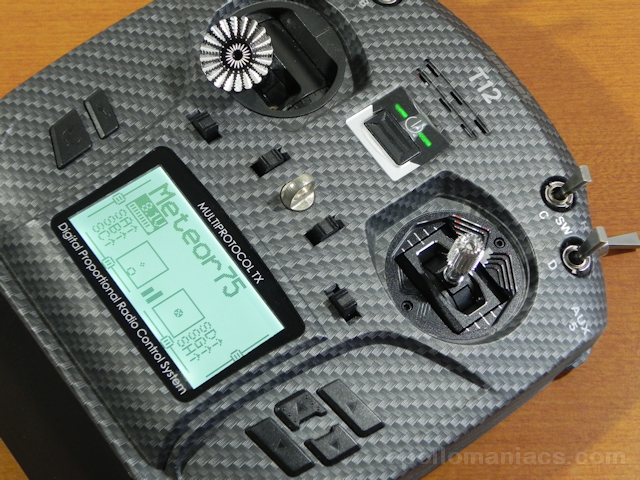
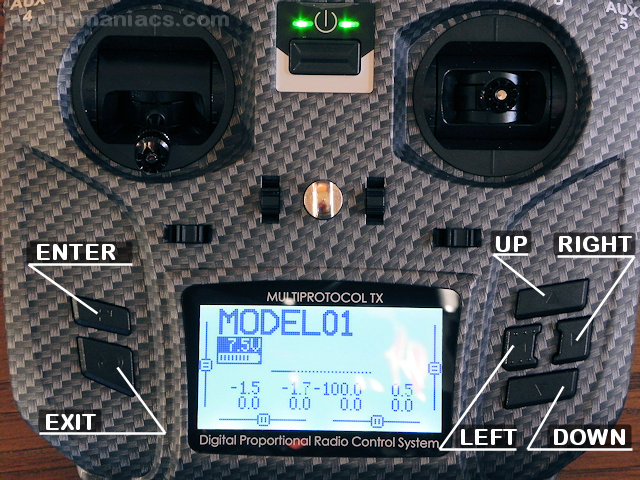 To operate OpenTX with Jumper T12, use the six switches shown in the figure.
Operations and functions are shown in the table below.
To operate OpenTX with Jumper T12, use the six switches shown in the figure.
Operations and functions are shown in the table below.
| Name of control | Function | Description |
|---|---|---|
| ENTER | Decide / Confirm | Confirm the change / input. Or select an item. |
| EXIT/RETURN | Cancel / Back | Cancel the change / input. Or return to the previous screen. |
| PAGE | Screen switching | In the setting screen consisting of multiple pages, move to the next page / previous page. Move cursor to the top of the screen and click [RIGHT] key to switch to the next page, and click [LEFT] key to switch to the previous page while the page number is selected. |
| CURSOR | Move cursor / selected position | Move the cursor. [UP] [DOWN] keys moves the cursor up and down, and [LEFT] [RIGHT] keys move the cursor left and right. |
| MODEL/SYSTEM | Calling MODEL / RADIO menu | Call the MODEL / RADIO(SYSTEM) menu. Press and hold [ENTER] or [RIGHT] key to bring up MODEL menu, and press and hold [LEFT] key to bring up RADIO(SYSTEM) menu. |
- Change screen
- Press [UP] [DOWN] keys on the main screen to switch between four main screens and "CHANNELS MONITOR" screen.
- Change contents
- You can switch contents of each main screen by pressing [LEFT] [RIGHT] keys on the main screen.
- Telemetry screen
- Press and hold [DOWN] key on the main screen to display Telemetry screen.
- Statistics / DEBUG screen
- Press and hold [UP] key on the main screen to display Statistics screen. If you press [UP] [DOWN] keys here, you can switch to "DEBUG" screen.
Switch and antenna replacement / repair

Also, I dropped the radio and antenna broke, so I bought 2.4GHz whip antenna (SMA connector) from Amazon and replaced it. Total length of the antenna for 2.4GHz is different from that for 5.8GHz.
AG01 MINI CNC Hall Gimbal : gimbal replacement
Here, We will explain the procedure to replace Jumper T12 Pro gimbal with AG01 MINI CNC Hall gimbal (RadioMaster) . However, this work can cause the radio to malfunction in the worst case. This site does not mean that we recommend replacing the gimbal. Please do it at your own risk.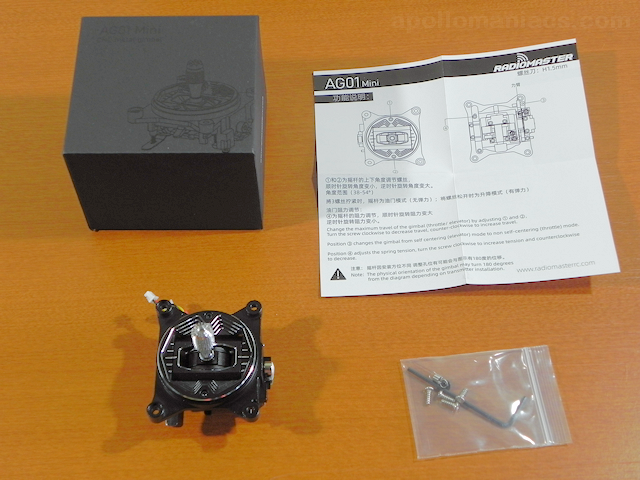 A high-end gimbal called
AG01 MINI CNC Hall gimbal (RadioMaster)
is on sale.
A set of two costs USD 99.99, which is the price you can buy one radio.
A high-end gimbal called
AG01 MINI CNC Hall gimbal (RadioMaster)
is on sale.
A set of two costs USD 99.99, which is the price you can buy one radio.
This gimbal has been developed for over a year with engineers and FPV champion pro-pilots from around the world. All parts are CNC machined from aluminum, and ball bearings provide a smooth and accurate feel.
This gimbal is compatible with RadioMaster Zorro, TX12 series and Jumper T12 series. It seems that Jumper T8SG, which has the same body shape, can also be used.
 Before mounting this gimbal on my
Radiomaster Zorro
, I mounted it on the right stick of my Jumper T12 Pro to make sure it worked.
The size is perfect and it works fine.
Before mounting this gimbal on my
Radiomaster Zorro
, I mounted it on the right stick of my Jumper T12 Pro to make sure it worked.
The size is perfect and it works fine.
However, in the Jumper T12 series, the chassis is thin, so the module bay interferes a little. Use a hot knife or similar to scrape off the contact area.
Gimbal is the key part of the radio. Flying FPV drones, in particular, puts a lot of force and abuse on the gimbal, so the all-metal AG01 gimbal is safe to use. The screw diameter of the stick end is 3 mm, the same as the original.
RadioMaster AG01 MINI CNC Hall Gimbals for TX12 & Zorro (RadioMaster)
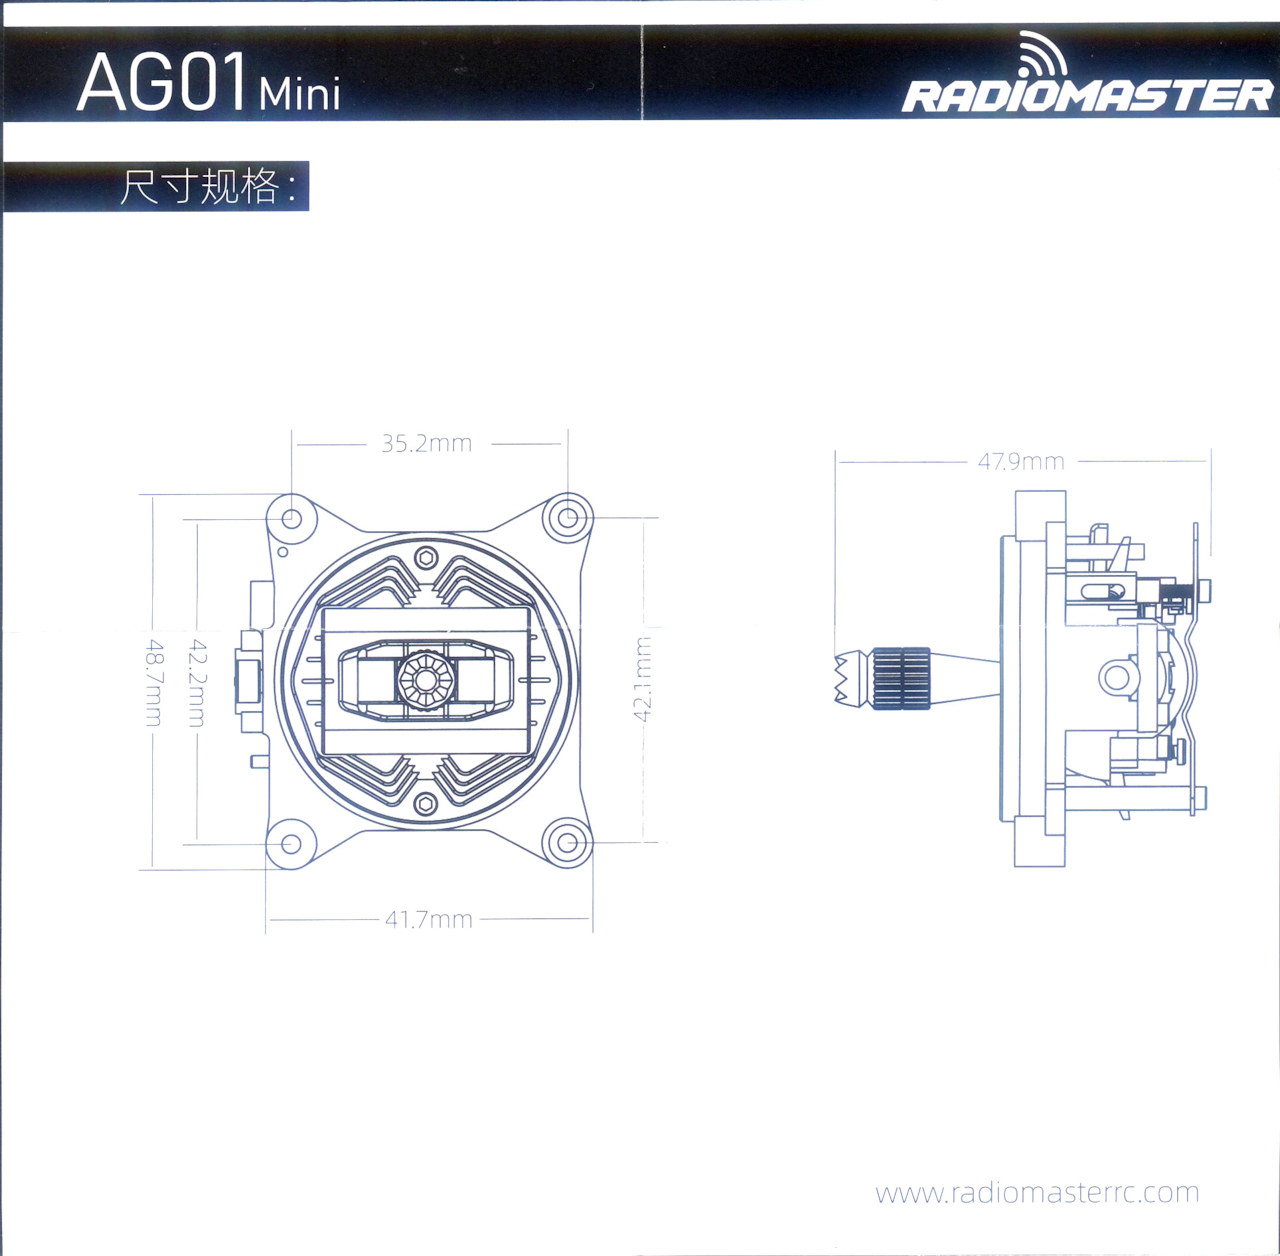 This is the manual attached to the AG01 MINI.
The dimensions of the AG01 MINI are shown in this diagram.
This is the manual attached to the AG01 MINI.
The dimensions of the AG01 MINI are shown in this diagram.
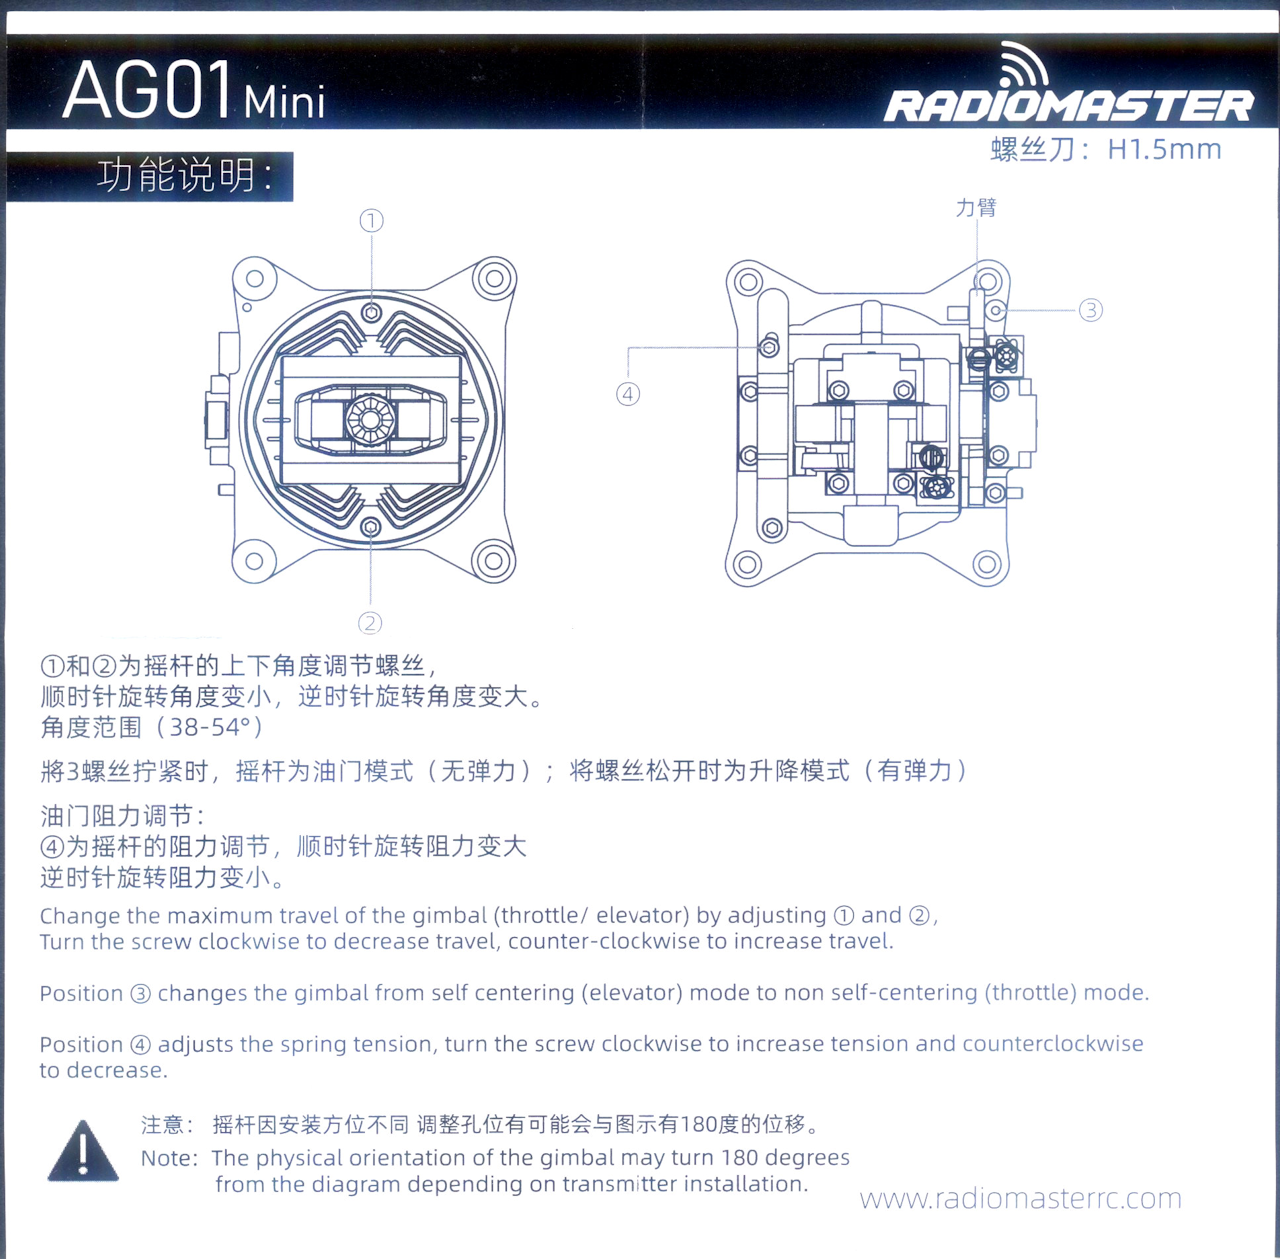 This is the other side of the instructions attached to the AG01 MINI.
This explains how to adjust the gimbal tension and range of motion.
This is the other side of the instructions attached to the AG01 MINI.
This explains how to adjust the gimbal tension and range of motion.
If you want to install AG01 MINI gimbal on something other than RadioMaster Zorro, you need to attach the screw that comes with the gimbal to number 3 screw hole in the figure on the gimbal used for throttle in advance. For more information, please refer to "Installation for Zorro & TX12" on AG01 MINI CNC Hall gimbal product page (RadioMaster)
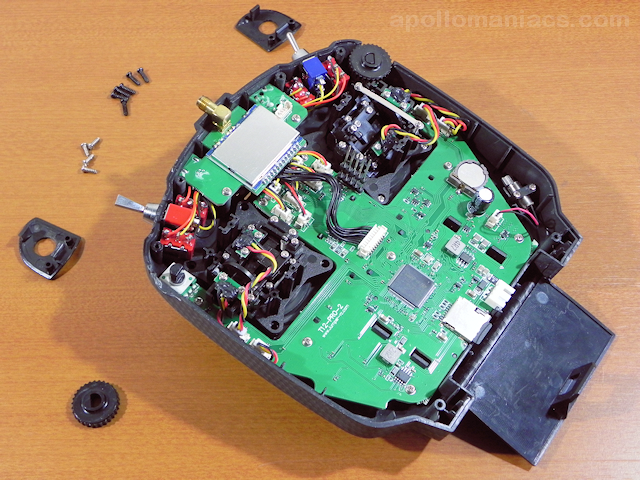 For Jumper T12 Pro, gimbal replacement is relatively easy.
Remove battery, loosen 6 screws visible from the back, pull out the cover on SG and SH switches, and you can remove the back cover like this.
Gimbal can be replaced by removing dial (Pot) parts and loosening four screws fixing the gimbal.
For Jumper T12 Pro, gimbal replacement is relatively easy.
Remove battery, loosen 6 screws visible from the back, pull out the cover on SG and SH switches, and you can remove the back cover like this.
Gimbal can be replaced by removing dial (Pot) parts and loosening four screws fixing the gimbal.
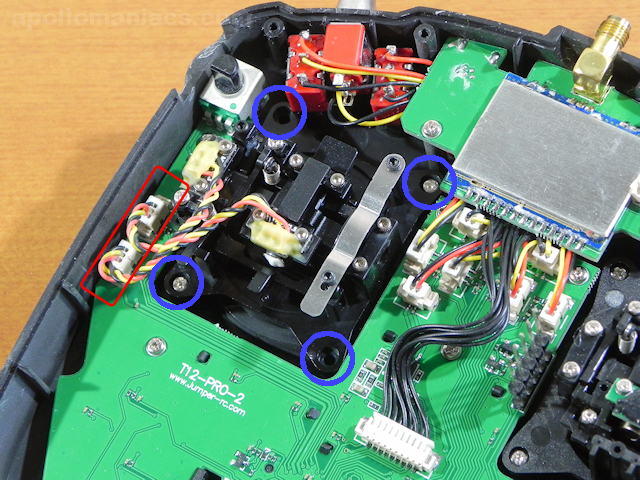 This is AG01 MINI gimbal temporarily attached to the right stick.
Gimbal connector is surrounded by a red frame, and gimbal fixing screw is surrounded by blue circles.
Since it is a temporary fixing, only two screws are installed.
This is AG01 MINI gimbal temporarily attached to the right stick.
Gimbal connector is surrounded by a red frame, and gimbal fixing screw is surrounded by blue circles.
Since it is a temporary fixing, only two screws are installed.
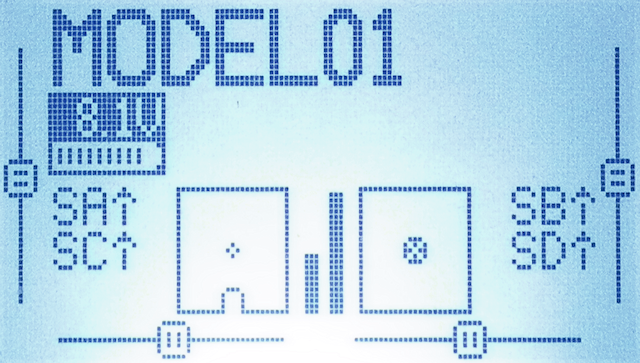 After replacing the gimbal, adjust the stick tension and
make sure all sticks, switches and dials (Pot:Potentiometer) are responding correctly on Input Monitor screen.
Then
calibrate the gimbal
.
After replacing the gimbal, adjust the stick tension and
make sure all sticks, switches and dials (Pot:Potentiometer) are responding correctly on Input Monitor screen.
Then
calibrate the gimbal
.
Stick (Gimbal) calibration
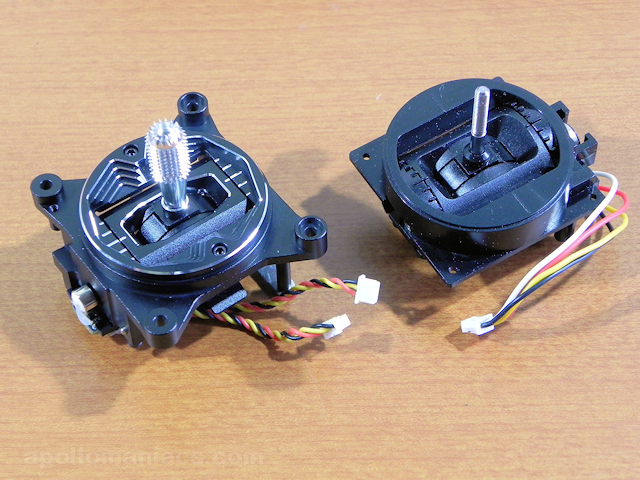 Here is a gimbal comparison photo.
Left is AG01 MINI gimbal, and right is original Jumper T12 Pro gimbal.
Here is a gimbal comparison photo.
Left is AG01 MINI gimbal, and right is original Jumper T12 Pro gimbal.
To know more about How to Fly Hobby Drone
To know more about iPhone