Create MODEL, Bind with drone, Test flight
Here, we will introduce the procedure for creating "MODEL" of drone, binding it, and making a test flight using OpenTX/EdgeTX radio.
The same operation is possible with any radio that uses OpenTX / EdgeTX. However, keyswitch assignments / functions differ depending on model, and screen / menu configuration differs depending on installed version of OpenTX / EdgeTX.
- Confirmation of drone specifications
- Assigning functions to radio
- OpenTX/EdgeTX firmware update
- ADC Filter settings
- Create a new MODEL
- Failsafe settings
- Bind and test flight of radio and aircraft
- Can't bind !? Frequency tuning
- Is the direction of propeller rotation correct? : How to solve yaw spin
- Drone flies in an unexpected direction!? : Turn off AIR MODE
- Drone's flight is strange !? Stick broke !?
- Tune PID and Rate profiles
-
RadioMaster Zorro 2.4GHz 16CH Hall Sensor Gimbals

RadioMaster 2022/02 USD89.99
On-board firmware:EdgeTX(OpenTX)
Featuring an ergonomic design, large bright LCD screen in the perfect viewing position, travel adjustable HALL sensor gimbals, a nano size external RF module bay

 (US)
(UK)
How to use RadioMaster Zorro
(US)
(UK)
How to use RadioMaster Zorro
Confirmation of drone specifications

Here, we will try binding with minimum settings using BetaFPV's Meteor65 HD (FC board is BetaFPV's F4 1S AIO Brushless Flight Controller) as an example. Meteor65 HD is CineWhoop for indoor use that is easy to handle even for beginners, not only small and flies lightly, but also can take aerial video at 1080p 60fps when microSD card is inserted. Furthermore, if you replace the frame and props for 75mm and motors to 1102-18000KV, you can fly aerobatics outdoors with powerful power.
Specification information required for binding this tiny whoop is as follows. The channel map (channel order) is "AETR" (Aileron, Elevator, Throttle, Rudder are assigned in this order from CH1).
| item | information | |
|---|---|---|
| Communication protocol | Frsky FCC (D16) (There are also Frsky-LBT and Futaba versions.) |
|
| Channel used | CH 1 | Aileron |
| CH 2 | Elevator | |
| CH 3 | Throttle | |
| CH 4 | Rudder | |
| CH 5 (AUX1) | Arm / Disarm | |
| CH 6 (AUX2) | ANGLE (900 - 1300 μsec), HORIZON (1300 - 1700 μsec) | |
| CH 7 (AUX3) | FLIP OVER AFTER CLASH (TURTLE) | |
When specifications are not clear

-
BETAFPV Meteor65 HD Whoop Quadcopter (1S)
BETAFPV USD149.99
Meteor65 HD is ultralight only 27.64g, which brings a stronger flight power. Adopted with the high-definition 1080P@60fps BETAFPV Nano HD Camera, this drone will lead you to a fairly clear image of every highlight moment. With this tiny whoop, you can easily achieve FPV freestyle tricks, while getting HD footage.
 (US)
(UK)
(US)
(UK)
Assigning functions to radio
Next, consider which switch on radio to assign channels to be used. This time, I decided to assign switches and names as follows.| channels | switches | name (3 chrs) |
|---|---|---|
| CH5 | SW G | Arm |
| CH6 | SW D | Mod (Mode) |
| CH7 | SW H | Flp (Flip over) |
OpenTX/EdgeTX firmware update
OpenTX/EdgeTX radio can update firmware, multi-protocol module (transmitter), and boot loader. If transmitter firmware is factory default, it may not be possible to bind to aircraft released after that. If you cannot bind, you may be able to solve it by updating to the latest version. First of all, let's update the firmware.See below for detailed instructions on updating the firmware.
ADC Filter settings
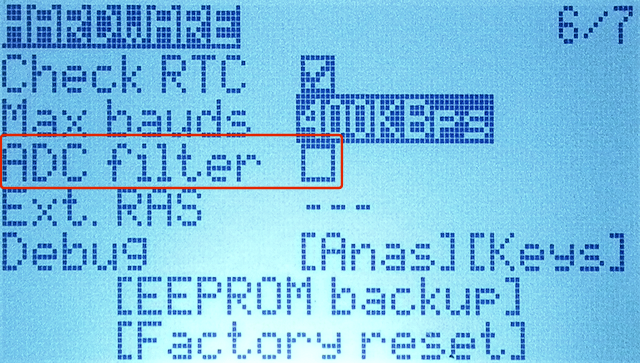 For multi-rotor aircraft, it is recommended to set "ADC Filter" on [HARDWARE] screen of "RADIO (SYSTEM) menu" on OpenTX/EdgeTX to OFF.
This option is ON by default.
Turn it off when flying a multi-rotor aircraft.
For multi-rotor aircraft, it is recommended to set "ADC Filter" on [HARDWARE] screen of "RADIO (SYSTEM) menu" on OpenTX/EdgeTX to OFF.
This option is ON by default.
Turn it off when flying a multi-rotor aircraft.
This is a function that smoothes fluctuation of values such as sticks sent from radio. It is effective for fixed-wing aircraft that do not operate steeply, but you may feel unresponsive when maneuvering a drone.
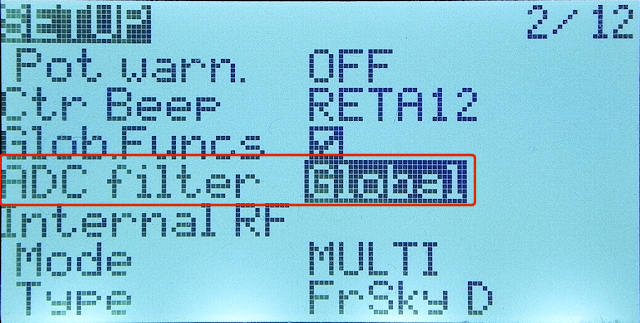 In EdgeTX, ADC Filter can also be set for each MODEL.
"Global", "Off" and "On" can be selected in "ADC Filter" field on the [SETUP] screen of "MODEL menu".
If you select "Global", "ADC Filter" setting on [HARDWARE] screen will be used.
In EdgeTX, ADC Filter can also be set for each MODEL.
"Global", "Off" and "On" can be selected in "ADC Filter" field on the [SETUP] screen of "MODEL menu".
If you select "Global", "ADC Filter" setting on [HARDWARE] screen will be used.
Create a new MODEL
With OpenTX/EdgeTX, you can register multiple aircraft information as "MODEL"s and switch between them for control. You can create a "MODEL" with the OpenTX / EdgeTX radio itself, or with the OpenTX / EdgeTX Companion software on your computer. Please refer to one of the pages below to create a model.Failsafe settings
Failsafe feature specifies how the drone behaves when communication between radio and drone is lost. It can be specified in "Failsafe / Failsafe Mode" field of transmission protocol setting on "SETUP" screen.| parameter | meaning |
|---|---|
| Not Set | Indicates that nothing has been set for failsafe. Depending on communication protocol, warning message may be displayed from the radio when switching models. The behavior when communication is lost is the same as "No Pulses". |
| Hold | When communication is lost, the last value of each channel is kept as it is. Therefore, the aircraft will continue to fly. If the flight mode is "Acro", the aircraft will soon rotate and crash. |
| Custom | The value of each channel when failsafe is activated can be specified individually in advance. For each channel, you can specify a value or select "Hold" or "No Pulse". |
| No Pulses | The pulse on all channels will stop (become zero). Throttle will also be zero, so drone will usually fall in place. |
| Receiver | Follow failsafe settings of receiver mounted on drone. |
Failsafe settings of receiver
Failsafe function can be set on some receivers. If you press "F/S (Failsafe)" button on receiver while radio and drone are connected, the value of each channel at that time will be memorized. And if communication is lost, the drone will follow stored channel values. In addition, some receivers with failsafe function may be able to be set using companion software such as Betaflight.
Bind and test flight of radio and aircraft
Let's finally bind radio and aircraft. When binding for the first time, remove propellers to avoid the risk of runaway due to misconfiguration. In addition, screws of the aircraft immediately after purchase may be loose. Tighten all screws. There are two types of propellers, one for clockwise rotation and the other for counterclockwise rotation. Make a note of the removed propeller so that it can be returned to its original position.Using ExpressLRS(ELRS) protocol, See also How to Bind ExpressLRS Transmitter and Receiver .
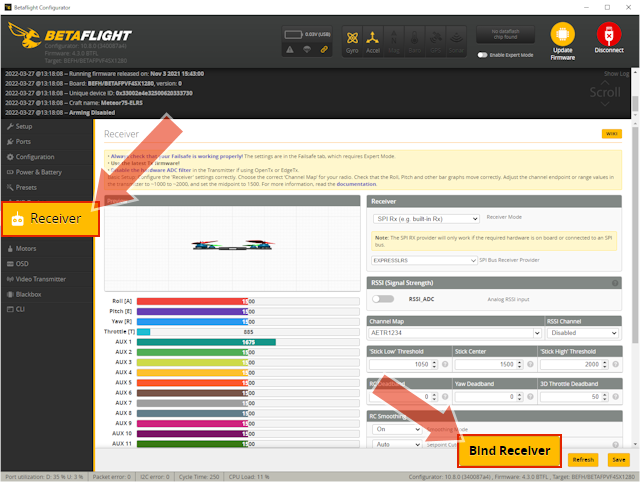
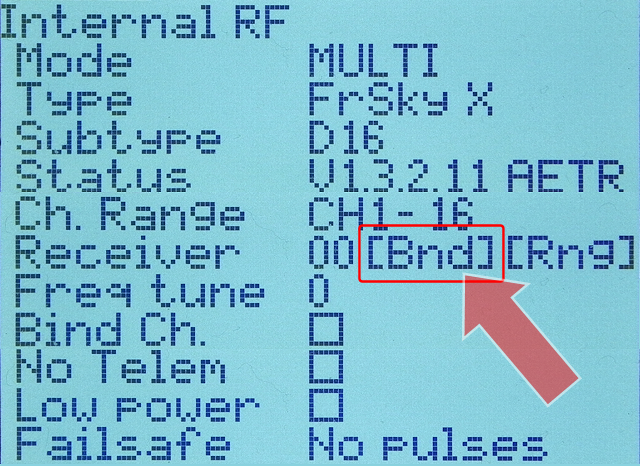 First, open SETUP screen of MODEL menu on the radio, and place cursor on [Bnd] (bind) on transmitter setting screen. Do not press [ENTER] yet.
If the distance between radio and drone is too close, you may not be able to bind properly. When binding, keep a distance of about 30 cm ( 1 ft ) or more between them.
Then start drone in bind mode.
This method depends on the product.
Check website or instruction manual of FC board or RX board.
For Meteor65 HD, connect battery to start drone, then hold down Bind button on FC board. Eventually green LED will stay lit and will be in bind mode.
 For drones with Betaflight firmware and built-in receiver on the FC board (AIO type FC), you can also switch to bind mode from Betaflight Configurator by connecting to a computer.
Click [Bind Receiver] button on Betaflight Configurator [Receiver] screen, or type "bind_rx" or "bind_rx_spi" in CLI command line.
For drones with Betaflight firmware and built-in receiver on the FC board (AIO type FC), you can also switch to bind mode from Betaflight Configurator by connecting to a computer.
Click [Bind Receiver] button on Betaflight Configurator [Receiver] screen, or type "bind_rx" or "bind_rx_spi" in CLI command line.
 When drone starts in bind mode, press [ENTER] on [Bnd] field on radio.
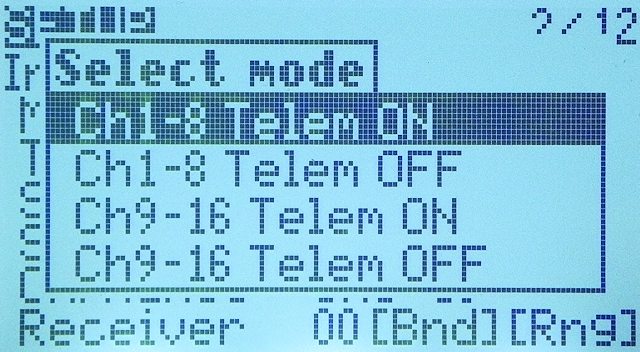
Depending on the protocol you use, you may see a screen like this. Specifies the range of channels to use and whether to use telemetry. Normally, "Ch1-8 Telem ON" should be selected.
Then the radio will start binding process. It keeps beeping, beeping, beeping.
If binding is successful, there should be some action on drone side. For Meteor65 HD, green LED flashes fast.
Once drone has been bound and radio stops beeping, remove battery from drone and reconnect it.
If you cannot bind, try updating the radio firmware or try frequency tuning .
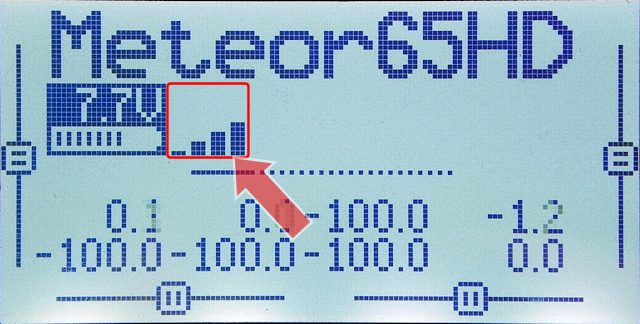 Once radio and drone are successfully connected, bars indicating strength of telemetry signal (RSSI) will be displayed on main screen of the radio.
First, turn on Arm switch and slowly raise throttle to check that the drone's motor turns.
If there are other things you can check without propellers, check here.
If it doesn't seem to be a problem, attach propellers and fly it.
Take a test flight, such as in a large room, to make sure sticks and switches are assigned as expected.
Once radio and drone are successfully connected, bars indicating strength of telemetry signal (RSSI) will be displayed on main screen of the radio.
First, turn on Arm switch and slowly raise throttle to check that the drone's motor turns.
If there are other things you can check without propellers, check here.
If it doesn't seem to be a problem, attach propellers and fly it.
Take a test flight, such as in a large room, to make sure sticks and switches are assigned as expected.
Can't bind !? Frequency tuning
Some protocols, such as FrSky, allow frequency tuning. It can absorb frequency fluctuations due to manufacturing variations in transmitter hardware. If you can't bind, or if the signal doesn't reach as expected, try frequency tuning. Frequency tuning is performed in the "Freq tune" field on SETUP screen of MODEL menu.
If you set the corresponding protocol to "Internal RF" or "External RF", "Freq tune" column will be displayed.
The initial value here is zero. You can set a value from +30 to -30.
Frequency tuning is performed in the "Freq tune" field on SETUP screen of MODEL menu.
If you set the corresponding protocol to "Internal RF" or "External RF", "Freq tune" column will be displayed.
The initial value here is zero. You can set a value from +30 to -30.
After fine-tuning, do bind again.
Is the direction of propeller rotation correct? : How to solve yaw spin
 In the case of self-assembled drone, ESC motor rotation direction may be different than expected.
If rotation direction is not correct, the drone will not be able to take off or will spin in the air.
In the case of self-assembled drone, ESC motor rotation direction may be different than expected.
If rotation direction is not correct, the drone will not be able to take off or will spin in the air.
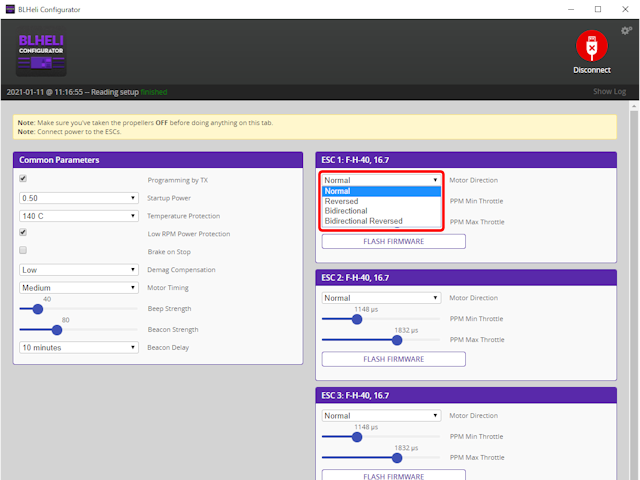
For drones with Betaflight in FC firmware, connect the drone to your computer and try rotating motors one by one on "Motors" screen of Betaflight Configurator , and check that the wind blows downward. If rotation direction is wrong, please correct it using BLHeli Configurator .
For more information, please refer to Installing and using BLHeli Configurator / How to solve yaw spin .
Drone flies in an unexpected direction!? : Turn off AIR MODE
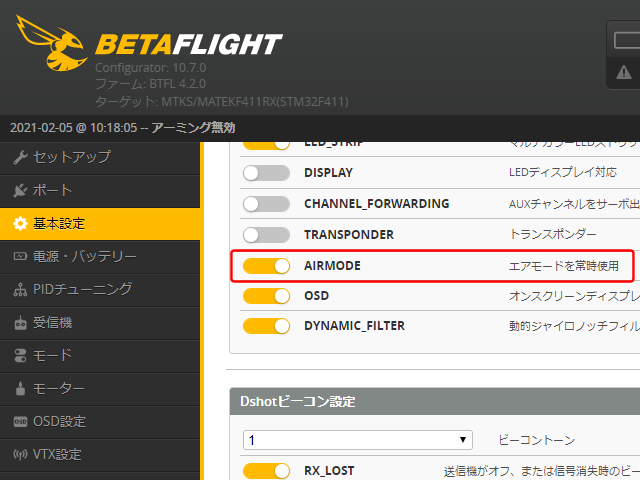 At the moment you arm and raise the throttle, drone may fly in an unexpected direction.
This can occur if
AIR MODE
is enabled. First, try turning off AIR MODE.
At the moment you arm and raise the throttle, drone may fly in an unexpected direction.
This can occur if
AIR MODE
is enabled. First, try turning off AIR MODE.
For drones with Betaflight installed in FC firmware, connect the drone to a computer, switch [AIRMODE] off on [Basic settings] screen of Betaflight Configurator , and "save".
Drone's flight is strange !? Stick broke !?
If you feel drone is behaving strangely, or if you feel stick is broken, first check the main screen below. If you feel something is wrong with your flight or drone simulator , check these screens to find out where the cause lies. Try stick calibration .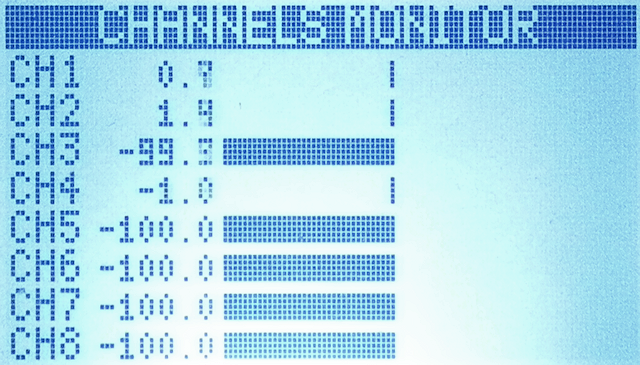 In this "CHANNELS (MIXERS) MONITOR" (Output Monitor) screen, value of each channel output from the radio (transmitter) is displayed as a bar graph.
You can see the actual output value of each channel processed and synthesized on MIXES screen of "MODEL menu".
In this "CHANNELS (MIXERS) MONITOR" (Output Monitor) screen, value of each channel output from the radio (transmitter) is displayed as a bar graph.
You can see the actual output value of each channel processed and synthesized on MIXES screen of "MODEL menu".
Make sure bar graph moves smoothly as you move each stick.
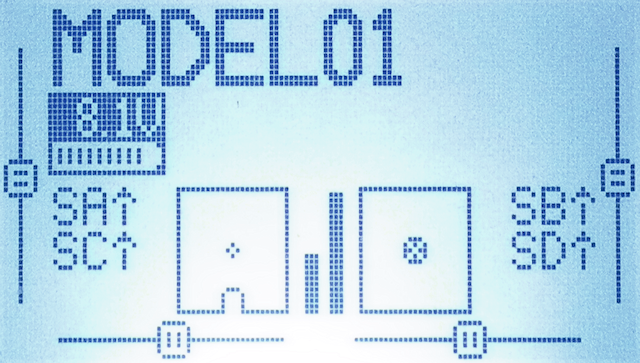 In this Input Monitor screen, one of the main screens, current input state of sticks and switches recognized by radio is displayed as an illustration.
Make sure illustration moves smoothly as you move each stick.
Tune PID and Rate profiles
By tuning the PID profile and Rate profile, you can change the flight characteristics of the drone. However, if you change these parameters indiscriminately, drone will not be able to fly. While studying the meaning of these parameters, try adjustments in order from the one you understand. Also, save initial values so that you can restore them at any time.To make it easier, first try increasing P value and RC Rate value little by little to test the operability.
For tuning drones with Betaflight in the firmware, The information on each site below will be helpful.
To know more about How to Fly Hobby Drone
To know more about iPhone