


How to use RunCam Thumb Pro camera - lightweight 4K video camera for FPV drone weighing 16 grams
RunCam Thumb Pro camera is a 4K video camera for micro/FPV drones weighing only 16g. It can also be installed on TinyWoop.- What is RunCam Thumb Pro Camera?
- Introducing RunCam Thumb Pro Camera
- Replace lens filter
- MicroSD card for RunCam Thumb Pro Camera
- How to record video
- Install the RunCam App
 Connect with RunCam App, Set shooting mode, Remote control
- Firmware version confirmation/version upgrade
- RunCam Thumb Pro Camera specifications
What is RunCam Thumb Pro Camera?

The RunCam Thumb Pro camera has an original model with an FOV of 145 degrees and a NEW (V2) model with an FOV of 155 degrees (RunCam Thumb Pro-W). Currently, only the NEW (V2) model can be purchased.
-
RunCam Thumb Pro

RunCam 2022/07 US$89.99
Max resolution: 4K 30fps / Weight:16.0g
Built-in gyro, perfectly output smooth and stabilized video. Support Shooting Horizontally and Vertically. You can change settings such as resolution, saturation and exposure through the RunCam App. After connecting Tx & Rx to the flight controller, you can easily start/stop recording by gently toggling the switch.

 (US)
(UK)
(US)
(UK)
-
RunCam Thumb
RunCam 2022/03 US$49.99
Max resolution: 1080p (1920x1080 pixel, 60fps) / Weight:9.8g
Ultra-light FPV 1080p60fps HD Camera. Mini and Lightweight 52mm*13mm*19mm. Net Weights 9.8g. Standard ND 16 Filter Effectively reduce the jello of flight video under strong sunlight.
(US)
(UK)
Introducing RunCam Thumb Pro Camera
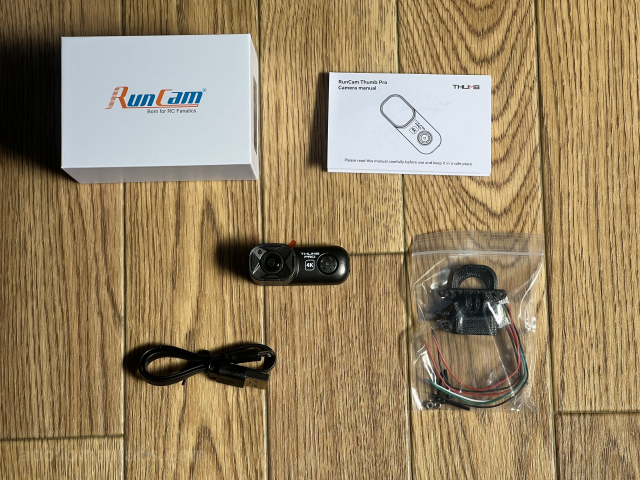 This photo shows a package and a set of bundled items.
From left to right, the top row is the packaging box and
user's manual (English/Chinese)
.
The middle row is micro USB Type-B cable, camera, a set of TPU mount, wiring cable, screw.
The user's manual is available for download in PDF format from
download page
.
This photo shows a package and a set of bundled items.
From left to right, the top row is the packaging box and
user's manual (English/Chinese)
.
The middle row is micro USB Type-B cable, camera, a set of TPU mount, wiring cable, screw.
The user's manual is available for download in PDF format from
download page
.
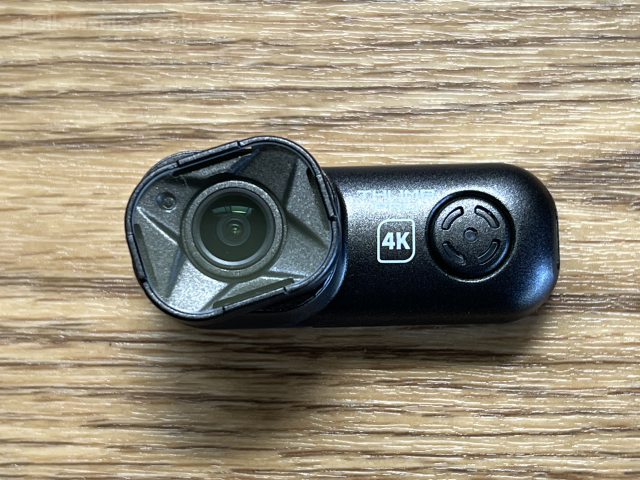
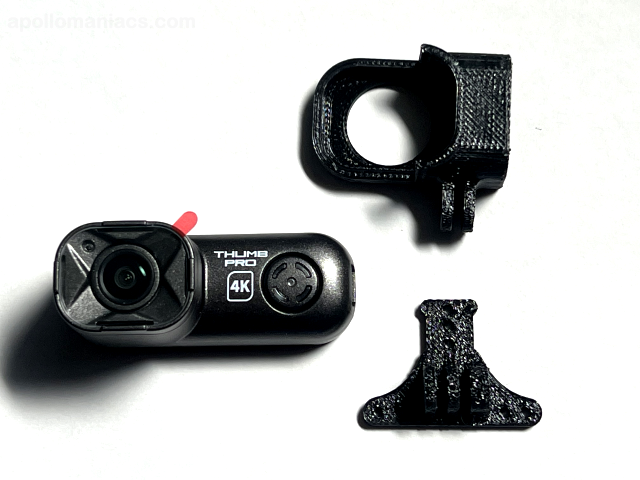 This is an enlarged photo of the camera and the included TPU mount.
The round part to the right of the lens is the power/shutter button. The central part of the button is an indicator lamp.
The TPU mount has several holes for mounting. Details such as dimensions of camera body and mount are displayed at the bottom of official site page.
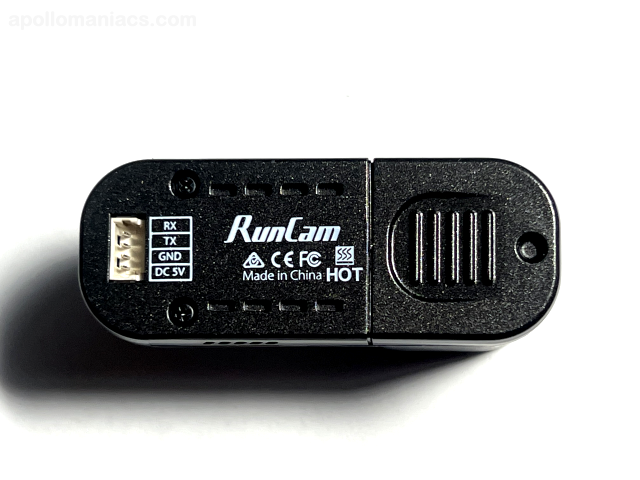 This photo shows the back of the camera body.
The connector is a Micro JST (1.25mm pitch) 4-pin connector.
This photo shows the back of the camera body.
The connector is a Micro JST (1.25mm pitch) 4-pin connector.
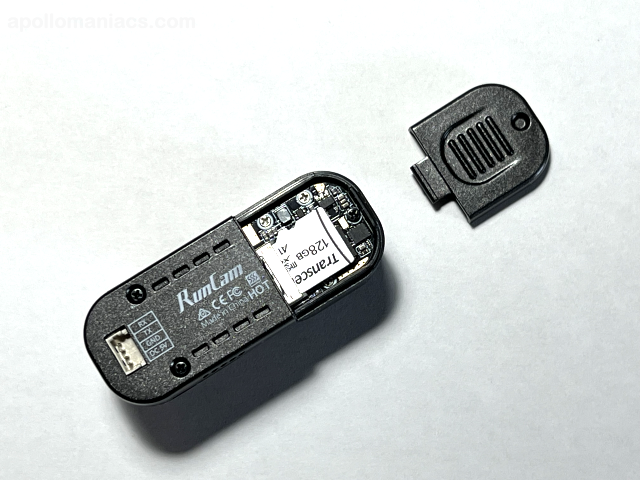 When you slide the back cover open, there is a microSD card slot inside.
Insert the microSD card with the label side facing the back and the terminal side facing the lens, and insert only the terminal part.
When you slide the back cover open, there is a microSD card slot inside.
Insert the microSD card with the label side facing the back and the terminal side facing the lens, and insert only the terminal part.
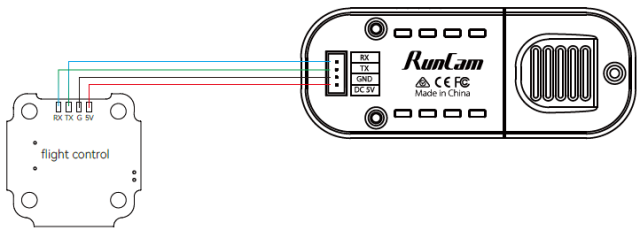 Pin arrangement is RX, TX, GND, DC5V from the top.
The camera can be used by connecting at least GND and DC5V.
Only 5V power supply is supported.
It cannot be directly connected to a battery of 2S or higher.
Pin arrangement is RX, TX, GND, DC5V from the top.
The camera can be used by connecting at least GND and DC5V.
Only 5V power supply is supported.
It cannot be directly connected to a battery of 2S or higher.
(Image quoted from RunCam Thumb Pro camera manual)
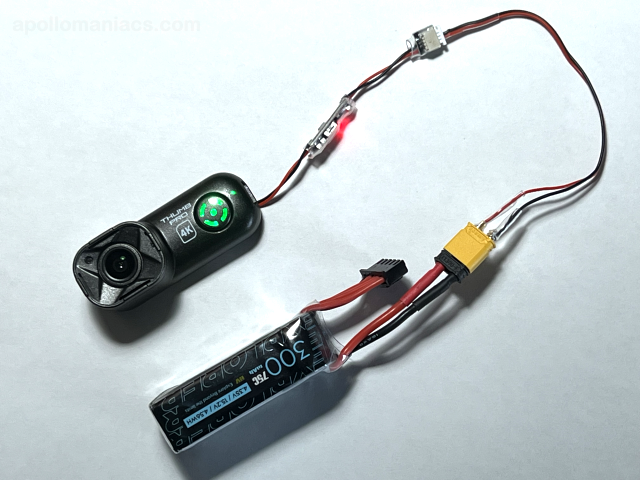
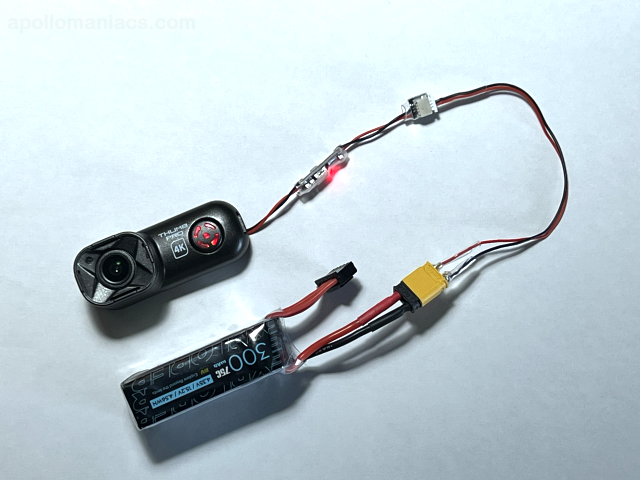 If you use the separately sold
RunCam Thumb Pro Camrea Adapter Cable (Flywoo)
, you can directly connect a 2S-6S battery as shown in this photo.
If you use the separately sold
RunCam Thumb Pro Camrea Adapter Cable (Flywoo)
, you can directly connect a 2S-6S battery as shown in this photo.
In this photo, a 5PCS Power Cable For GP9/GP10/GP11 (Flywoo) with yellow XT30 connectors is connected between the Camrea Adapter Cable and battery.
The Camrea Adapter Cable connector format is JST-SH (1.0mm pitch) 3 pin.
If you use it in this configuration without mounting on your drone, please use a fan to cool it down. Otherwise, thermal runaway may occur.
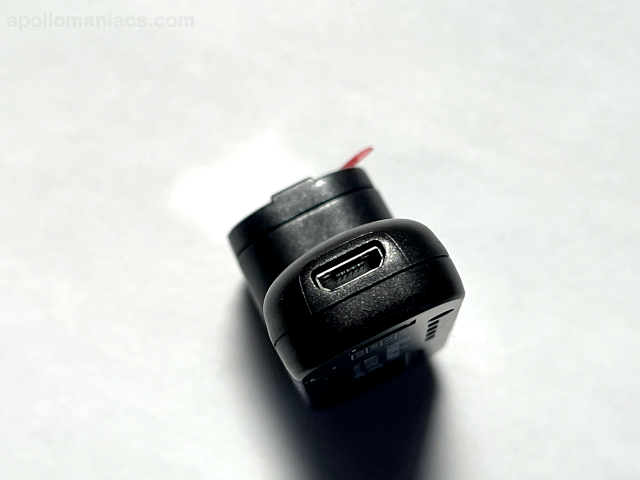 There is a micro USB Type-B connector on the side of the camera body.
When connected to a computer, the camera will be recognized as a USB memory and you can directly retrieve the recorded video.
You can also use it as a web camera by clicking the camera button while connected to your computer.
Do not connect the battery to the camera when connecting it to a computer with a USB cable.
There is a micro USB Type-B connector on the side of the camera body.
When connected to a computer, the camera will be recognized as a USB memory and you can directly retrieve the recorded video.
You can also use it as a web camera by clicking the camera button while connected to your computer.
Do not connect the battery to the camera when connecting it to a computer with a USB cable.
Replace lens filter
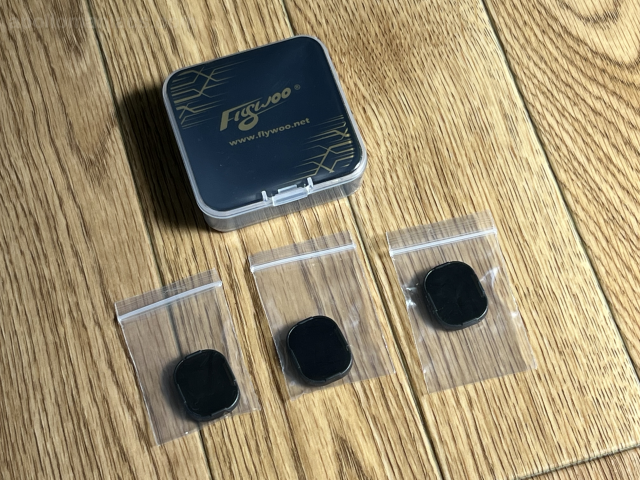 A dedicated
ND filter set and lens protector (RunCam)
are available for RunCam Thumb Pro (sold separately).
The ND filter set includes ND8, ND16, and ND32.
A dedicated
ND filter set and lens protector (RunCam)
are available for RunCam Thumb Pro (sold separately).
The ND filter set includes ND8, ND16, and ND32.
 To replace the filter, first remove the attached lens protector.
Twist the lens counterclockwise to remove it.
To replace the filter, first remove the attached lens protector.
Twist the lens counterclockwise to remove it.
 After removing the lens protector, it looks like this.
Align the filter tab with the groove on the camera side, insert it, and turn it clockwise to fix it.
After removing the lens protector, it looks like this.
Align the filter tab with the groove on the camera side, insert it, and turn it clockwise to fix it.
MicroSD card for RunCam Thumb Pro Camera
Maximum bit rate of RunCam Thumb Pro Camera is about 60Mbps. To record 4K 30fps video, you need a microSD card with UHS Class 3 (U3), Video Class 30 (V30), UHS-I or higher performance. Prepare a microSD card withPlease note that some models of the same series of microSD cards do not support U3 depending on the capacity.
Shooting for 4 minutes at a bit rate of 60 Mbps consumes 14.4 GB. To store 4K resolution video for 10 flights (about 40 minutes), you need about 144GB of capacity. The maximum capacity supported by RunCam Thumb Camera is 256GB.
How to record video
Turn on the camera
Connect camera (drone) to the battery and wait a few seconds for the camera to power on. Camera's LED will turn solid red. If the LED is flashing red quickly, an SD card error has occurred. Possible reasons include no card, card full, card speed slow, or card damaged. Check if the SD card is set correctly.
Start / end of recording
Press the power/shutter button to start recording. LED flashes red slowly.
Press the power/shutter button during recording to stop recording. The LED will turn solid red.
If you press and hold the power / shutter button while recording is stopped, the camera will stop. The LED turns off.
Note: If you remove battery during recording or continue recording until battery is empty, you will end up with unplayable files. Be sure to press record button to stop recording before turning off the power or removing the battery.
Remote control
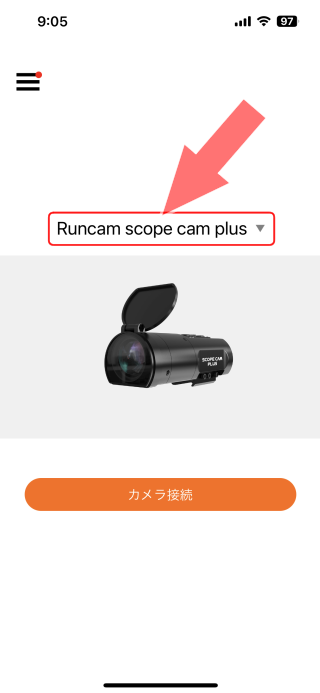
By using RunCam App app installed on your smartphone, you can make settings such as shooting mode by reading QR code displayed on the smartphone screen. RunCam Thumb Pro does not have a Wi-Fi function, so it cannot be directly connected to a smartphone. For details, please refer to Connect with RunCam App, Set shooting mode, Remote control .
Image stabilization
RunCam Thumb Pro records the vibration of the camera measured by gyro sensor during video shooting in a text file in ".gcsv" format. Loading this along with the video file into a tool called GyroFlow can eliminate camera shake.
Install the RunCam App
RunCam action cameras can be controlled with RunCam App. Install RunCam App on your smartphone.However, RunCam Thumb Pro does not have Wi-Fi functionality. Therefore, you cannot start/stop recording or preview the video remotely. You can set the shooting mode by reading the settings QR code displayed on your smartphone using the app into the camera.
-
RunCam App
CAMERA2000 LIMITED Photo / video free
By connecting the camera via WiFi, you can: * Capture videos/photos with a variety of shooting modes. * Adjust the camera parameters and preview in real time. * Play/Download videos/photos. * Record in landscape and preview in full screen. * Update firmware through App. * Set all camera parameters.
view details (App Store)
Connect with RunCam App, Set shooting mode, Remote control
 Open
Open
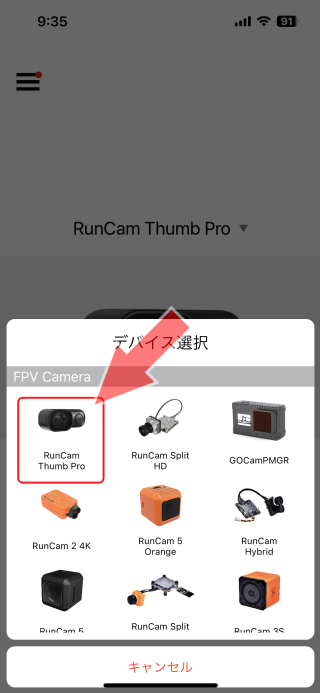 A list of products is displayed.
Tap "RunCam Thumb Pro".
A list of products is displayed.
Tap "RunCam Thumb Pro".
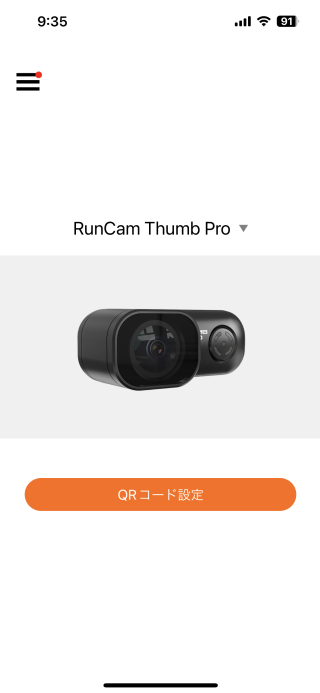 The screen will look like this.
Tap "QR code setting".
The screen will look like this.
Tap "QR code setting".
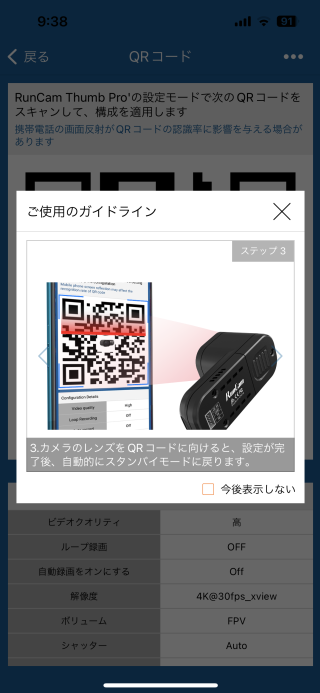
 Then the screen will look like this.
After entering and changing various parameters on this screen, tap "Generate QR code" at the bottom of the screen to display QR code on the smartphone screen.
Then the screen will look like this.
After entering and changing various parameters on this screen, tap "Generate QR code" at the bottom of the screen to display QR code on the smartphone screen.
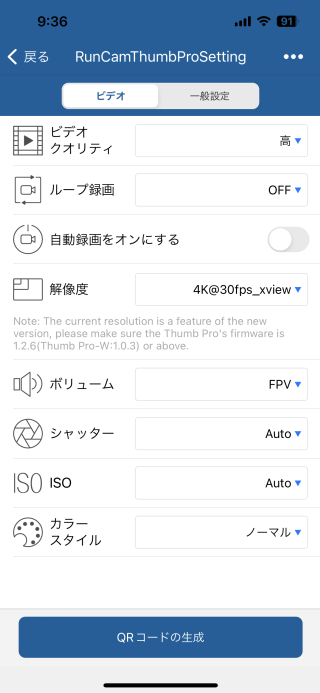
This is "Video" setting screen. Other settings can be made by tapping "General Settings" at the top of the screen.
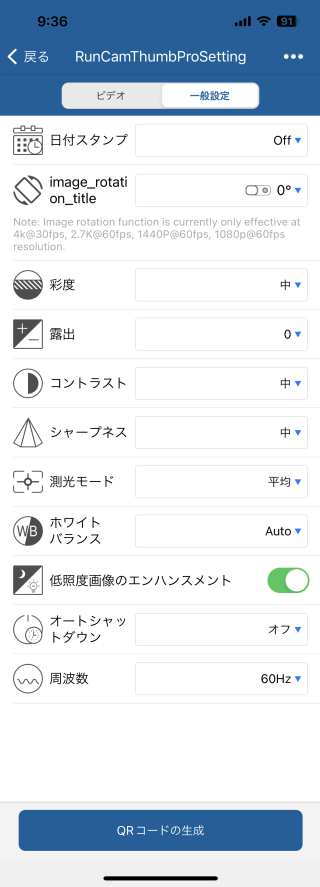 In "General Settings", such setting items can be specified.
 Tap
Tap
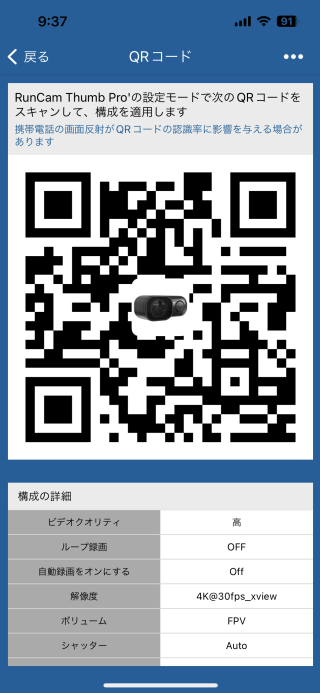 After specifying the parameters, tap "Generate QR code" and you will see a screen like this.
 Next, start RunCam Thumb Pro.
If you use the separately sold RunCam Thumb Pro Camrea Adapter Cable (Flywoo) , you can directly connect a 2S-6S battery as shown in this photo.
Quickly double-click the power/shutter button to switch to parameter setting mode (green light steady on).
 Let RunCam Thumb Pro read the QR code displayed on the smartphone screen.
Once the reading is complete, the camera will return to shooting mode (red light steady on).
Let RunCam Thumb Pro read the QR code displayed on the smartphone screen.
Once the reading is complete, the camera will return to shooting mode (red light steady on).
Firmware version confirmation/version upgrade
Version confirmation
A file named "version.txt" is stored in the root of the microSD card set in RunCam Thumb Pro. If you open this with a text editor, etc., you can see the version of the firmware. It is written like "ThumbPW:V1.0.4".
Version upgrade
You can download the latest firmware from RunCam site. Unzip the downloaded file (7-Zip format) to obtain a firmware file with a file name such as "ThumbPW.BRN". Copy this to the root of the microSD card, set it in the camera, and turn on the power of the camera to perform the version upgrade.
The camera LED flashes green while the version is being updated. When the upgrade is finished, LED will turn off and the power of the camera will be turned off. There are two types of firmware, one for original model with FOV 145 degrees and one for NEW (V2) model (RunCam Thumb Pro-W) with FOV 155 degrees .
RunCam Thumb Pro Camera specifications
| item | description |
|---|---|
| Video resolution |
4K@30fps, 2.7K@60fps, 1440P@60fps, 1080P@60/120fps |
| Sensor | IMX577(12MP) |
| F.O.V | OLD VERSION 145°,NEW VERSION 155° |
| Video format | MP4 |
| Gyro | Bulit-in |
| Communication Interface | Micro USB |
| Micro SD Card Capacity | 256G Max |
| USB Power Input/ Terminal Power Supply | DC 5.0V |
| Remote Control | Uart |
| Power Consumption | 500mA@5V Max |
| Dimension | 54mm*25.5mm*21mm |
| Net Weight | 16g |
| Resolution | Video Quality | Codec | ||
|---|---|---|---|---|
| High | Medium | Low | ||
| 4K@30fps | 60Mbps | 50Mbps | 40Mbps | H.264 |
| 2.7K@60fps | 60Mbps | 50Mbps | 40Mbps | |
| 1440P@60fps | 40Mbps | 30Mbps | 20Mbps | |
| 1080P@120fps | 60Mbps | 50Mbps | 40Mbps | |
| 1080P@60fps | 45Mbps | 30Mbps | 22Mbps | |