How to use RadioMaster TX16S Mark II
Here, we will introduce and explain how to use RadioMaster TX16S Mark II EdgeTX/OpenTX radio.
-
RadioMaster TX16S Mark II

RadioMaster 2022/04 USD199.99
On-board firmware:EdgeTX(OpenTX)
Improved internal circuity and optimized power supply. New charge circuitry with integrated reverse-polarity protection. Optimized charge IC now allows up to 2.2A internal USB-C charge current. Rear mounted audio jack provided headphone output.

 (US)
(UK)
(US)
(UK)
Introducing RadioMaster TX16S Mark II
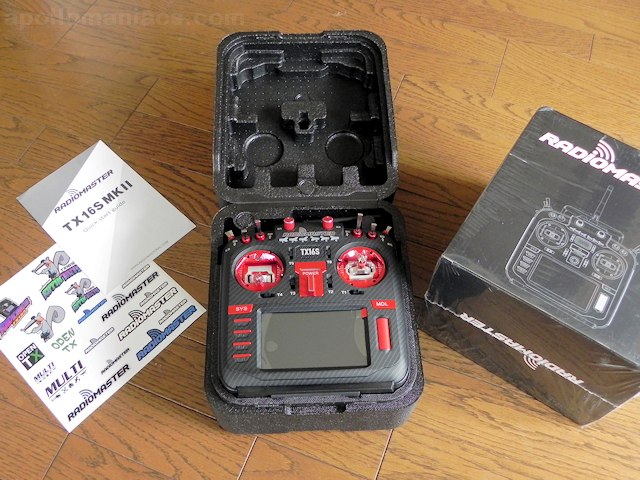 This is the package of RadioMaster TX16S Mark II.
Open cool black box and you'll see the RadioMaster TX16S Mark II in a black case.
The material of the case is similar to Styrofoam, but it is denser, firmer and more elastic.
It can be used as a carrying case as it is, but it is slightly oversized compared to the size of radio body.
You can buy
Foam Box Zipper Cover (RadioMaster)
to use it as a carrying case.
Battery is sold separately, but if you order it at the same time as you purchase radio, it will arrive in the battery bay of the radio.
This is the package of RadioMaster TX16S Mark II.
Open cool black box and you'll see the RadioMaster TX16S Mark II in a black case.
The material of the case is similar to Styrofoam, but it is denser, firmer and more elastic.
It can be used as a carrying case as it is, but it is slightly oversized compared to the size of radio body.
You can buy
Foam Box Zipper Cover (RadioMaster)
to use it as a carrying case.
Battery is sold separately, but if you order it at the same time as you purchase radio, it will arrive in the battery bay of the radio.
 There are two product variations of RadioMaster TX16S Mark II, 4-in-1 and
ExpressLRS (ELRS)
, depending on the type of built-in transmitter.
Furthermore, there are many versions such as
Normal version
,
Max version
,
Max Pro version
,
Customized version
, etc. due to the difference in exterior.
The cheapest model is USD 199.99 Normal version, and the highest model is USD 549.99.
There is a wide range of prices.
However, these differences are mainly in the exterior design and finish.
The functions and performance are the same for all models.
There are two product variations of RadioMaster TX16S Mark II, 4-in-1 and
ExpressLRS (ELRS)
, depending on the type of built-in transmitter.
Furthermore, there are many versions such as
Normal version
,
Max version
,
Max Pro version
,
Customized version
, etc. due to the difference in exterior.
The cheapest model is USD 199.99 Normal version, and the highest model is USD 549.99.
There is a wide range of prices.
However, these differences are mainly in the exterior design and finish.
The functions and performance are the same for all models.
I chose the Max version equipped with 4-in-1 transmitter and beautiful metallic red "Carbon Fiber Red" model. It's list price is USD 249.99. And I added optional luxury gimbal AG01 CNC Hall gimbal (RadioMaster). , then total price becomes USD379.99.
Official site has a lot of repair parts and customized parts (RadioMaster) for TX16S. So it seems that I can continue to use this radio for a long time after purchase.
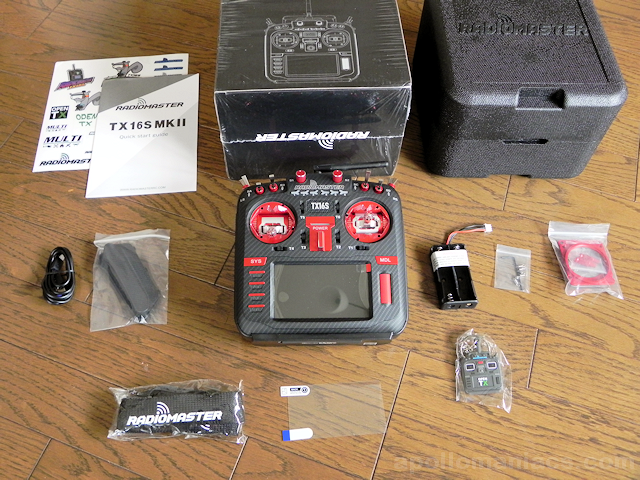 This photo shows the list of items included with RadioMaster TX16S Mark II.
From the top left, sticker, quick start guide, packing box, and case.
From the middle left, USB-C cable, optional grip, radio, battery box for 18650 type LiPo battery, tension spring and Allen key for gimbal, front panel for original gimbal (V4.0 Hall).
From the bottom left, strap, screen protection film, TX16S key chain.
A microSD card with a capacity of 256MB is pre-installed on the body.
Just order battery with it and you're ready to go.
This photo shows the list of items included with RadioMaster TX16S Mark II.
From the top left, sticker, quick start guide, packing box, and case.
From the middle left, USB-C cable, optional grip, radio, battery box for 18650 type LiPo battery, tension spring and Allen key for gimbal, front panel for original gimbal (V4.0 Hall).
From the bottom left, strap, screen protection film, TX16S key chain.
A microSD card with a capacity of 256MB is pre-installed on the body.
Just order battery with it and you're ready to go.
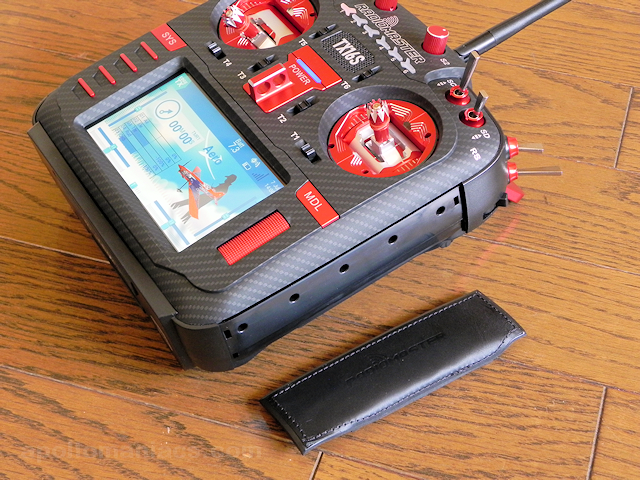
A protective film is attached to the screen. Before you start using it, pull on the red tab to remove the protective film. In addition, since the screen is installed in a deep position, it is difficult to attach screen protection film, which is not very practical.
Quick Start Guide and more detailed Manual can also be downloaded from RadioMaster official site .
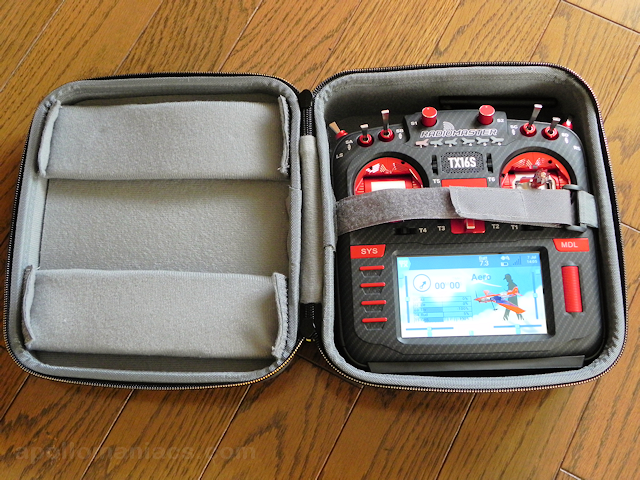 This photo is
RadioMaster original carrying case (RadioMaster)
sold separately.
It's the perfect size, and you can carry the radio in the minimum size.
However, to fit in this case, back handle must be foldable.
CNC Metal Folding Handle (RadioMaster)
that comes with the Max version is foldable, so it fits perfectly in this case.
This photo is
RadioMaster original carrying case (RadioMaster)
sold separately.
It's the perfect size, and you can carry the radio in the minimum size.
However, to fit in this case, back handle must be foldable.
CNC Metal Folding Handle (RadioMaster)
that comes with the Max version is foldable, so it fits perfectly in this case.
Large carrying case (RadioMaster) that can hold radio and some accessories is also on sale.
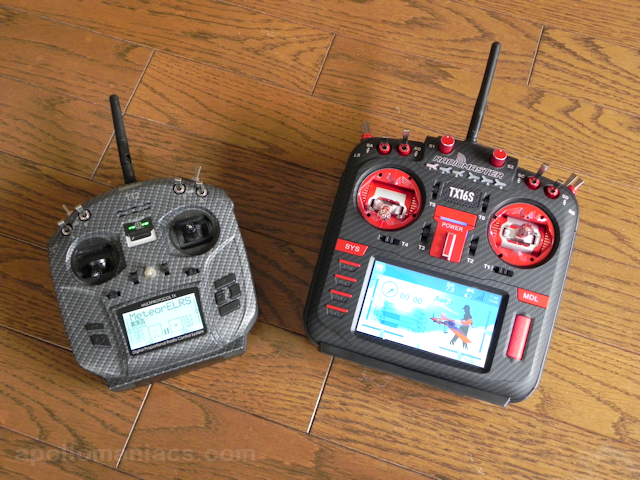
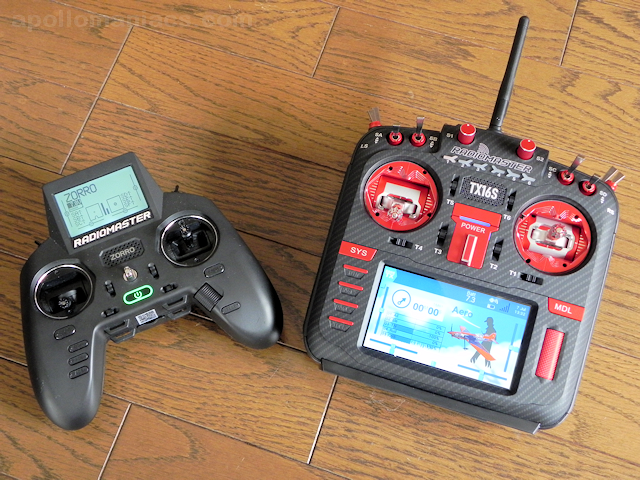 This is a comparison with
RadioMaster Zorro
.
It is larger than RadioMaster Zorro and weighs 736g (excluding battery), so you can feel the weight firmly.
Size of gimbals are also large, and the installation interval is about 1cm wider.
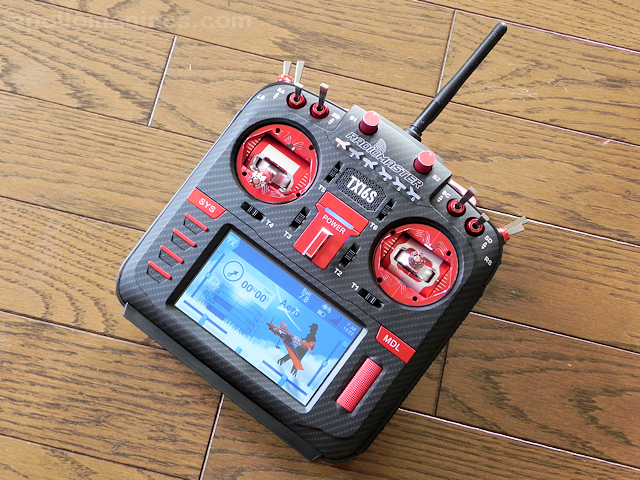
LCD touch display has a high resolution (480 x 272 pixels) and is 4.3 inches in size.
This display is bright in color and has good visibility and touch operability.
This is a comparison with
RadioMaster Zorro
.
It is larger than RadioMaster Zorro and weighs 736g (excluding battery), so you can feel the weight firmly.
Size of gimbals are also large, and the installation interval is about 1cm wider.
LCD touch display has a high resolution (480 x 272 pixels) and is 4.3 inches in size.
This display is bright in color and has good visibility and touch operability.
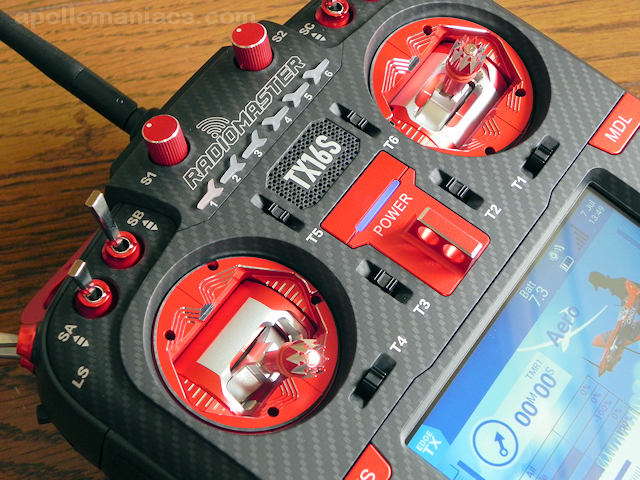
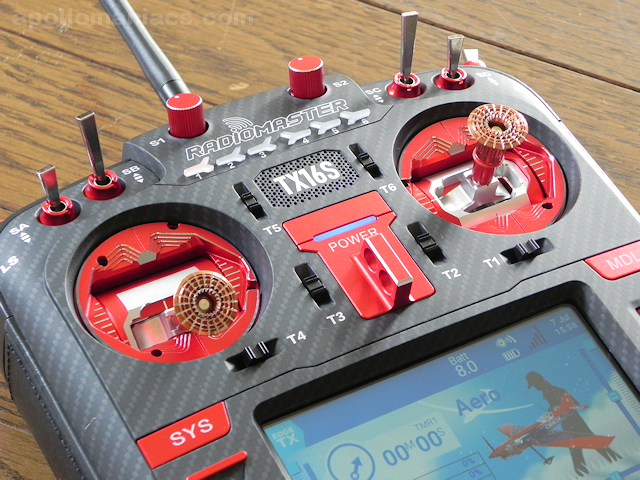
There are power button and indicator lamp shining blue above the word "POWER" in the center. To the left and right of power button are trim switches . There are 6 trim switches, 4 for sticks, and 2 for fine-tuning any channel.
In addition, the six arrow-shaped white buttons lined up in a horizontal row under the "RADIO MASTER" logo in the upper center are 6-position switches.
 This is a comparison with
Jumper T12 Pro
. It's bigger and heavier than Jumper T12 Pro, but overall it's solid and luxurious.
Similar to the comparison with RadioMaster Zorro, size of the gimbal is large and installation interval is about 1cm wider.
The difference in LCD display size is also obvious.
This is a comparison with
Jumper T12 Pro
. It's bigger and heavier than Jumper T12 Pro, but overall it's solid and luxurious.
Similar to the comparison with RadioMaster Zorro, size of the gimbal is large and installation interval is about 1cm wider.
The difference in LCD display size is also obvious.
 Pre-installed firmware is EdgeTX 2.6.0.
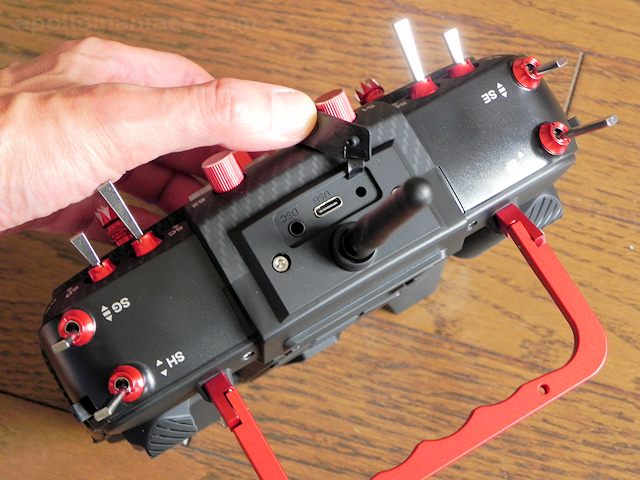 Inside rubber cover on the top, there is a DSC port for trainer mode and a USB Type-C connector for connecting to a PC.
Antenna cannot be removed. It can only be folded. Removable antenna (RadioMaster) is also available as an option, but the antenna must be installed before turning on the radio.
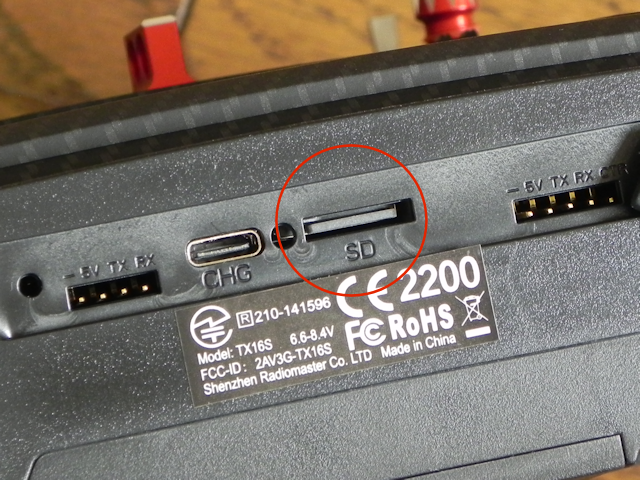
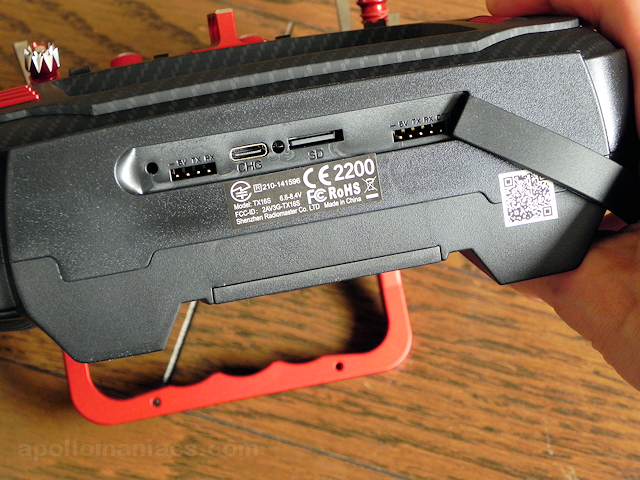 Inside rubber cover on the bottom, there is a USB Type-C connector for charging battery, a microSD card slot, and two UART ports on the left and right.
UART ports are directly connected to built-in MCU and can be used to add hardware or update transceiver / receiver firmware.
Japanese TELEC certification
is printed on the affixed label.
Inside rubber cover on the bottom, there is a USB Type-C connector for charging battery, a microSD card slot, and two UART ports on the left and right.
UART ports are directly connected to built-in MCU and can be used to add hardware or update transceiver / receiver firmware.
Japanese TELEC certification
is printed on the affixed label.
In addition, QR code pasted here seems to point to official site of RadioMaster, but the site cannot be opened because URL is incorrect ...
AG01 CNC Hall Gimbal
 For the gimbal, I have selected optional
AG01 CNC Hall gimbal (RadioMaster).
A set of two costs USD 129.99, which is the price you can buy one radio.
For the gimbal, I have selected optional
AG01 CNC Hall gimbal (RadioMaster).
A set of two costs USD 129.99, which is the price you can buy one radio.
This gimbal has been developed for over a year with engineers and FPV champion pro-pilots from around the world. All parts are CNC machined from aluminum, and ball bearings provide a smooth and accurate feel.
 Gimbal is the key part of the radio.
Flying FPV drones, in particular, puts a lot of force and abuse on the gimbal, so the all-metal AG01 gimbal is safe to use.
Gimbal is the key part of the radio.
Flying FPV drones, in particular, puts a lot of force and abuse on the gimbal, so the all-metal AG01 gimbal is safe to use.
 The screw diameter of the stick end is 4 mm.
Be careful when replacing.
You can use
M4 Lotus aluminum gimbal stick end for FrSky (banggood)
in the photo.
The screw diameter of the stick end is 4 mm.
Be careful when replacing.
You can use
M4 Lotus aluminum gimbal stick end for FrSky (banggood)
in the photo.
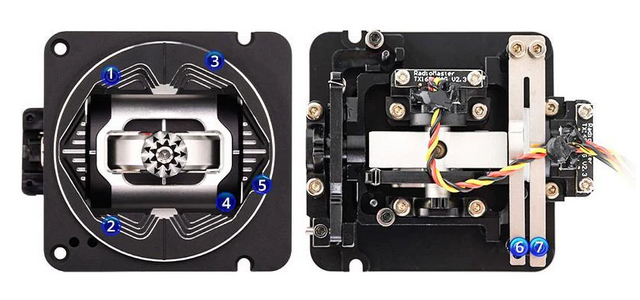 This gimbal can be adjusted as follows by simply turning screws.
(Image quoted from RadioMaster official site)
- STICK TRAVEL LIMITER (Min.38°,Max,54°)
- Turning screw 1/2 clockwise reduces the amount of movement of the stick, and turning it counterclockwise increases it.
- SPRING TENSION ADJUSTABLE
- Turning screw 3/4 clockwise increases the spring tension of the stick, and turning it counterclockwise decreases it. Screw 3 is for horizontal adjustment, and screw 4 is for vertical adjustment. Screw 4 is recessed in the rotating part of the gimbal and cannot be adjusted without straightening the stick. Mine was too stiff at the initial settings, so I turned the screw counterclockwise 3-4 times and it was just right.
- GIMBAL MODE SETTING
- Turn clockwise to the bottom to switch to throttle mode (without spring), and turn counterclockwise to the top to switch to stick self centering.
- THROTTLE TENSION ADJUSTABLE
- You can adjust the throttle tension with screw 6 and the throttle scale with screw 7.
-
RadioMaster AG01 CNC Hall Gimbals for TX16S
RadioMaster 2022-06-01 USD129.99
The AG01 is fully CNC milled for ultimate precision with quad ball bearings for a smooth and precise feel. Featuring front accessible tension and travel adjustment for easy fine tuning. The AG01 will take your TX16s to the next level.
(US)
(UK)
Battery setting and charging
 RadioMaster TX16S Mark II has a large battery bay (width approx. 52mm x height approx. 95mm x depth approx. 25mm) on the back.
It has a standard 3-pin JST-XH connector and can be fitted with 2S LiPo battery.
RadioMaster's genuine battery (RadioMaster)
is a pack of two 21700 type Li-ion batteries and has a large capacity of 5,000mAh.
Two 18650 type lithium-ion batteries can be set in the battery box that comes with the radio.
RadioMaster TX16S Mark II has a large battery bay (width approx. 52mm x height approx. 95mm x depth approx. 25mm) on the back.
It has a standard 3-pin JST-XH connector and can be fitted with 2S LiPo battery.
RadioMaster's genuine battery (RadioMaster)
is a pack of two 21700 type Li-ion batteries and has a large capacity of 5,000mAh.
Two 18650 type lithium-ion batteries can be set in the battery box that comes with the radio.
Only 2S-7.4V lithium-ion batteries can be used. LiFE batteries cannot be used.
 This radio has a function to charge battery.
Use USB Type-C cable to connect commercially available USB AC adapter to the connector at the bottom of the radio.
Then, power lamp lights up in green like this, and battery charging starts.
When charging is complete, the lamp will turn off.
This radio has a function to charge battery.
Use USB Type-C cable to connect commercially available USB AC adapter to the connector at the bottom of the radio.
Then, power lamp lights up in green like this, and battery charging starts.
When charging is complete, the lamp will turn off.
However, TX16S does not support the USB PD standard. It is necessary to charge using a Type-A to Type-C cable from an AC adapter with a USB Type-A connector.
There is also a USB Type-C connector on the top of the body, but this is for connecting to PC. You cannot charge battery with this connector.
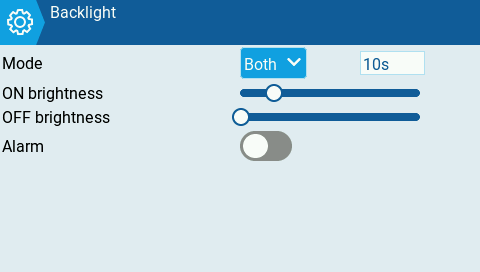 This radio consumes a lot of power because the display is a large and bright color LCD, and the default setting is always on at maximum illuminance.
To reduce power consumption, open
RADIO SETUP screen
of RADIO (SYSTEM) menu, in "Backlight" section,
set "Mode" field to "Both", "Duration" field to "10s", and "ON brightness" field to about 10% and "OFF brightness" field to about 1%.
This radio consumes a lot of power because the display is a large and bright color LCD, and the default setting is always on at maximum illuminance.
To reduce power consumption, open
RADIO SETUP screen
of RADIO (SYSTEM) menu, in "Backlight" section,
set "Mode" field to "Both", "Duration" field to "10s", and "ON brightness" field to about 10% and "OFF brightness" field to about 1%.
Module bay and Grips
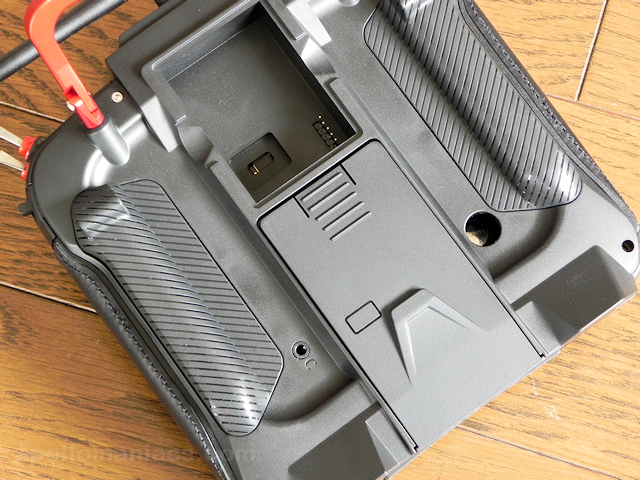 MICRO module bay (JR / SLIM module bay) will appear when you remove back cover.
Also, there is a headphone jack on the left of battery bay, and you can see backup battery (RTC battery) by removing round cap on the right, but this is not a hole for replacing the backup battery.
Optional switch (RadioMaster)
can be added to this hole.
MICRO module bay (JR / SLIM module bay) will appear when you remove back cover.
Also, there is a headphone jack on the left of battery bay, and you can see backup battery (RTC battery) by removing round cap on the right, but this is not a hole for replacing the backup battery.
Optional switch (RadioMaster)
can be added to this hole.
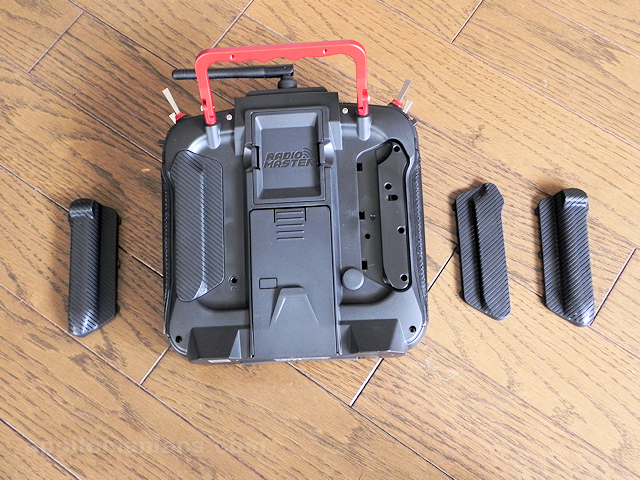 Grips on the back of the radio are replaceable.
Initially, tall (Raised) type grip is attached.
It can be replaced with short (Flat) type grip that comes with radio.
Grips on the back of the radio are replaceable.
Initially, tall (Raised) type grip is attached.
It can be replaced with short (Flat) type grip that comes with radio.
 Leather side grips on the side of radio are also replaceable.
You can buy
different colored grips (RadioMaster)
on official site.
Leather side grips on the side of radio are also replaceable.
You can buy
different colored grips (RadioMaster)
on official site.
Preparation of microSD card
 RadioMaster TX16S Mark II comes pre-installed with a 256MB microSD card with EdgeTX data written on it.
It also contains Lua scripts for ELRS version 1 and 2.
MicroSD card slot will appear when you remove the rubber cover on the bottom of body.
Insert the card face down (card terminal side faces to front side of the radio, label side faces to back side of the radio).
RadioMaster TX16S Mark II comes pre-installed with a 256MB microSD card with EdgeTX data written on it.
It also contains Lua scripts for ELRS version 1 and 2.
MicroSD card slot will appear when you remove the rubber cover on the bottom of body.
Insert the card face down (card terminal side faces to front side of the radio, label side faces to back side of the radio).
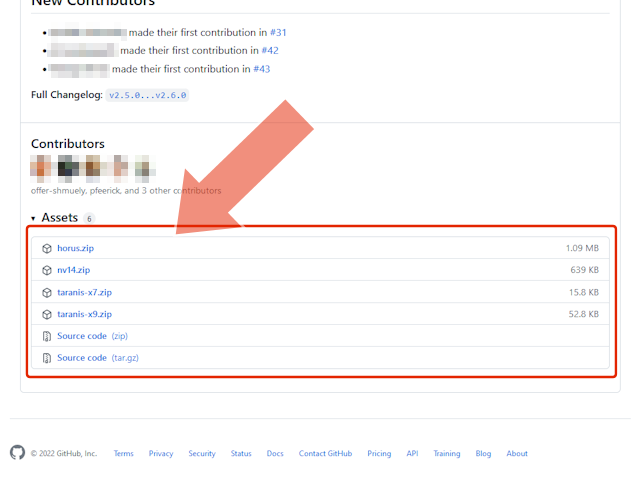 If the capacity is insufficient and you need to replace with a new SD card, or if you need to upgrade EdgeTX version, download SD card image from
EdgeTX SD card image release page (GitHub).
(RadioMaster's radios only supports up to 8GB, but 16GB could be used.)
If the capacity is insufficient and you need to replace with a new SD card, or if you need to upgrade EdgeTX version, download SD card image from
EdgeTX SD card image release page (GitHub).
(RadioMaster's radios only supports up to 8GB, but 16GB could be used.)
For the procedure to prepare the microSD card, see How to prepare microSD card for EdgeTX radio .
Screen navigation
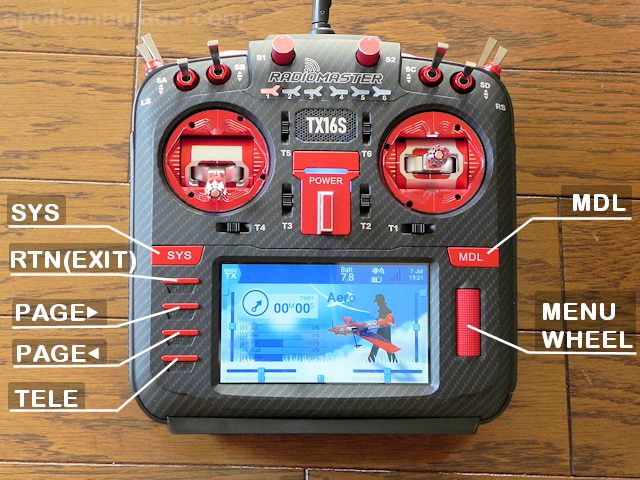 To operate EdgeTX with RadioMaster TX16S Mark II, use the switches shown in the figure.
The operations and functions are shown in the table below.
To operate EdgeTX with RadioMaster TX16S Mark II, use the switches shown in the figure.
The operations and functions are shown in the table below.
Alternatively, you can operate it by touching the touch panel with your finger. Tap icons to bring up functions, and drag or flick screen up or down to scroll.
| Name of control | Function | Description |
|---|---|---|
| ENTER | Decide / Confirm | Confirm the change / input. Or select an item. In RadioMaster TX16S Mark II, clicking the bottom of [MENU WHEEL] works as an [ENTER] button. |
| EXIT/RETURN | Cancel / Back | Cancel the change / input. Or return to the previous screen. |
| PAGE | Screen switching | In the setting screen consisting of multiple pages, move to the next page / previous page. Click [PAGE>] key to switch to the next page, and click the [PAGE<] key to switch to the previous page. |
| CURSOR | Move cursor / selected position | Move the cursor. In RadioMaster TX16S Mark II, turn [MENU WHEEL] to move cursor. |
| MODEL/SYSTEM | Calling MODEL / RADIO menu | Call the MODEL / RADIO(SYSTEM) menu. Click [MDL] key to call MODEL menu, and click [SYS] key to call RADIO (SYSTEM) menu. |
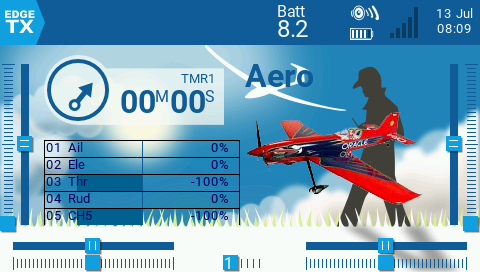 This is main screen of radio.
At the top of the screen is menu bar, which shows radio's battery voltage, speaker volume, RSSI bar graph, date and time.
This is main screen of radio.
At the top of the screen is menu bar, which shows radio's battery voltage, speaker volume, RSSI bar graph, date and time.
In the center of the screen, value of Timer1 of selected MODEL is displayed in the upper left, Input Monitor screen that displays the current input status of sticks and switches as an illustration in the lower left, and the name of selected MODEL ("Aero" in this example screen) and image assigned to this MODEL are displayed.
At the edge of screen, LS, RS dial, throttle, and elevator trim status are displayed at the left and right edges, and S1, S2 dial, 6-position switch, ladder, and aileron trim status are displayed at the bottom edge.
These screen layouts can be changed in "Screens Settings" menu (below).
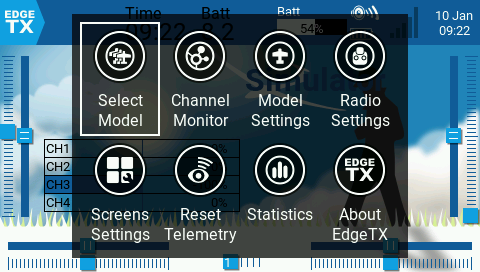 Press and hold scroll wheel (ENTER) on main screen, or tap empty area on the screen to display a menu like this.
You can scroll the menu by turning scroll wheel or dragging screen left or right.
Press and hold scroll wheel (ENTER) on main screen, or tap empty area on the screen to display a menu like this.
You can scroll the menu by turning scroll wheel or dragging screen left or right.
- Select Model
- You can select MODEL to flight. Displays MODELSEL screen. Press and hold [ENTER] (scroll wheel) on MODELSEL screen to create, copy, move, or delete MODEL.
- Channel Monitor (Output Monitor)
- Value of each channel output by radio (transmitter) is displayed as bar graphs.
- Model Settings
- Open setting screen (MODEL SETUP) of the currently selected MODEL.
- Radio Settings
- Open RADIO (SYSTEM) menu. TOOLS screen will open.
- Screens Settings
- Open layout setting screen of the main screen. You can also open this screen by pressing [TELE] key on the main screen.
- Reset Telemetry
- Resets telemetry information of the selected MODEL.
- Statistics
- The usage status of the radio so far is displayed.
- About EdgeTX
- The version of EdgeTX installed in radio is displayed. Scan QR code displayed here to open official EdgeTX site.
Switches
In addition, there are two unused connectors on main board inside the radio to which a two-position switch or dial (Potentiometer) can be connected. You can add your own switch or dial here.
| Name | Location | Type | Description |
|---|---|---|---|
| SA | Upper front of left hand | 3 position | |
| SB | |||
| SC | Upper front of right hand | ||
| SD | |||
| SE | Top left | ||
| SF | 2 position | ||
| SG | Top right | 3 position | |
| SH | Toggle (momentary) | ON only while pressing | |
| SI | Not connected | 2 position or potentiometer | There are connectors on the main board. |
| SJ | |||
| S1 | Upper front center | dial (Potentiometer) | There is a center detent. |
| S2 | |||
| LS | Upper left side | ||
| RS | Upper right side | ||
| 1~6 | Upper front center | 6 position | Only the last switch pressed will turn on. Not all switches can be turned off. The behavior is similar to function switch . |
RadioMaster TX16S Mark II related links
To know more about How to Fly Hobby Drone
To know more about iPhone