Installing and using Betaflight Configurator for beginners
Betaflight Configurator allows you to check and change FC (Flight Controller) settings of drones that use Betaflight as their firmware.
Here's how to install Betaflight Configurator on your Windows computer, how to use it, and some things that beginners should check first when they get a drone.
- Download Betaflight Configurator
- Install Betaflight Configurator
- Horizontal calibration and backup of settings
- Check channel map, connection status with radio
- Check functions assigned to each channel
- VTX transmission channel settings
- DShot Beacon (buzzer) settings
- Using CLI commands
- Tune PID and Rate profiles
- Update FC firmware : Version-up Betaflight
- Adjust your drone on your smartphone / tablet: use SpeedyBee
- Related links
Download Betaflight Configurator
Betaflight Configurator is distributed on Github.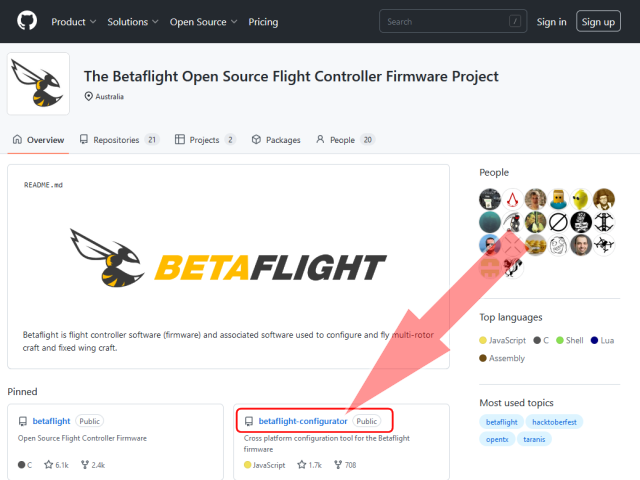 Open
Betaflight page
on Github.
A screen like this will appear, so click "betaflight-Configurator".
Not "betaflight".
Open
Betaflight page
on Github.
A screen like this will appear, so click "betaflight-Configurator".
Not "betaflight".
There is also a link called "betaflight-configurator-nightlies", but since this is a nightly build, so-called beta version, it may be unstable or contain bugs. This version is for developers, so please do not use it for general users.
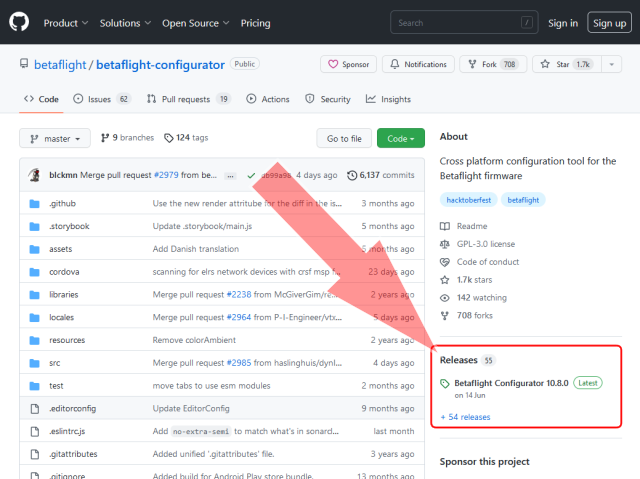 "betaflight-Configurator" page will open, so click "Releases" on the right side of the screen.
Also you can move to latest version of the page by clicking "Latest".
"betaflight-Configurator" page will open, so click "Releases" on the right side of the screen.
Also you can move to latest version of the page by clicking "Latest".
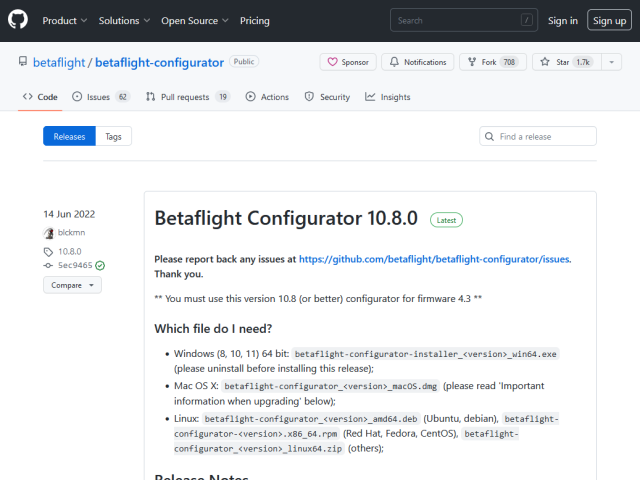 "betaflight-Configurator" release page
opens.
This screen allows you to download any version of betaflight-Configurator, including past versions.
At the top is the latest version.
"betaflight-Configurator" release page
opens.
This screen allows you to download any version of betaflight-Configurator, including past versions.
At the top is the latest version.
The version with "Release Candidate" written after the version number is the RC (Release Candidate) version. The RC version is under evaluation and may contain bugs. So general users should avoid using it as much as possible.
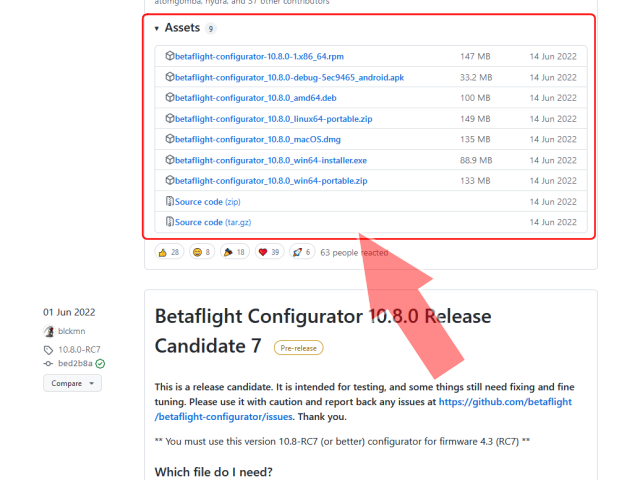 If you scroll this screen, in "Assets" column, there are download links for each OS.
Click this to download the installation module.
Please refer to table below and click link that matches your OS.
If you scroll this screen, in "Assets" column, there are download links for each OS.
Click this to download the installation module.
Please refer to table below and click link that matches your OS.
For Windows, click the file name ending with "_win64-Insaller.exe" or "_win64-portable.zip". If you use "_win64-Insaller.exe", you can install it just by following the instructions on the screen.
| OS | File name |
|---|---|
| Windows (8, 10, 11) | betaflight-configurator-[version]_win64-installer.exe |
| Mac OS X | betaflight-configurator_[version]_macOS.dmg |
| Ubuntu, debian | betaflight-configurator_[version]_amd64.deb |
| Red Hat, Fedora, CentOS | betaflight-configurator-[version].x86_64.rpm |
| Other Linux | betaflight-configurator_[version]_linux64-portable.zip |
| Android (Preview version) | betaflight-configurator-debug-[version]_android.apk |
Install Betaflight Configurator
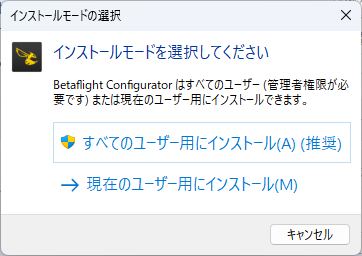 Double-click downloaded Betaflight Configurator installer "_win64-Insaller.exe" to start installation.
The first is to select an installation mode. Please choose according to your preference.
Double-click downloaded Betaflight Configurator installer "_win64-Insaller.exe" to start installation.
The first is to select an installation mode. Please choose according to your preference.
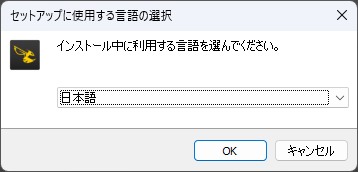 Next, select language to use for installation. Please select your preference.
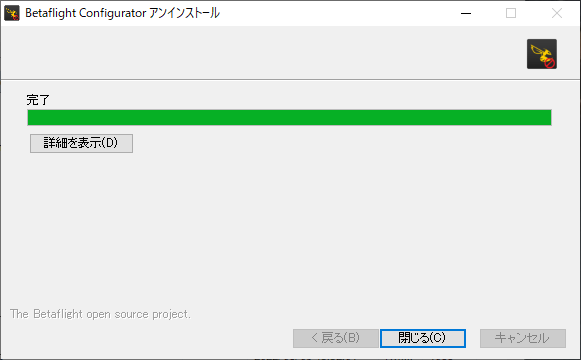 If you had an older version of Betaflight Configurator installed on your computer, the uninstaller will start.
When uninstallation is completed, a screen like this will appear.
Click "Close".
If you had an older version of Betaflight Configurator installed on your computer, the uninstaller will start.
When uninstallation is completed, a screen like this will appear.
Click "Close".
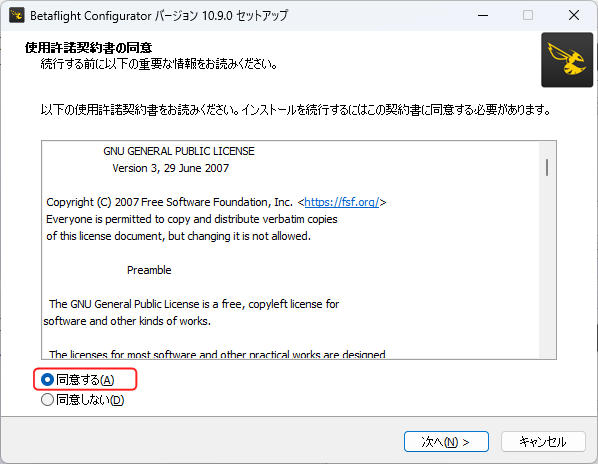 The license agreement screen for the software.
Select "Agree" and click "Next".
The license agreement screen for the software.
Select "Agree" and click "Next".
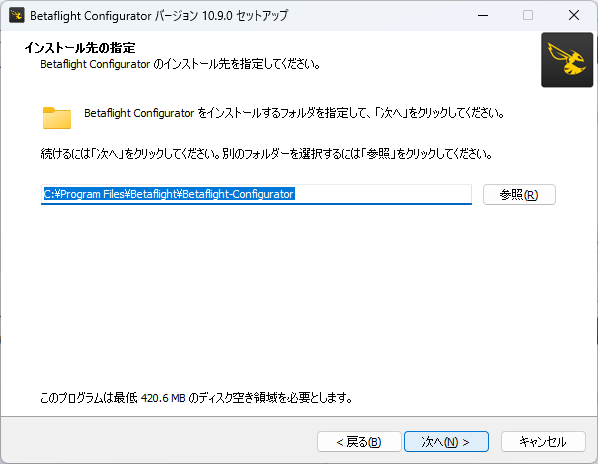 Then select installation folder.
You won't need to change anything.
Click "Next".
Then select installation folder.
You won't need to change anything.
Click "Next".
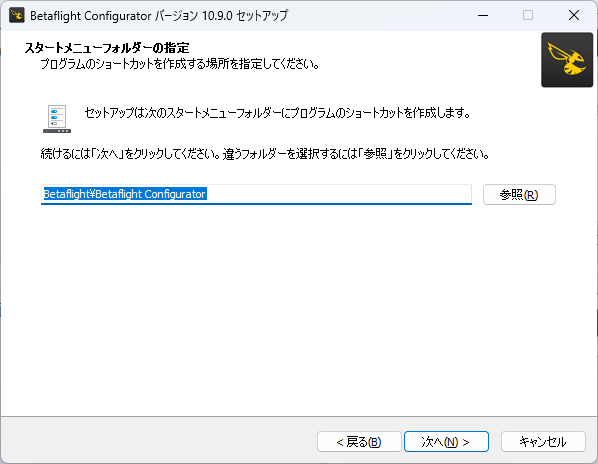 Then select Start Menu folder.
You won't need to change anything.
Click "Next".
Then select Start Menu folder.
You won't need to change anything.
Click "Next".
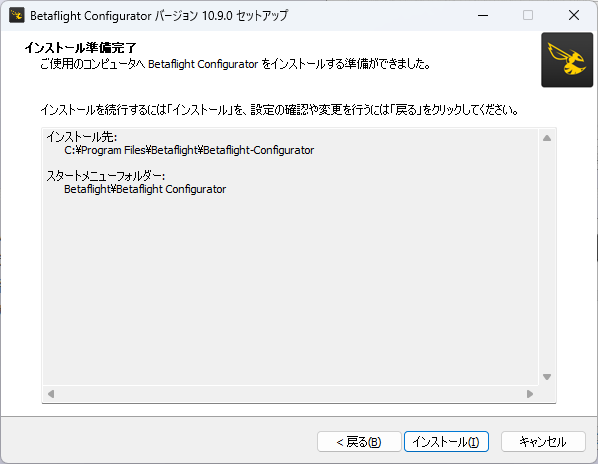 The screen will look like this.
Click "Install".
The screen will look like this.
Click "Install".
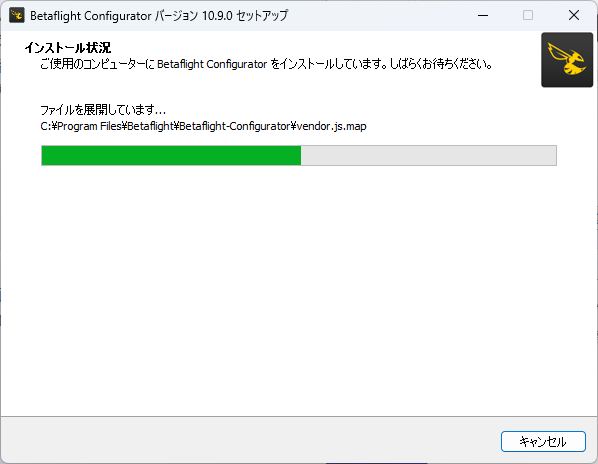 Installation will start.
It takes a few minutes to a dozen minutes to install.
Installation will start.
It takes a few minutes to a dozen minutes to install.
At the end of the installation, progress bar on the screen progresses very slowly, but if you leave it, installation will end soon.
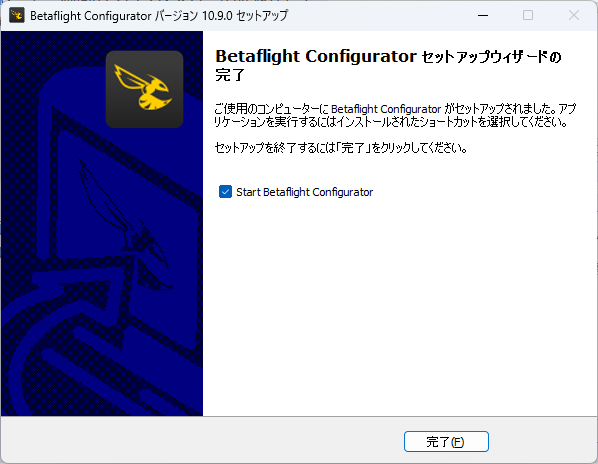 Installation is complete when a screen like this appears.
Click "Finish".
Installation is complete when a screen like this appears.
Click "Finish".
 Then Betaflight Configurator starts.
You can read and update drone information by connecting the drone equipped with Betaflight to your computer with USB cable and clicking "Connect" button at the top right of the screen.
Then Betaflight Configurator starts.
You can read and update drone information by connecting the drone equipped with Betaflight to your computer with USB cable and clicking "Connect" button at the top right of the screen.
Alternatively, if you turn on "Auto connect" switch at the top right of the screen, drone and computer will be connected simply by connecting the USB cable.
If you want to check or change the drone's settings without rotating the motor, there is no need to connect the battery to the drone. To run the motor, connect the battery first and then connect it to the computer.
There are two types of USB cables: "For data communication" where all terminals are connected, and "For charging" where only power supply terminals are connected. You need to use "For data communication" to communicate with Betaflight Configurator. Please note that some cables attached to bonus of mobile phone or charger, battery are "For charging".
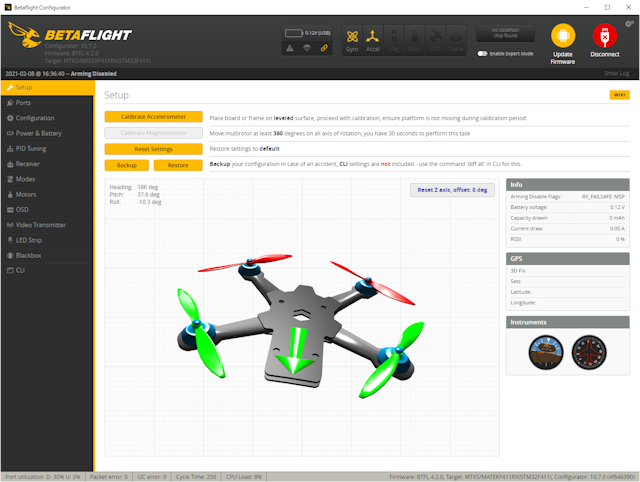 When drone is successfully connected, you will see a screen like this.
When you move the drone, 3DCG on the screen moves based on value of gyro sensor.
When drone is successfully connected, you will see a screen like this.
When you move the drone, 3DCG on the screen moves based on value of gyro sensor.
If you cannot connect the drone, quit Betaflight Configurator, connect the drone to your computer first, and then start Betaflight Configurator again.
 If you connect drone to your computer and leave it on for a long time, the VTX may run away with heat and break down in the worst case.
Minimize connection time with your computer, and occasionally blow on camera to cool it.
It is also effective to place a small electric fan nearby.
If you connect drone to your computer and leave it on for a long time, the VTX may run away with heat and break down in the worst case.
Minimize connection time with your computer, and occasionally blow on camera to cool it.
It is also effective to place a small electric fan nearby.
Horizontal calibration and backup of settings
You can perform horizontal calibration on the "Setup" screen.
If 3DCG on the screen is not level when you level the drone, you need to calibrate its accelerometer.
After fixing the drone horizontally, click "Calibrate Accelerometer".
If horizontal calibration is slightly off, not only will the trajectory fluctuate during flight, but it may also suddenly fly sideways during takeoff.
Look at the aircraft from front, back, left and right, and carefully level the aircraft before calibration.
I think it's a good idea to make a simple stand using cardboard.
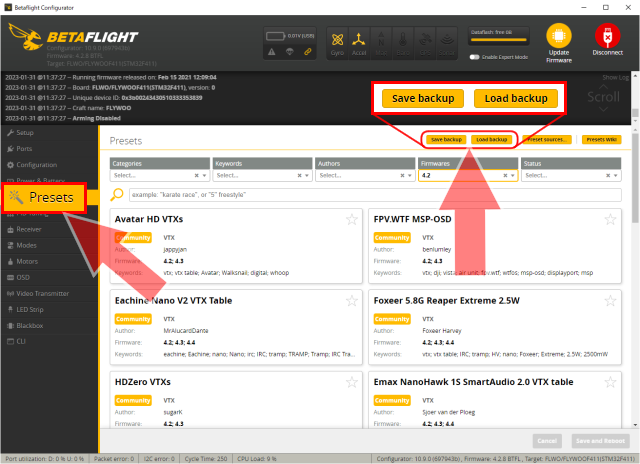 Select "Presets" from the menu on the left.
Then click "Save backup" from the buttons at the top.
Then the FC settings will be read and a folder selection dialog box will appear.
Select the folder where you want to save the backup, and a text backup of the settings will be saved there.
Select "Presets" from the menu on the left.
Then click "Save backup" from the buttons at the top.
Then the FC settings will be read and a folder selection dialog box will appear.
Select the folder where you want to save the backup, and a text backup of the settings will be saved there.
The same information as the operation by the "diff all" command below can be collected.
 Or you can back up the drone settings by typing "diff all" on
CLI screen
.
If you get a drone, collect it first.
See
Using CLI commands
for more information.
Or you can back up the drone settings by typing "diff all" on
CLI screen
.
If you get a drone, collect it first.
See
Using CLI commands
for more information.
In previous versions, Setup screen above had a Backup button to back up your settings in Json text format, but it's gone now.
Check channel map, connection status with radio
 "Channel Map" column of "Receiver" screen, you can see channel map for drone (eg "AETR").
If you don't know drone's channel map before binding, you can check / change it here.
"Channel Map" column of "Receiver" screen, you can see channel map for drone (eg "AETR").
If you don't know drone's channel map before binding, you can check / change it here.
And you can also check connection status between radio and drone in the bar graph on the left side of the screen. If you bind radio and drone, and operate sticks or switchs of the radio, bar graphs here will move. You can check that drone is receiving radio signal correctly and that each switch is set to expected channel.
At the bottom right of some settings screens in Betaflight Configurator are rows of "Refresh" and "Save" buttons. When you change the value on the screen, click "Save" button and the value will be reflected in the drone. Conversely, when you click "Refresh" button, setting values of the drone are read and reflected on the screen.
On this screen, adjust radio so that pulse length should be 1500 μsec when you take your finger off the stick (Roll, Pitch, Yaw) of the radio. Also, adjust radio so that it is larger than the value in "Stick Heigh Threshold" column when it is swung to the maximum and smaller than the value in "Stick Low Threshold" column when it is swung to the minimum. For radios with OpenTX/EdgeTX, these values can be adjusted on "OUTPUT" screen.
If value flutters when you take your finger off the stick, specify the width (up to about 10) in each "Deadband" column. If these are not adjusted, drone will not fly straight.
RC Deadband: Specifies the width to ignore the jitter of the center value of the roll and pitch stick.
Yaw Deadband: Specifies the width to ignore the jitter at the center value of the yaw stick.
Check functions assigned to each channel
 On "Modes" screen, you can check functions assigned to each channel of drone.
In the example on this screen, ARM function is assigned to pulse length "1700 - 2100 μsec" of "AUX1 (channel 5)". Radio switch sends pulse of less than 1000 μsec when it is “down”, 1500 μsec when it is “center”, and 2000 μsec or more when it is “up”. This means that assigning a switch to channel 5 and switching it to "up" position will enable ARM functionality.
In addition, flight modes ANGLE and HORIZON are both assigned to "AUX2 (channel 6)". In this case, if you assign 3-position switch to channel 6, "down" position will enable ANGLE mode, "center" will enable HORIZON mode, and "up" will enable ACRO mode (ACRO mode will enable if no flight mode is specified).
VTX transmission channel settings
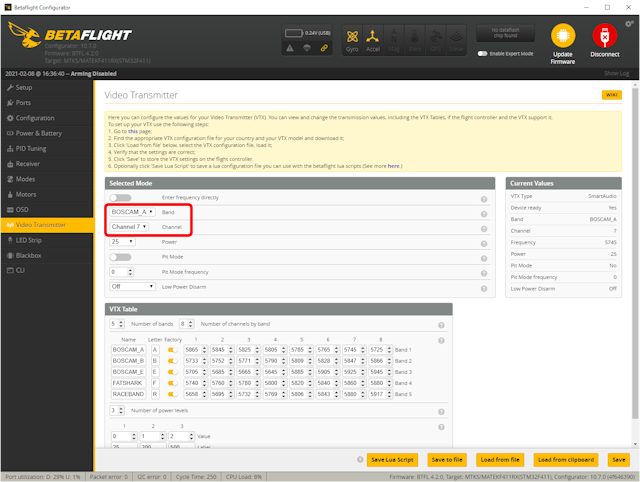 On "Video Transmitter" screen, you can set transmission channel for video signal of FPV camera.
Select band field and channel field, and click "Save" at the bottom right of the screen to set. Transmission channels that can be used in each region are limited as follows, so please set accordingly. If you have multiple drones, keep all drones on same channel so you don't have to use goggles scanning feature.
DShot Beacon (buzzer) settings
With a feature called DShot Beacon, you can make drone's motors vibrate and make a beeping sound. Even small drones that don't have a physical buzzer can be easier to find if they're crashed and lost.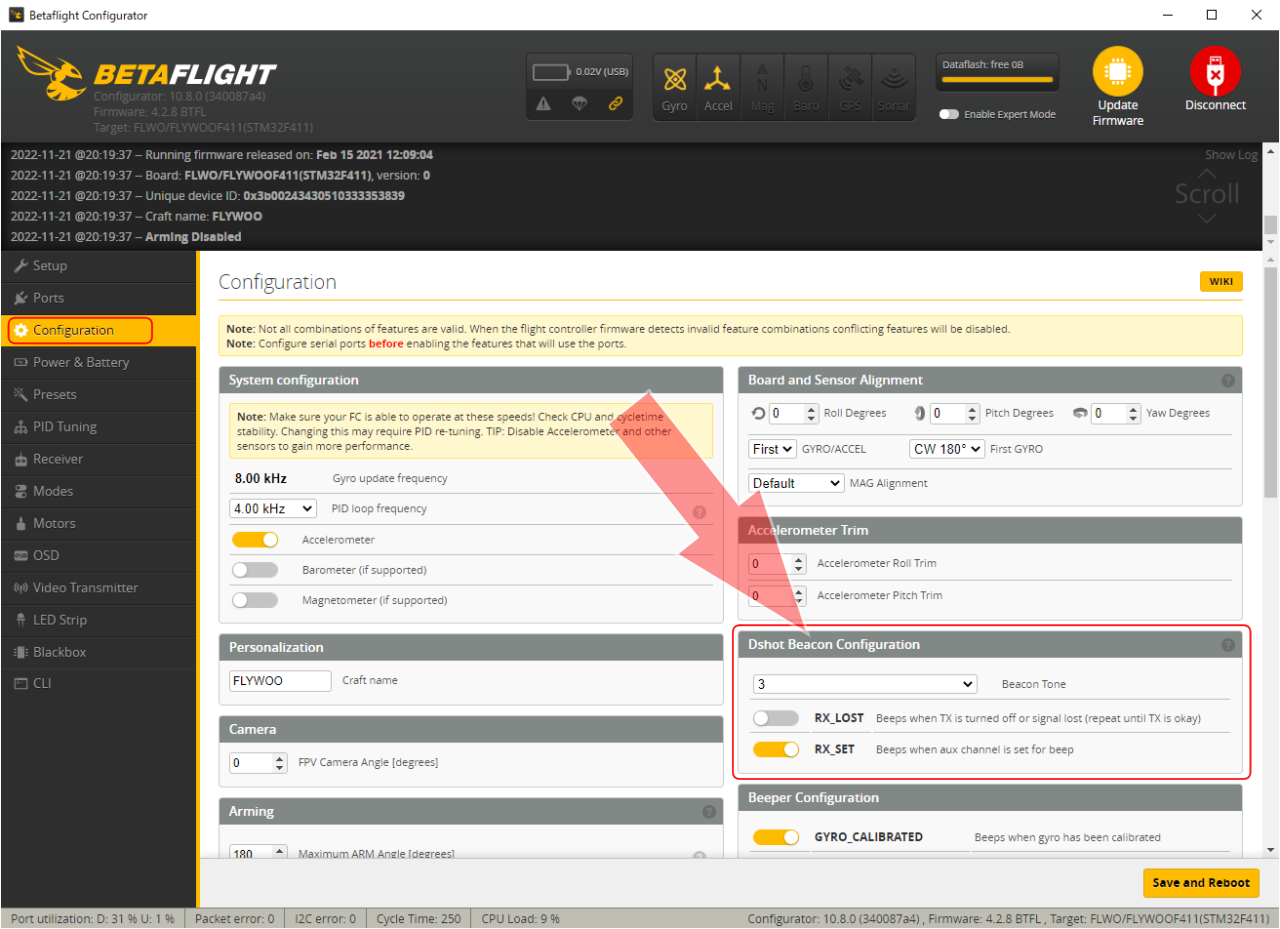 First, open "Configuration" screen and set each item in "DShot Beacon Configuration" column.
In "Beacon Tone" field, you can select the type of sound to be played (1~5, 0 is silent).
If "RX_LOST" is turned on, buzzer will sound when communication with the radio is lost.
When "RX_SET" is turned on, buzzer can be turned ON/OFF from the radio switch.
Finally, click "Save and Reboot" button at the bottom right of the screen.
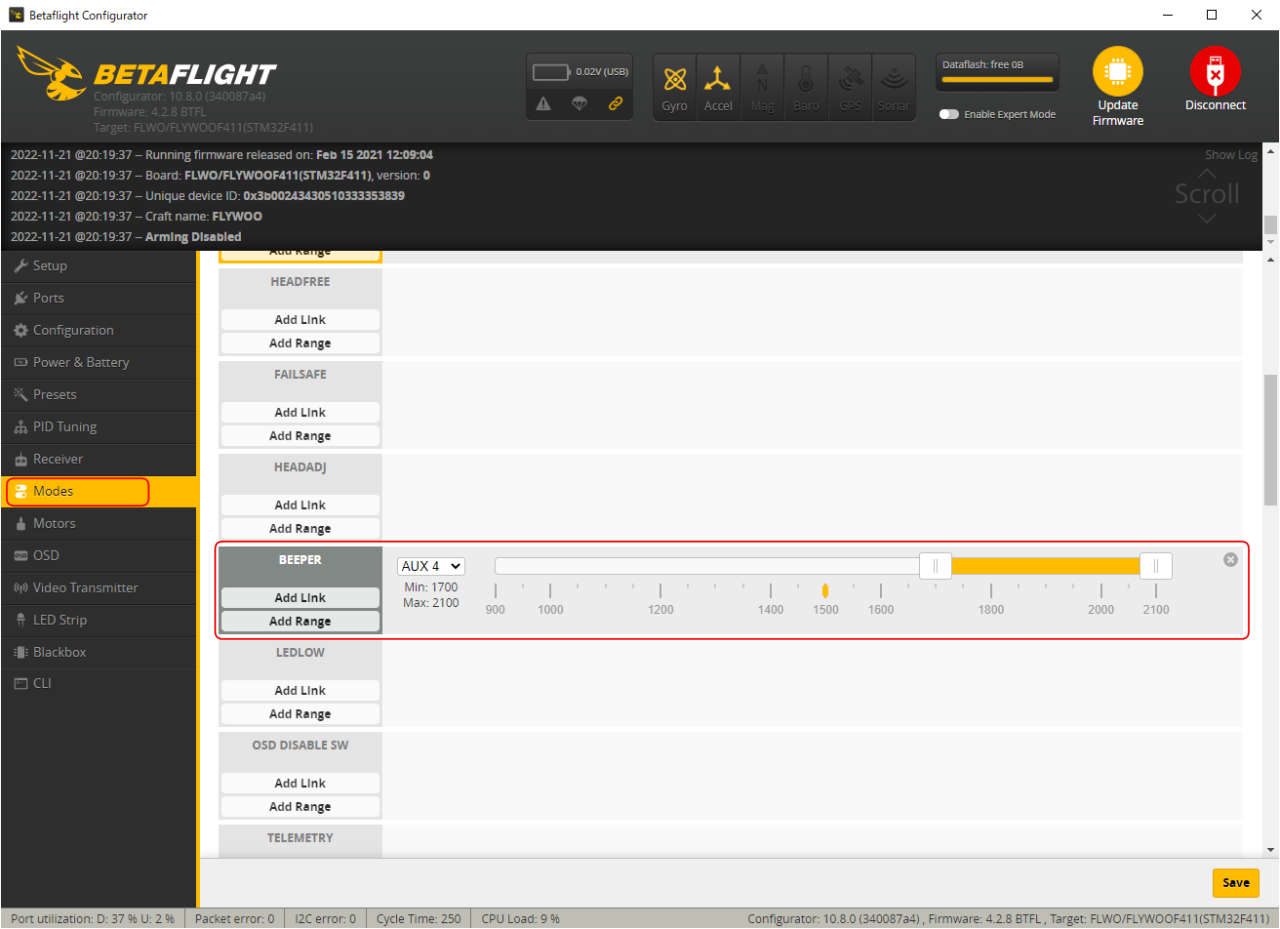 Next, on "Modes" screen, click "Add Range" of "BEEPER" to enable it and assign it to any channel.
Then click "Save" button at the bottom right of the screen.
In the example shown in the figure, the buzzer sounds when the switch assigned to "AUX 4 (Channel 8)" is set to "up".
Next, on "Modes" screen, click "Add Range" of "BEEPER" to enable it and assign it to any channel.
Then click "Save" button at the bottom right of the screen.
In the example shown in the figure, the buzzer sounds when the switch assigned to "AUX 4 (Channel 8)" is set to "up".
Using CLI commands
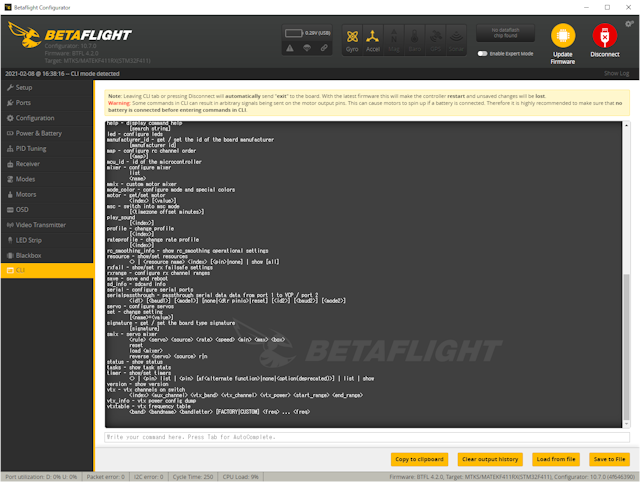 On "CLI" screen, you can configure all of drone settings by typing commands from keyboard (Command Line Interface).
Enter command in text box that says "Write your command here" at the bottom of the screen, and press [Enter] key to enter command. You can also save CLI exchange displayed on screen as a text file by clicking "Save to File" at the bottom right of the screen.
You can read current values of various setting values with [get] command and change them with [set] command. However, if you do not enter [save] command at the end, the changes will not be reflected in drone.
[help] command displays a list of available CLI commands.
[diff] command displays a list of differences from default values. If you type "diff all" and saving displayed result when you get drone, you can always restore it to factory defaults. Use "Save to File" or "Copy to Clipboard" button to save this in a text file.
[dump] command dumps list of settings.
[bind_rx] or [bind_rx_spi] command put drone in bind mode (if receiver is built into FC board).
On the drone manufacturer's website, execution result of the product's [diff] or [dump] commands may be called "CLI DIFF" or "CLI DUMP" and distributed as a text file. After resetting with [defaults] command, you can copy and paste the contents of this text file into "CLI" screen and press [Enter] key to initialize the drone to factory defaults.
Note: Depending on the version of Betaflight, pasting the result of old "diff all" may not set the parameters correctly. In this case, check and change each item manually.
Tune PID and Rate profiles
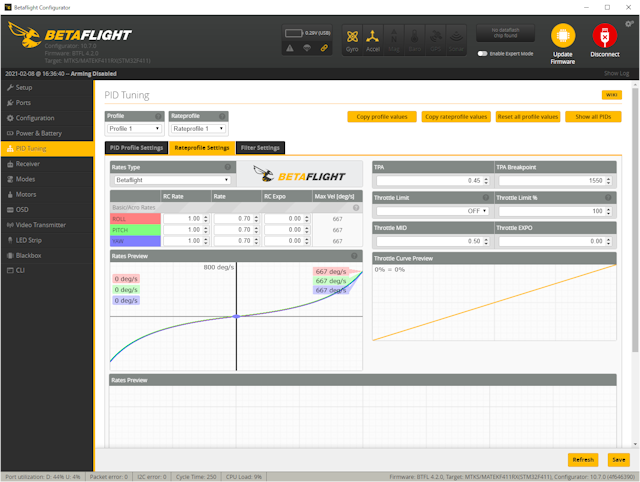 On "PID Tuning" screen, you can access PID profile that determines flight characteristics of drone and Rate profile that can adjust response to stick operation of radio.
In the profile selection drop-down menu at the top left of the screen, you can save / switch between 3 types of PID profiles and 6 types of Rate profiles.
On "PID Tuning" screen, you can access PID profile that determines flight characteristics of drone and Rate profile that can adjust response to stick operation of radio.
In the profile selection drop-down menu at the top left of the screen, you can save / switch between 3 types of PID profiles and 6 types of Rate profiles.
To make it easier, first try increasing P value and RC Rate value little by little to test the operability.
The information on each site below will be helpful.
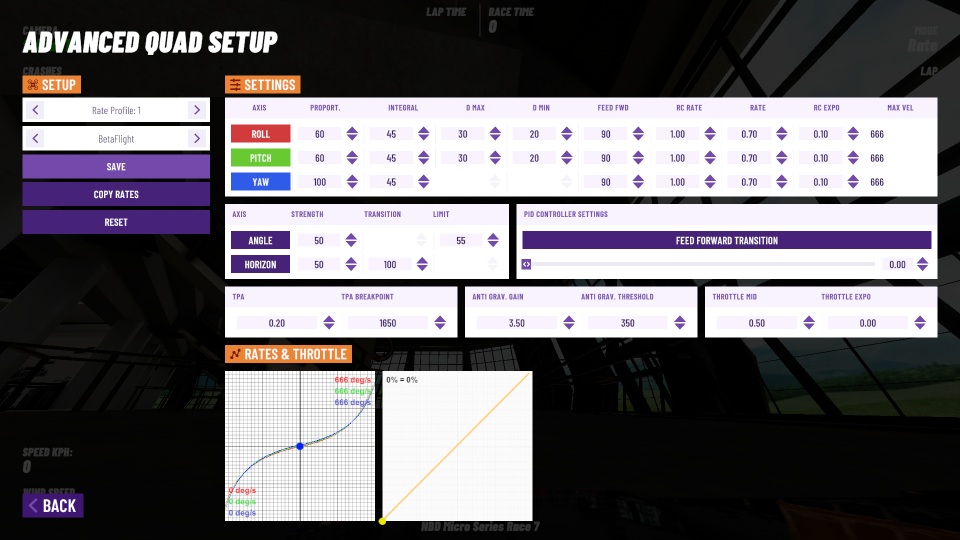 Alternatively, you can use a drone simulator like
VelociDrone
to simulate effect of changing PID profile and Rate profile on your PC.
Alternatively, you can use a drone simulator like
VelociDrone
to simulate effect of changing PID profile and Rate profile on your PC.
It is also a good idea to apply it to your actual machine by referring to the initial value of VelociDrone shown in the figure.
Update FC firmware : Version-up Betaflight
You can update the FC (Flight Controller) firmware: Betaflight. However, updating to the latest version is not necessarily good for your drone. If there are no particular flight problems with the current version, there is no need to upgrade.Install the driver : STM32 BOOTLOADER
To access the firmware of FPV drones and OpenTX/EdgeTX radios using STM32 processors on Windows PC, it is necessary to install a driver called "STM32 BOOTLOADER". Normally this driver is not installed automatically and must be installed manually. See below for details.
Update FC firmware
Such as
Save the settings before updating firmware.
Select "Presets" from the menu on the left.
Then click "Save backup" from the buttons at the top.
Then the settings are saved in a text file.
Alternatively, enter "diff all" on "CLI command line" screen and use "Save to File" or "Copy to Clipboard" button to save displayed results to a text file.
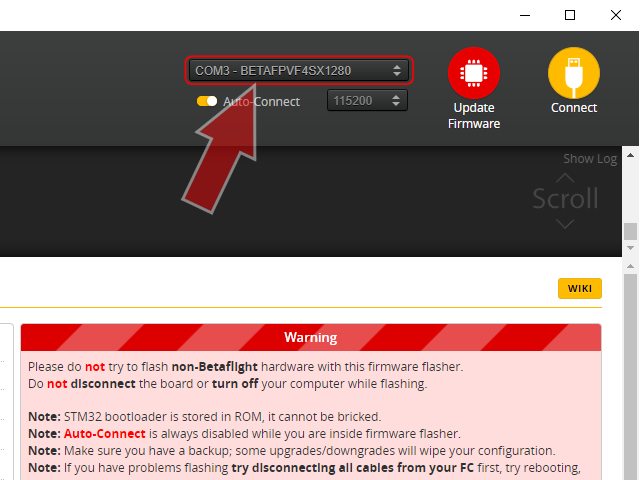
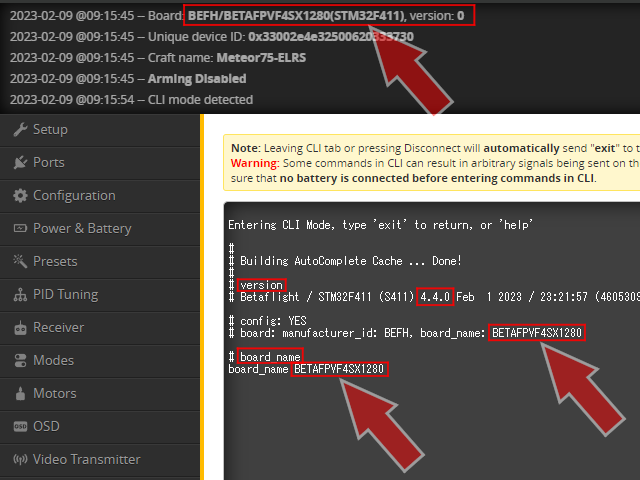 Confirm the name of the target FC board to write the firmware.
When you connect the FC to your computer, the name of the FC board will be displayed in the log on the upper left of the screen.
Alternatively, type "version" in the CLI command screen to display the Betaflight version and board name. Type "board_name" on the CLI command screen to display the board name.
Or version / board_name is collected at the beginning of CLI dump.
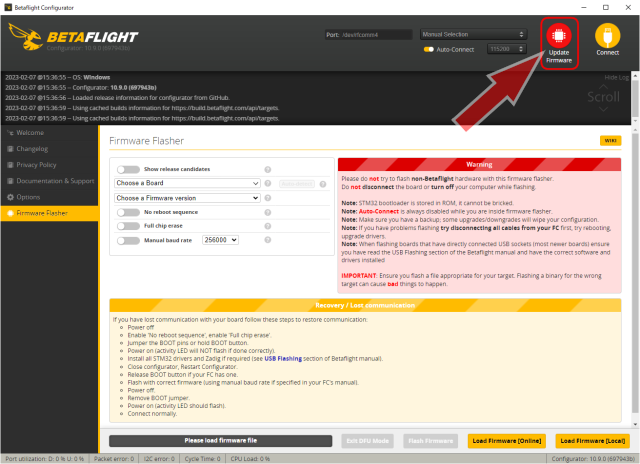 Click the "Update Firmware" button at the top right of the screen.
You can press this button even when the drone is not connected to your computer.
Then "Firmware Flasher" screen like this opens.
Click the "Update Firmware" button at the top right of the screen.
You can press this button even when the drone is not connected to your computer.
Then "Firmware Flasher" screen like this opens.
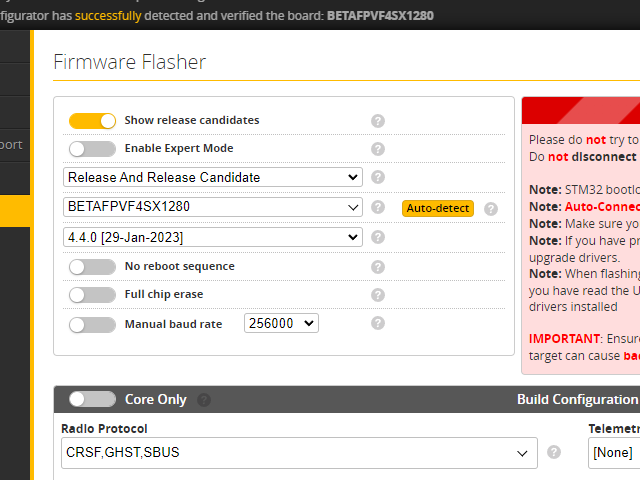 Download the firmware online
Select FC board model number to write to and firmware version.
If PC and FC are connected with a USB cable, [Auto-detect] button on the right side of the FC board selection menu will be enabled. Clicking this will automatically select the matching firmware.
Then click "Load Firmware [Online]" at the bottom right of the screen. Then download of the matching firmware from Betaflight official site will start.
Using firmware obtained from the manufacturer's website
Click "Load Firmware [Local]" at the bottom right of the screen. Then you can specify the firmware file saved on your computer.
The extension of Betaflight firmware is ".hex".
If you turn on "Show release candidates" and select "Release And Release Candidate" on the above screen, RC (Release Candidate) version will also be displayed in the list. But RC version firmware is under evaluation and may contain bugs. Please use release version as much as possible. You may also be able to download tuned RC version of your product from the FC manufacturer's website. When using RC version, first check FC manufacturer's website.
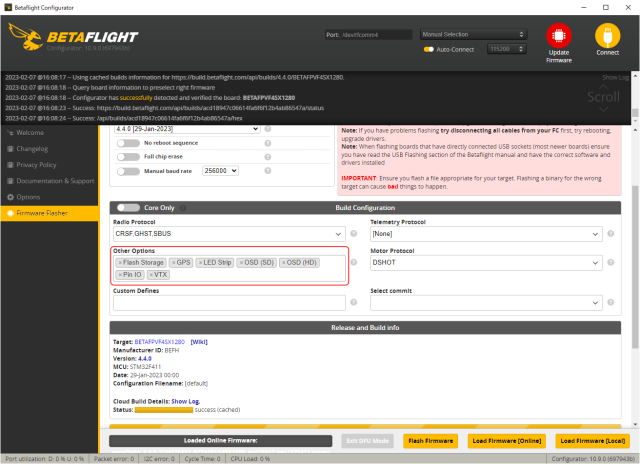 Before downloading the firmware, in the [Build Configuration]-[Other Options] field, you can add/remove features built into the firmware.
Removing unnecessary features can reduce the size of the firmware.
Before downloading the firmware, in the [Build Configuration]-[Other Options] field, you can add/remove features built into the firmware.
Removing unnecessary features can reduce the size of the firmware.
Normally, you do not need to change this item. But if you want to use ACRO TRAINER mode , you may need to add that feature.
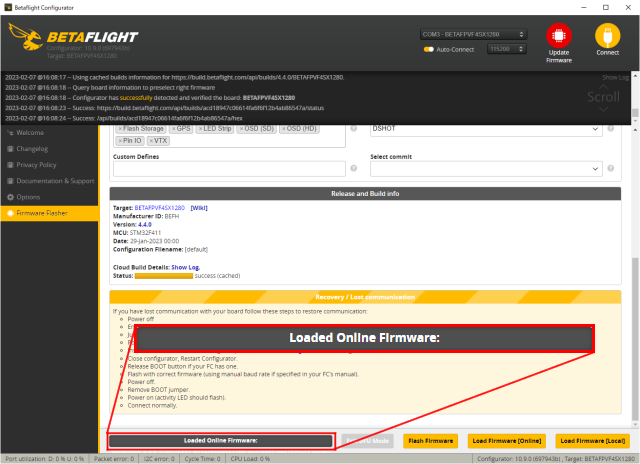 When firmware download is complete, message "Loaded Online Firmware" will be displayed at the bottom of the screen.
After that, connect drone (FC) to your computer and click "Flash Firmware" button to start the update.
When firmware download is complete, message "Loaded Online Firmware" will be displayed at the bottom of the screen.
After that, connect drone (FC) to your computer and click "Flash Firmware" button to start the update.
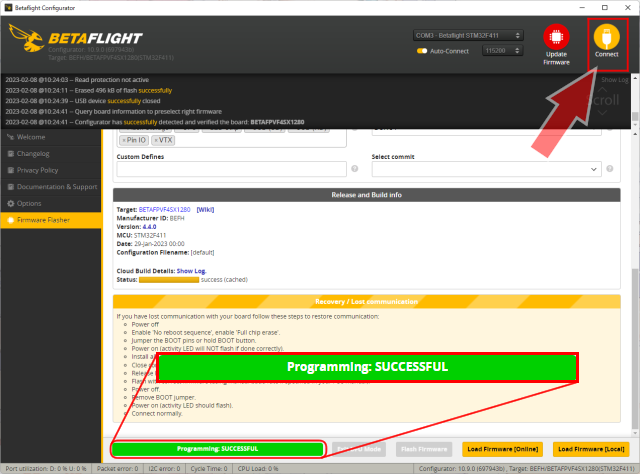 If the update is successful, "Programming: SUCCESSFUL" will be displayed in green at the bottom of the screen as shown in this figure.
Then click the yellow "Connect" button at the top right of the screen.
If the update is successful, "Programming: SUCCESSFUL" will be displayed in green at the bottom of the screen as shown in this figure.
Then click the yellow "Connect" button at the top right of the screen.
If writing fails, please refer to Failed to write firmware!? below.
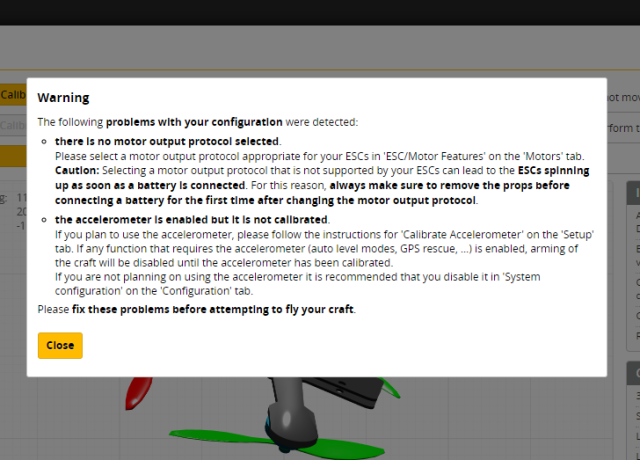
 Depending on the version of the written firmware, a dialog box like this one will appear.
It is necessary to set the initial values for functions added or changed in the new version.
Click "Apply Custom Defaults".
Depending on the version of the written firmware, a dialog box like this one will appear.
It is necessary to set the initial values for functions added or changed in the new version.
Click "Apply Custom Defaults".
 Depending on the version of the firmware written subsequently, such a dialog box may appear.
It is necessary to set/change the functions added/changed in the new version.
After confirming the contents, click "Close".
Capture this screen and check it later.
Depending on the version of the firmware written subsequently, such a dialog box may appear.
It is necessary to set/change the functions added/changed in the new version.
After confirming the contents, click "Close".
Capture this screen and check it later.
In the example in this figure, problem 1 is solved by resetting "motor_pwm_protocol" in CLI screen (e.g. DSHOT300). The second problem is solved by redoing "Calibrate Accelerometer".
Alternatively, both can be resolved by "Restore the settings" (below).
After successfully updating the FC firmware, write back the backup data collected in advance to the FC.
Select "Presets" from the left menu and click "Load backup".
Then select the text file you saved before the update.
Or paste the result of "diff all" saved before the update to CLI command line and write it to FC with "save" command.
After this, if no error message is displayed, the firmware update is complete.
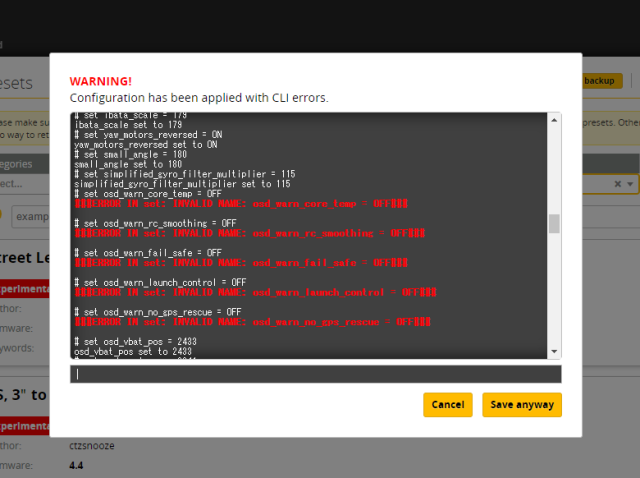 Depending on the version of the written firmware, such a dialog box may appear.
It is necessary to set/change the functions added/changed in the new version.
Scroll the screen and check the contents of the part displayed in red.
Depending on the version of the written firmware, such a dialog box may appear.
It is necessary to set/change the functions added/changed in the new version.
Scroll the screen and check the contents of the part displayed in red.
Capture the part displayed in red and check it later.
Click "Save anyway" to return to the normal screen. And review the setting values according to the contents of the various warnings displayed so far.
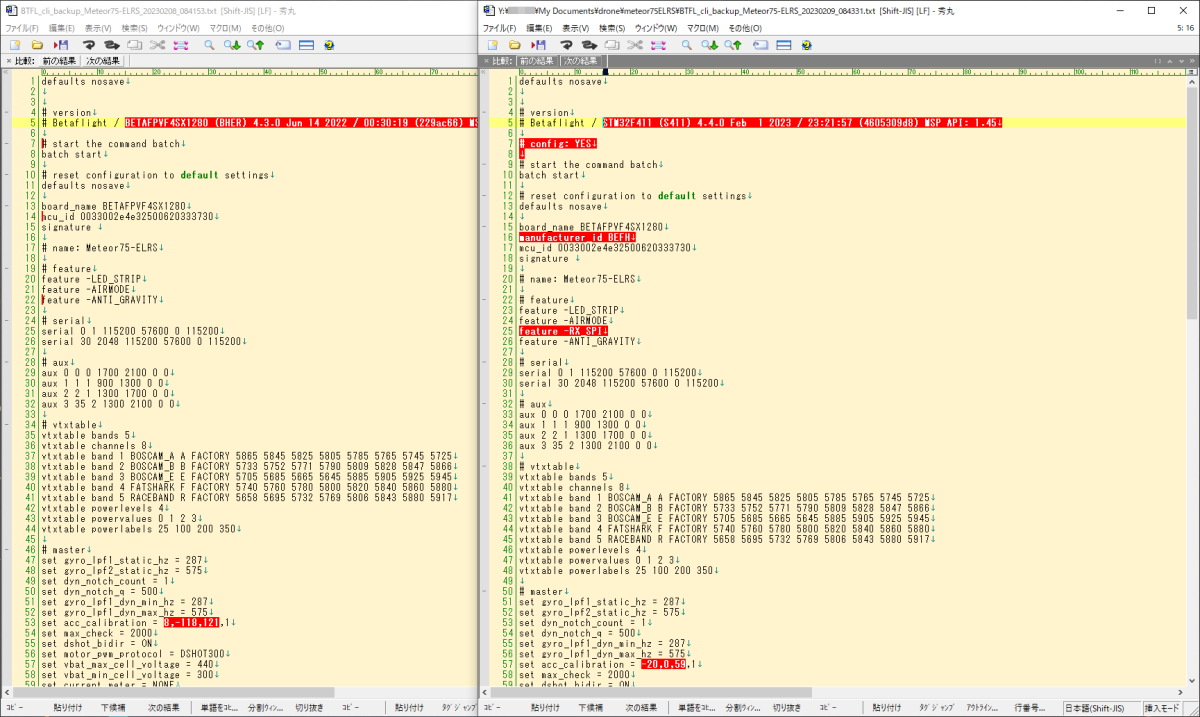 You can easily check the differences by comparing the "backup" (or "diff all") taken before the firmware update and the "backup" taken after the update.
Many text editors have the ability to show the differences between two text files, as shown.
Make sure that the keywords added/deleted with new version are set without any problems.
You can easily check the differences by comparing the "backup" (or "diff all") taken before the firmware update and the "backup" taken after the update.
Many text editors have the ability to show the differences between two text files, as shown.
Make sure that the keywords added/deleted with new version are set without any problems.
Removed parameters are often obsolete in newer versions. You can ignore it.
Make sure that appropriate values are set for the added/changed parameters. If the parameters have been renamed, make sure they carry over the correct values.
Write back to old firmware
To write back to the old firmware, select the old version on "Firmware Flasher" screen, rewrite the firmware, and then load the backup (or "diff all") of the settings collected at that time. It is recommended to save a backup of the firmware file and setting value for each drone (FC board) and its version.
Failed to write firmware!?
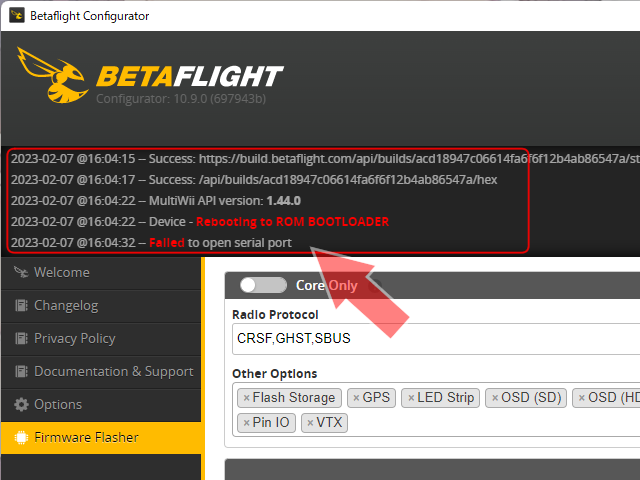 If an error message is displayed in red in the log on the upper left of the screen, a problem may have occurred.
Please solve the problem by referring to the log.
If an error message is displayed in red in the log on the upper left of the screen, a problem may have occurred.
Please solve the problem by referring to the log.
If the error message "Failed to open serial port" is displayed here, or if the process stalls while displaying "Initiating reboot to bootloader..." here, please check if STM32 BOOTLOADER is properly installed on your computer. Or make sure that no other software that uses COM port, such as ExpressLRS Configurator , is running at the same time.
 Or make sure that the COM port to which the FC is connected is correctly selected.
Adjust your drone on your smartphone / tablet: use SpeedyBee
With SpeedyBee app, you can use your smartphone/tablet to adjust parameters and update the firmware of drones equipped with Betaflight 3.2.0, iNAV 2.0.0, EmuFlight 0.1.0 or later. Connect your smartphone/tablet and drone via Bluetooth or Wi-Fi using the Speedy Bee Adapters below or " Bluetooth-USB Adapter (SpeedyBee) " or " Bluetooth-UART Adapter (SpeedyBee) ". The screen configuration of SpeedyBee app is the same as Betaflight Configurator. Once you master how to use the Betaflight Configurator, you can also use the SpeedyBee app.-
SpeedyBee App

SPEEDY BEE Utility free
The application that can set the flight controller of the drone equipped with Betaflight 3.1.0 or later. Communication between the mobile device and the flight control board can be achieved via Bluetooth or Wi-Fi. Connect to the drone using "Bluetooth-UART/USB Adapte" or "Speedy Bee Adapter".
view details(App Store) -
SpeedyBee Adapter 3 Flight Controller ESC Accessories, Portable Configurator & Flasher, Black Box Analyzer, 1S -6S LiPo Checker
SPEEDY BEE 2022/3/28 USD38.48
The new SpeedyBee adapter is a wireless firmware flasher/configurator, blackbox analyzer, ESC flasher and 1S-6SLiPo battery checker all in one. Connect to the SpeedyBee app and configure your flight controller anytime, anywhere. Or flash the latest version of Betaflight/Emuflight/INAV just 2 minutes before your flight session.
 (US)
(UK)
(US)
(UK)
-
Speedy Bee Adapter 2 BF/INAV/Emu Portable Configurator
Speedy Bee 2020-09-09 USD29.98
With the Built-in WIFI, Speedy Bee Adapter 2 is a full-featured BF/INAV/Emu mobile configurator help the FPV pilots go to the field to fly without carrying a heavy laptop. The lanyard-style cable is tight of connection enough, can prevent being lost. The liquid silicone cable is with two same micro USB ports on both ends, it can even easily carry 500 grams.
(US)
(UK)
Related links
The following sites are useful for using Betaflight Configurator.To know more about How to Fly Hobby Drone
To know more about iPhone