How to use RadioMaster Zorro
Here, we will introduce and explain how to use RadioMaster Zorro EdgeTX/OpenTX radio.
このページを日本語で見る
Table of contents
-
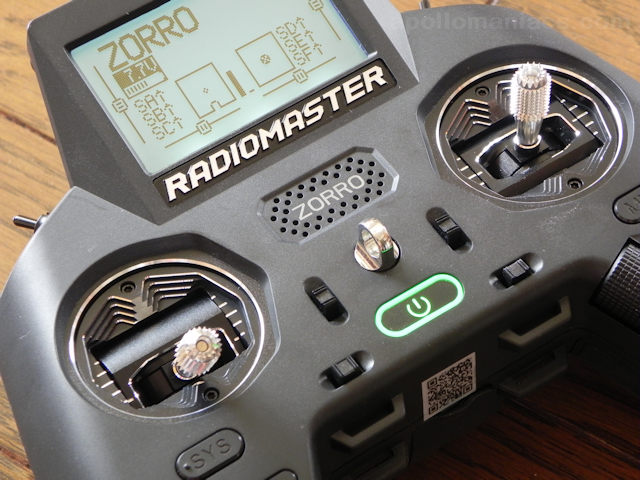
RadioMaster Zorro 2.4GHz 16CH Hall Sensor Gimbals

RadioMaster 2022/02 USD89.99
On-board firmware:EdgeTX(OpenTX)
Featuring an ergonomic design, large bright LCD screen in the perfect viewing position, travel adjustable HALL sensor gimbals, a nano size external RF module bay

 (US)
(UK)
(US)
(UK)
Introducing RadioMaster Zorro
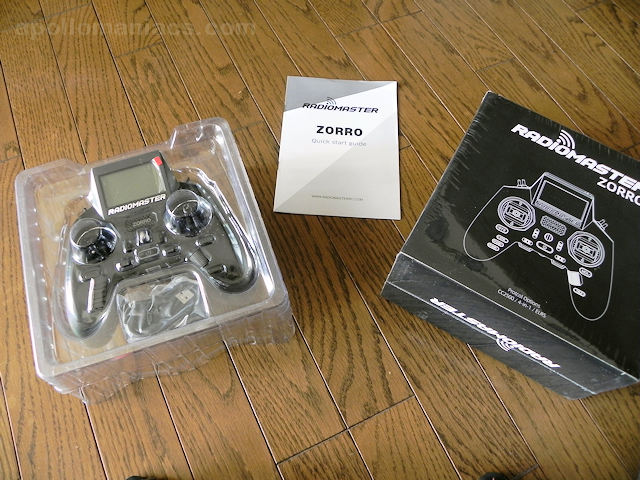 This is RadioMaster Zorro package.
Open cool black box and you'll see the RadioMaster Zorro in blister pack.
18350 Battery (RadioMaster)
is sold separately, but if you order it at the same time as you purchase, it will arrive as it is set in Zorro body.
This is RadioMaster Zorro package.
Open cool black box and you'll see the RadioMaster Zorro in blister pack.
18350 Battery (RadioMaster)
is sold separately, but if you order it at the same time as you purchase, it will arrive as it is set in Zorro body.
RadioMaster Zorro's built-in transmitter is available in three versions: CC2500, 4-in-1, ELRS. The 4-in-1 model I chose this time is USD 119.99 (about JPY 13,605).
 This photo shows the list of items included with RadioMaster Zorro.
To the right of Zorro is a quick start guide, screen protection film, USB-C cable, and straps to fasten additional battery to Zorro body.
A microSD card with a capacity of 256MB is pre-installed on the body.
Just order battery with it and you're ready to go.
This photo shows the list of items included with RadioMaster Zorro.
To the right of Zorro is a quick start guide, screen protection film, USB-C cable, and straps to fasten additional battery to Zorro body.
A microSD card with a capacity of 256MB is pre-installed on the body.
Just order battery with it and you're ready to go.
In addition, since the screen is installed in a deep position, it is difficult to attach screen protection film, which is not very practical.
Quick Start Guide and more detailed Manual can also be downloaded from RadioMaster official site .
User Manuals download (RadioMaster)
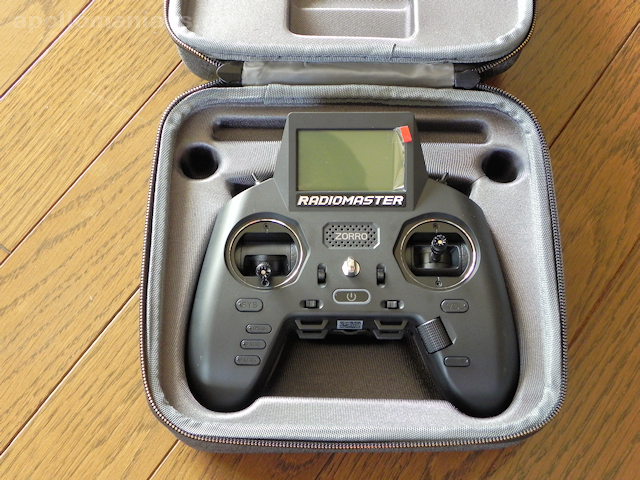 This figure shows Zorro in
Carry Case for Zorro Radio Control (RadioMaster)
(sold separately).
This figure shows Zorro in
Carry Case for Zorro Radio Control (RadioMaster)
(sold separately).
A protective film is attached to the screen. Before you start using it, pull on the red tab to remove the protective film.
The gimbal stick end has a screw diameter of 3 mm.
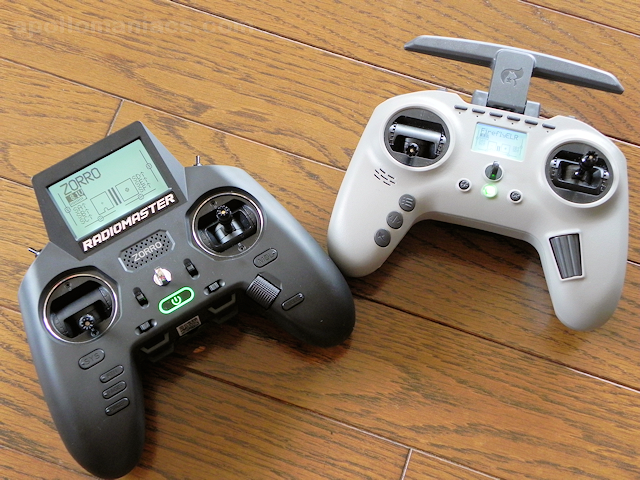 This is comparison with
Jumper T-Pro.
Body size is slightly larger and heavier than the Jumper T-Pro, but it has a robust image.
Scroll wheels and switches are also made of metal and seem to be sturdy.
The size of the gimbal and its installation interval are almost the same.
LCD display resolution (128x64) is the same, but the screen size is large, so visibility is good.
It has a lot of switches and is sturdy, so it feels more like a professional than T-Pro.
This is comparison with
Jumper T-Pro.
Body size is slightly larger and heavier than the Jumper T-Pro, but it has a robust image.
Scroll wheels and switches are also made of metal and seem to be sturdy.
The size of the gimbal and its installation interval are almost the same.
LCD display resolution (128x64) is the same, but the screen size is large, so visibility is good.
It has a lot of switches and is sturdy, so it feels more like a professional than T-Pro.
Gimbal is compatible with RadioMaster TX12 series and Jumper T12 series . It is possible to use the same parts.
Power button is shining in the green in the center. Left and right of power button are trim buttons.
How to use Jumper T-Pro
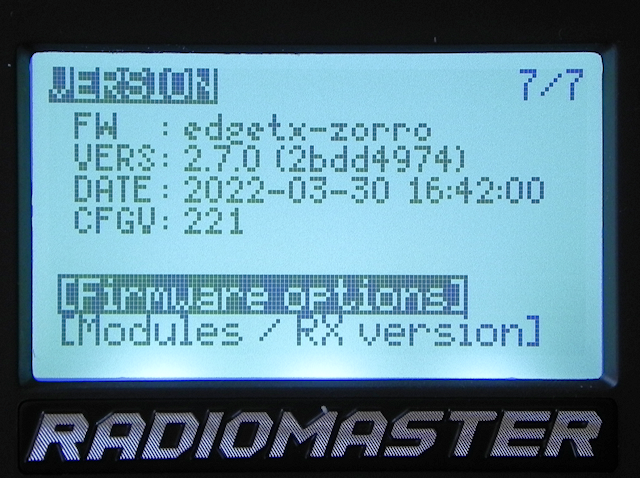 Pre-installed firmware is the latest version of EdgeTX, 2.7.0.
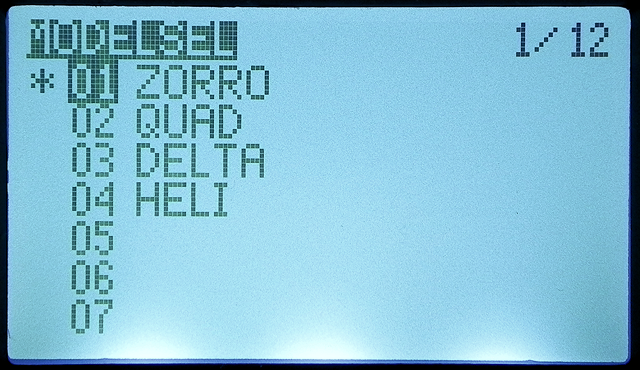 In addition, four models of "ZORRO", "QUAD", "DELTA", and "HELI" are stored as samples.
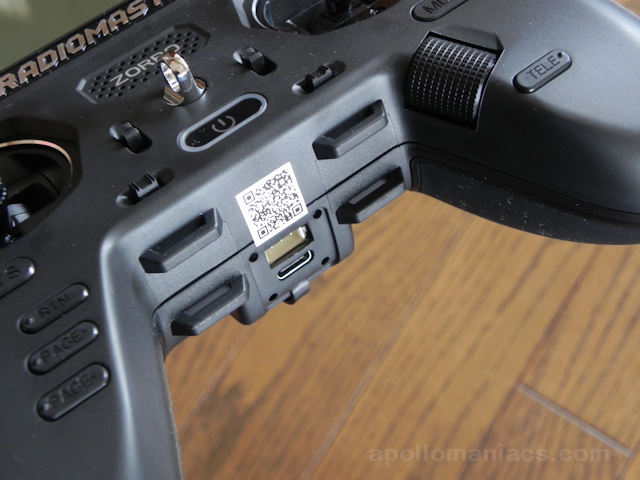
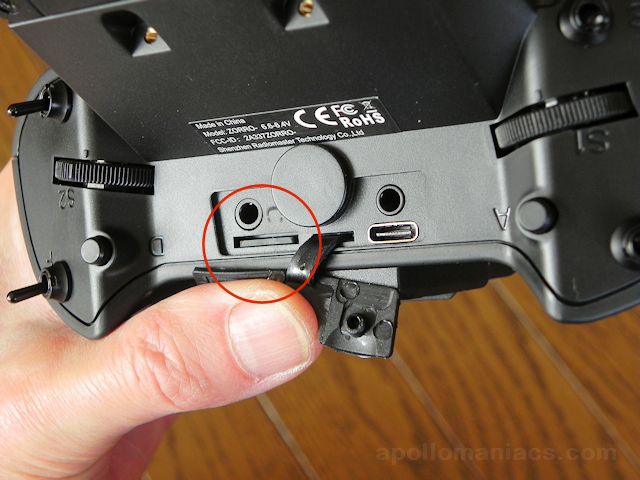
 Inside rubber cover on the top of the body, there is a 3.5mm headphone jack, a DSC port for trainer mode, a microSD card slot, and a USB Type-C connector for connecting to PC.
External Antenna (RadioMaster)
can be added to the central round part.
Inside rubber cover on the top of the body, there is a 3.5mm headphone jack, a DSC port for trainer mode, a microSD card slot, and a USB Type-C connector for connecting to PC.
External Antenna (RadioMaster)
can be added to the central round part.
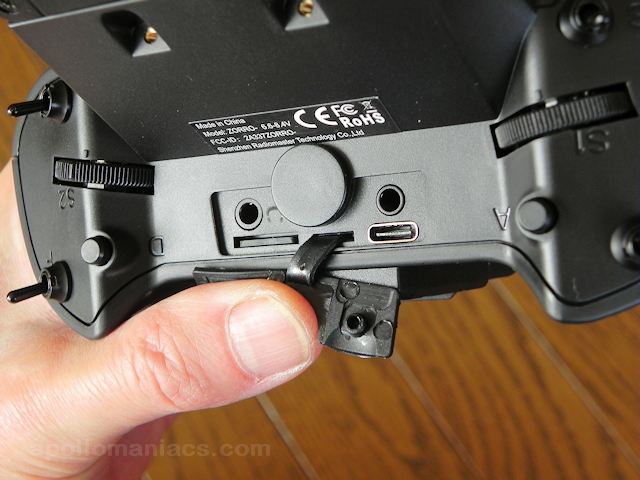
 Inside rubber cover on the bottom of the body, there is a JST-XH type 3-pin connector for adding a 2S battery and a USB Type-C connector for charging the internal battery.
Four protrusions around this are strap mounting parts for fixing additional battery.
Inside rubber cover on the bottom of the body, there is a JST-XH type 3-pin connector for adding a 2S battery and a USB Type-C connector for charging the internal battery.
Four protrusions around this are strap mounting parts for fixing additional battery.
The rubber cap here does not close properly once it is opened. I would like the manufacturer to improve it.
In addition, QR code pasted here seems to point to official site of RadioMaster, but the site cannot be opened because URL is incorrect ...
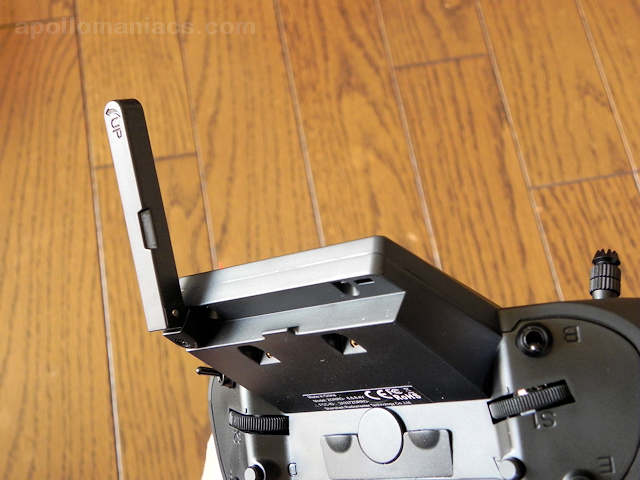 Antenna is folded behind LCD display.
When expanded, it will look like the figure.
Antenna is folded behind LCD display.
When expanded, it will look like the figure.
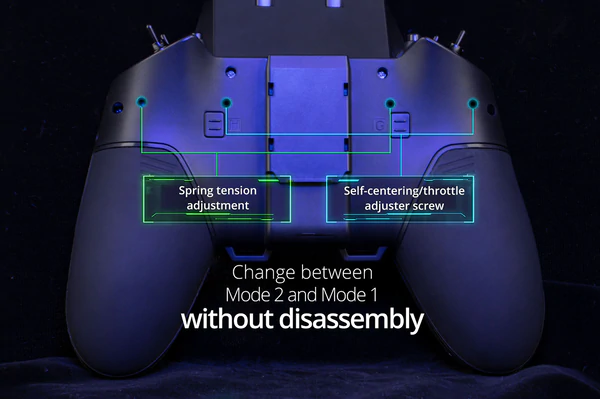 You can adjust spring tension of stick by using the screw on the back.
You can also enable / disable throttle spring.
You can switch the stick mode without disassembling.
These screw holes are 1.5 mm Allen key (hex nut).
You can adjust spring tension of stick by using the screw on the back.
You can also enable / disable throttle spring.
You can switch the stick mode without disassembling.
These screw holes are 1.5 mm Allen key (hex nut).
(Image quoted from RadioMaster official site)
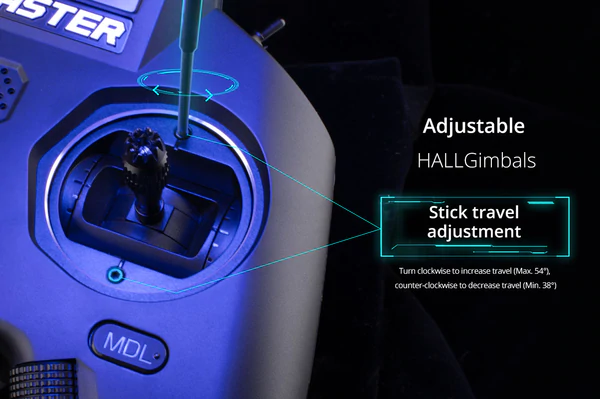 By using screws on the top and bottom of the gimbal on body front, you can adjust the range of movement of stick in the range of 38 degrees to 54 degrees.
These screw holes are 1.5 mm Allen key (hex nut).
By using screws on the top and bottom of the gimbal on body front, you can adjust the range of movement of stick in the range of 38 degrees to 54 degrees.
These screw holes are 1.5 mm Allen key (hex nut).
(Image quoted from RadioMaster official site)
AG01 MINI CNC Hall Gimbal
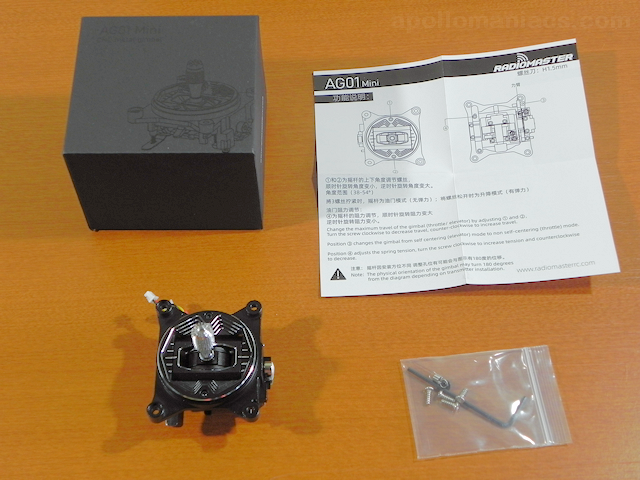 I replaced the gimbal with optional
AG01 MINI CNC Hall gimbal (RadioMaster).
A set of two costs USD 99.99, which is the price you can buy one radio.
I replaced the gimbal with optional
AG01 MINI CNC Hall gimbal (RadioMaster).
A set of two costs USD 99.99, which is the price you can buy one radio.
This gimbal has been developed for over a year with engineers and FPV champion pro-pilots from around the world. All parts are CNC machined from aluminum, and ball bearings provide a smooth and accurate feel.
This gimbal is compatible with RadioMaster Zorro, TX12 series and Jumper T12 series.
 Gimbal is the key part of the radio.
Flying FPV drones, in particular, puts a lot of force and abuse on the gimbal, so the all-metal AG01 gimbal is safe to use.
The screw diameter of the stick end is 3 mm, the same as the original.
Gimbal is the key part of the radio.
Flying FPV drones, in particular, puts a lot of force and abuse on the gimbal, so the all-metal AG01 gimbal is safe to use.
The screw diameter of the stick end is 3 mm, the same as the original.
Even if you replace the gimbal, you can adjust the tension and range of motion just like the original by using the screws on the back and front of the radio.
Please refer to Gimbal replacement method for instructions on how to replace the gimbal.
RadioMaster AG01 MINI CNC Hall Gimbals for TX12 & Zorro (RadioMaster)
 This is the manual attached to the AG01 MINI.
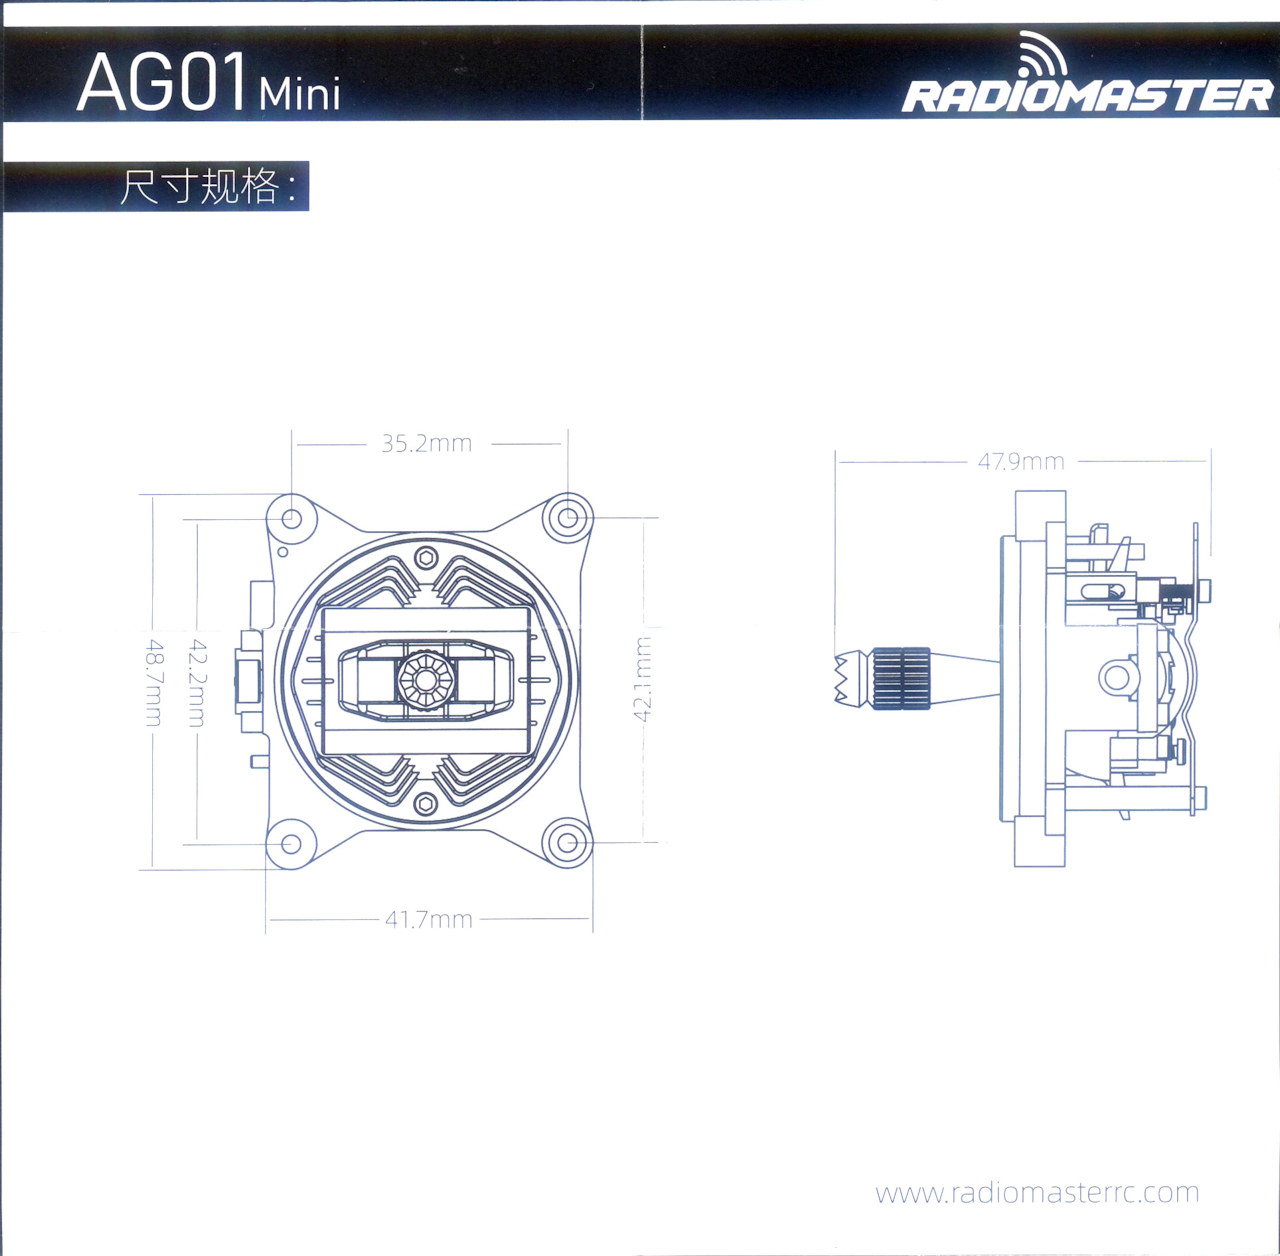
The dimensions of the AG01 MINI are shown in this diagram.
This is the manual attached to the AG01 MINI.
The dimensions of the AG01 MINI are shown in this diagram.
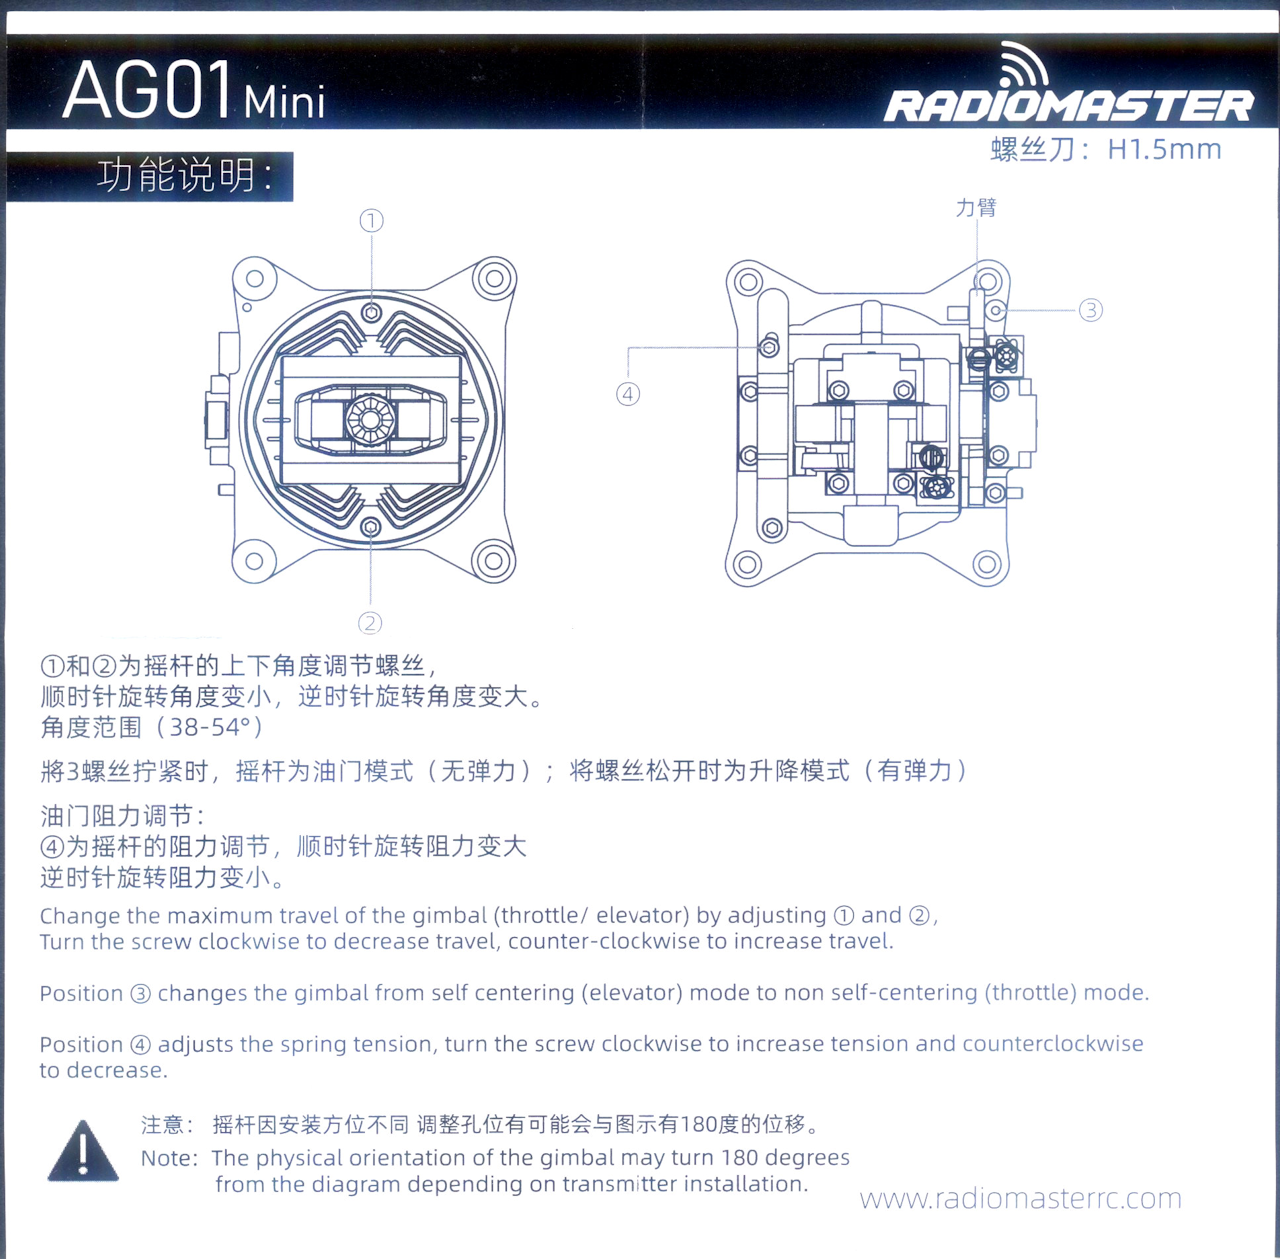 This is the other side of the instructions attached to the AG01 MINI.
This explains how to adjust the gimbal tension and range of motion.
This is the other side of the instructions attached to the AG01 MINI.
This explains how to adjust the gimbal tension and range of motion.
Battery setting and charging
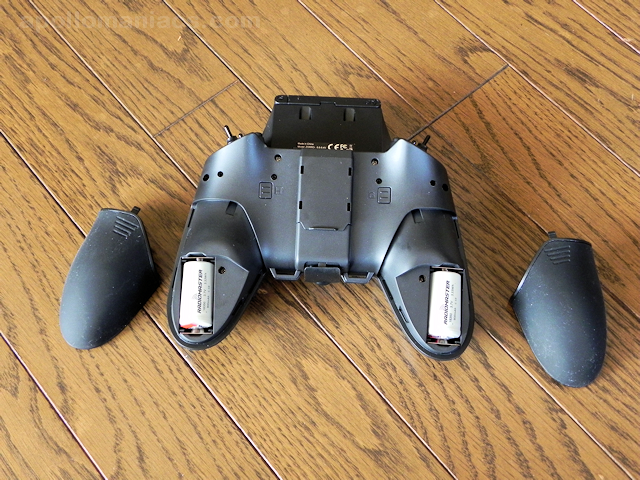 For RadioMaster Zorro, set batteries in the grip part.
Pull grip cover down to reveal battery box.
Insert one 18350 type lithium-ion battery on each side.
For RadioMaster Zorro, set batteries in the grip part.
Pull grip cover down to reveal battery box.
Insert one 18350 type lithium-ion battery on each side.
If you order at the same time as purchasing Zorro, you will receive batteries with RadioMaster genuine logo set in the body like this. However, a vinyl tab is attached to batteries. You need to peel it off before using it.
The grip cover is tricky to remove and install. When installing, it will come off easily if you do not insert it carefully so that all the claws fit perfectly.
Buy 18350 type battery (Amazon.com)
Buy 18350 type battery (Amazon.co.uk)
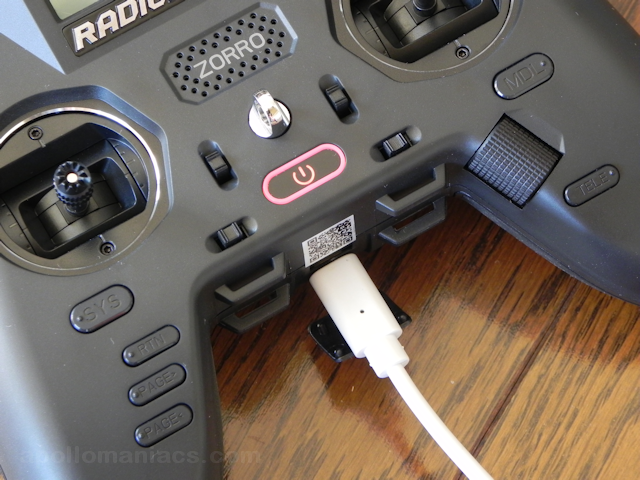 RadioMaster Zorro has a function to charge batteries.
Use USB Type-C cable to connect commercially available USB AC adapter to the connector at the bottom.
Then, power lamp lights up in red like this, and battery charging starts.
The lamp goes out when charging is complete.
RadioMaster Zorro has a function to charge batteries.
Use USB Type-C cable to connect commercially available USB AC adapter to the connector at the bottom.
Then, power lamp lights up in red like this, and battery charging starts.
The lamp goes out when charging is complete.
RadioMaster Zorro supports the USB PD standard. A USB AC adapter that supports the USB PD standard can be used.
There is also a USB Type-C connector on the top of the body, but this is for connecting to PC. You cannot charge battery with this connector. However, since voltage rises only when connected to PC, it seems that power is supplied to the radio.
Module bay
 Slide the cover on the back of unit upwards to remove it, and NANO (JR Lite) module bay will appear.
Due to large area around the module bay, most NANO modules should be able to be installed without interference.
Slide the cover on the back of unit upwards to remove it, and NANO (JR Lite) module bay will appear.
Due to large area around the module bay, most NANO modules should be able to be installed without interference.
SG and SH switches are located on both sides of the module bay. However, at the position of this button, if the maneuvering gets hot during a race etc., it will be accidentally pressed, so it seems a little unusable.
 This is a picture of NANO module Jumper AION-2.4TX-NANO ExpressLRS (ELRS) transmitter installed.
How to use ExpressLRS (ELRS) / Long-distance, high-speed communication protocol

Preparation of microSD card
 RadioMaster Zorro comes pre-installed with a 256MB microSD card with EdgeTX data written on it.
It also contains Lua scripts for ELRS version 2.
MicroSD card slot will appear when you remove the rubber cover on the top of body behind display.
Insert the card face down (card terminal up, label down).
RadioMaster Zorro comes pre-installed with a 256MB microSD card with EdgeTX data written on it.
It also contains Lua scripts for ELRS version 2.
MicroSD card slot will appear when you remove the rubber cover on the top of body behind display.
Insert the card face down (card terminal up, label down).
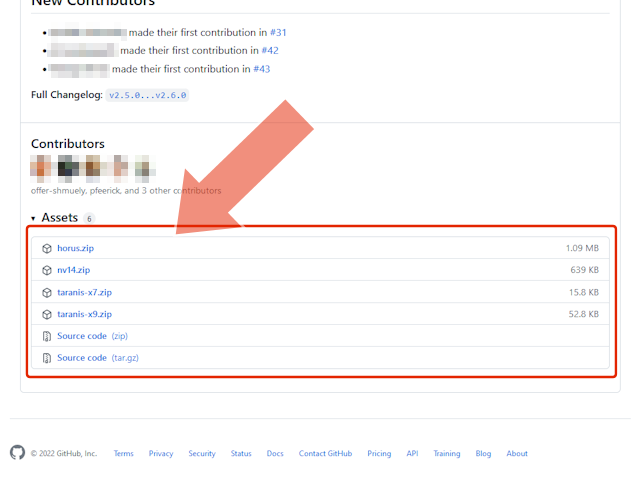 If the capacity is insufficient and you need to replace with a new SD card, or if you need to upgrade EdgeTX version, download SD card image from
EdgeTX SD card image release page (GitHub).
(RadioMaster's radios only supports up to 8GB, but 16GB could be used.)
If the capacity is insufficient and you need to replace with a new SD card, or if you need to upgrade EdgeTX version, download SD card image from
EdgeTX SD card image release page (GitHub).
(RadioMaster's radios only supports up to 8GB, but 16GB could be used.)
For the procedure to prepare the microSD card, see How to prepare microSD card for EdgeTX radio .
How to prepare microSD card for EdgeTX radio
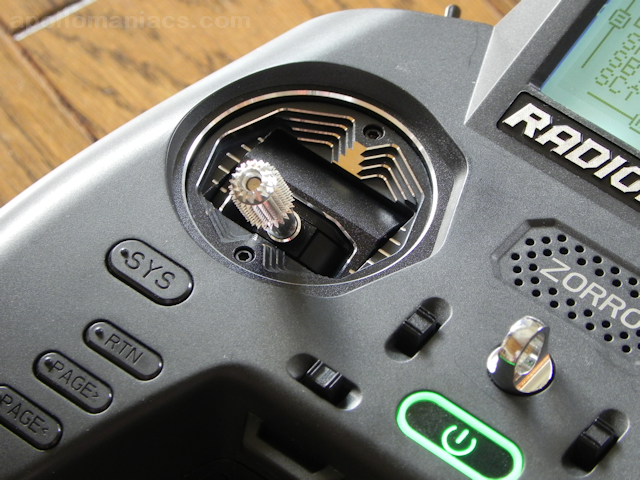
Screen navigation
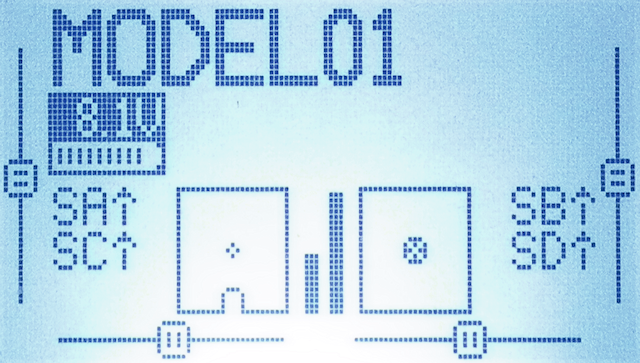
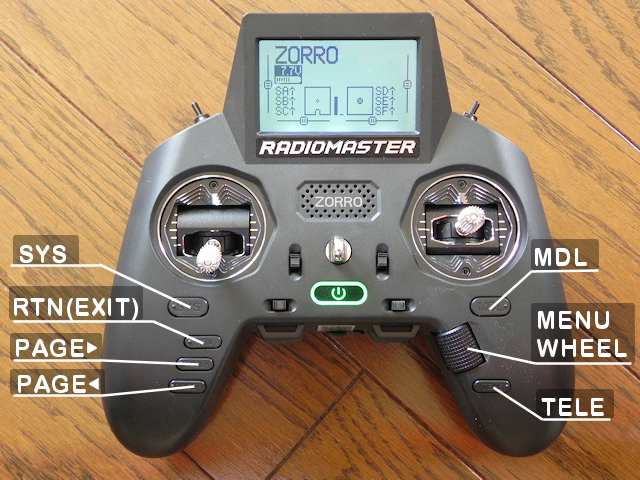 To operate EdgeTX with RadioMaster Zorro, use the switches shown in the figure.
The operations and functions are shown in the table below.
To operate EdgeTX with RadioMaster Zorro, use the switches shown in the figure.
The operations and functions are shown in the table below.
| Name of control | Function | Description |
|---|---|---|
| ENTER | Decide / Confirm | Confirm the change / input. Or select an item. In RadioMaster Zorro, clicking the bottom of [MENU WHEEL] works as an [ENTER] button. |
| EXIT/RETURN | Cancel / Back | Cancel the change / input. Or return to the previous screen. |
| PAGE | Screen switching | In the setting screen consisting of multiple pages, move to the next page / previous page. Click [PAGE>] key to switch to the next page, and click the [PAGE<] key to switch to the previous page. |
| CURSOR | Move cursor / selected position | Move the cursor. In RadioMaster Zorro, turn [MENU WHEEL] to move cursor. |
| MODEL/SYSTEM | Calling MODEL / RADIO menu | Call the MODEL / RADIO(SYSTEM) menu. Click [MDL] key to call MODEL menu, and click [SYS] key to call RADIO (SYSTEM) menu. |
- Change screen
- Press [PAGE>] [PAGE<] key on the main screen to switch between four main screens and "CHANNELS MONITOR" screen.
- Change contents
- You can switch contents of each main screen by turning scroll wheel on the main screen.
- Telemetry screen
- Press [TELE] key on the main screen to display Telemetry screen.
- Statistics / DEBUG screen
- Press and hold scroll wheel on the main screen and select "Statistics" menu to display Statistics screen. If you press [PAGE>][PAGE<] key here, you can switch to "DEBUG" screen.
Switches
| Name | Location | Type | Description |
|---|---|---|---|
| SA | Top of left hand | toggle | ON only while pressing |
| SB | Top of left hand | 3-position | |
| SC | Top of right hand | ||
| SD | Top of right hand | toggle | ON only while pressing |
| SE | Top of left hand | 2-position | |
| SF | Top of right hand | ||
| SG | Back of left hand | toggle | ON only while pressing |
| SH | Back of right hand | ||
| S1 | Top of left hand | dial (Potentiometer) | |
| S2 | Top of right hand |
Gimbal replacement method
Here, We will explain the procedure to replace RadioMaster Zorro gimbal with AG01 MINI CNC Hall gimbal (RadioMaster) . However, this task is not so easy. In the worst case, it may damage the radio. This site does not mean that we recommend replacing the gimbal. Please do it at your own risk.Jumper T12 series and Radiomaster TX12 series can be replaced with gimbal more easily than Zorro.
In addition, when installing AG01 MINI gimbal on something other than RadioMaster Zorro, it is necessary to set the gimbal to be used for throttle in advance. For more information, please refer to "Installation for Zorro & TX12" on AG01 MINI CNC Hall gimbal product page (RadioMaster) .
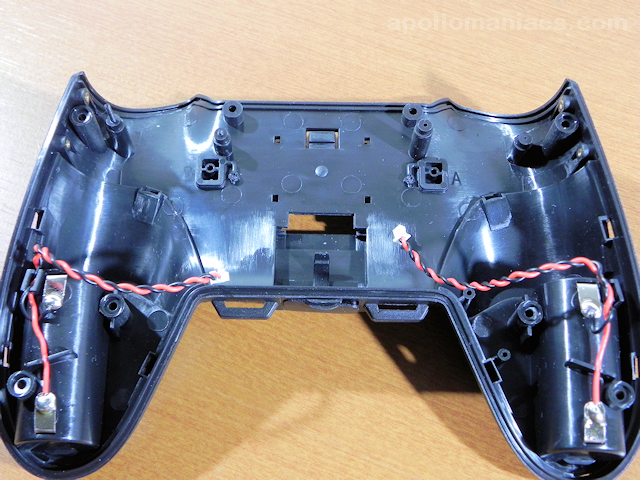
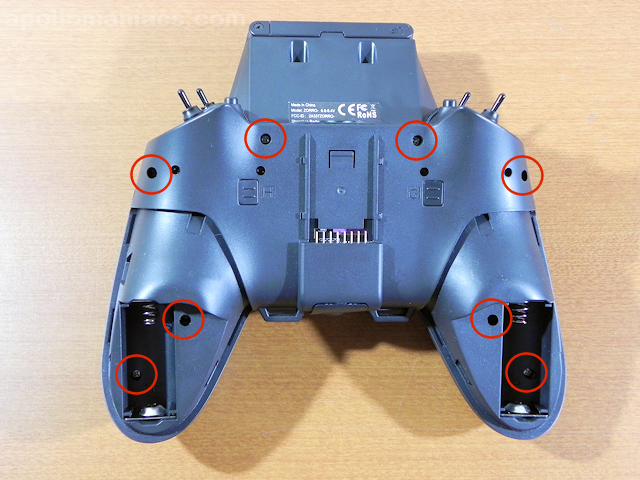 First, remove microSD card and batteries, and remove the eight screws circled in red in the figure.
All eight screws are the same size.
First, remove microSD card and batteries, and remove the eight screws circled in red in the figure.
All eight screws are the same size.
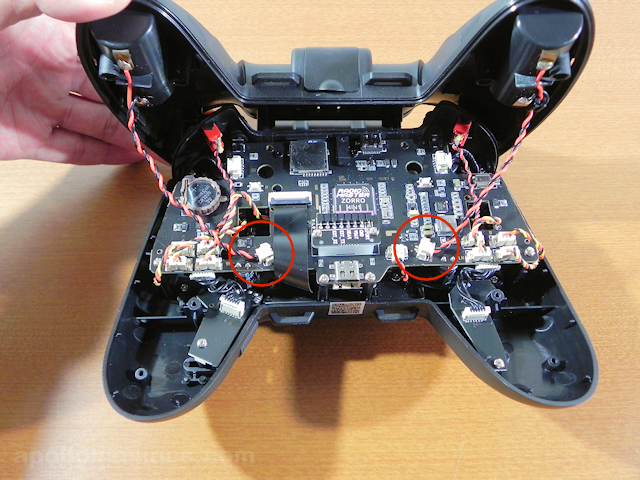 Next, remove two connectors diagonally attached to the board, which are indicated by red circles in the figure.
This is the cable that connects battery to mainboard.
By removing this, you can separate main body and back cover.
Next, remove two connectors diagonally attached to the board, which are indicated by red circles in the figure.
This is the cable that connects battery to mainboard.
By removing this, you can separate main body and back cover.
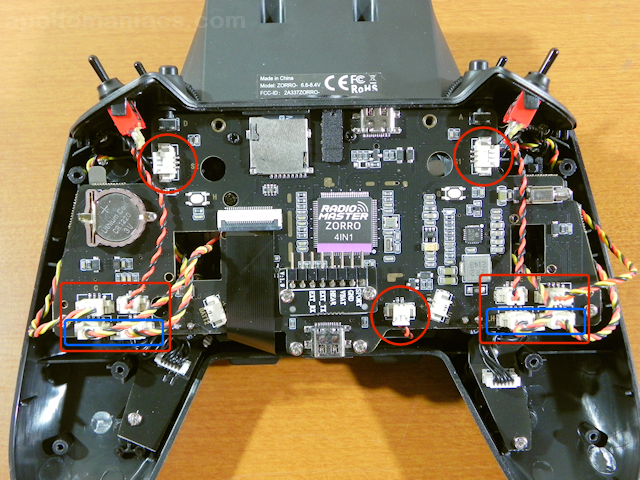 Next, remove 11 connectors circled in red in the figure.
Mark the cables so you know where each one goes before you remove them.
Of these, the four connectors surrounded by blue frames are gimbal connectors.
Next, remove 11 connectors circled in red in the figure.
Mark the cables so you know where each one goes before you remove them.
Of these, the four connectors surrounded by blue frames are gimbal connectors.
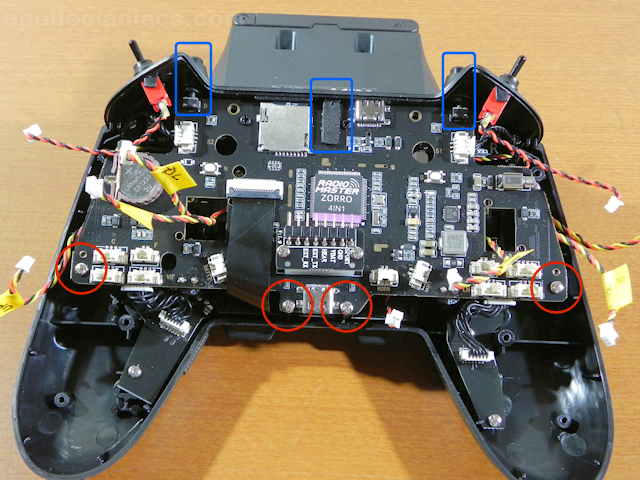 Next, remove four screws circled in red in the figure.
Then you can remove the main board.
Raise the main board forward, being careful not to put a load on the black flat cable visible in the center left.
At this time, the SA and SD button parts and part of the rubber cover enclosed in the blue frame in the figure will get caught.
Raise the board while carefully removing these parts to avoid prying.
Next, remove four screws circled in red in the figure.
Then you can remove the main board.
Raise the main board forward, being careful not to put a load on the black flat cable visible in the center left.
At this time, the SA and SD button parts and part of the rubber cover enclosed in the blue frame in the figure will get caught.
Raise the board while carefully removing these parts to avoid prying.
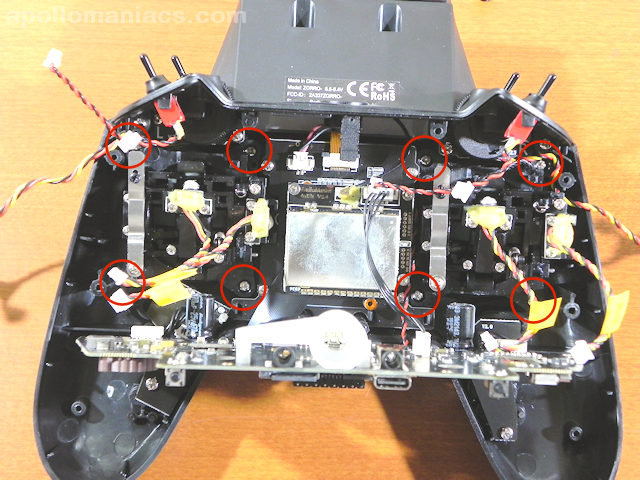 Next, remove the 8 screws circled in red in the figure (partially hidden in the photo).
Then the gimbal will come off.
Next, remove the 8 screws circled in red in the figure (partially hidden in the photo).
Then the gimbal will come off.
Then install the new gimbal in the same way. A metal ring is fitted between the gimbal and the front panel. Be careful not to shift the ring.
 Here is a picture just before installing the new gimbal.
Align with the old gimbal and mark the connector in the same way.
Here is a picture just before installing the new gimbal.
Align with the old gimbal and mark the connector in the same way.
 All you have to do is assemble in the reverse order of disassembly.
The last thing to note is the attachment of this battery cable.
When installing the back cover, this cable can be pinched by the internal structure.
Forcibly tightening the screws may cut the cable.
If the back cover doesn't fit snugly, the cable is stuck somewhere.
Please reinsert it carefully.
All you have to do is assemble in the reverse order of disassembly.
The last thing to note is the attachment of this battery cable.
When installing the back cover, this cable can be pinched by the internal structure.
Forcibly tightening the screws may cut the cable.
If the back cover doesn't fit snugly, the cable is stuck somewhere.
Please reinsert it carefully.
 After assembling and setting microSD card and batteries, do not turn on the power and leave it for a while to check if the battery is hot.
If the battery is hot, there is a short somewhere.
Remove the battery immediately and check the wiring.
After assembling and setting microSD card and batteries, do not turn on the power and leave it for a while to check if the battery is hot.
If the battery is hot, there is a short somewhere.
Remove the battery immediately and check the wiring.
Let it sit for a while, and if nothing seems to be wrong, turn on the radio. If EdgeTX starts successfully, it is completed.
 Make sure all sticks, switches and dials (Pot:Potentiometer) are responding correctly on Input Monitor screen.
Now adjust the stick tension and
calibrate the gimbal
.
Make sure all sticks, switches and dials (Pot:Potentiometer) are responding correctly on Input Monitor screen.
Now adjust the stick tension and
calibrate the gimbal
.
Stick (Gimbal) calibration
RadioMaster Zorro related links
RadioMaster official site
RadioMaster manual download
Review: RadioMaster Zorro Radio Transmitter (oscarliang)
Review: Radiomaster AG01 Mini Gimbals (oscarliang)
To know more about How to Fly Hobby Drone
To know more about iPhone