How to set up ExpressLRS transmitter
Here, we will show you how to setup ExpressLRS transmitter.
このページを日本語で見る
Table of contents
Installing ExpressLRS transmitter
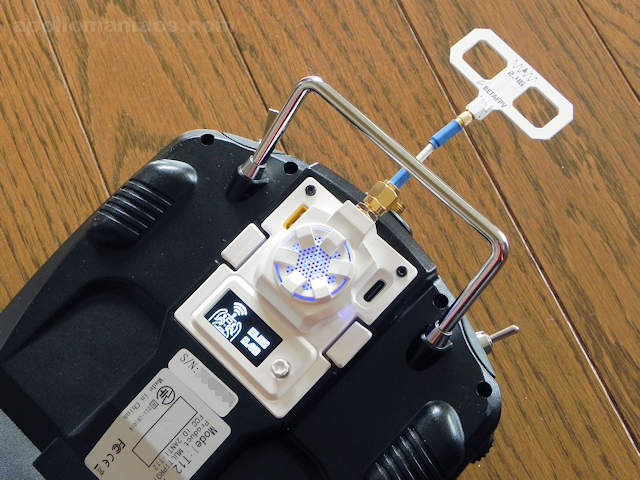 If you use an external ELRS transmitter, install it in the module bay of radio.
You must always install the antenna before turning on radio.
If you use an external ELRS transmitter, install it in the module bay of radio.
You must always install the antenna before turning on radio.
Depending on the transmitter, there are some products that require careful handling. Check the transmitter manufacturer's website.
Obtaining and saving ELRS Lua script
ELRS transmitter is set by ELRS Lua script. Store the ELRS Lua script in "\SCRIPTS\TOOLS\" folder on the radio's SD card.
Lua script for beginners
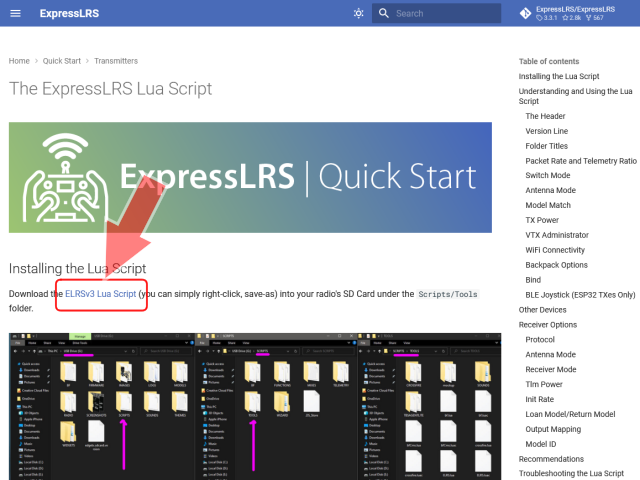 You can download ELRS Lua script from
"The ExpressLRS Lua Script" page
on ExpressLRS official site.
Right-click on the string labeled "ELRSv3 Lua Script" in the figure and select "Save As" menu to download.
You can download ELRS Lua script from
"The ExpressLRS Lua Script" page
on ExpressLRS official site.
Right-click on the string labeled "ELRSv3 Lua Script" in the figure and select "Save As" menu to download.
ELRS Lua scripts for version 3 can also be used with version 2 firmware.
The ExpressLRS Lua Script (expresslrs.org)
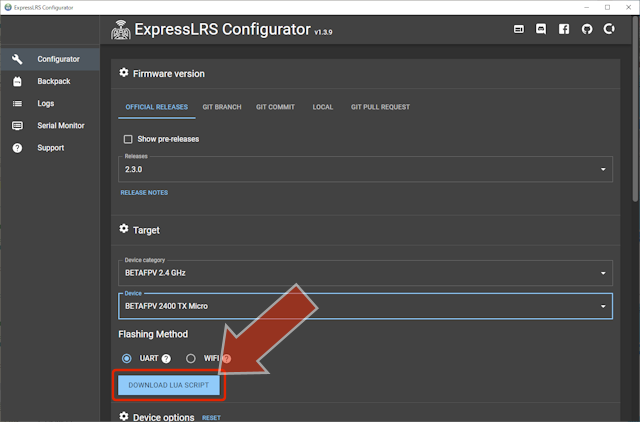 Or start
ExpressLRS Configurator
and specify the target device in "Device category" and "Device" fields.
Then "DOWNLOAD LUA SCRIPT" button will be displayed on the screen.
Click this to download latest ELRS Lua script for your device.
Or start
ExpressLRS Configurator
and specify the target device in "Device category" and "Device" fields.
Then "DOWNLOAD LUA SCRIPT" button will be displayed on the screen.
Click this to download latest ELRS Lua script for your device.
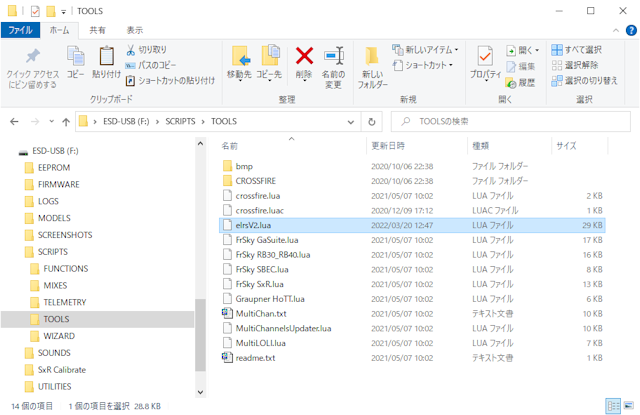 Downloaded script is a text file with the file name "elrsV3.lua" (for ELRS version 3).
Store this in the "\SCRIPTS\TOOLS\" folder of SD memory card of the radio.
Example shown in the figure, SD card is removed from the radio and inserted into PC.
Downloaded script is a text file with the file name "elrsV3.lua" (for ELRS version 3).
Store this in the "\SCRIPTS\TOOLS\" folder of SD memory card of the radio.
Example shown in the figure, SD card is removed from the radio and inserted into PC.
 Alternatively, you can write the script directly from your computer to SD card in the radio.
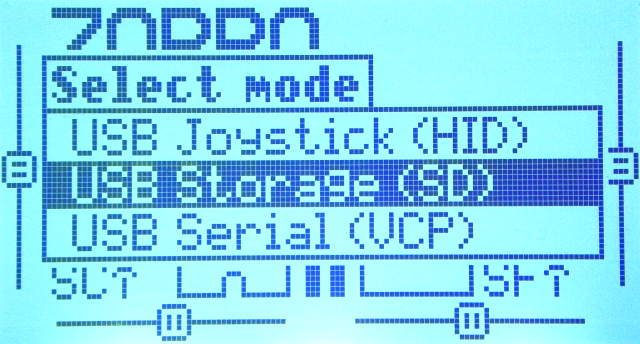
Turn on the radio, connect it to your computer with a USB cable, and select "USB Storage (SD)" from the menu that appears. Then, after waiting for a while (about 20-30 seconds), two drives, "ESD-USB" or "USB drive", and "Taranis" or "(your radio name)" will be mounted in Explorer on your computer.
(For EdgeTX, only "USB drive")
The "USB drive" drive is the SD card in the radio.
How to access radio microSD card directly from your PC
Create a drone MODEL
 As usual,
create a MODEL
for the drone you want to fly with OpenTX/EdgeTX.
However, when using ELRS transmitter, select "CRSF" as communication protocol.
Radio and transmitter communicate using TBS Crossfire (CRSF) serial protocol.
As usual,
create a MODEL
for the drone you want to fly with OpenTX/EdgeTX.
However, when using ELRS transmitter, select "CRSF" as communication protocol.
Radio and transmitter communicate using TBS Crossfire (CRSF) serial protocol.
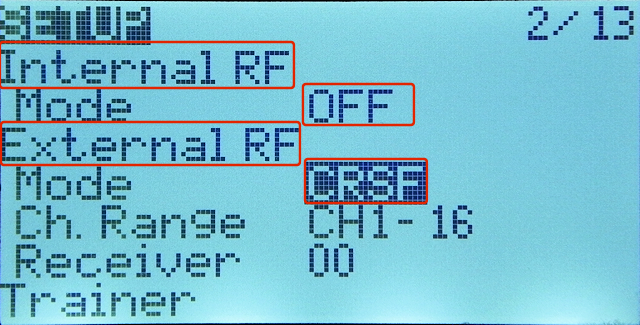
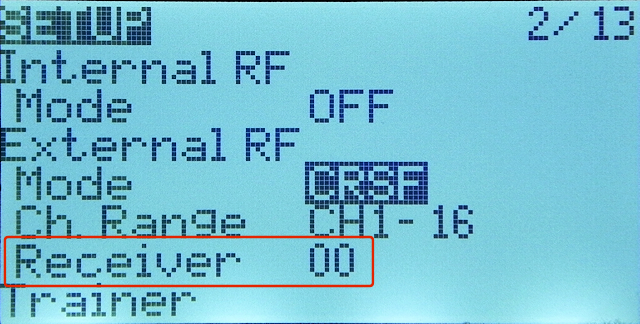
Open "SETUP" screen from "MODEL menu" of OpenTX/EdgeTX, then on the [External RF]-[Mode] field when using external ELRS transmitter, or on the [Internal RF]-[Mode] field when using built-in ELRS transmitter, select "CRSF".
If you try to select [Mode] field when ELRS transmitter is not attached to the radio, a beep sounds and you cannot select it.
Create MODEL, Bind with drone, Test flight
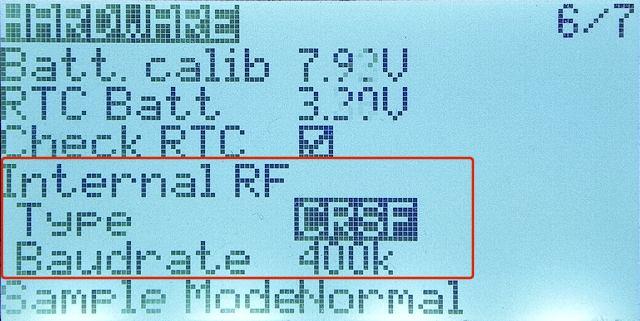 In the radio with built-in ELRS transmitter, "CRSF" cannot be selected on the above screen unless "Type" in "Internal RF" column is changed to "CRSF" on "HARDWARE" screen of "RADIO (SYSTEM) menu".
 If you set the protocol "CRSF" in [Mode] field, ELRS transmitter will start.
LED of the transmitter lights up.
If the ELRS transmitter is equipped with a display, ELRS logo or current status will be displayed there.
If you set the protocol "CRSF" in [Mode] field, ELRS transmitter will start.
LED of the transmitter lights up.
If the ELRS transmitter is equipped with a display, ELRS logo or current status will be displayed there.
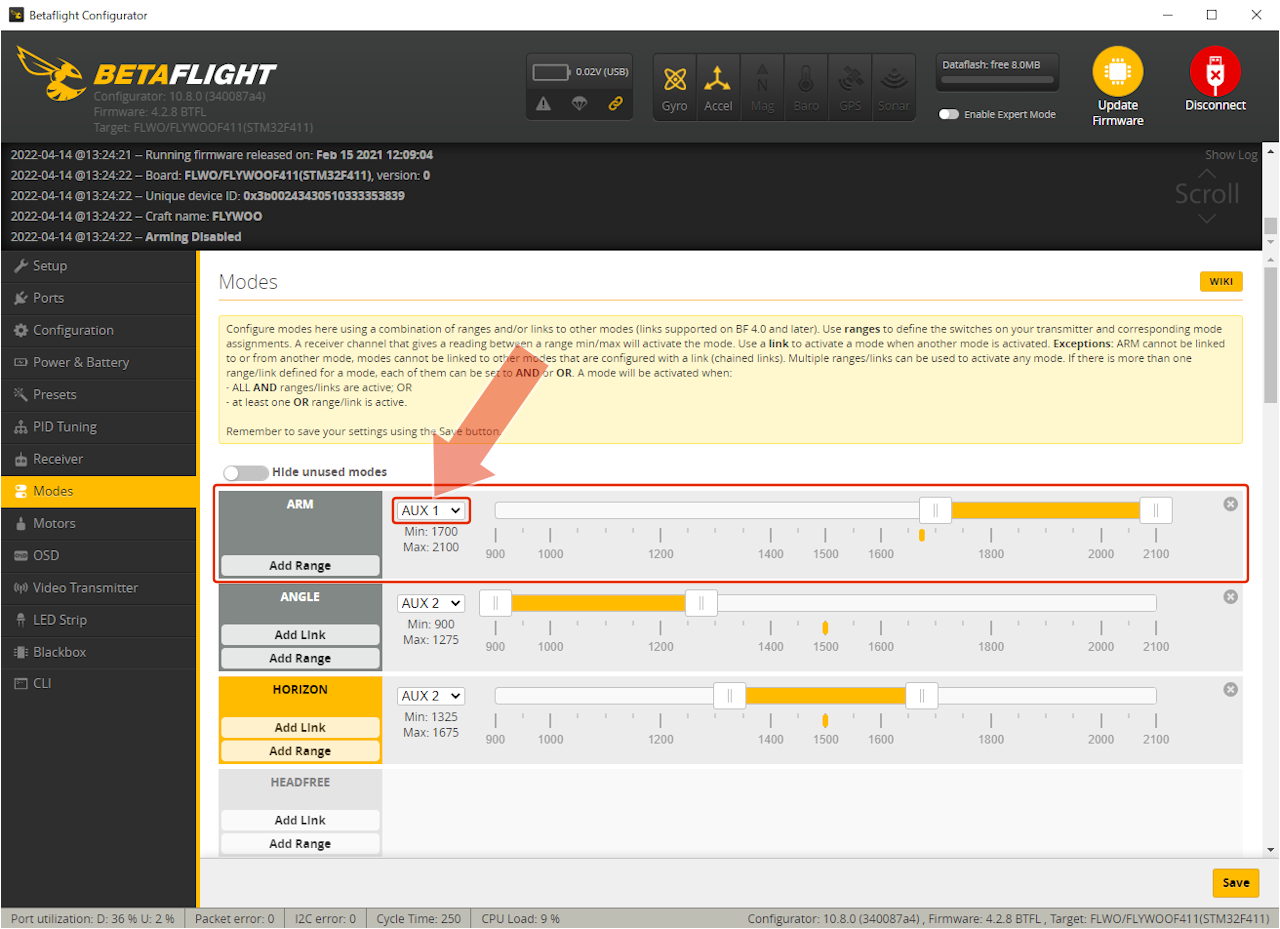 Assign Arm / Disarm to CH 5 (AUX1).
Set the drone's channel on
Assign Arm / Disarm to CH 5 (AUX1).
Set the drone's channel on
Installing and using Betaflight Configurator for beginners
| CH | SW type | range | item |
|---|---|---|---|
| AUX1 (CH5) | 3 position | 1300 - 2100 | ARM |
| 1700 - 2100 | AIR MODE | ||
| AUX2 (CH6) | 3 position | 900 - 1275 | ANGLE |
| 1300 - 1675 | HORIZON | ||
| AUX3 (CH7) | 2 position | 1700 - 2100 | FLIP OVER AFTER CRASH |
| AUX4 (CH8) | 2 position | 1700 - 2100 | BEEPER |
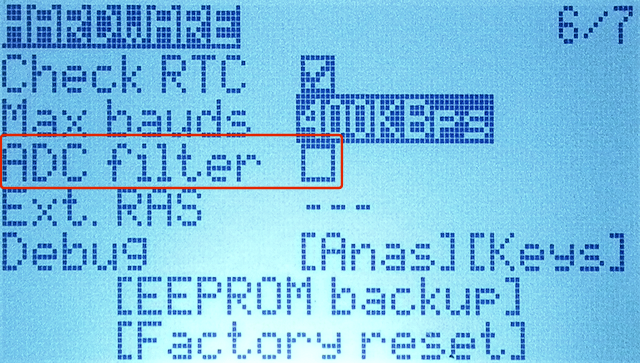 For multi-rotor aircraft, it is recommended to set "ADC Filter" on [HARDWARE] screen of "RADIO (SYSTEM) menu" on OpenTX/EdgeTX to OFF.
This option is ON by default.
Turn it off when flying a multi-rotor aircraft.
For multi-rotor aircraft, it is recommended to set "ADC Filter" on [HARDWARE] screen of "RADIO (SYSTEM) menu" on OpenTX/EdgeTX to OFF.
This option is ON by default.
Turn it off when flying a multi-rotor aircraft.
This is a function that smoothes fluctuation of values such as sticks sent from radio. It is effective for fixed-wing aircraft that do not operate steeply, but you may feel unresponsive when maneuvering a drone.
Radio Preparation (expresslrs.org)
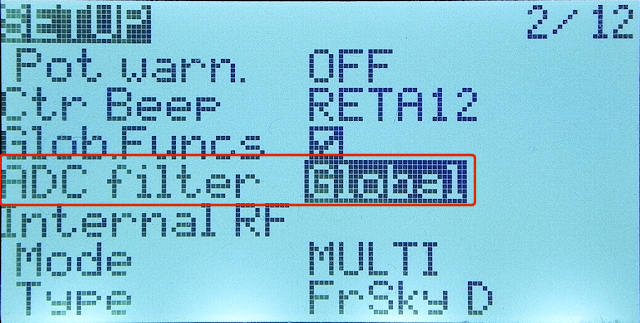 In EdgeTX, ADC Filter can also be set for each MODEL.
"Global", "Off" and "On" can be selected in "ADC Filter" field on the [SETUP] screen of "MODEL menu".
If you select "Global", "ADC Filter" setting on [HARDWARE] screen will be used.
In EdgeTX, ADC Filter can also be set for each MODEL.
"Global", "Off" and "On" can be selected in "ADC Filter" field on the [SETUP] screen of "MODEL menu".
If you select "Global", "ADC Filter" setting on [HARDWARE] screen will be used.
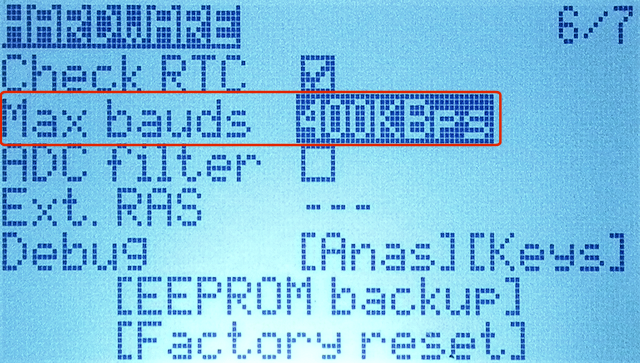 If you are using R9M 2018 module for transmitter, you need to set communication speed (baud rate) between radio and transmitter.
On OpenTX/EdgeTX, change [RADIO (SYSTEM) menu]-[HARDWARE]-[Baudrate/Max bauds] (built-in transmitter) or [MODEL menu]-[MODEL SETUP]-[External RF]-[Baudrate] (external transmitter) to 115200 baud (115KBps).
For other transmitters, the default value of 400KBps can be used. Higher baud rates can be selected depending on the radio and transmitter used.
Set up ELRS transmitter
You can set ELRS transmitter by launching ELRS Lua script in the radio.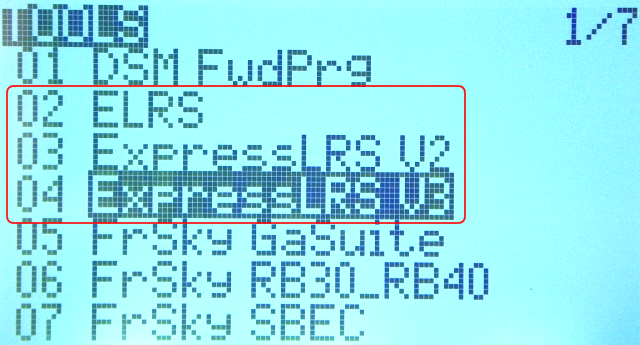 When ELRS Lua script is correctly stored in the SD card, "ELRS"(V1) or "Express LRS"(V2/V3) menu is displayed on "TOOLS" screen of "RADIO (SYSTEM) menu" of the radio.
Select it and press [ENTER].
When ELRS Lua script is correctly stored in the SD card, "ELRS"(V1) or "Express LRS"(V2/V3) menu is displayed on "TOOLS" screen of "RADIO (SYSTEM) menu" of the radio.
Select it and press [ENTER].
You can change the title displayed on "TOOLS" screen by modifying TNS-TNE statement at the top of the script. If you add "V2", "V3", etc. here, you can distinguish between version 2 and version 3 scripts.
Lua script for beginners
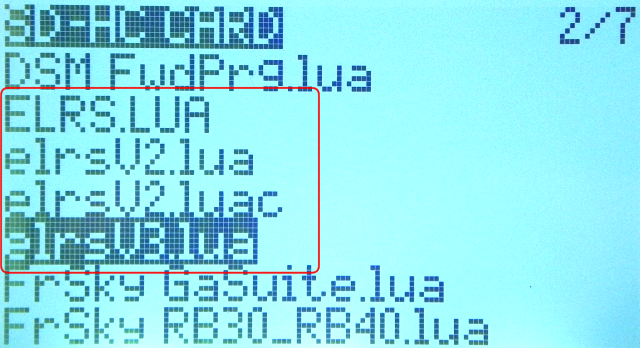 Alternatively, open "SD-HC CARD" or "SD CARD" screen from "RADIO (SYSTEM) menu" in the radio, select [SCRIPTS]-[TOOLS]-[elrsV3.lua] (For version 3), and press [ENTER].
Then a submenu will open.
Select "Execute" and press [ENTER].
Alternatively, open "SD-HC CARD" or "SD CARD" screen from "RADIO (SYSTEM) menu" in the radio, select [SCRIPTS]-[TOOLS]-[elrsV3.lua] (For version 3), and press [ENTER].
Then a submenu will open.
Select "Execute" and press [ENTER].
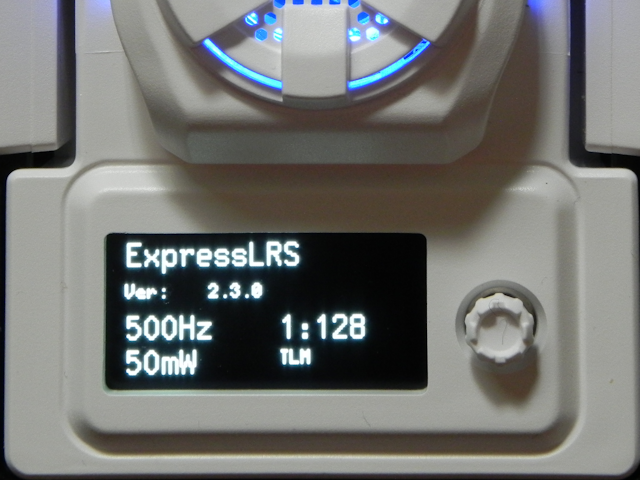
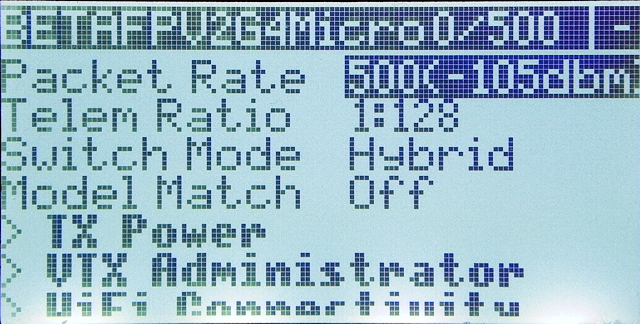 When ELRS Lua script is launched, you will see a screen like this.
The transmitter parameters are displayed.
You can change the value by selecting each parameter and pressing [ENTER].
However, basically change the parameters when drone is not Armed.
When ELRS Lua script is launched, you will see a screen like this.
The transmitter parameters are displayed.
You can change the value by selecting each parameter and pressing [ENTER].
However, basically change the parameters when drone is not Armed.
Press and hold [EXIT] on this screen to end the script and return to the previous screen.
Character "-" displayed in the upper right corner of this screen indicates that it is not bound to any receiver. If the transmitter is binding and connecting to the receiver, you will see character "C" here.
"0/500" displayed in the upper right of this screen indicates the packet transmission status. The left of "/" is the number of Bad packets, and the right is the number of Good packets. "0/500" indicates that the packet rate is set to 500Hz and there are no bad packets.
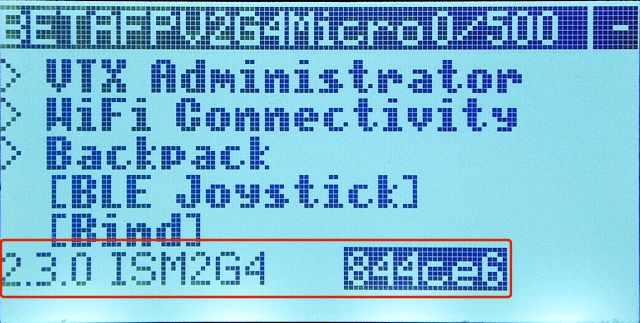 Scroll the screen to see the firmware version at the bottom.
The part that says "844ce6" is the commit hash value of git.
Scroll the screen to see the firmware version at the bottom.
The part that says "844ce6" is the commit hash value of git.
The meaning of each parameter is explained below. More detailed explanation of each parameter can be read on "Using The Lua Script" page of ExpressLRS official site.
Using The Lua Script (expresslrs.org)
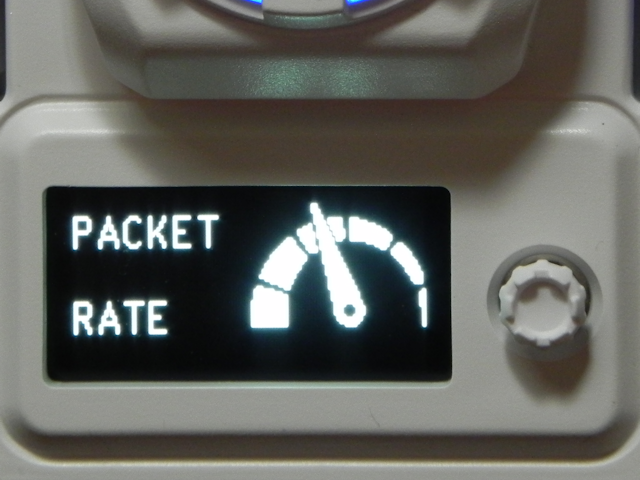
Packet Rate
Packet Rate is a parameter that specifies the transmission speed of packet data. If you specify a large value, latency (delay) will decrease, but radio wave reach will be shorter.In 2.4GHz band, you can select from 50Hz, 150Hz, 250Hz, and 500Hz. In version 3.x, F500, F1000 (Pure FLRC) / D250, D500 (redundant transmit FLRC) / 100Hz Full, 333Hz Full (LoRa 10-bit) can also be selected.
In 900MHz band, you can select from 25Hz, 50Hz, 100Hz, and 200Hz. In version 3.x, 100Hz Full (LoRa 10-bit) can also be selected.
500Hz is recommended when participating in a race, and 250Hz otherwise.
The number in parentheses after a frequency is "Sensitivity Limit" at that frequency. You can read about this on "Signal Health" page of ExpressLRS official site.
Telemetry Ratio
Telemetry Ratio is a parameter that specifies the amount (percentage) of packets used to send telemetry data. For example, "1:64" means that one packet for every 64 packets will be used to send telemetry data. You can select from Off (does not send telemetry data), 1:128, 1:64, 1:32, 1:16, 1:8, 1:4, 1:2. In version 3.x, you can also select "Std" (automatically set from Packet Rate) and "Race" (same as Std, but telemetry is disabled and synced during Arm)."Race" is recommended when participating in a race, and "Std" is recommended for others.
If you want to use "Dynamic" function of "TX Power" parameter described below, specify "Std" or the value recommended on "Dynamic Transmit Power" page of ExpressLRS official site.
Switch Mode
Switch Mode is a parameter that specifies the accuracy and frequency of transmission data for AUX1-AUX8 channels. There are two choices, "Hybrid" and "Wide (WideHybrid)". And in version 3.x, there are " Full Resolution Switch Configuration Modes " that reduce latency and increase accuracy.If you select "Hybrid", AUX2-AUX7 channels will have 3 bits of accuracy and AUX8 will have 4 bits of accuracy, and each packet will be sent in round robin. Therefore, once AUX2 channel is transmitted, next AUX2 channel is transmitted after 7 packets.
If you select "Wide", AUX2-AUX8 channels will have 6 or 7 bits of accuracy, and each packet will be sent in round robin. Therefore, once AUX2 channel is transmitted, next AUX2 channel is transmitted after 8 packets.
Note that AUX1 is always transmitted with 1-bit accuracy (ON or OFF) for all packets. ELRS is based on assigning Arm / Disarm to AUX1.
This parameter can only be changed when not connected to receiver. Also, main 4 channels (sticks) are always transmitted with 10-bit accuracy.
FPV drones do not require switch data accuracy, so I think you should choose "Hybrid".
You can read more about Switch Mode on "Switch Configs" page of ExpressLRS official site.
Model Match
ELRS transmitter can store multiple parameter configurations. And ELRS transmitter can be bound to any receiver that matches "Binding Phrase". For this reason, it is possible to accidentally fly the aircraft with a parameter configuration that is different from what was expected.
If "Model Match" is set to "On" when a receiver is connected, the receiver will only be connected to the MODEL's Receiver number currently selected in radio. If you set a different Receiver number for each MODEL that uses ELRS, even if "BindingPhrase" matches, it will not be bound when you switch MODEL of radio. This is useful when you want to select a receiver to bind to by MODEL.
You can read more about Model Match on "Model Matching" page of ExpressLRS official site.
TX Power
TX Power is a parameter that specifies the output power of ELRS transmitter. There are three subparameters:Max Power
Specifies output power of transmitter. You can choose from 10, 25, 50, 100, 250, 500, 1000, 2000 (mW). Higher output increases the range of radio waves, but increases possibility of thermal runaway of transmitter and increases power consumption. When "Dynamic" below is "Off", the transmitter always operates with the output specified here.
Dynamic
When this is set to "Dyn" or "On", output power is automatically adjusted according to the telemetry reception status, up to the value specified by "Max Power". Therefore, if you set "Telemetry Ratio" to "Off", this function will not work. If you set this to "AUX9", "AUX10", "AUX11", or "AUX12", you can turn "Dynamic" on / off on the specified channel. Setting the switch assigned to these channels to HIGH enables "Dynamic".
You can read more about Dynamic parameters on "Dynamic Transmit Power" page of ExpressLRS official site.
Fan Thresh (Fan Threshold)
Specifies the output power that start rotate air cooling fan built into the ELRS transmitter. Not all transmitters have a built-in air cooling fan.
VTX Administrator
VTX Administrator is a parameter that specifies the transmission frequency of VTX connected to receiver (drone). The settings here are sent to VTX each time the transmitter and receiver connect. Alternatively, you can send by pressing [ENTER] on [Send VTX]. However, it only sends during Disarm.VTX Administrator has four subparameters:
Band
Specifies the VTX band. If you select Off, the VTX transmission frequency will not be set to the receiver.
Channel
Specify the VTX channel.
Pwr Lvl
Specify the VTX output power as a number from "-" or "1" to "8". The actual output value depends on the VTX table settings of FC.
Pitmode
Set Pitmode to On or Off.
WiFi Connectivity
In WiFi Connectivity menu, you can switch ELRS transmitter or receiver etc. to WiFi mode to update the firmware.Enable WiFi
Put the ELRS transmitter in WiFi mode. However, some transmitters do not have WiFi function.
Enable Rx WiFi
Put the receiver connected to ELRS transmitter into WiFi mode. However, some receivers do not have WiFi function.
Enable Backpack WiFi
Put the Tx Backpack connected to ELRS transmitter into WiFi mode.
Enable VRx WiFi
Set the VRx of FPV goggles connected to ELRS transmitter with Tx Backpack function to WiFi mode.
BLE Joystick
Switch to Bluetooth LE joystick mode. The radio can be used as a Bluetooth gamepad for your computer. This feature is used when playing drone simulator on your computer. After switching to joystick mode, restart the radio or switch MODEL to return to normal mode.This function can only be used with transmitters equipped with ESP32 chip. And the radio wave reach of this Bluetooth is about 3m.
How to play VelociDrone FPV drone racing simulator
Bind
Bind to an ELRS receiver that is in bind mode. However, if you are binding using "Binding Phrase", nothing happens. See below for details.
How to Bind ExpressLRS Transmitter and Receiver
Change parameters on the ExpressLRS transmitter
 For transmitters with a display and joystick, you can change the parameters on the transmitter itself.
Push the joystick to "confirm", tilt it up and down to switch menus, tilt it to the right to "select", and tilt it to the left to "return".
Press and hold the joystick to display the item selection screen. At first, you can select the packet rate.
Tilt the joystick to the left to return to the top screen.
While the menu screen is displayed, the connection with receiver (drone) will be disconnected. Also, if you change the packet rate (Pkt rate), you need to restart receiver.
To know more about iPhone