BETAFPV Pavo25 V2 Walksnail Avatar version - Aerial photography FPV drone for outdoor use
BETAFPV Pavo25 V2 is an outdoor FPV drone that is compatible with digital FPV systems and has a powerful motor that allows for aerobatic flight and the ability to carry an action camera weighing around 100g. This time, I installed Walksnail Avatar digital FPV and assembled a full HD aerial photography CineWhoop.Since this aircraft has a takeoff weight of 100g or more, it is subject to the " Flight Rules for Unmanned Aerial Vehicles " in Japan. Additionally, after purchase, you will need to register with the Drone Registration System . See below for details.
What is BETAFPV Pavo25 V2?

However, the takeoff weight is approximately 281g (when equipped with the Walksnail Avatar HD Pro Kit), so in Japan, it is necessary to register with the drone registration system, be equipped with a remote ID function, and have a visual observer present during flight. Additionally, permission from the Minister of Land, Infrastructure, Transport and Tourism (Local Aviation Administration Bureau) is required to fly in populated areas.
Model variety
The BETAFPV Pavo25 V2 series is available in three types depending on the receiver installed: ELRS version, TBS version, and PNP (no receiver installed).
-
BETAFPV Pavo25 V2 Brushless Whoop Quadcopter

BETAFPV 2023/09 USD189.99~229.99
Wheelbase: 112.8mm / Battery: 4S / Weight: 285g (DJI O3) / 277g (Walksnail)
Pavo25 V2 is the revolutionary Cinewhoop that the product team has come up with after spending countless hours applying aerodynamics. The whoop duct can enhance an additional 200g thrust and a CNC 7075 Aluminum Y shape standoff to eliminate distortion and bending during flight while also accommodating mainstream HD VTX and Naked Action Cams.

 (US)
(UK)
(US)
(UK)
-
Walksnail Avatar HD Pro Kit
CADDX 2023/03 USD159.00(single antenna)/ USD169.00(dual antenna
The Avatar HD system uses H.265 code, an industry-leading technology, to provide 1080p FPV image quality with ultra-low latency. Support 1080P/60FPS, 720P/120FPS. Featuring a 1/1.8 inch Sony Starvis Ⅱ sensor, this camera delivers excellent night vision that's just as clear as day.
 (US)
(UK)
(US)
(UK)
Introducing BETAFPV Pavo25 V2
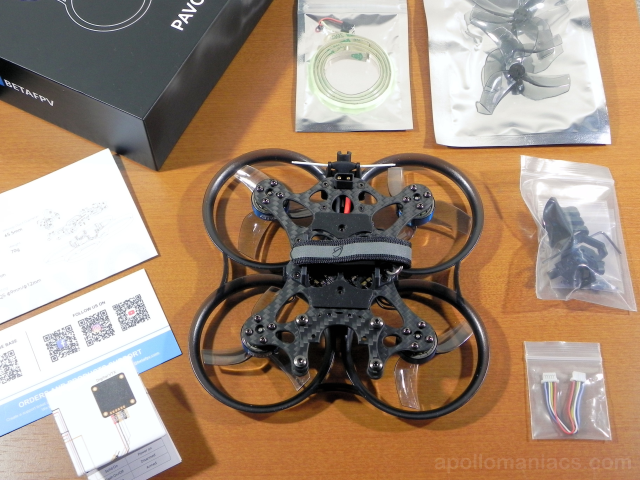 This photo shows the packaging box and all included items.
On the left side of the aircraft are instructional documents and support cards.
On the upper side of the aircraft are an LED light and a spare propeller.
On the right side of the aircraft is a set of screws and a connection cable for DJI O3.
Battery, VTX, and camera are sold separately.
This photo shows the packaging box and all included items.
On the left side of the aircraft are instructional documents and support cards.
On the upper side of the aircraft are an LED light and a spare propeller.
On the right side of the aircraft is a set of screws and a connection cable for DJI O3.
Battery, VTX, and camera are sold separately.
Cable for Walksnail Avatar are not included, so you will need to prepare it yourself.
Also, a 1.5mm Allen key (hexagonal wrench) is required for assembly. It is not included in the product, so you will need to prepare it yourself.
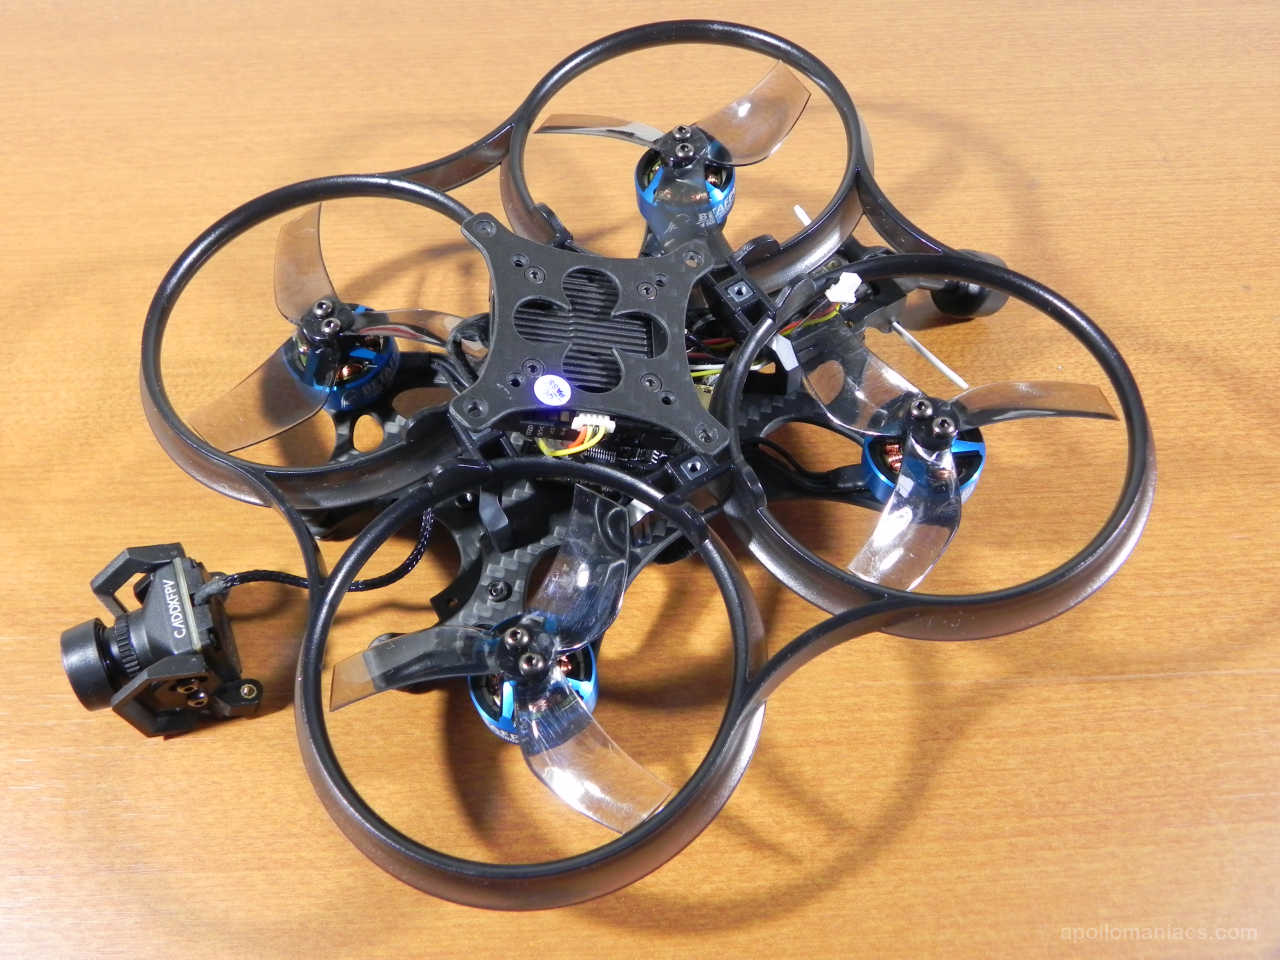
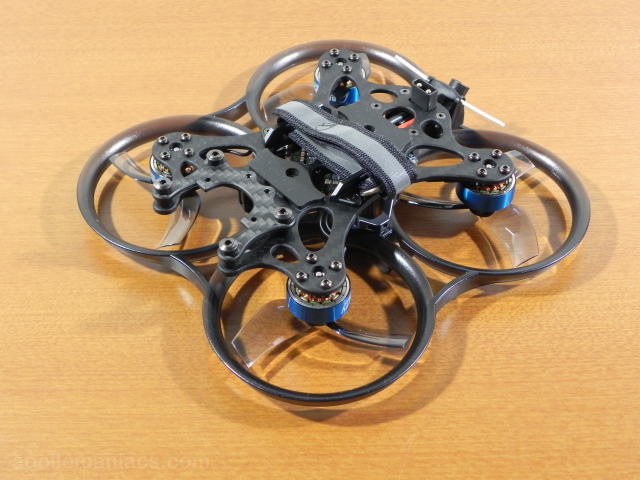 This is the top of the drone.
Secure the battery here using the strap.
The battery connector is XT30.
The connector is fixed to the rear of the frame.
This is the top of the drone.
Secure the battery here using the strap.
The battery connector is XT30.
The connector is fixed to the rear of the frame.
The two white sticks sticking out at the back are the ELRS receiver antennas. The ELRS receiver is fixed at the rear of the frame and connected to the FC by a cable.
 This is the bottom of the drone.
Place the VTX in the square plate in the center of the aircraft.
The white 3-pin JST-SH connector on the back is for the LED light.
I don't use an LED light, so this time I'll connect a remote ID transmitter here.
This is the bottom of the drone.
Place the VTX in the square plate in the center of the aircraft.
The white 3-pin JST-SH connector on the back is for the LED light.
I don't use an LED light, so this time I'll connect a remote ID transmitter here.
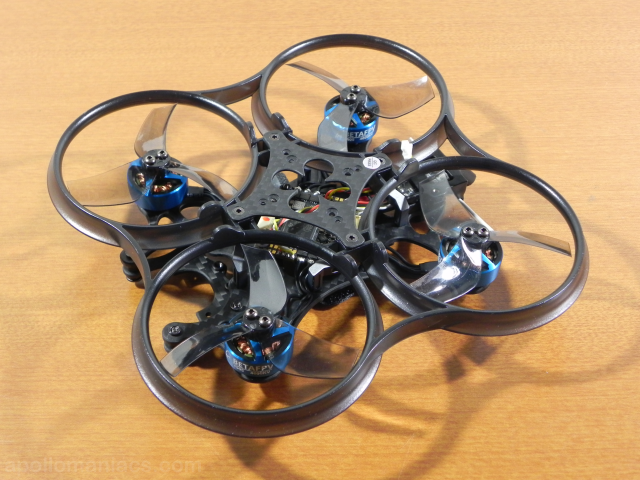
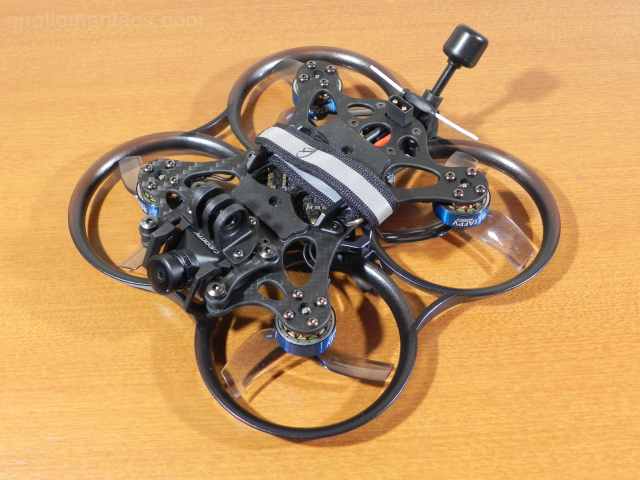 This photo shows the completed version with the
Walksnail Avatar HD Pro Kit
(17.6g) installed.
This photo shows the completed version with the
Walksnail Avatar HD Pro Kit
(17.6g) installed.
The forehead part has a 2-prong mount, a fork-shaped mount system that became famous for the GoPro series. A wide variety of action cameras can be mounted up to 100g in weight.
If you always use an action camera for aerial photography, it may be better to use the lighter Walksnail Avatar HD Micro/Nano Kit (16g) for VTX.
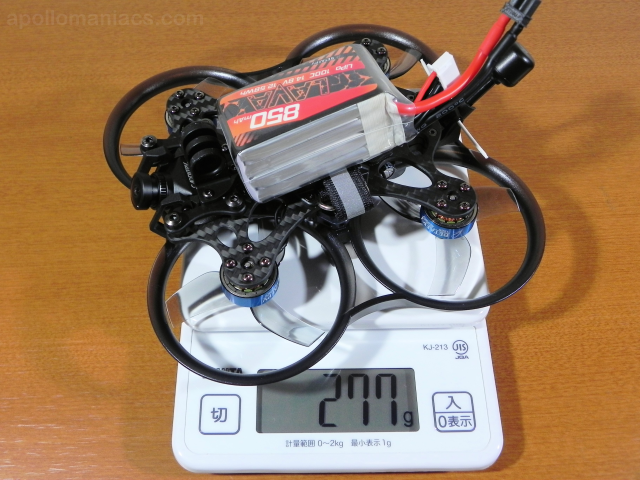 This time I got a
ExpressLRS (ELRS) receiver
model.
When the Walksnail Avatar HD Pro Kit is attached to this, the weight including the
BETAFPV LAVA Series 4S 850mAh LiPo battery
is 277g.
If a remote ID transmitter is installed, the weight will increase by an additional 4g, and the takeoff weight according to Japanese aviation law will be approximately 281g.
This time I got a
ExpressLRS (ELRS) receiver
model.
When the Walksnail Avatar HD Pro Kit is attached to this, the weight including the
BETAFPV LAVA Series 4S 850mAh LiPo battery
is 277g.
If a remote ID transmitter is installed, the weight will increase by an additional 4g, and the takeoff weight according to Japanese aviation law will be approximately 281g.
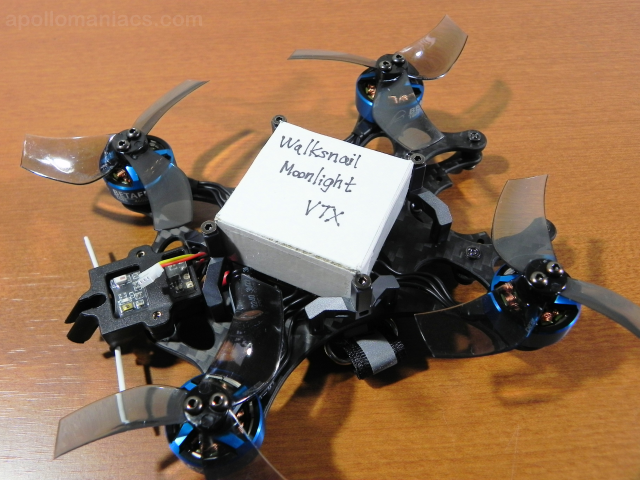 I checked to see if the
Walksnail Moonlight kit
, a digital VTX capable of 4K/60fps shooting released in January 2024, can be installed.
I tried to fit a VTX mockup made from cardboard.
Length x width x height all seem to be just out of line.
It seems possible to install it if you try hard, but there doesn't seem to be enough room to route the cables.
This photo shows the
Insta360 GO 3 action camera
installed.
It is mounted using
a silicone case made by another company (Amazon.com)
.
I checked to see if the
Walksnail Moonlight kit
, a digital VTX capable of 4K/60fps shooting released in January 2024, can be installed.
I tried to fit a VTX mockup made from cardboard.
Length x width x height all seem to be just out of line.
It seems possible to install it if you try hard, but there doesn't seem to be enough room to route the cables.
This photo shows the
Insta360 GO 3 action camera
installed.
It is mounted using
a silicone case made by another company (Amazon.com)
.
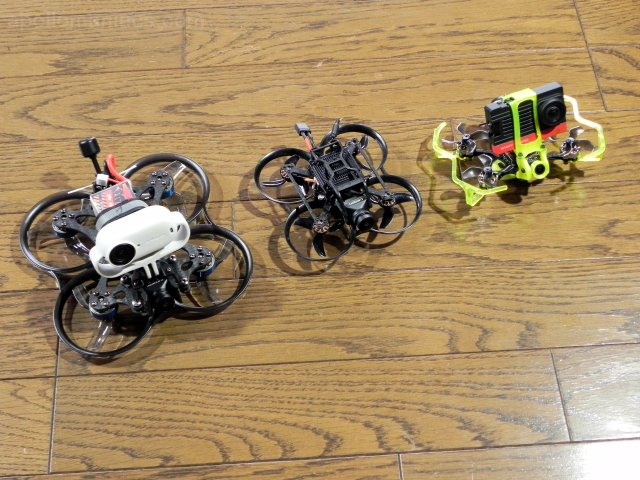 Comparison with
Pavo Pico
from the same BETAFPV company and
Firefly Baby Quad
(equipped with BETAFPV SMO 4K camera).
It feels a little bigger than other drones.
Comparison with
Pavo Pico
from the same BETAFPV company and
Firefly Baby Quad
(equipped with BETAFPV SMO 4K camera).
It feels a little bigger than other drones.
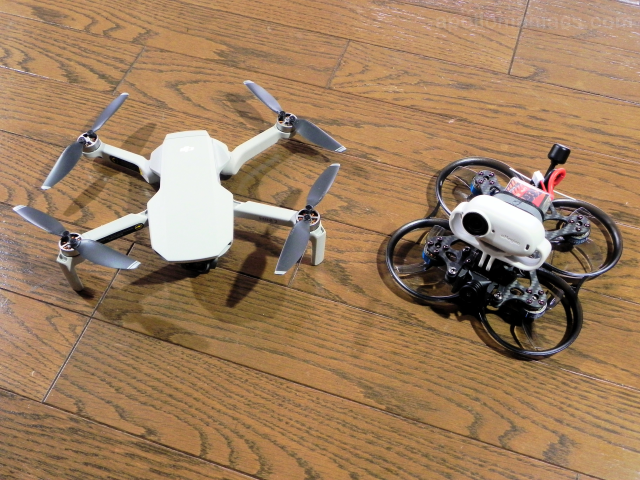 Comparison with
DJI Mini 2
.
There doesn't seem to be much difference in size.
Comparison with
DJI Mini 2
.
There doesn't seem to be much difference in size.
How to install a Walksnail Avatar HD Pro Kit
Air Unit (camera, VTX) is sold separately. You need to install it yourself.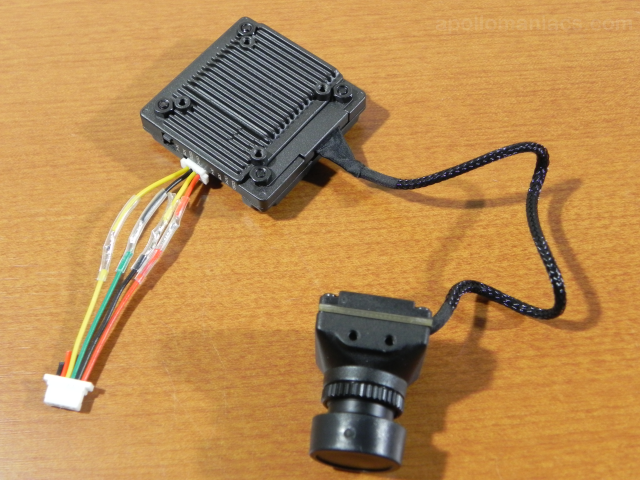 FC of BETAFPV Pavo25 V2: F722 35A AIO V2 is equipped with a 6-pin connector for DJI O3.
To use Walksnail Avatar, prepare a 4-pin conversion cable.
Alternatively, solder connectors to the FC or VTX that can be connected to each other.
FC of BETAFPV Pavo25 V2: F722 35A AIO V2 is equipped with a 6-pin connector for DJI O3.
To use Walksnail Avatar, prepare a 4-pin conversion cable.
Alternatively, solder connectors to the FC or VTX that can be connected to each other.
This time, I created a conversion cable like the one in the photo. Both connectors are JST-SH (1.0mm pitch).
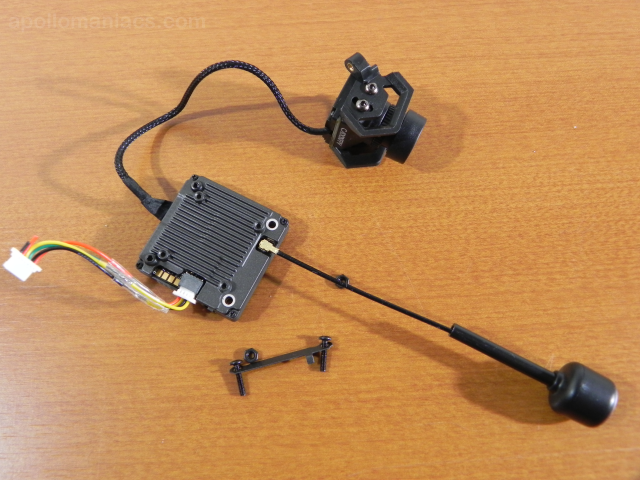 Attach the antenna to the Walksnail Avatar HD Pro Air Unit.
Use the lollipop antenna that comes with the VTX.
After inserting the antenna into the VTX connector as shown in the photo, screw the metal plate included with the Air Unit to secure the base of the antenna.
Attach the antenna to the Walksnail Avatar HD Pro Air Unit.
Use the lollipop antenna that comes with the VTX.
After inserting the antenna into the VTX connector as shown in the photo, screw the metal plate included with the Air Unit to secure the base of the antenna.
Also, screw the frame onto the camera as shown in the photo. Both the frame and screws are included with the Pavo25 V2.
 By removing the four screws that secure the square plate on the bottom of the drone, you can also remove the round propeller guard.
Consider how to install VTX.
By removing the four screws that secure the square plate on the bottom of the drone, you can also remove the round propeller guard.
Consider how to install VTX.
The mounting direction of the VTX will change depending on the length of the connection cable you created. Rotate or flip the VTX to determine the optimal mounting direction, taking into account the positional relationship of the VTX, antenna, and camera.
 After deciding the mounting direction of the VTX, assemble the frame.
First, screw the square plate onto the VTX.
Insert the antenna into the frame, arrange the camera cables, fit the propeller guard, and secure the square plate to the frame.
After deciding the mounting direction of the VTX, assemble the frame.
First, screw the square plate onto the VTX.
Insert the antenna into the frame, arrange the camera cables, fit the propeller guard, and secure the square plate to the frame.
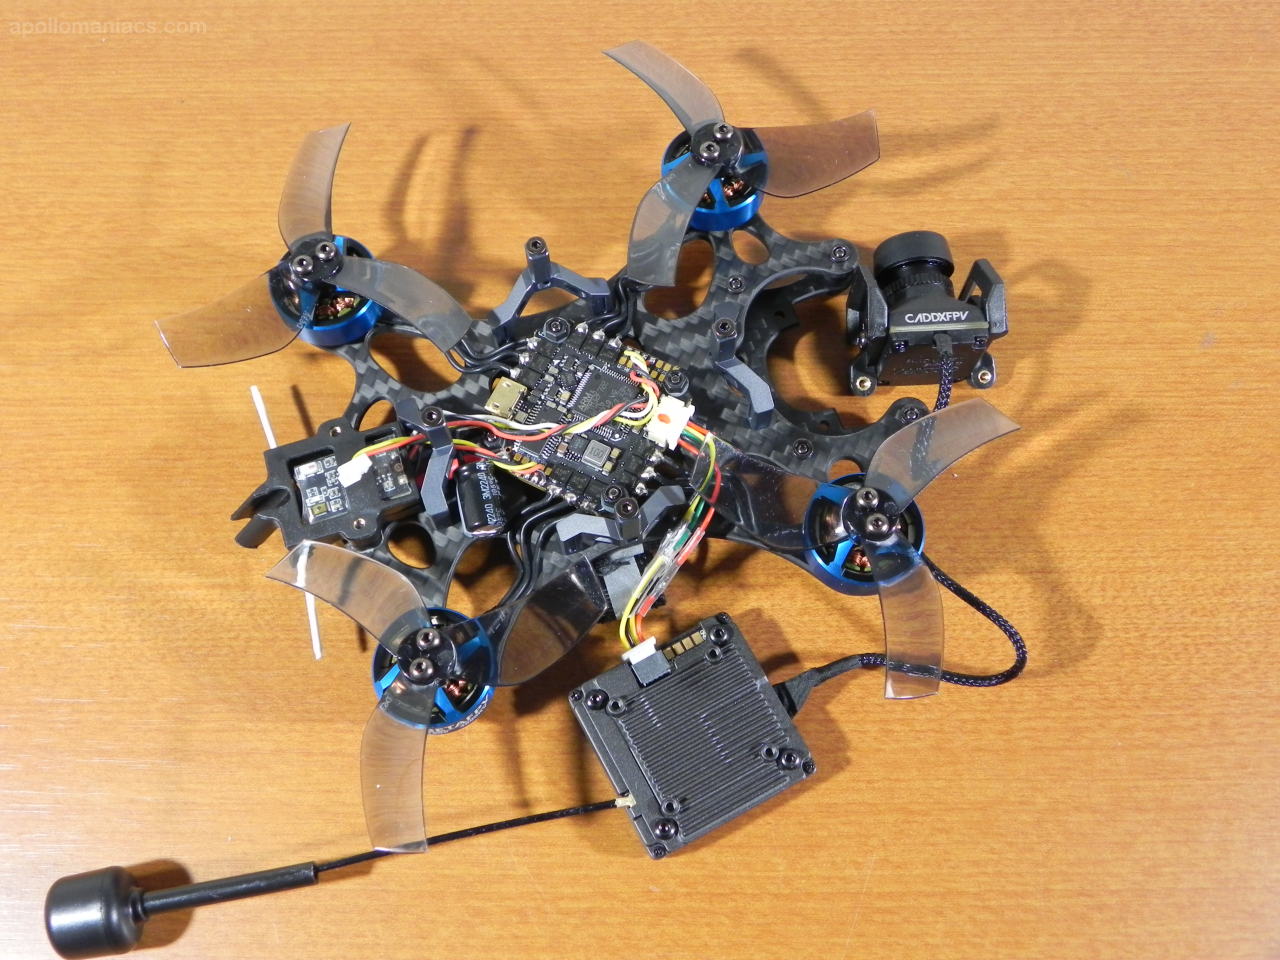
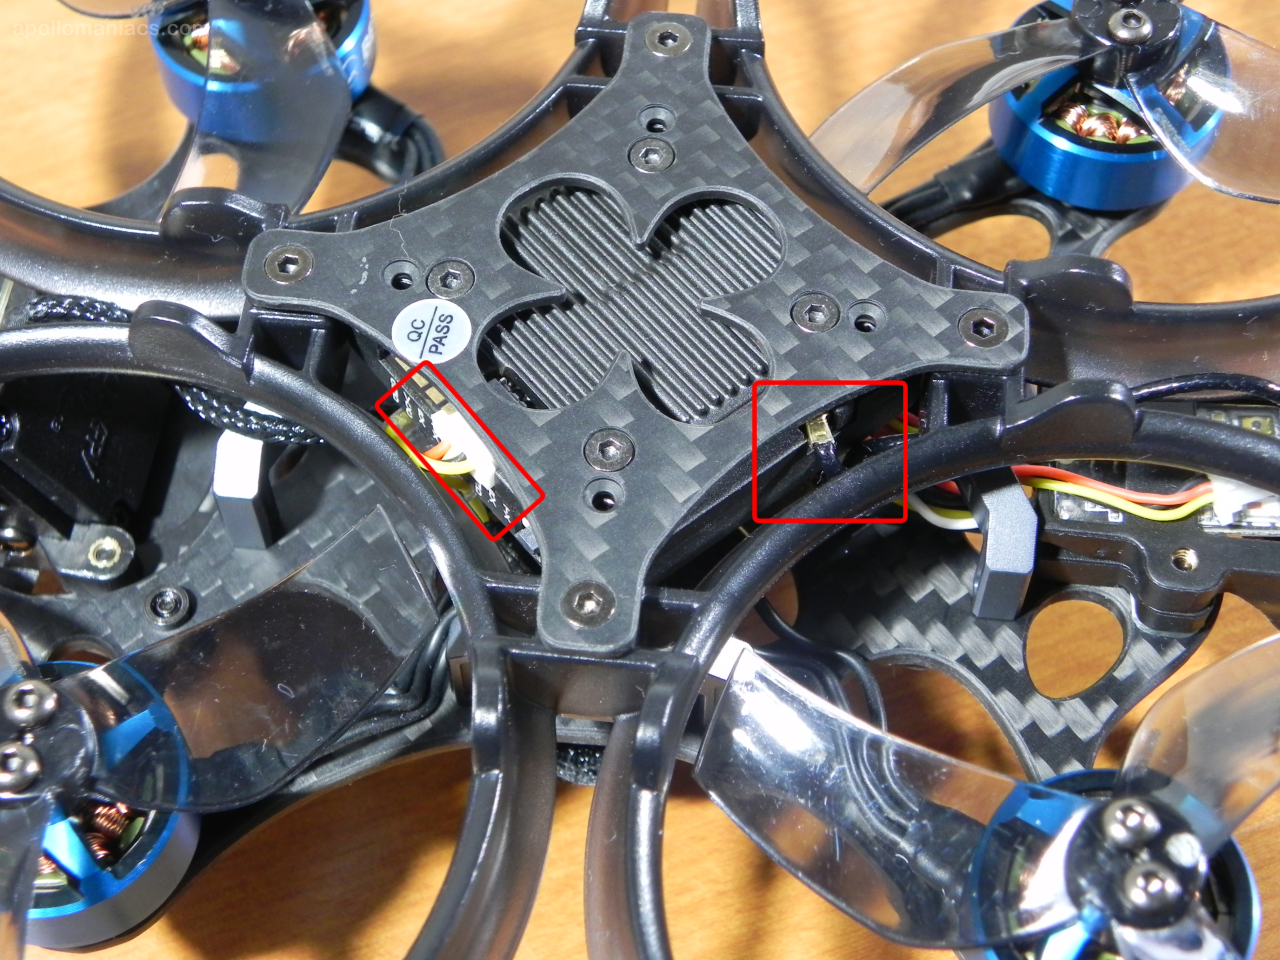 Walksnail Avatar HD Pro is thinner than DJI O3, so the connectors and switches are located very close to the propeller guard.
The connector cable for the FC and the VTX antenna cable were stuck in the gap between the propeller guard.
Route the cables so that as little load as possible is placed on them.
Walksnail Avatar HD Pro is thinner than DJI O3, so the connectors and switches are located very close to the propeller guard.
The connector cable for the FC and the VTX antenna cable were stuck in the gap between the propeller guard.
Route the cables so that as little load as possible is placed on them.
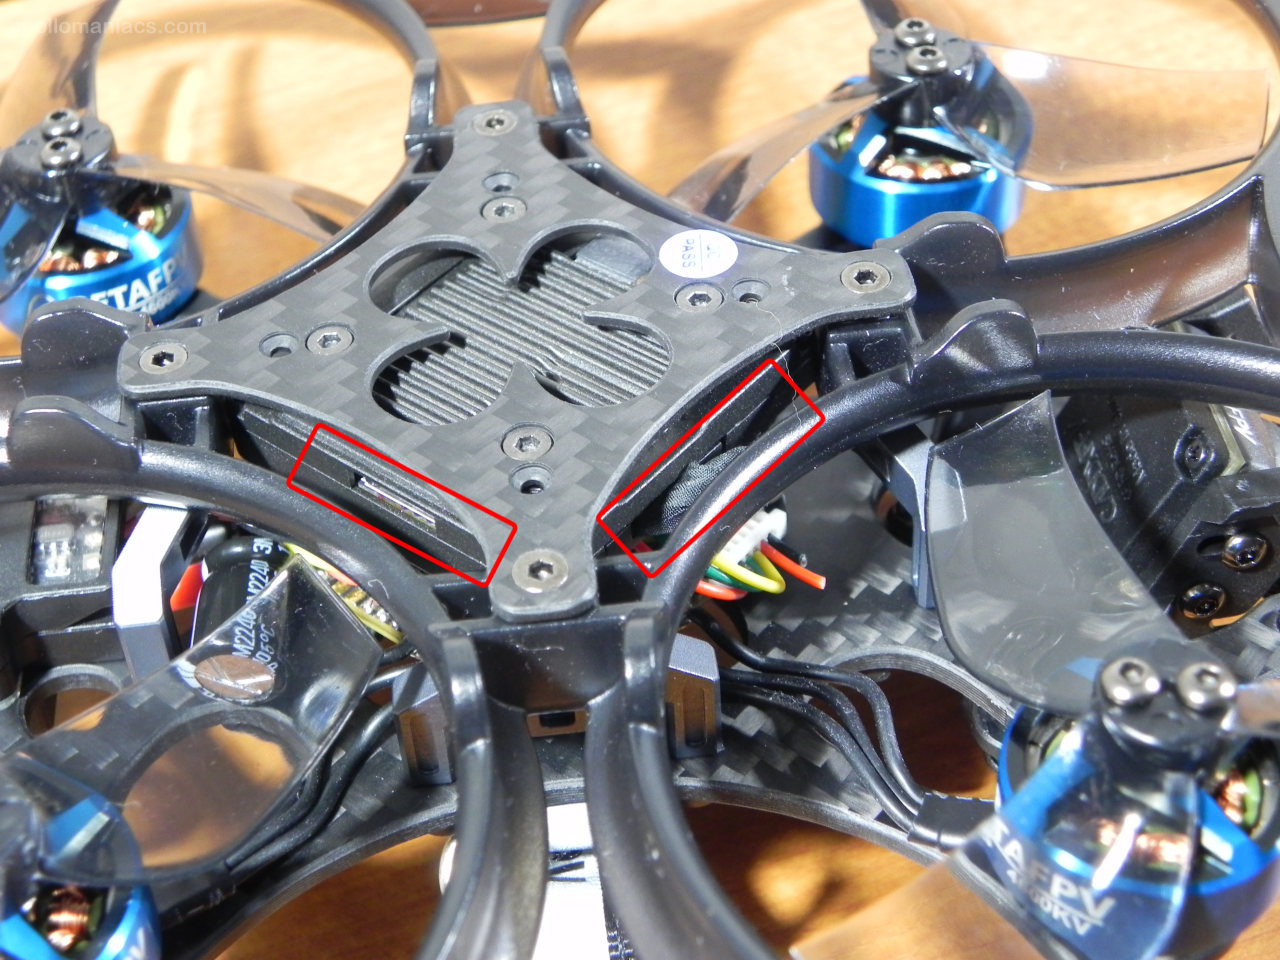 The VTX's USB connector is hidden behind the propeller guard, so in order to retrieve recorded video from the VTX, you must remove the VTX from the frame.
The camera cable is also tucked into the gap in the propeller guard.
If you can prepare screws and spacers of appropriate length, it seems better to move the VTX further back (upward).
The VTX's USB connector is hidden behind the propeller guard, so in order to retrieve recorded video from the VTX, you must remove the VTX from the frame.
The camera cable is also tucked into the gap in the propeller guard.
If you can prepare screws and spacers of appropriate length, it seems better to move the VTX further back (upward).
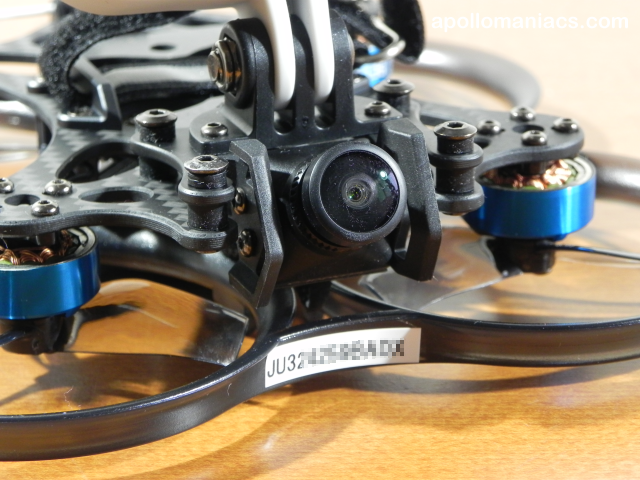
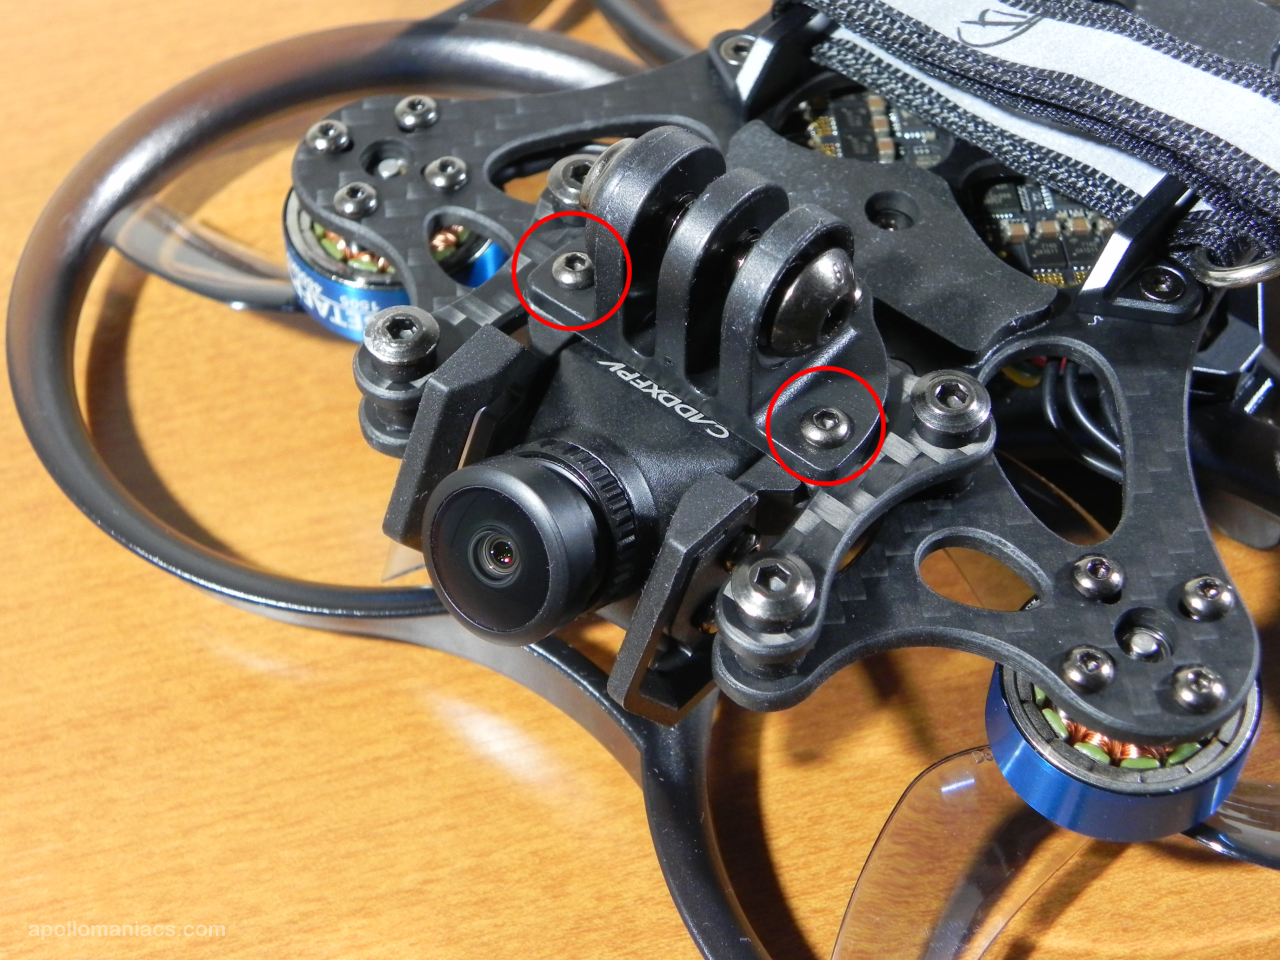 The FPV camera is fixed to the frame along with the GoPro camera mount using two screws as shown in the picture.
Drone registration and remote ID transmitter installation
 Since the takeoff weight of this aircraft including the battery and remote ID transmitter is 281g, I registered it in the
"Drone Registration System"
as "Amateur-Built UA/Others".
I was worried about where to paste the "registration ID", but as shown in the photo, I pasted it on the front and back of the propeller guard, like a car license plate.
Since the propeller guard cannot be easily removed on this aircraft, I think there will be no problem by pasting it here.
Since the takeoff weight of this aircraft including the battery and remote ID transmitter is 281g, I registered it in the
"Drone Registration System"
as "Amateur-Built UA/Others".
I was worried about where to paste the "registration ID", but as shown in the photo, I pasted it on the front and back of the propeller guard, like a car license plate.
Since the propeller guard cannot be easily removed on this aircraft, I think there will be no problem by pasting it here.
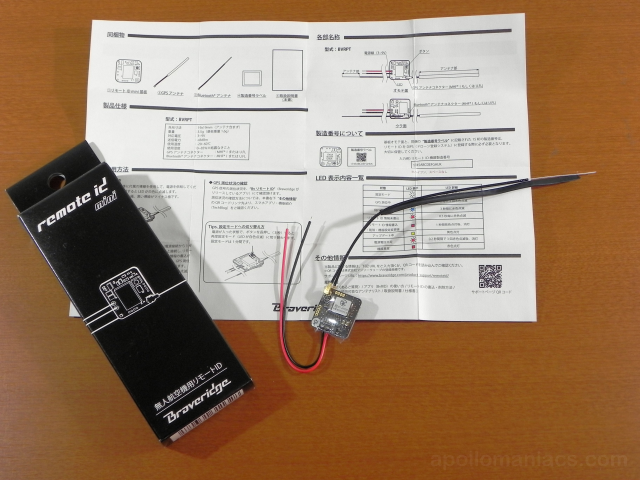 I installed
Braveridge
's "Remote ID mini BVRPT".
The total weight including the antenna is only 3.5g, and the power supply is compatible with 3~9V (1s~2s), making it suitable for FPV drones.
I installed
Braveridge
's "Remote ID mini BVRPT".
The total weight including the antenna is only 3.5g, and the power supply is compatible with 3~9V (1s~2s), making it suitable for FPV drones.
Connect to the 5V BEC connector (JST-SH 3 pin) for the LED light that is prepared from the beginning.
For more information, see How to install a remote ID transmitter on a drone (for Japan) .
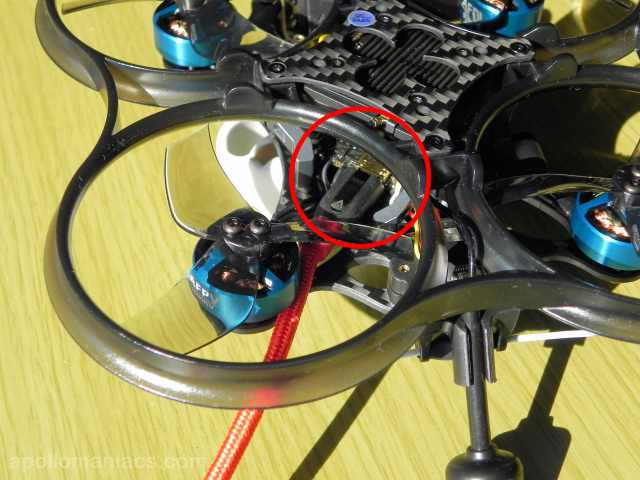
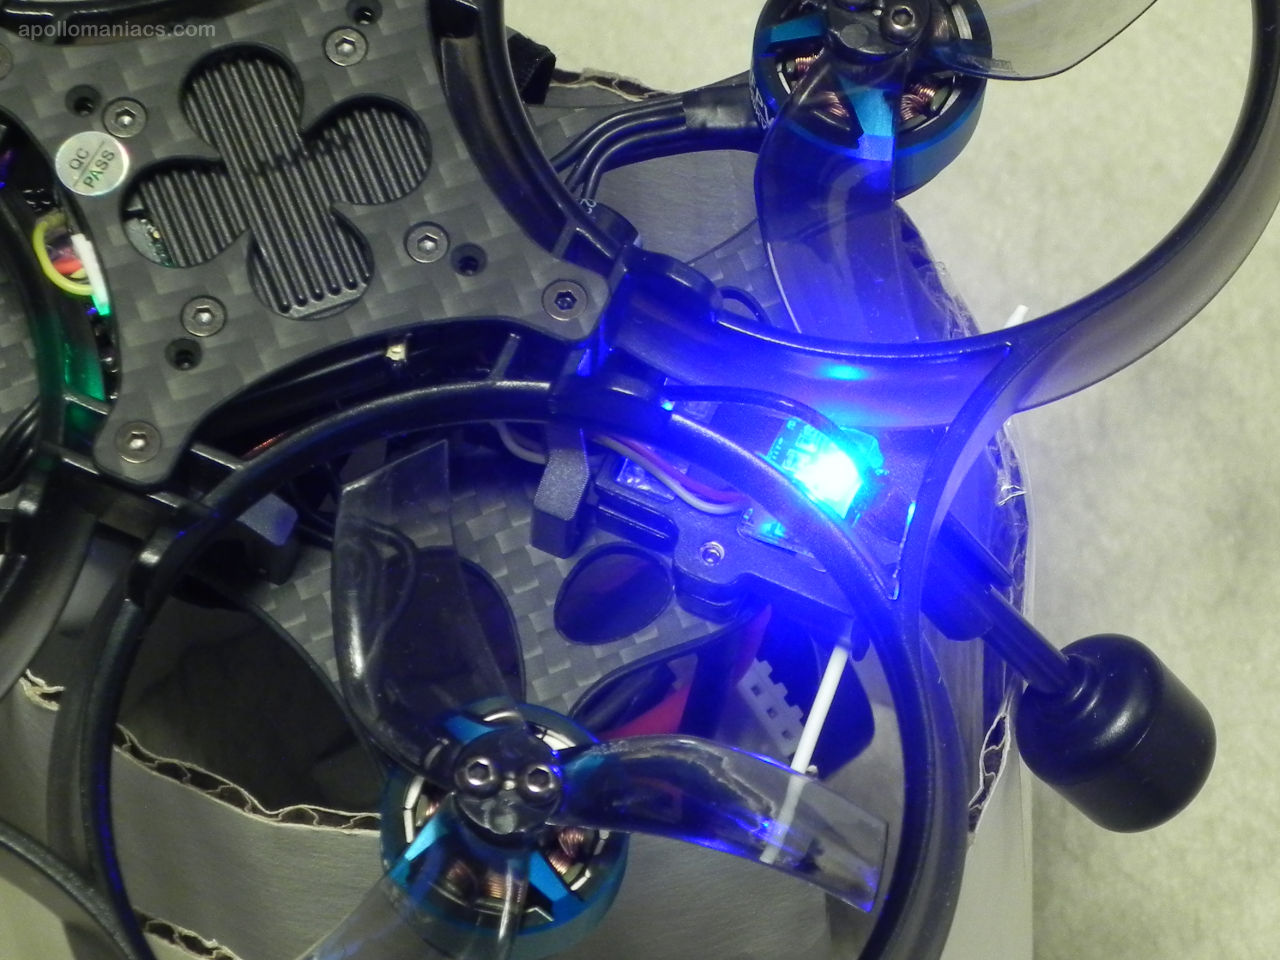
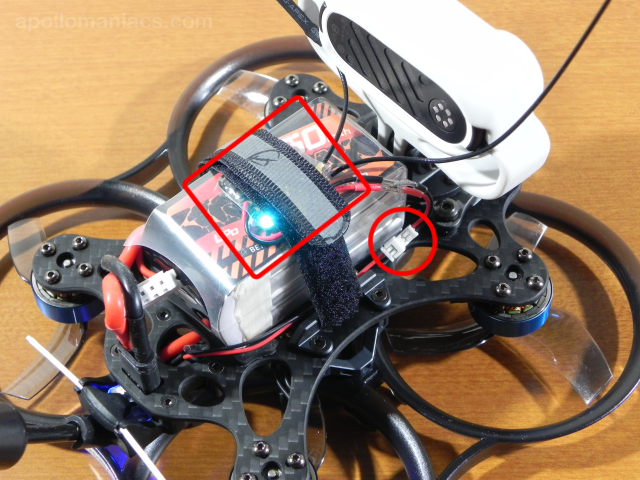 The remote ID transmitter was installed on the aircraft as shown in this photo.
The part circled in red is the connection part between the 5V BEC connector for the LED light on the aircraft and the power supply for the remote ID transmitter.
Both are replaced with 2-pin Micro JST (1.25mm pitch) connectors.
The remote ID transmitter was installed on the aircraft as shown in this photo.
The part circled in red is the connection part between the 5V BEC connector for the LED light on the aircraft and the power supply for the remote ID transmitter.
Both are replaced with 2-pin Micro JST (1.25mm pitch) connectors.
Also, the board surrounded by a red square with a lit blue LED light is the remote ID transmitter. I decided to fasten this together with the battery using Velcro tape.
During the flight of an FPV drone, the battery output voltage will fluctuate greatly as the motor rotation speed changes. Do not connect additional devices such as remote ID transmitters directly to the battery output terminals. Take the power from the BEC connector on the FC board, or connect an electrolytic capacitor for output smoothing to the battery output terminal.
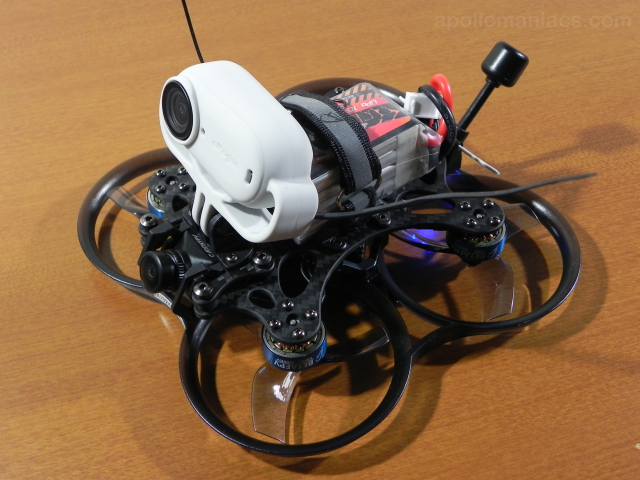 This is the completed photo.
The antennas sticking out on both sides of the back of the
Insta360 Go3 camera
are the Bluetooth and GPS antennas of the remote ID transmitter.
This is the completed photo.
The antennas sticking out on both sides of the back of the
Insta360 Go3 camera
are the Bluetooth and GPS antennas of the remote ID transmitter.
-
Braveridge Remote ID mini (external antenna, antenna and power line installed) BVRPT
Braveridge 2023/03 JPY16,800(USD113)
Weight 1.6 g (excluding antenna and power line) (Total weight including antenna line and power line: 3.5 g) The world's smallest and lightest "Remote ID BVRPA/BVRPN" Braveridge, which has achieved an overwhelmingly low price for remote ID devices, is now releasing an overwhelmingly smaller and lighter remote ID device that is the world's smallest and lightest. We have achieved this goal.
Product variety
Drone Remote ID Portal (Japanese:Braveridge)
BETAFPV Pavo25 V2 flight preparation
 The flight controller's USB connector is now a somewhat old miniB type.
The connector is located deep within the main body frame, so it is helpful to have a thin-tipped screwdriver or tweezers available to attach/remove the cable.
The flight controller's USB connector is now a somewhat old miniB type.
The connector is located deep within the main body frame, so it is helpful to have a thin-tipped screwdriver or tweezers available to attach/remove the cable.
Note that, in the case of this aircraft (FC), even if you connect the aircraft to a computer via a USB cable, only the FC will start. No power is supplied to peripherals such as VTX or ELRS receivers. When configuring peripheral settings, the battery must be connected.
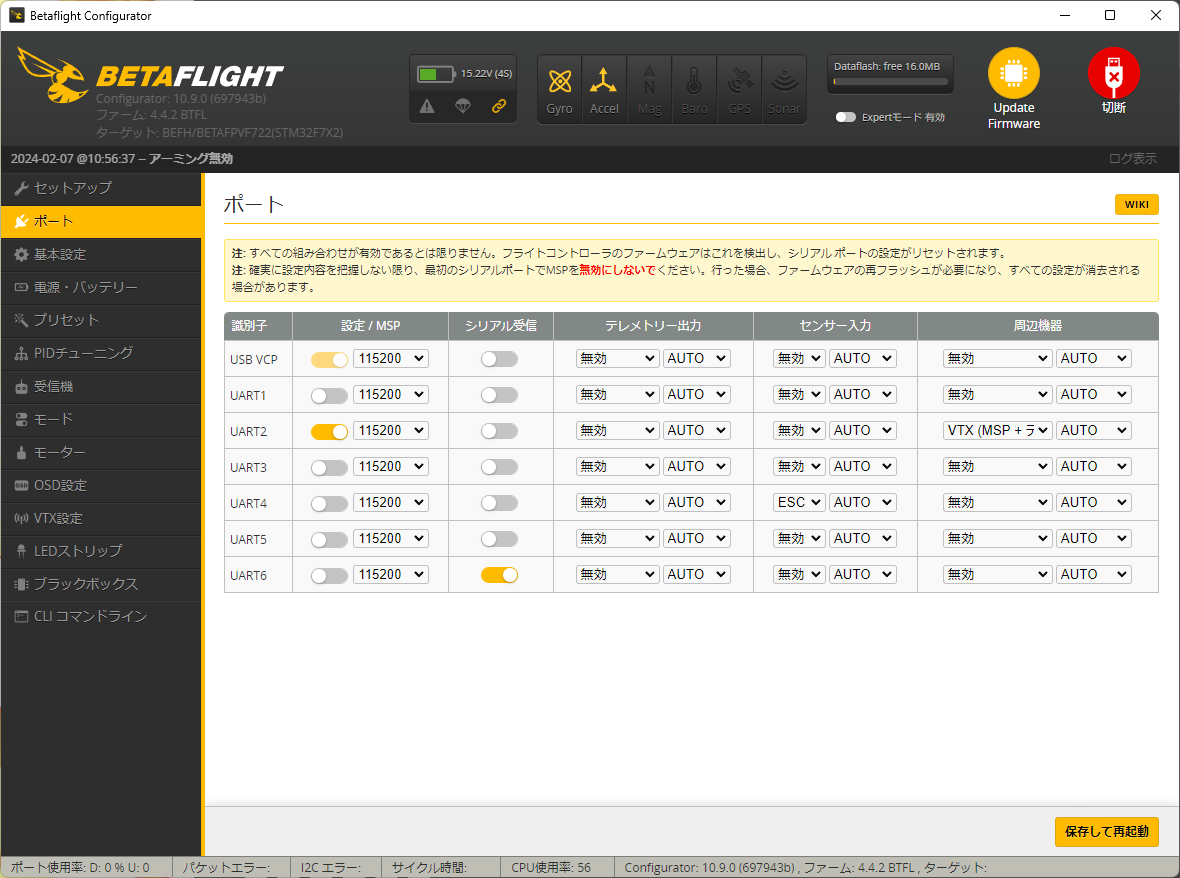 The FC firmware is Betaflight 4.4.2.
The device name is BEFH/BETAFPVF722(STM32F7X2).
The FC firmware is Betaflight 4.4.2.
The device name is BEFH/BETAFPVF722(STM32F7X2).
The port settings are as shown in this figure. ELRS receiver is connected to UART6. The connector for digital VTX is connected to UART2.
Also, although "Permanently enable Airmode" on the "Configuration" screen was turned on, but if you leave it that way, the aircraft may jump during takeoff and landing. It is best to set the Air mode to a 3-position switch .
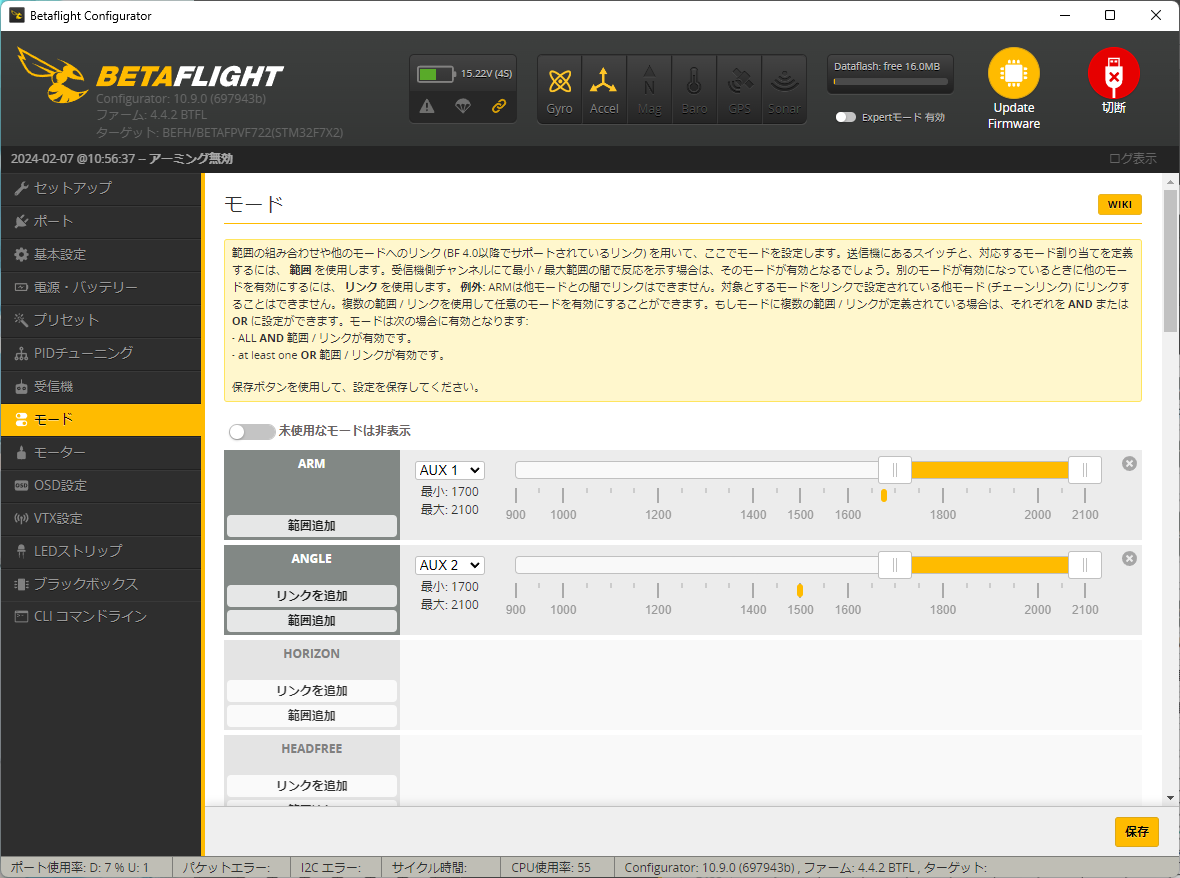 The mode settings are as shown in this figure.
ARM is set to AUX 1 and ANGLE mode is set to AUX 2 "up" position.
However, HORIZON mode is not set.
The mode settings are as shown in this figure.
ARM is set to AUX 1 and ANGLE mode is set to AUX 2 "up" position.
However, HORIZON mode is not set.
Also, BEEPER is already set for AUX 3, and "RX_SET" is turned on in the "DShot Beacon" field on the "Settings" screen. You can use it by simply assigning a switch to AUX 3.
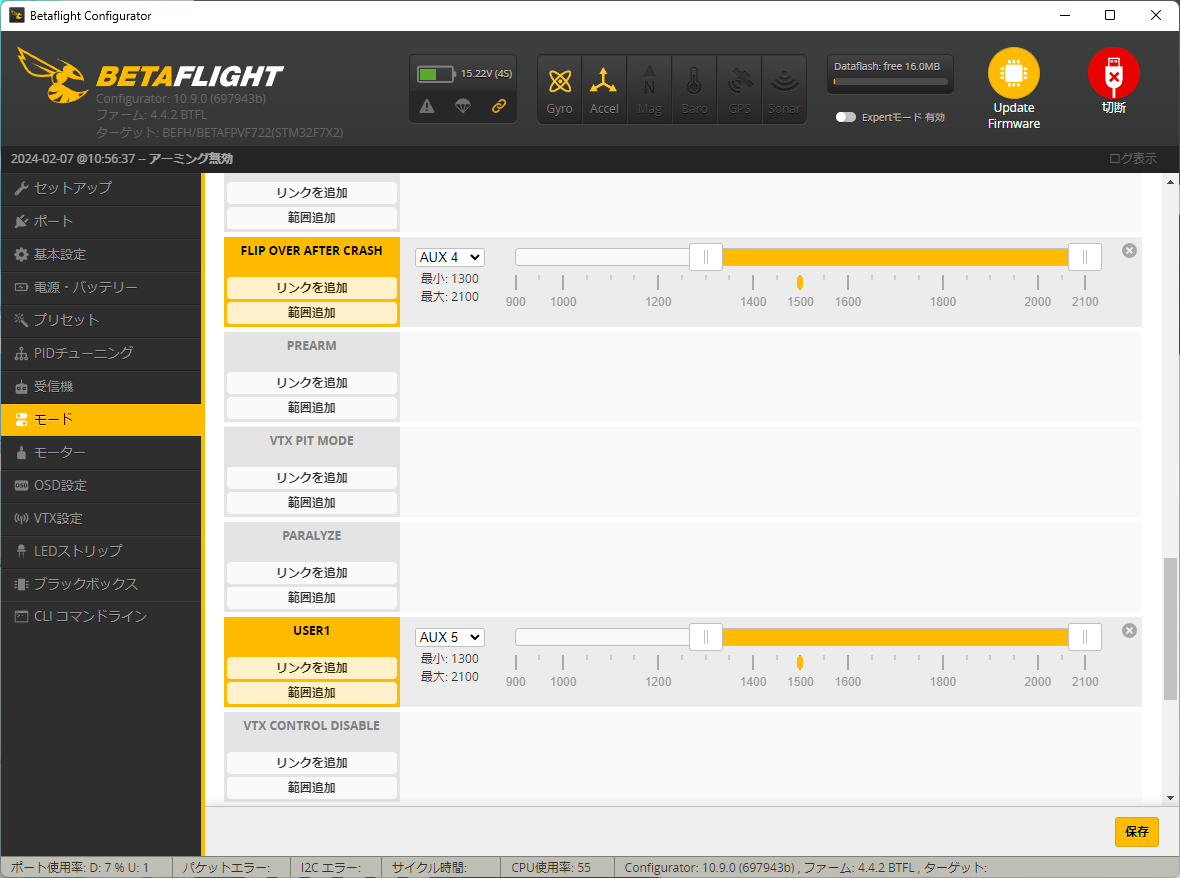 AUX 4 is set to turtle mode, and AUX 5 is set to USER (LED).
Nothing else is assigned.
AUX 4 is set to turtle mode, and AUX 5 is set to USER (LED).
Nothing else is assigned.
Please change the channel of each mode according to your radio settings.
 The ELRS receiver installed in Pavo25 V2 is BETAFPV 2.4GHz Nano RX.
You can update the version using Wi-Fi.
When you connect the battery to the aircraft and wait about 60 seconds, it will enter Wi-Fi mode and the blue LED on the ELRS receiver board installed at the rear of the aircraft will blink at high speed.
The ELRS receiver installed in Pavo25 V2 is BETAFPV 2.4GHz Nano RX.
You can update the version using Wi-Fi.
When you connect the battery to the aircraft and wait about 60 seconds, it will enter Wi-Fi mode and the blue LED on the ELRS receiver board installed at the rear of the aircraft will blink at high speed.
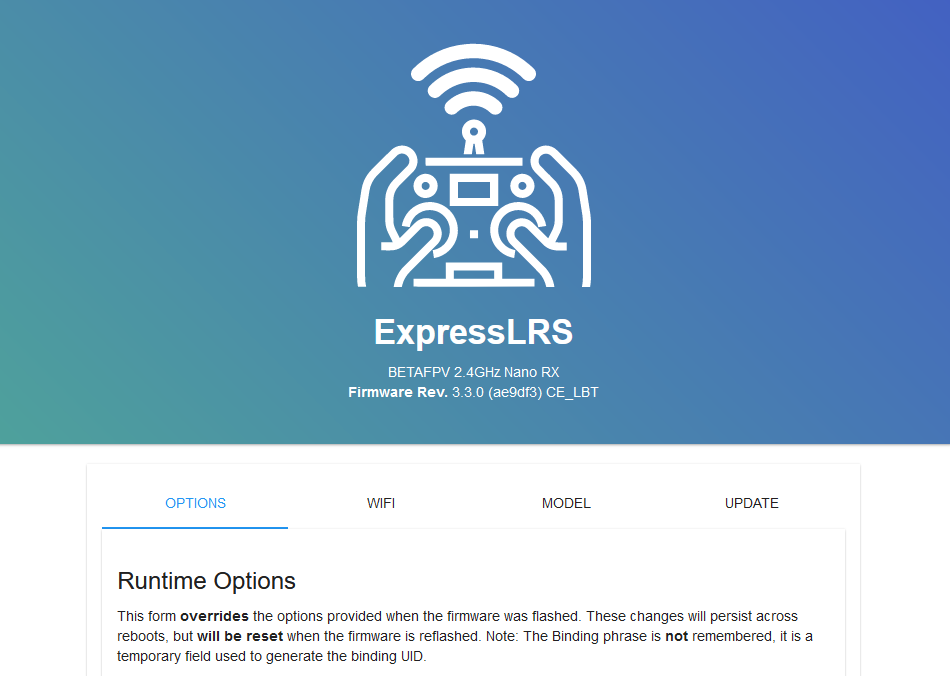 The ELRS receiver firmware was version 3.3.0.
And the regulatory domain is set to CE_LBT.
The device name specified when building firmware is "BETAFPV 2.4GHz Nano RX".
The ELRS receiver firmware was version 3.3.0.
And the regulatory domain is set to CE_LBT.
The device name specified when building firmware is "BETAFPV 2.4GHz Nano RX".
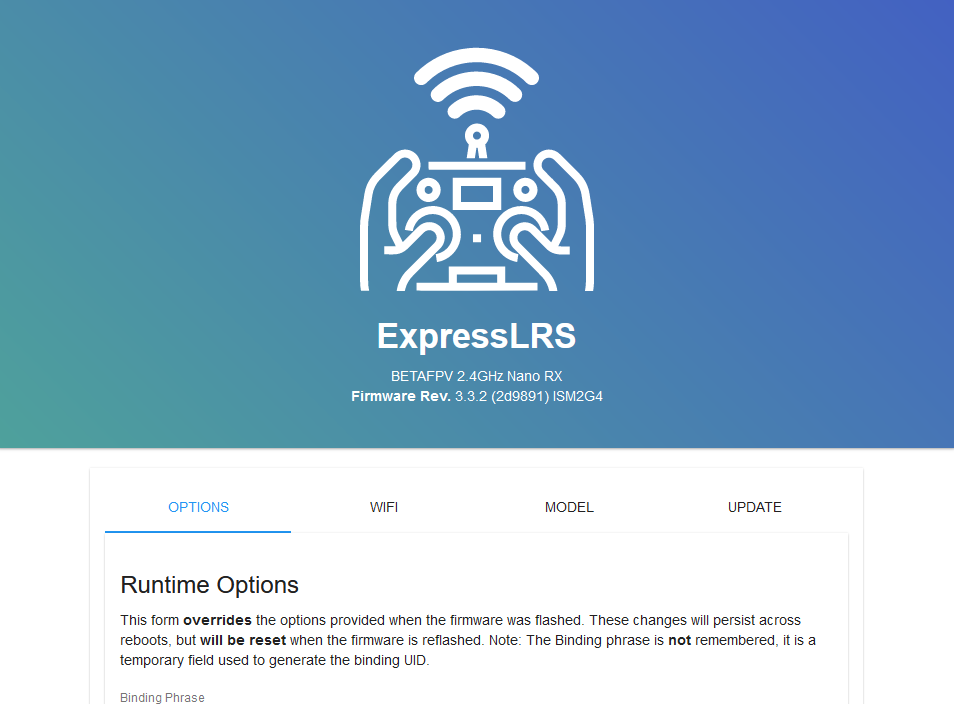 I was able to set the binding phrase and regulatory domain ISM_2400, and upgrade to version 3.3.2.
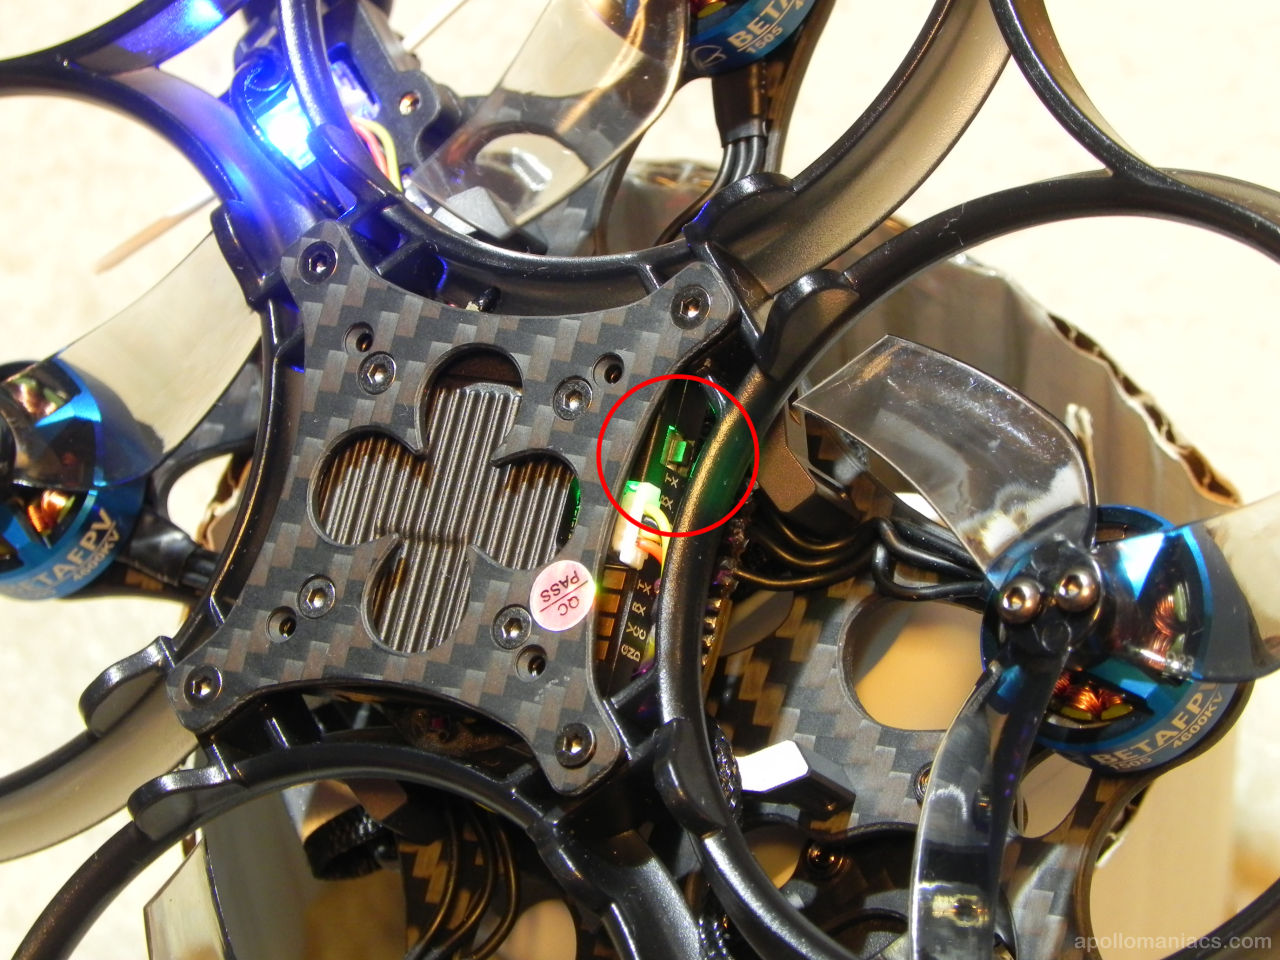 No special settings are required for Air unit.
Bind to goggles/VRX using the bind button indicated by the red circle in the figure.
It's located deep in the frame, so you'll need something like a thin screwdriver to press the button.
No special settings are required for Air unit.
Bind to goggles/VRX using the bind button indicated by the red circle in the figure.
It's located deep in the frame, so you'll need something like a thin screwdriver to press the button.
For information on how to set up Walksnail Avatar HD Pro, see How to use Walksnail Avatar VRX .
BETAFPV Pavo25 V2 Mini Review
Flight feeling
Very stable. Due to its size, it flies more smoothly than the smaller TinyWhoop. I think it's a drone for aerial photography.
The motor is very powerful and you won't feel any strain even when carrying the Insta360 Go3 camera . Easily performs aerobatic flight with a camera mounted. However, the speed in Acro mode is too high, making it difficult to fly in tight spaces. Please fly in a large area with no people, such as a sandy beach.
If you are using it as a Cinewhoop, I think you can basically get more stable aerial shots by flying in Angle mode. I also recommend that pilots flying an aircraft of this size for the first time practice enough in Angle mode first until they get used to it.
Flight time
Without payloads such as cameras, it can fly for eight minutes, as per specifications.
Flight sound
The high-pitched propeller sound is probably due to the powerful motor and small propeller compared to the output. It's quite noisy. I felt it was close to the flying sound of Firefly Baby Quad .
Indoor flight
It is also possible to fly the Pavo25 V2 indoors. If you have some flying experience, you can use Angle mode to fly around your home. However, since the motor is powerful, it flies while blowing away all the light objects indoors. Also, please do not use Acro mode indoors as it is dangerous.
BETAFPV Pavo25 V2 Specifications
| item | description |
|---|---|
| Manufacturer | BETAFPV |
| Flight Time | 6~8 min |
| Wheelbase | 112mm |
| Props | Gemfan D63 3-Blade 1.5mm Shaft |
| Motors | 1505 | 4600KV |
| Weight |
190g (DJI O3), 182g (Avatar) (No Battery),
285g (DJI O3), 277g (Avatar)(w/Battery) |
| Frame | Pavo25 V2 Brushless Whoop Frame |
| FC & ESC | F722 35A AIO V2 |
| VTX | Support DJI O3 Air Unit, Walksnail Avatar HD Pro Kit, Caddx Vista Kit/RUNCAM Link, Analog camera |
| Camera | Support DJI O3, Avatar HD Pro Caddx, RUNCAM series 19mm&20mm HD, Analog 19mm |
| RX Version | Serial ELRS/TBS |
| Recommend Battery | 4S 650mAh~850mAh |
BETAFPV Pavo25 V2 related links
To know more about How to Fly Hobby Drone
To know more about iPhone