How to use SkyRC iMAX B6 Series / LiPo / NiCd Battery Charger

- What is SkyRC iMAX B6 series
- Batteries supported by SkyRC iMAX B6 series
- Introducing SkyRC iMAX B6 AC V2
- Basics of operation method
- Lithium battery charging mode
- Connection with battery
- How to calculate charge current
- Start charging
- End of charging
- Check battery voltage
- Check internal resistance of battery
- Save charging parameters in memory
- Retrieving saved charging parameters from memory
- Check / change system setting values
- Control from PC: How to use Charger Master
- Install Charger Master
- Launch Charger Master
- Charge with Charger Master
- Charger Master setting screen
- Use Program feature of Charger Master
- Charger Master Help screen
-
SkyRC iMAX B6 AC V2 50W LiPo LiFe LiIon NiMH NiCd Battery Charger Discharger

SkyRC USD58.99
SKYRC B6AC V2 is the upgraded version for well-known iMAX B6AC. Compared with iMAX B6AC, it is more accurate and stable and also has some new features and functions. Users could set the terminal voltage by themselves and connect it to PC for PC control and firmware upgrade.

 (US)
(UK)
(US)
(UK)
What is SkyRC iMAX B6 series
iMAX B6 series are battery charger for radio controll models, compatible with lithium ion, lithium polymer, NiCd, NiMH, lead-acid batteries, etc., made by SkyRC in China, which mainly develops chargers and power supplies for radio controll models. Not only lithium batteries, but also NiCd and NiMH batteries monitor the delta peak and automatically end charging when fully charged. In addition to charging, it is equipped with various functions such as discharging and charging for long-term storage, high-speed charging, and checking battery voltage and internal resistance.First release was in 2007. It is a long-selling product that has been continuously improved since then. You can operate the charger on your computer by connecting with USB cable and using free software "Charger Master" for Windows. You can also control it on your smartphone by connecting with an optional WiFi module and using free app "Charger Master".
iMAX B6 AC V2 introduced here is a model with a built-in AC adapter. Currently in addition, B6 V2 / B6 mini with an external AC adapter and enhanced version B6 EVO are on sale.
The manual for this charger can be downloaded from SkyRC website .
Batteries supported by SkyRC iMAX B6 series
The following types of batteries can be charged.| types | Number of cells / voltage |
|---|---|
| LiPo (Lithium polymer) | 1-6 cells |
| LiFe (Lithium ferrite) | 1-6 cells |
| LiIon (Lithium ion) | 1-6 cells |
| LiHV (Lithium high voltage polymer) | 1-6 cells |
| NiMH (Nickel metal hydride) | 1-15 cells |
| NiCd (NiCad) | 1-15 cells |
| Pb (Lead-acid battery) | 2-20 V |
Introducing SkyRC iMAX B6 AC V2
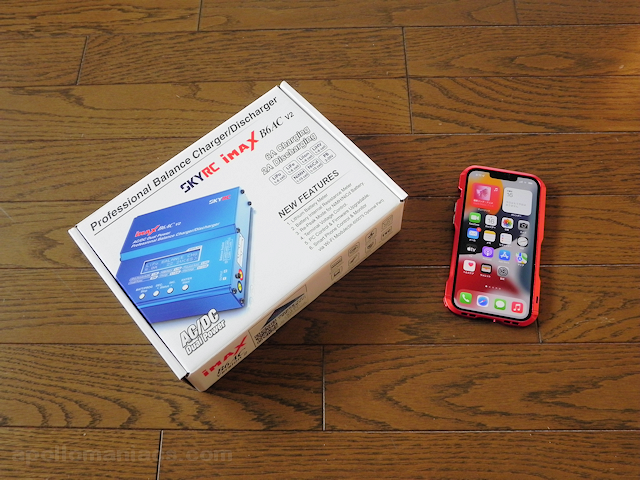 Arrives in a box like this. This is a size comparison with iPhone.
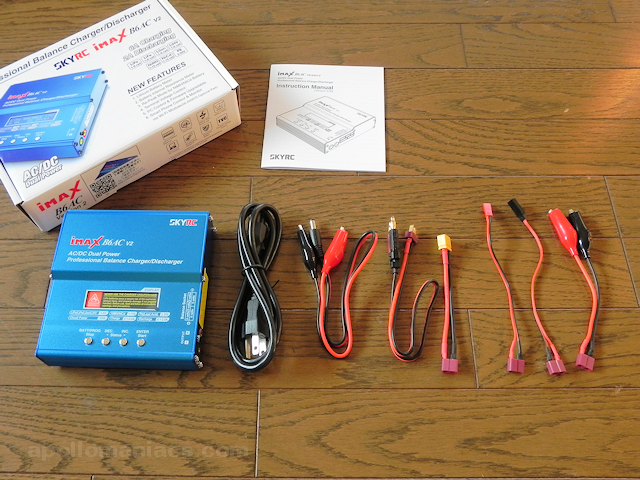 Here is a list of the contents.
From the left, there are three types of power supply cables: AC power input cable for electrical outlet (black), DC power input cable with alligator clip, and charging / output banana chip to T-type Deans connector conversion cable.
And the rest cables are for connecting to battery, conversion cable with a T-type connector.
Four types of connectors are available: XT60 (yellow), JST (red), Futaba (black), and alligator clip.
If you want to charge other batteries such as XT30 or 1-cell JST-XH type (white) connector, which is often used in FPV drones, you need to prepare these cables yourself.
Compared the size of the charger with iPhone.
There is a black warning sticker on the LCD display to read the instructions carefully before use.
Here is a list of the contents.
From the left, there are three types of power supply cables: AC power input cable for electrical outlet (black), DC power input cable with alligator clip, and charging / output banana chip to T-type Deans connector conversion cable.
And the rest cables are for connecting to battery, conversion cable with a T-type connector.
Four types of connectors are available: XT60 (yellow), JST (red), Futaba (black), and alligator clip.
If you want to charge other batteries such as XT30 or 1-cell JST-XH type (white) connector, which is often used in FPV drones, you need to prepare these cables yourself.
Compared the size of the charger with iPhone.
There is a black warning sticker on the LCD display to read the instructions carefully before use.
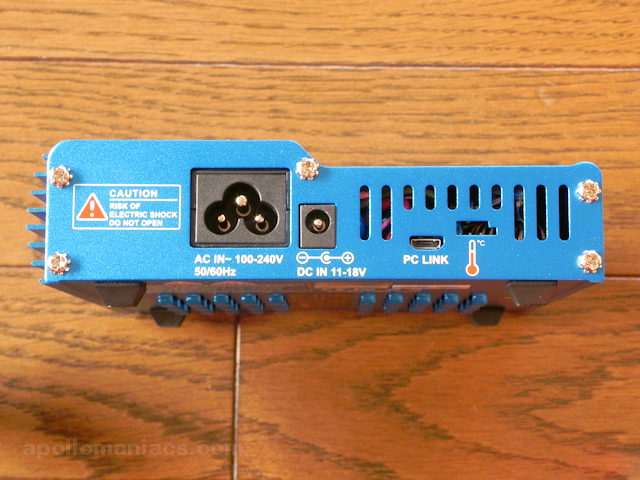 The photo on the left side of the charger.
It has a built-in "Mickey" 3-pin connector for connecting the power cable.
Since dedicated AC adapter is built-in, the charging speed is fast. 4S-300mAh battery can be fully charged in about 12 minutes.
External AC adapter can also be used as a power source. However, if the AC adapter is not capable of supplying a considerably large current, charging will stop due to insufficient power.
The connector labeled "PC LINK" is a microUSB Type-B connector for connecting to a PC, and the connector on the right is for a temperature sensor (sold separately).
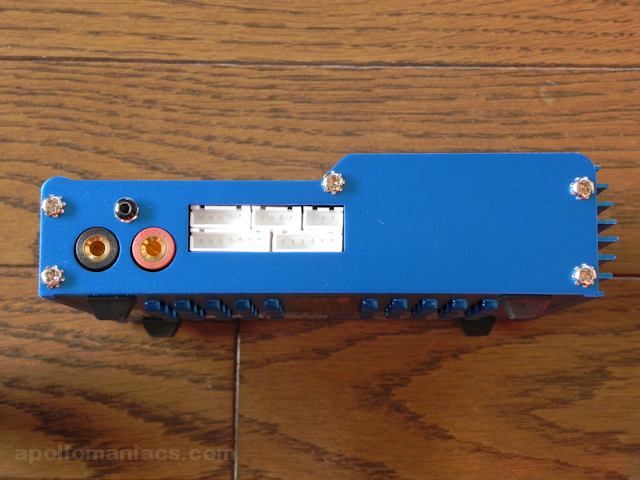 The right side.
Red and black round connectors are banana chip type connectors (4mm) for battery charging. Connect only here for one cell batteries and batteries that do not require balanced charging.
White connectors are JST-XH type for balanced charging. Batteries that require balanced charging connect to both the banana chip connector and this one. Five connectors for 2 cells (3 pins) to 6 cells (7 pins) are lined up. However, only one battery can be charged at the same time.
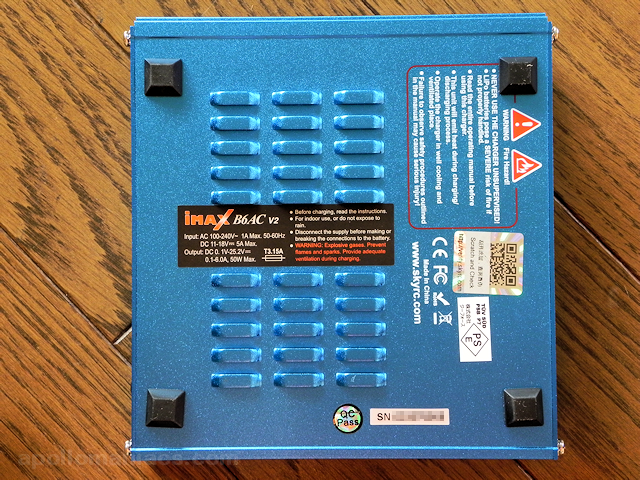 This is the back side photo.
The hologram sticker is said to be a proof of genuine product.
Be careful of imitations.
This is the back side photo.
The hologram sticker is said to be a proof of genuine product.
Be careful of imitations.
Basics of operation method
 When you connect the power supply to the charger, you will hear a beep and the screen will look like this.
Operate only with four round silver buttons that are lined up horizontally under the display.
When you connect the power supply to the charger, you will hear a beep and the screen will look like this.
Operate only with four round silver buttons that are lined up horizontally under the display.
| button | function |
|---|---|
| BATT/PROG Stop | Return to the previous screen. Or specify "Stop" or "Cancel". |
| DEC. | Used to switch menus and change setting values (decrease). |
| INC. | Used to switch menus and change setting values (increase). |
| ENTER Start | Used to "select" or "save" the settings on the screen. Press and hold for 3 seconds or longer to start charging. |
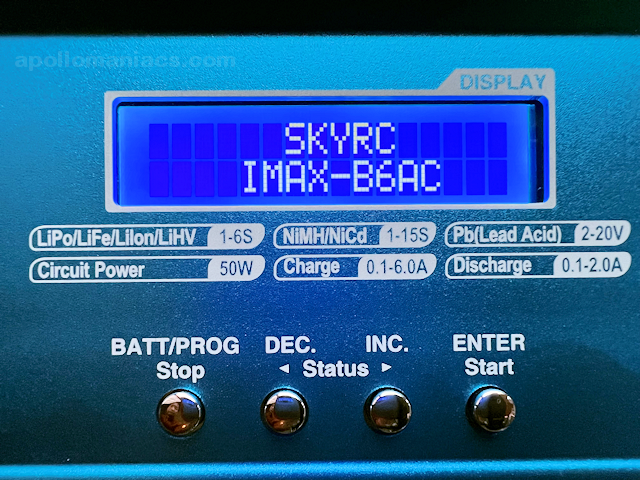
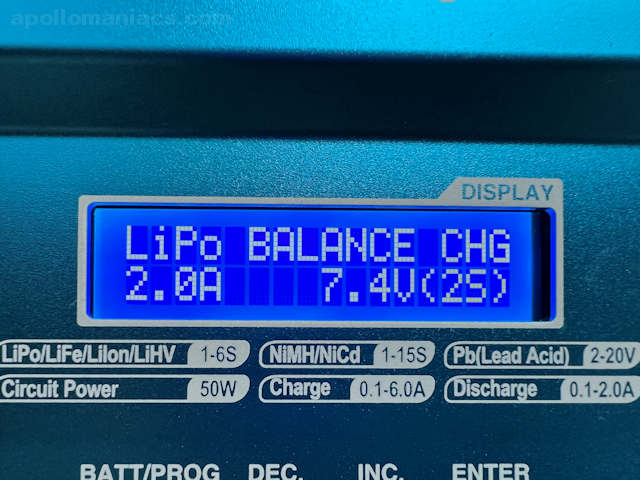 When charger starts up, LCD screen will look like this.
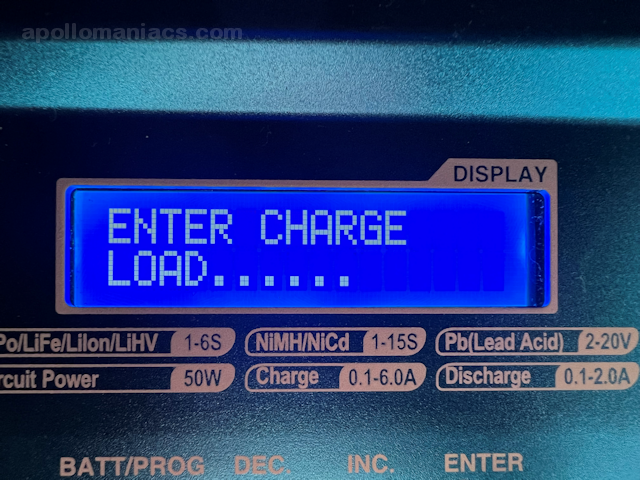
Initially, LiPo battery balanced charging mode is set. The numbers displayed on the screen indicate that charging parameter is a 2-cell series (7.4V) battery with maximum of 2.0A current.
By pressing [Dec.] [Inc.] Button on this screen, you can switch to another charging mode (fast charging, long-term storage charging, discharging, etc.) with the same LiPo battery selected.
Press and hold [ENTER Start] button for 3 seconds or longer to start charging with current screen settings.
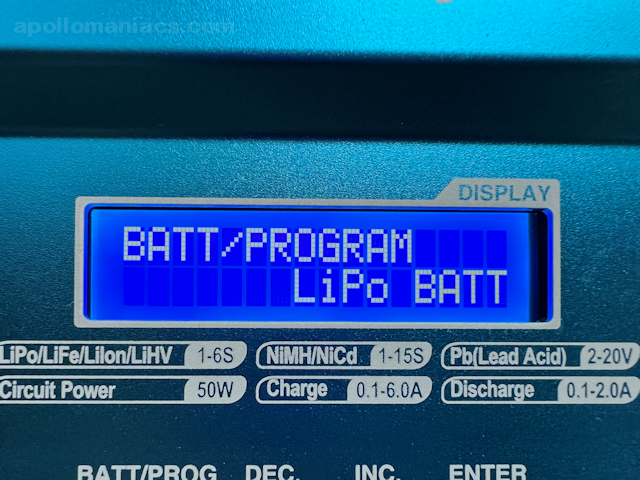 If you press [BATT / PROG Stop] button on the upper screen, you will move to upper hierarchical menu and see a screen like this.
If you press [Dec.] [Inc.] Button here, you can switch to the charging menu of another type of battery (LiPo, LiFe, LiIo, LiHV, e.t.c).
If you select another type of battery and press [ENTER Start] button, charging mode of that battery will be selected.
If you press [BATT / PROG Stop] button on the upper screen, you will move to upper hierarchical menu and see a screen like this.
If you press [Dec.] [Inc.] Button here, you can switch to the charging menu of another type of battery (LiPo, LiFe, LiIo, LiHV, e.t.c).
If you select another type of battery and press [ENTER Start] button, charging mode of that battery will be selected.
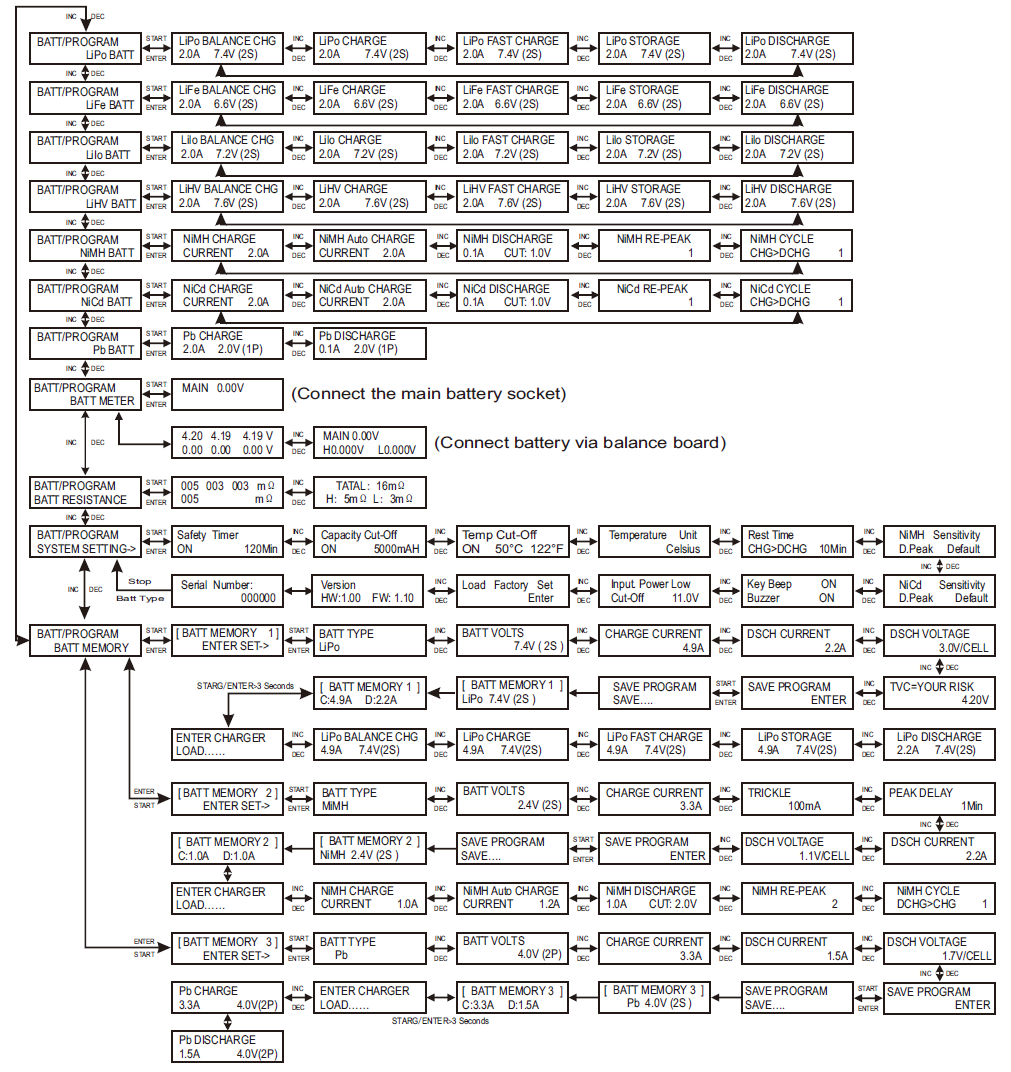 Screen transitions associated with button operations are summarized in the attached manual as a list like this image.
Incorrect charging mode or parameter settings can cause battery to ignite or explode. Carefully set the charging mode and parameters correctly.
Lithium battery charging mode
There are four charging modes for lithium battery (LiPo, LiFe, LiIo, LiHV) in this charger.| mode | function |
|---|---|
| Balanced charging (BALANCE CHG) |
Charge batteries consisting of multiple cells while balancing each cell.
Use this mode to charge 2-6 cell batteries.
For an explanation of "cell" and "balance" of battery, see Drone Battery Knowledge / How to long-lasting and reviving . |
| Charging (CHARGE) |
Charge without balance. Used to charge one cell batteries. In this case, system setting value Bal. Connection must also be switched off. |
| Fast charging (FAST CHARGE) |
Charge faster than usual. It can only be used with batteries that support fast charging. However, the voltage when charging is completed will be lower than normal charging. |
| Charging for long-term storage (STORAGE) |
Charging / discharging battery for long-term storage.
You can specify the voltage when charging is completed.
Battery will be charged or discharged until it reaches the specified voltage.
For explanation of long-term battery storage, see Drone Battery Knowledge / How to long-lasting and reviving . |
| Discharge (DISCHARGE) |
Discharges an overcharged battery for long-term storage e.t.c.. |
Connection with battery
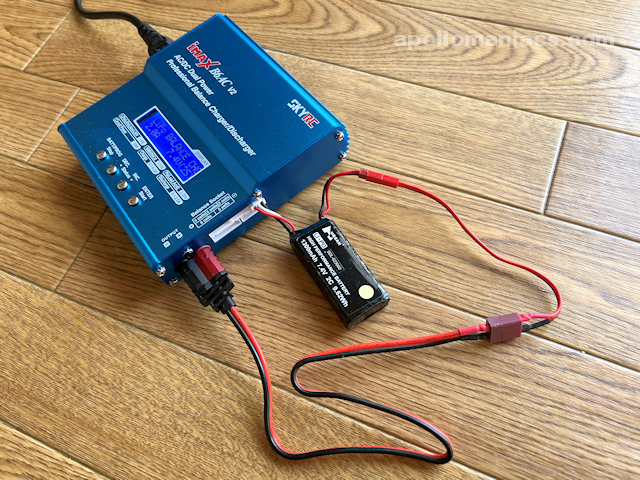 After selecting charging mode on the charger, connect battery to the charger.
Connection with multi-cell lithium battery is as shown in this photo. With any simple charger, only white JST-XH connector for balanced charging is connected, but with this charger, another one, the battery output connector, is connected to the charger via a banana chip. If only balanced charging connector is connected, an error will occur and charging will not be possible.
After that, connect output connector of battery to the cable on banana plug side.
Finally, connect white balanced charging connector of battery to the charger.
If you don't have a cable that fits your battery, you'll have to prepare it yourself.
-
Battery Charger Adapter Connector Splitter Cab, Leads
szwisechip USD17.99
connectors, Leads for Banana and Tamiya input, output support for EC3, EC5, XT60, Mini Tamiya, JST, JR FUTABA, Alligator clips, T plug, MCX, MCP X, TRX, TX 5.5 X 2.5
(US)
(UK)
-
Tenergy Octopus Charging Harness for TB6,TB6B,TB6AC Balance Charger Compatible
Tenergy USD12.99
Combine with a compatible Tenergy balance charger (like TB6, TB6B, TB6AC, or T108) to reduce the number of charging connectors down to one. Tenergy’s charging harness simplifies 7 connectors down to one easy-to-manage harness.
(US)
(UK)
-
2 PCS RC Battery Charge Cable XT30 Female Plug to 4mm Bullet Banana Connector 18AWG
UAV USD6.99
XT30 plug Female to 4.0mm Banana connector. Wire Length: 20CM. Wire: 18AWG. Application: RC battery.
(US)
(UK)
How to calculate charge current
Maximum charge current that can be passed from charger to battery is calculated from the battery capacity (mAh) and the charge / discharge capacity (C) of the battery. For example, a battery labeled "2S-300mAh, 30C/60C" can carry a maximum charge current of 0.3 (A) x 30 (C) = 9 (A). And in this case, it takes about 1/30 hours (= 2 minutes) to fully charge. Be sure to charge below this maximum current.Also, when powering charger from AC adapter, pay attention to the maximum output of connected AC adapter. Charge with smaller of the maximum output current of AC adapter and the maximum charging current of battery.
However, if you charge with the maximum current, battery will heat up and deteriorate. It is recommended to charge with a sufficiently lower current with a margin. It depends on the C value of the battery, but it will be safe if you charge it with max 1 to 2A current.
Note: When charging a battery with unknown C value, set charging current of charger assuming C value of 1 or less to avoid dangers such as ignition. For example, when charging a 300mAh battery with an unknown C value, set the charging current to 0.3A or less. In this case, it will take about 1 hour to charge.
For the basic knowledge of LiPo battery, see Drone Battery Knowledge / How to long-lasting and reviving .
Start charging
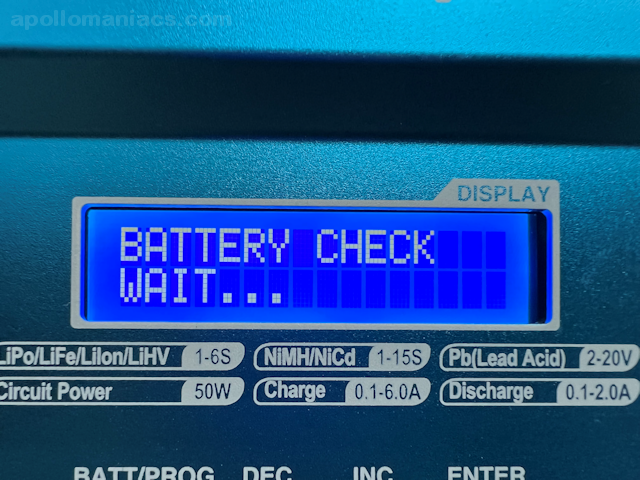 After setting the charger and connecting battery, press and hold [ENTER Start] button for 3 seconds or longer.
Then melody will sound and battery check will start.
After setting the charger and connecting battery, press and hold [ENTER Start] button for 3 seconds or longer.
Then melody will sound and battery check will start.
Even in the case of charging for long-term storage or discharging, screen transition is the same as in the case of normal charging.
 Then you will see a screen like this.
The number following "R:" is the number of battery cells detected by charger.
The number following "S:" is the number of battery cells set by user.
If both values are correct, press [ENTER Start] button to start charging.
If it is not correct, press [BATT / PROG Stop] button to cancel charging and check charger settings or battery connector and cable.
Then you will see a screen like this.
The number following "R:" is the number of battery cells detected by charger.
The number following "S:" is the number of battery cells set by user.
If both values are correct, press [ENTER Start] button to start charging.
If it is not correct, press [BATT / PROG Stop] button to cancel charging and check charger settings or battery connector and cable.
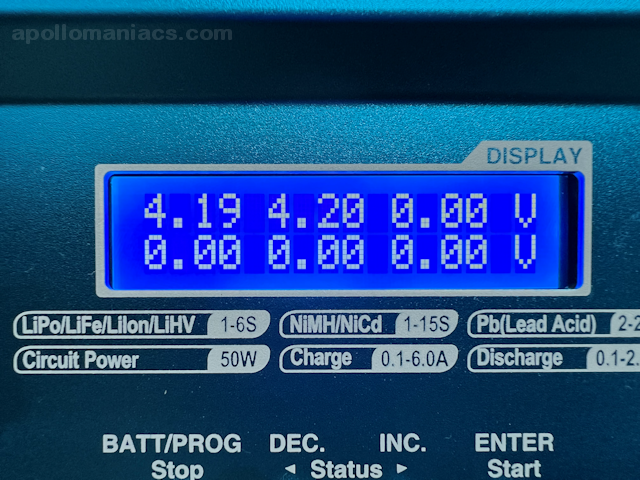
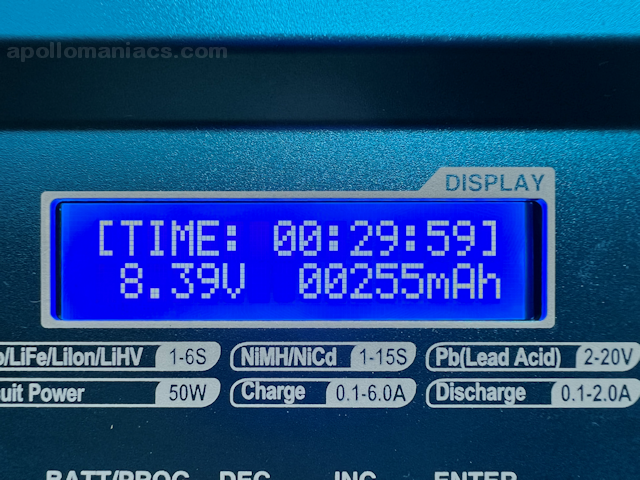
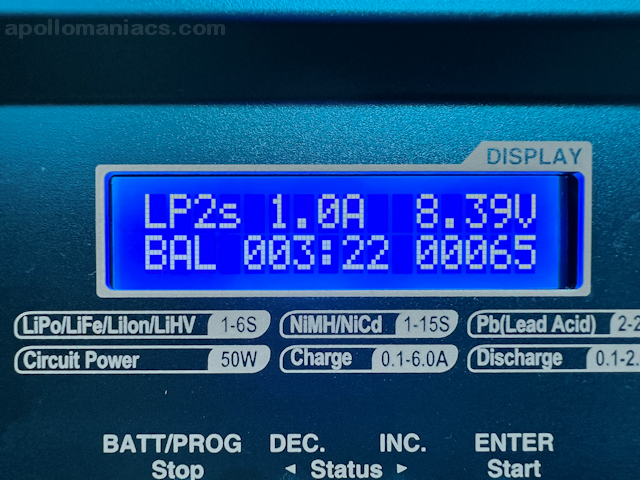 The screen looks like this while charging, and various statuses will be displayed.
"LP2s" indicates charging in LiPo 2 cell mode.
"1.0A" indicates charging current for now. It starts with large value at first and decreases as it approaches full charge.
"8.39V" indicates total output voltage of the battery for now. As it approaches full charge, it gradually increases and decreases and approaches target value.
"BAL" indicates balanced charging is in progress.
"003: 22" indicates elapsed time (minutes: seconds) from the start of charging.
"00065" indicates the amount of charge (mAh) that has been injected into the battery so far with this charge.
You can stop charging by pressing [BATT / PROG Stop] button while charging.
 If you press [Inc.] button while charging, you will see a screen like this.
Current voltage for each of up to 6 cells is displayed.
If you press [Inc.] button while charging, you will see a screen like this.
Current voltage for each of up to 6 cells is displayed.
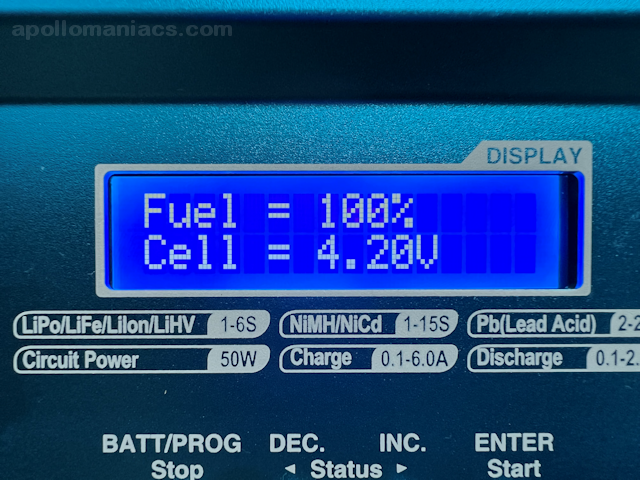 If you press [Inc.] button again while charging, you will see a screen like this.
"Fuel" number indicates the charged capacity as a percentage. However, even if it reaches 100%, charging does not end immediately.
"Cell" number indicates the average voltage per cell for the entire battery.
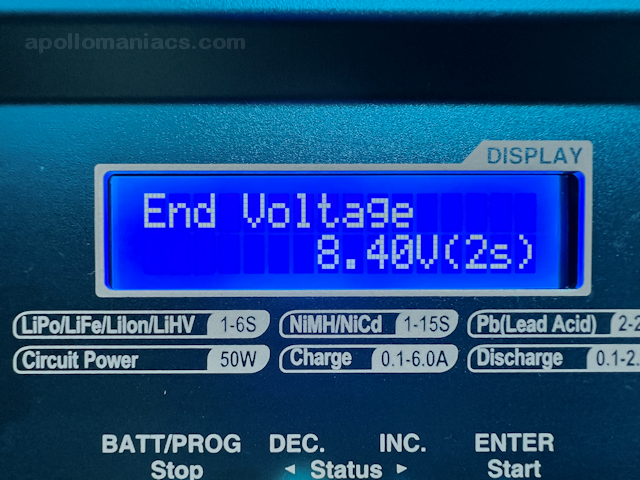 If you press [Dec.] Button while charging, you will see a screen like this.
Charging target voltage is displayed.
If you press [Dec.] Button while charging, you will see a screen like this.
Charging target voltage is displayed.
This value can be changed on Charger system setting change screen .
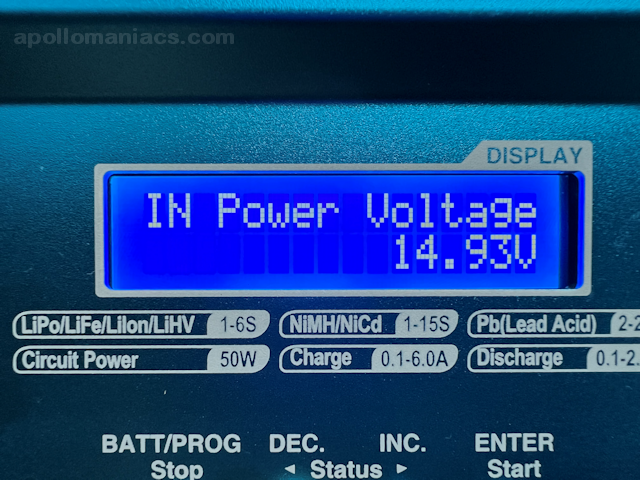 If you press [Dec.] Button again while charging, you will see a screen like this.
Input voltage supplied to the charger is displayed.
In the model with built-in AC adapter, it seems to be output voltage of built-in AC adapter.
If you press [Dec.] Button again while charging, you will see a screen like this.
Input voltage supplied to the charger is displayed.
In the model with built-in AC adapter, it seems to be output voltage of built-in AC adapter.
 If you press [Dec.] Button again while charging, you will see a screen like this.
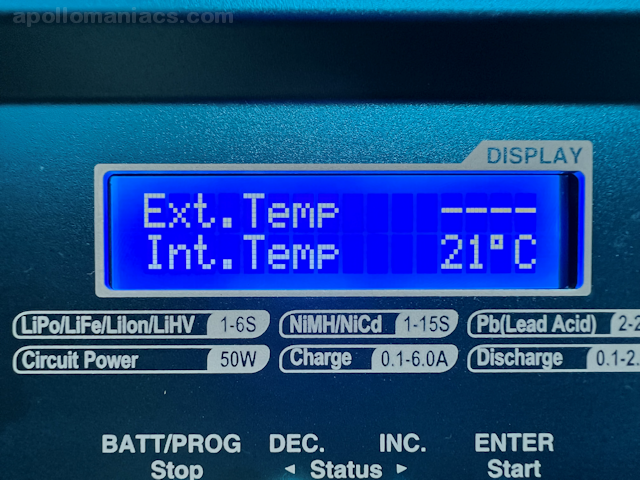
"Ext.Temp" number indicates detection value of external temperature sensor (sold separately).
"Int.Temp" number indicates temperature inside the charger.
 If you press [Dec.] Button again while charging, you will see a screen like this.
Currently set cutoff temperature is displayed.
This value can be changed on
Charger system setting change screen
.
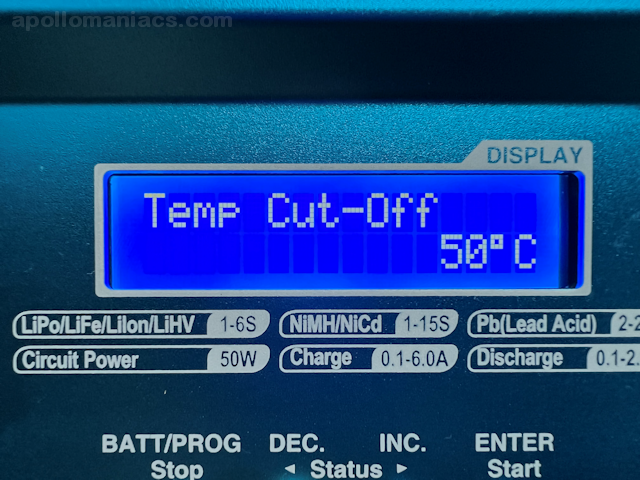
If you press [Dec.] Button again while charging, you will see a screen like this.
Currently set cutoff temperature is displayed.
This value can be changed on
Charger system setting change screen
.
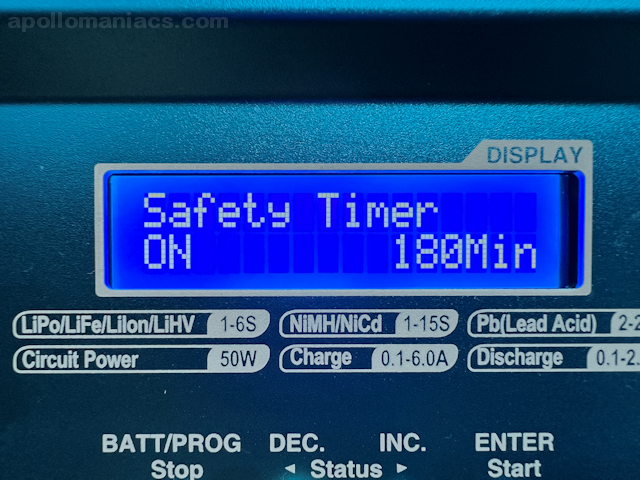 If you press [Dec.] Button again while charging, you will see a screen like this.
ON / OFF status of safety timer and its time (minutes) are displayed.
This value can be changed on
Charger system setting change screen
.
If you press [Dec.] Button again while charging, you will see a screen like this.
ON / OFF status of safety timer and its time (minutes) are displayed.
This value can be changed on
Charger system setting change screen
.
End of charging
 When charging is complete, a melody will sound and the screen will look like this.
Time taken for charging this time is displayed in the upper row, and voltage of entire battery and amount of charge injected into battery this time are displayed in mAh in the lower row.
When charging is complete, a melody will sound and the screen will look like this.
Time taken for charging this time is displayed in the upper row, and voltage of entire battery and amount of charge injected into battery this time are displayed in mAh in the lower row.
To remove battery, remove white balance connector first, and then banana plug side battery connector in the reverse order of installation. If you do not continue to charge another battery, it is safe to unplug the charger before removing battery.
Check battery voltage
You can check battery voltage by using a function called BATTERY METER.
Start the charger and connect battery you want to check.
Battery connection method is the same as when charging.
Press [BATT / PROG Stop] button to move to upper level menu.
Then press [Dec.] or [Inc.] Button until the message [BATT METER] appears.
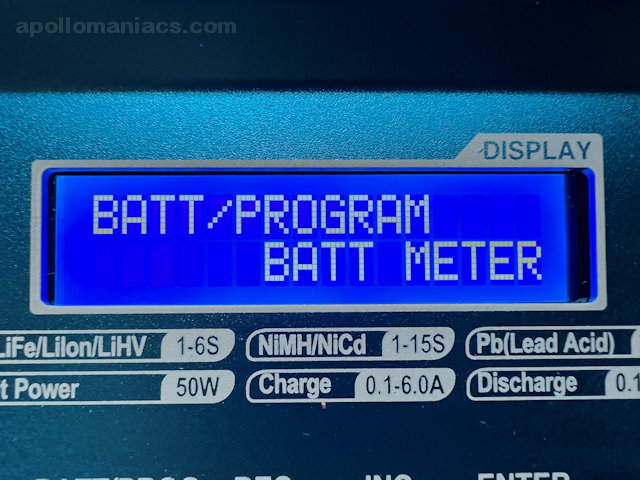 When [BATT METER] is displayed, press [ENTER Start] button.
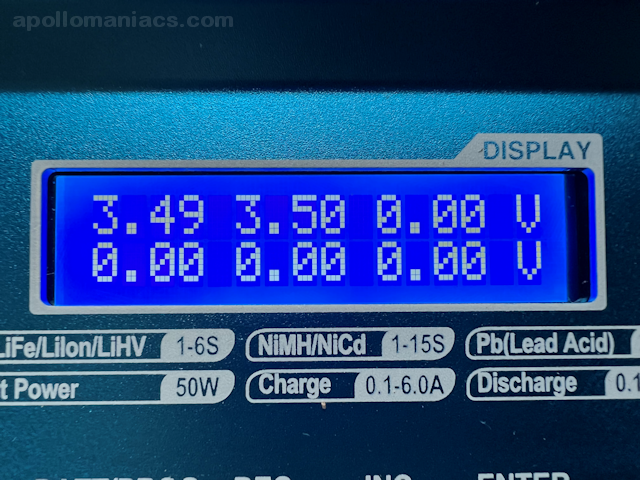 Current voltage for each of up to 6 cells is displayed.
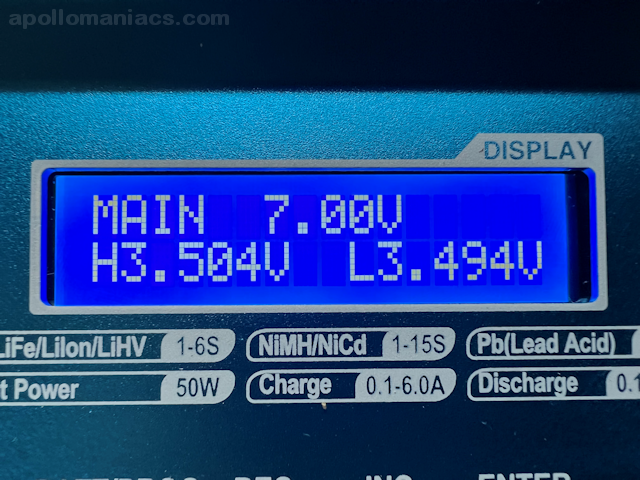 When you press [Inc.] button, you will see a screen like this.
Top row shows total voltage of the entire battery, and bottom row shows values of the cells with highest and lowest voltage.
When you press [Inc.] button, you will see a screen like this.
Top row shows total voltage of the entire battery, and bottom row shows values of the cells with highest and lowest voltage.
Press [Dec.] Button on this screen to return to the previous screen.
Press [BATT / PROG Stop] button to exit BATTERY METER and move to upper level menu.
Check internal resistance of battery
You can check internal resistance of battery by using a function called BATTERY RESISTANCE. As battery deteriorates, the internal resistance value increases. By checking internal resistance value on a regular basis, deterioration status can be grasped.
Start the charger and connect battery you want to check.
Battery connection method is the same as when charging.
Press [BATT / PROG Stop] button to move to upper level menu.
Then press [Dec.] or [Inc.] Button until the message [BATT RESISTANCE] appears.
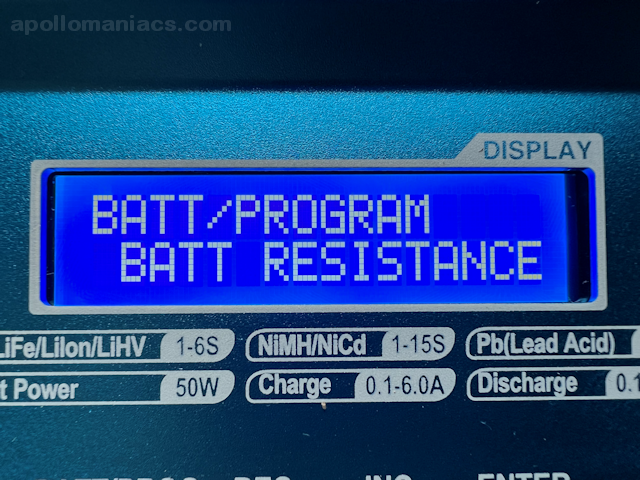 When [BATT RESISTANCE] is displayed, press [ENTER Start] button.
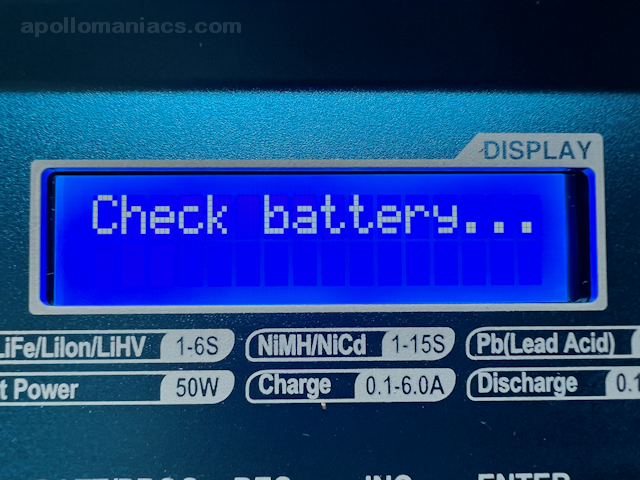 Battery check will start.
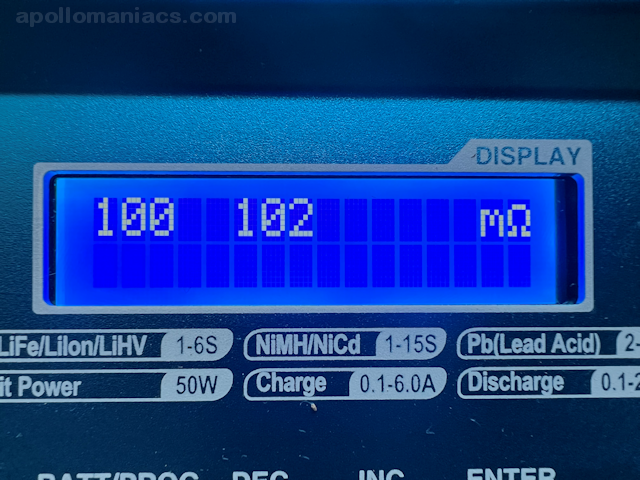 Internal resistance value of each of up to 6 cells is displayed.
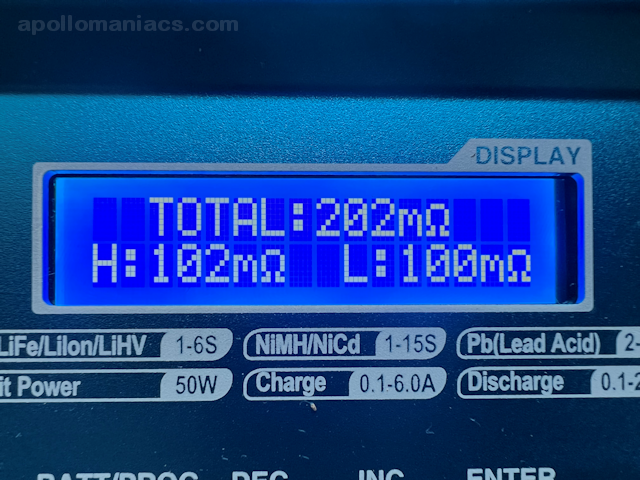 When you press [Inc.] button, you will see a screen like this.
Upper row shows total internal resistance value of the entire battery, and lower row shows values of the cells with the highest and lowest internal resistance.
When you press [Inc.] button, you will see a screen like this.
Upper row shows total internal resistance value of the entire battery, and lower row shows values of the cells with the highest and lowest internal resistance.
Press [Dec.] Button on this screen to return to the previous screen.
Press [BATT / PROG Stop] button to exit BATTERY METER and move to upper level menu.
Save charging parameters in memory
This charger has "memory" function that allows you to store up to 10 different charging parameters and recall them to charge. First, I will explain how to save the charging parameters in the memory.
Start the charger.
If you just want to save the charging parameters, you don't need to connect battery.
Press [BATT / PROG Stop] button to move to upper level menu.
Then press [Dec.] or [Inc.] Button until the message [BATT MEMORY] appears.
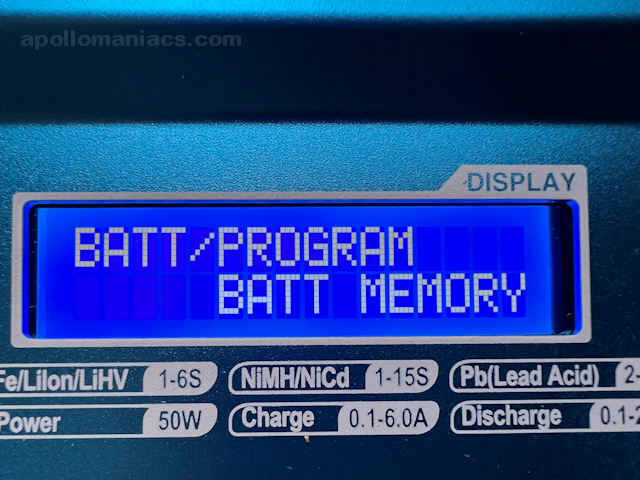 When [BATT MEMORY] is displayed, press [ENTER Start] button.
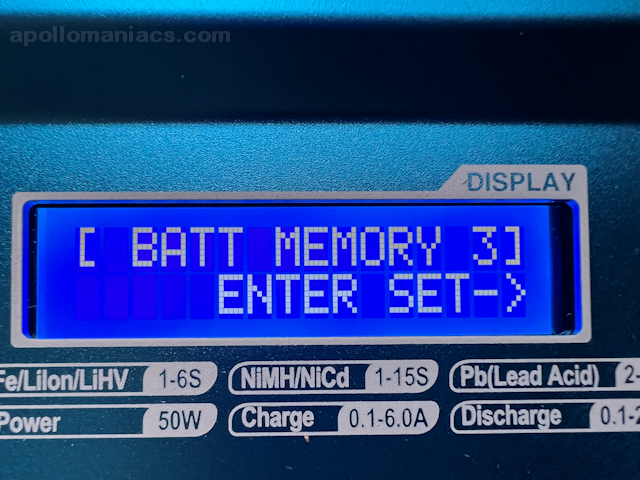 Then press [Dec.] or [Inc.] Button and select the memory number you want to use.
Choose from 10 from MEMORY 1 to MEMORY 10.
After deciding which memory to use, press [ENTER Start] button.
Then press [Dec.] or [Inc.] Button and select the memory number you want to use.
Choose from 10 from MEMORY 1 to MEMORY 10.
After deciding which memory to use, press [ENTER Start] button.
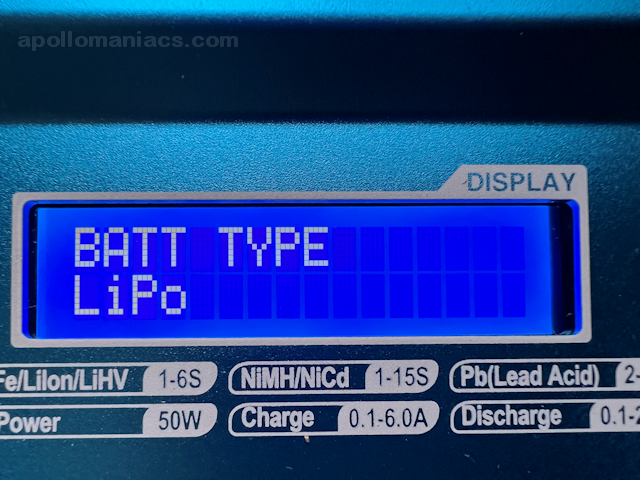 Then, current setting value of selected memory is displayed.
The first is battery type. LiPo is set as the initial value.
Then, current setting value of selected memory is displayed.
The first is battery type. LiPo is set as the initial value.
To change the value, press [ENTER Start] button. Then the value blinks, so change the value with [Dec.] or [Inc.] Button. Press [ENTER Start] button again to confirm the value.
Press [Dec.] or [Inc.] Button to advance to the previous / next parameter.
| label | meaning | initial value |
|---|---|---|
| BATT TYPE | Battery type | LiPo |
| BATT VOLTS | Battery voltage (number of cells) | 7.4V(2S) |
| CHARGE CURRENT | Maximum charging current | 2.0A |
| DISCH CURRENT | Current at the time of discharge | 1.0A |
| DISCH VOLTAGE |
Target discharge voltage per cell.
If you specify a value lower than the battery specifications, the battery will be over-discharged and will not be usable. Please be careful. |
3.2V/CELL |
| TVC (Terminal Voltage) |
Target charging voltage per cell.
If this value is set incorrectly, there is a risk of the battery catching fire or exploding. Only users with sufficient knowledge should make changes. |
4.20V |
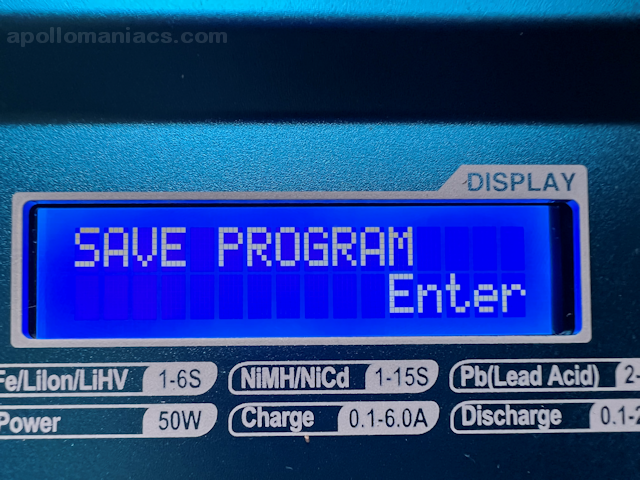 As you switch screens, you will end up with a screen like this.
If you press [ENTER Start] button on this screen, parameters you have entered will be saved in memory.
As you switch screens, you will end up with a screen like this.
If you press [ENTER Start] button on this screen, parameters you have entered will be saved in memory.
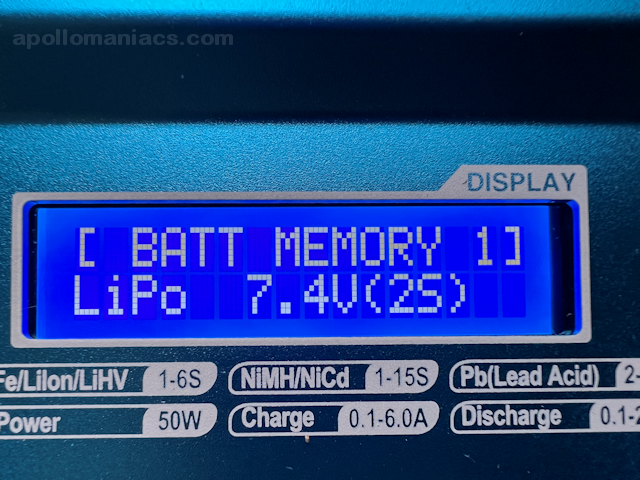 When parameters are saved in memory, you will see a screen like this.
Memory number is displayed in the upper row, and saved battery type / voltage (number of cells), maximum charging current (C :), and discharging current (D :) are displayed alternately in the lower row.
When parameters are saved in memory, you will see a screen like this.
Memory number is displayed in the upper row, and saved battery type / voltage (number of cells), maximum charging current (C :), and discharging current (D :) are displayed alternately in the lower row.
If you press [ENTER Start] button here, you can check or change the memory settings again.
Press and hold [ENTER Start] button for 3 seconds or longer to start charging with current screen settings.
Press [BATT / PROG Stop] button to move to upper level menu.
Retrieving saved charging parameters from memory
This charger has a memory function that allows you to store up to 10 different charging parameters and recall them to charge. Here, we will explain how to retrieve the saved charging parameters.
Start the charger and connect battery you want to charge.
Battery connection method is the same as when charging.
Press [BATT / PROG Stop] button to move to upper level menu.
Then press [Dec.] or [Inc.] Button until the message [BATT MEMORY] appears.
When [BATT MEMORY] is displayed, press [ENTER Start] button.
Then press [Dec.] or [Inc.] Button and select the memory number you want to retrieve.
Choose from 10 from MEMORY 1 to MEMORY 10.
If you press [ENTER Start] button here, you can check or change values set in the memory again.
If you press and hold [ENTER Start] button for 3 seconds or longer ...
 Charging parameters saved from the memory are read out.
When you take your finger off [ENTER Start] button ...
The read setting values are set in charger.
Charging parameters saved from the memory are read out.
When you take your finger off [ENTER Start] button ...
The read setting values are set in charger.
Press and hold [ENTER Start] button for 3 seconds or longer to start charging with current screen settings.
Press [BATT / PROG Stop] button to move to memory number selection screen.
Check / change system setting values
Start the charger.
Press [BATT / PROG Stop] button to move to upper level menu.
Then press [Dec.] or [Inc.] Button until the message [SYSTEM SETTING->] appears.
 When [SYSTEM SETTING->] is displayed, press [ENTER Start] button.
 Then the system settings will be displayed.
If you press [Dec.] [Inc.] Buttons here, you can switch to the screen of different system setting values.
To change the value, press [ENTER Start] button. Then the value blinks, so change the value with [Dec.] or [Inc.] Button. Press [ENTER Start] button again to confirm the value.
First parameter displayed is "Safety Timer".
This is a feature that limits the maximum charge time to prevent overcharging when the charger does not correctly detect the end of charge of the battery.
Initial value is ON (valid), and time is set to 180 minutes.
1 minute to 720 minutes can be specified.
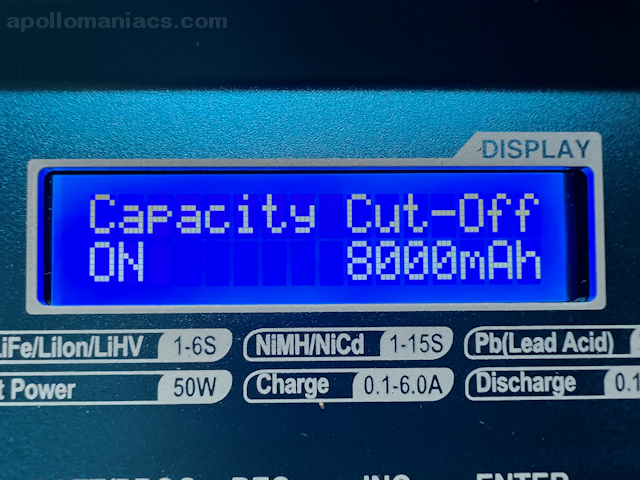 This is a feature that limits the maximum charge amount to prevent overcharging when the charger does not correctly detect the end of charging or when "Safety Timer" does not work for some reason.
Initial value is ON (valid), and amount of charge is set to 8000mAh.
100mAh to 50000mAh can be specified.
This is a feature that limits the maximum charge amount to prevent overcharging when the charger does not correctly detect the end of charging or when "Safety Timer" does not work for some reason.
Initial value is ON (valid), and amount of charge is set to 8000mAh.
100mAh to 50000mAh can be specified.
 This is a feature to stop charging when the temperature rises too much while charging the battery.
To measure the temperature, you need to attach an optional temperature sensor to the battery.
Initial value is ON (valid), and the temperature is set to 50 degrees.
20 ° C (68 ° F) to 80 ° C (176 ° F) can be specified.
This is a feature to stop charging when the temperature rises too much while charging the battery.
To measure the temperature, you need to attach an optional temperature sensor to the battery.
Initial value is ON (valid), and the temperature is set to 50 degrees.
20 ° C (68 ° F) to 80 ° C (176 ° F) can be specified.
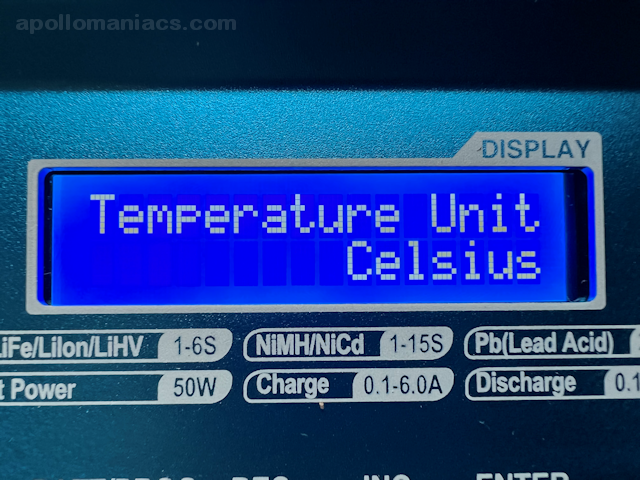 Select the unit for temperature display.
Initial value is Celsius.
You can choose Celsius or Fahrenheit.
Select the unit for temperature display.
Initial value is Celsius.
You can choose Celsius or Fahrenheit.
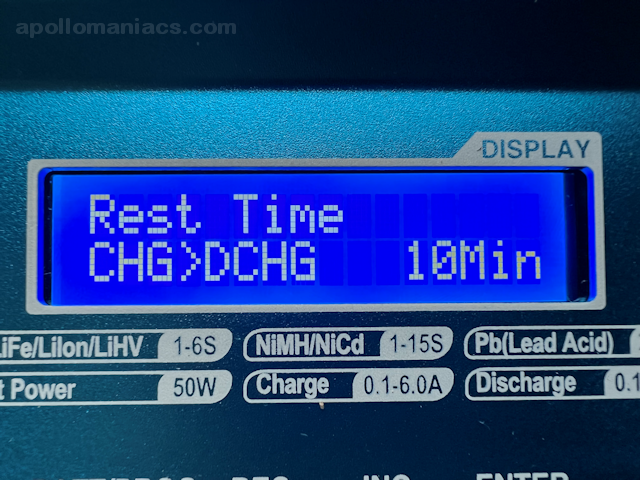 With a NiMH (nickel-metal hydride) or NiCd (nickel-cadmium) battery, you can repeat charging and discharging (Cyclic charging) to reduce the memory effect.
This is a function that specifies the break time between charging and discharging to avoid overheating of the battery at that time.
The initial value is set to 10 minutes.
You can specify 1 to 60 minutes.
With a NiMH (nickel-metal hydride) or NiCd (nickel-cadmium) battery, you can repeat charging and discharging (Cyclic charging) to reduce the memory effect.
This is a function that specifies the break time between charging and discharging to avoid overheating of the battery at that time.
The initial value is set to 10 minutes.
You can specify 1 to 60 minutes.
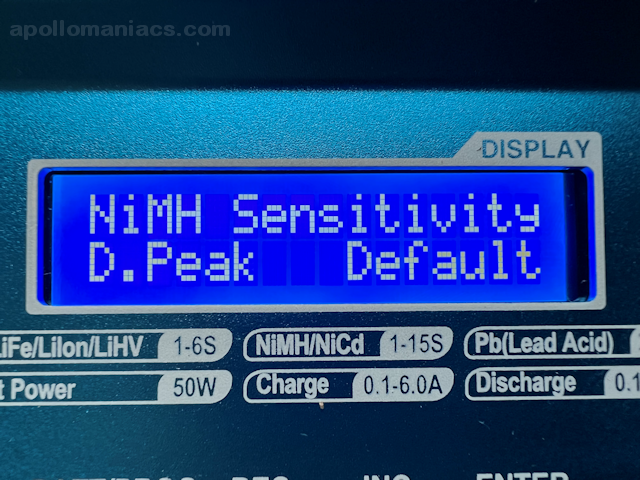 Specifies the sensitivity of delta peak to determine when NiMH (Nickel Metal Hydride) battery is fully charged.
Default (4mV / Cell) is set as initial value.
5 to 15 mV / Cell can be specified.
Specifies the sensitivity of delta peak to determine when NiMH (Nickel Metal Hydride) battery is fully charged.
Default (4mV / Cell) is set as initial value.
5 to 15 mV / Cell can be specified.
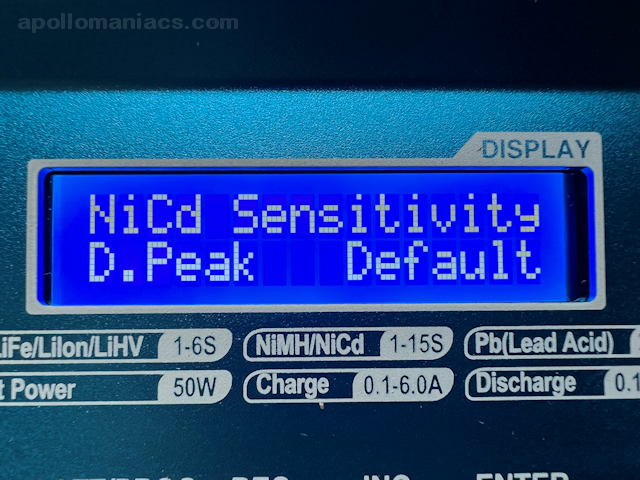 Specifies the sensitivity of delta peak to determine when NiCd (nickel-cadmium) battery is fully charged.
Default (4mV / Cell) is set as initial value.
5 to 15 mV / Cell can be specified.
Specifies the sensitivity of delta peak to determine when NiCd (nickel-cadmium) battery is fully charged.
Default (4mV / Cell) is set as initial value.
5 to 15 mV / Cell can be specified.
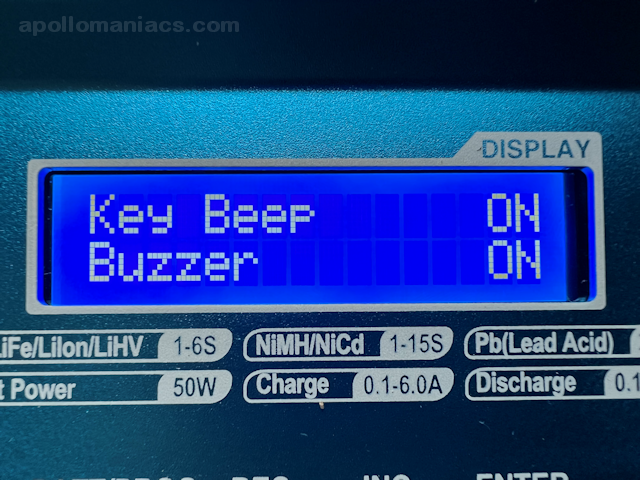 You can specify whether to play beep sound (Key Beep) when buttons are pressed, and beep sound (Buzzer) at the time of various notifications.
Both are set to ON by default.
You can specify whether to play beep sound (Key Beep) when buttons are pressed, and beep sound (Buzzer) at the time of various notifications.
Both are set to ON by default.
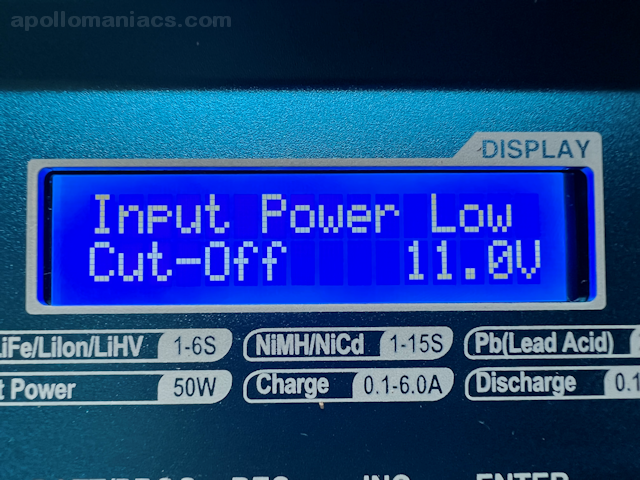 This function stops charging when input voltage to the charger drops below this value.
If you are using a battery for input, you can avoid over-discharging that battery.
If you are using power from AC outlet, you can ignore it.
Initial value is set to 11.0V.
10.0V to 11.0V can be specified.
This function stops charging when input voltage to the charger drops below this value.
If you are using a battery for input, you can avoid over-discharging that battery.
If you are using power from AC outlet, you can ignore it.
Initial value is set to 11.0V.
10.0V to 11.0V can be specified.
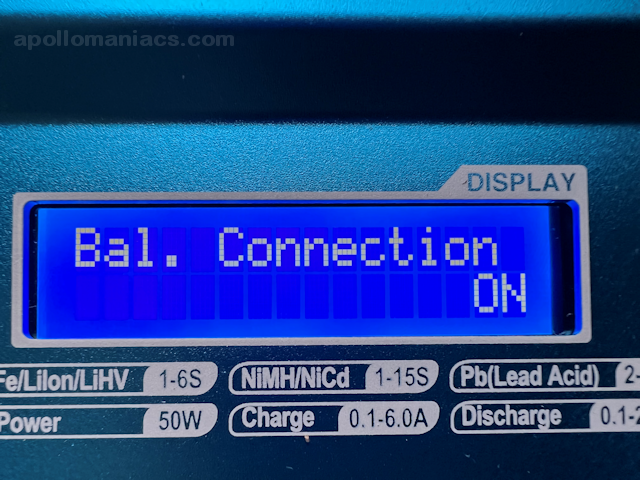 You can specify whether to use the balance connector (built-in balancer) when charging.
The initial value is set to ON (use).
You can specify whether to use the balance connector (built-in balancer) when charging.
The initial value is set to ON (use).
When charging one-cell battery (balance connector is not used), so you need to turn it off. Otherwise, an error will occur if the balance connector is not connected.
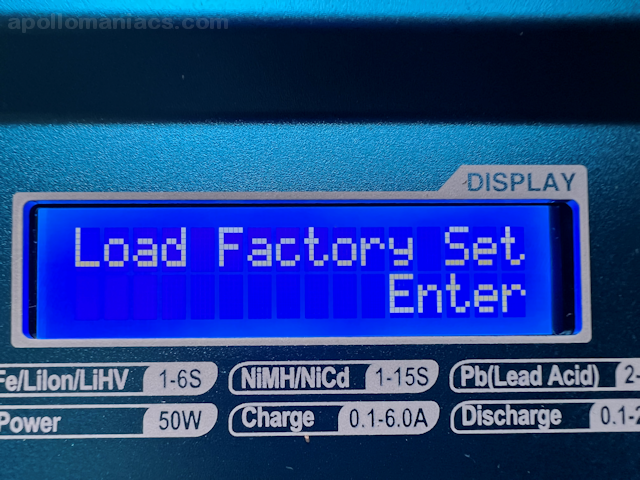 Resets the charger parameter settings to factory defaults.
Press [ENTER Start] button to initialize.
Resets the charger parameter settings to factory defaults.
Press [ENTER Start] button to initialize.
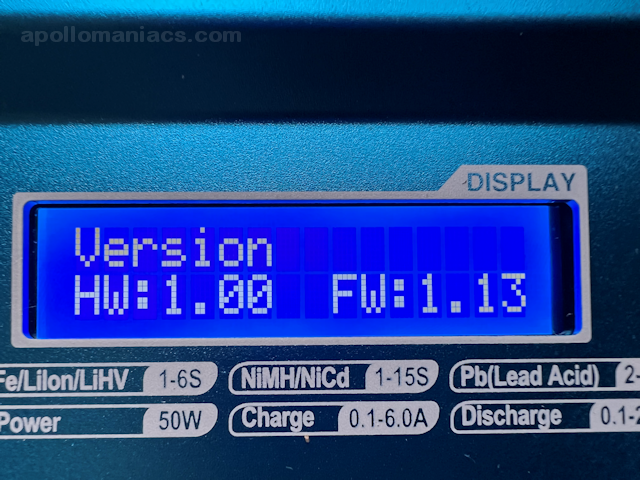 Shows hardware and firmware version of the charger.
Latest firmware for the charger can be downloaded from "Downloads" on each product introduction page on
SkyRC website
.
Shows hardware and firmware version of the charger.
Latest firmware for the charger can be downloaded from "Downloads" on each product introduction page on
SkyRC website
.
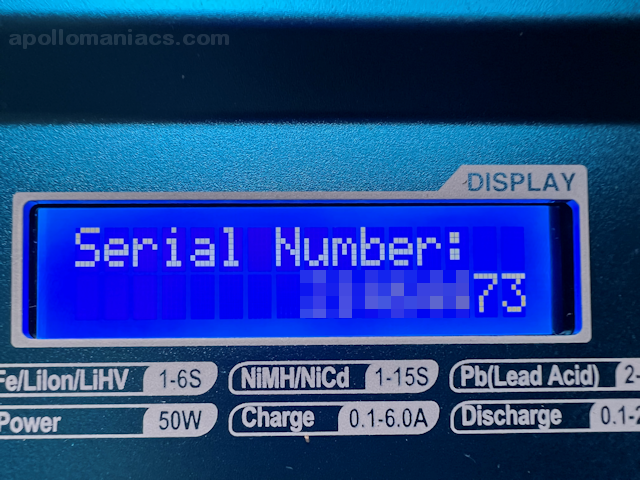 Displays serial number of the charger.
It alternates with the version screen shown above.
However, the serial number displayed here is different from the serial number on the sticker on back of charger body.
Displays serial number of the charger.
It alternates with the version screen shown above.
However, the serial number displayed here is different from the serial number on the sticker on back of charger body.
 Control from PC: How to use Charger Master
Connect iMAX B6 series to your PC with USB cable and control it using free software "Charger Master" for Windows provided by SkyRC.
Download Charger Master
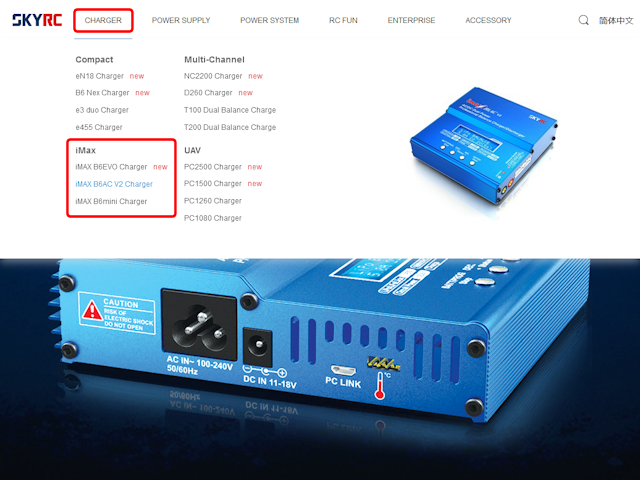 Open
SkyRC website
and select [CHARGER]-[(Model Name)] from menu at the top of the screen.
Open
SkyRC website
and select [CHARGER]-[(Model Name)] from menu at the top of the screen.
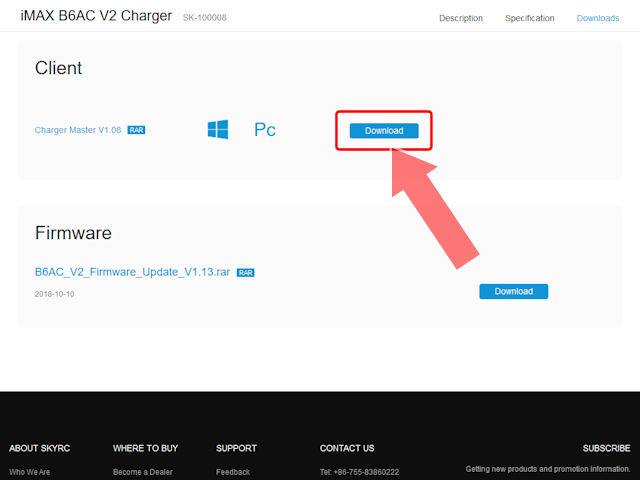 If you scroll the screen, you will find Charger Master "Download" button in Client column.
Click this to download.
However, there is no Download button on the model page where Charger Master cannot support.
If you scroll the screen, you will find Charger Master "Download" button in Client column.
Click this to download.
However, there is no Download button on the model page where Charger Master cannot support.
You can download a file of about 60MB such as “Charger Master V1.08.rar”. If you unzip this in any folder, you will get an installer of about 63MB such as “charger master V1.08.exe”.
Install Charger Master
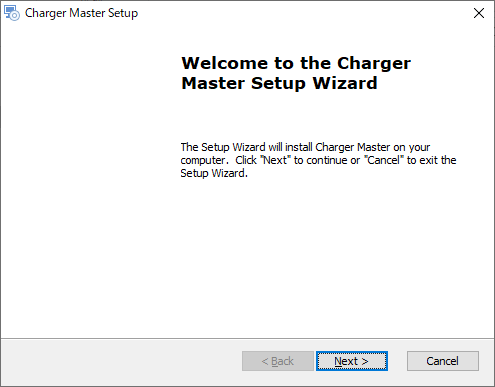 Double-click the installer file with a name such as “charger master V1.08.exe”.
Then, a screen like this will appear, so click "Next>".
Double-click the installer file with a name such as “charger master V1.08.exe”.
Then, a screen like this will appear, so click "Next>".
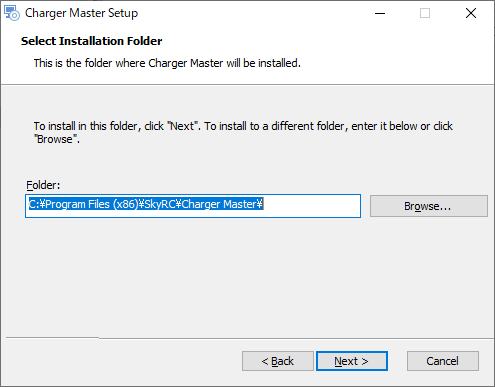 Specify the installation folder.
No particular changes are required.
Click "Next>".
Specify the installation folder.
No particular changes are required.
Click "Next>".
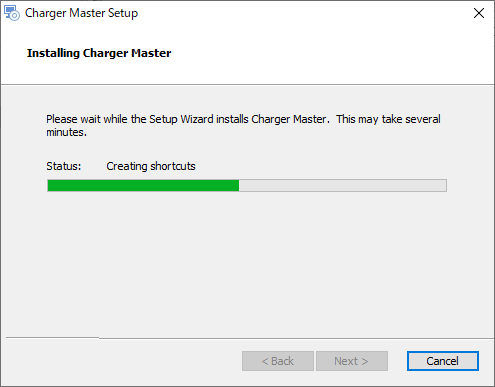 Then installation will start.
 Installation is complete when a screen like this appears.
Launch Charger Master
 Double-click
There are two types of USB cables: "For data communication" where all terminals are connected, and "For charging" where only power supply terminals are connected. You need to use "For data communication" to operate the charger from PC. Please note that some cables attached to bonus of mobile phone or charger, battery are "For charging".
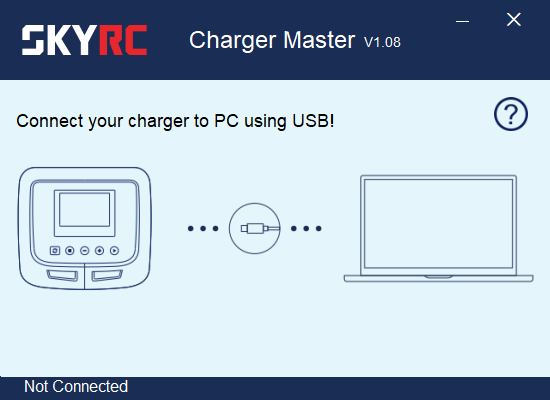
 When charger is connected to your computer, you will see a screen like this.
Initially, "Charge" menu is selected.
In addition, there are "System", "Program", and "Help" menus, which can be switched with the icon at the top left of the screen.
When charger is connected to your computer, you will see a screen like this.
Initially, "Charge" menu is selected.
In addition, there are "System", "Program", and "Help" menus, which can be switched with the icon at the top left of the screen.
Charge with Charger Master
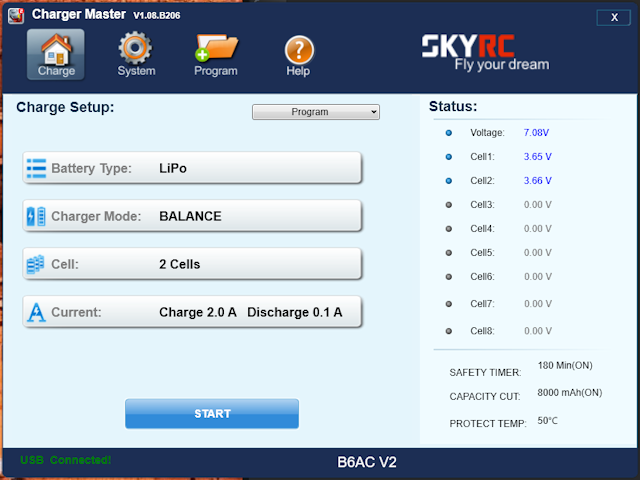
Connect battery to the charger and select "Charge" from the icon at the top left of screen.
Charging parameters are set by clicking four buttons in the center of screen.
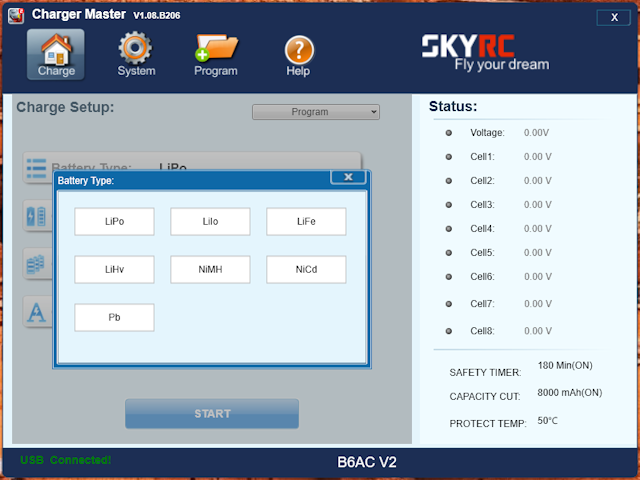 Click "Battery Type" button and you will see a screen like this.
Select the type of battery to charge.
Here, we will explain using the charging of LiPo battery as an example.
Click "Battery Type" button and you will see a screen like this.
Select the type of battery to charge.
Here, we will explain using the charging of LiPo battery as an example.
 If you click "Charger Mode" button when selecting LiPo battery, you will see a screen like this.
Select battery charging / discharging method.
Select "BALANCE" for balanced charging.
If you click "Charger Mode" button when selecting LiPo battery, you will see a screen like this.
Select battery charging / discharging method.
Select "BALANCE" for balanced charging.
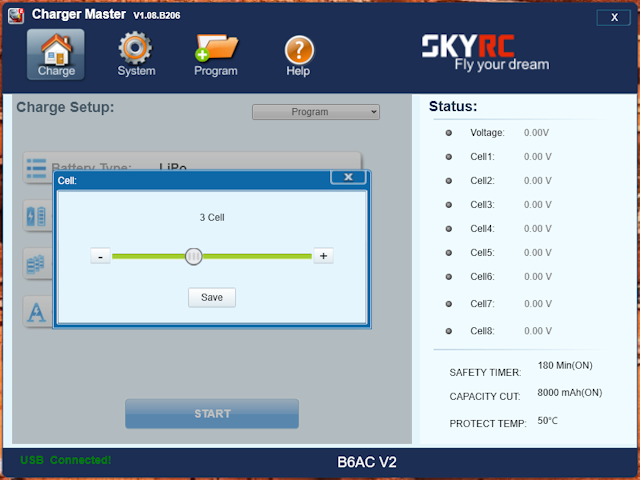 If you click "Cell" button when selecting LiPo battery, you will see a screen like this.
Select the number of battery cells.
Use "+" and "-" buttons to increase or decrease the value, and use "Save" button to confirm the value.
If you click "Cell" button when selecting LiPo battery, you will see a screen like this.
Select the number of battery cells.
Use "+" and "-" buttons to increase or decrease the value, and use "Save" button to confirm the value.
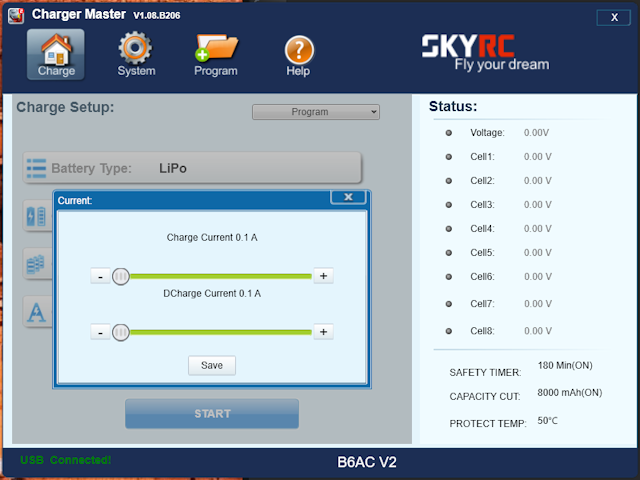 If you click "Current" button when selecting LiPo battery, you will see a screen like this.
Select maximum charge current and discharge current.
Use "+" and "-" buttons to increase or decrease the value, and use "Save" button to confirm the value.
When you connect battery to the charger, battery parameters will be displayed in "Status:" field on the right side of the screen.
Double-check that the parameters you have set are correct.
Click "START" button at the bottom of the screen to start charging.
If you click "Current" button when selecting LiPo battery, you will see a screen like this.
Select maximum charge current and discharge current.
Use "+" and "-" buttons to increase or decrease the value, and use "Save" button to confirm the value.
When you connect battery to the charger, battery parameters will be displayed in "Status:" field on the right side of the screen.
Double-check that the parameters you have set are correct.
Click "START" button at the bottom of the screen to start charging.
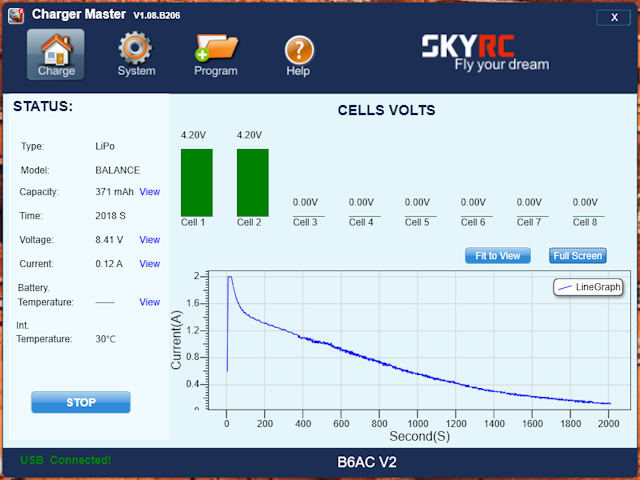 This screen will appear during charging.
LCD screen of the charger will be the same as when charging without PC.
Press "STOP" button at the bottom left of the screen to stop charging.
This screen will appear during charging.
LCD screen of the charger will be the same as when charging without PC.
Press "STOP" button at the bottom left of the screen to stop charging.
Charging parameters are displayed on the left side of the screen. Voltage of each cell of the battery is displayed at the top of the screen. Current supplied to the battery is displayed in a graph at the bottom right of the screen.
Click "Full Screen" button at the top right of the graph to display the graph in full screen.
Click "Fit to View" button at the upper right corner of the graph to adjust the size of the graph to fit the display area. However, the graph is usually displayed to fit, so clicking this will not change the screen.
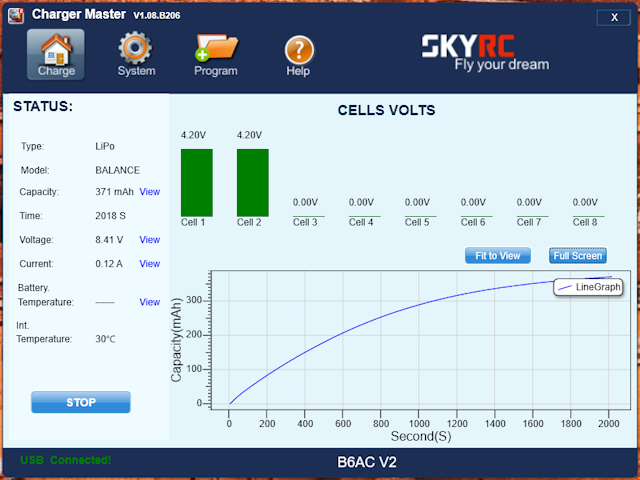 Click "View" in the "Capacity" field on the left side of the screen to display a graph like this.
It is a graph of the amount of electric charge (mAh) injected into the battery so far with this charge.
Click "View" in the "Capacity" field on the left side of the screen to display a graph like this.
It is a graph of the amount of electric charge (mAh) injected into the battery so far with this charge.
Similarly, clicking "View" in the "Voltage" column will display a graph of charging voltage, and clicking "View" in the "Temperature" column will display a graph of battery temperature. However, if you are not using an optional thermometer, the temperature graph will always be zero.
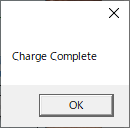 When charging is complete, you will hear a melody from the charger and a dialog box like this will appear.
LCD screen of the charger will be the same as when charging without PC.
When charging is complete, you will hear a melody from the charger and a dialog box like this will appear.
LCD screen of the charger will be the same as when charging without PC.
Charger Master setting screen
 If you select "System" from the icon on the upper left of the screen, you will see a screen like this.
You can check and change
system settings of the charger
on computer screen.
If you select "System" from the icon on the upper left of the screen, you will see a screen like this.
You can check and change
system settings of the charger
on computer screen.
Click "Load from Charger" button to read values set in the charger to PC screen.
Click "Save to Charger" button to write values set on PC screen to the charger.
Click "Factory default" button to reset parameters to factory default values.
Use Program feature of Charger Master
Like the "memory" of the charger itself, Charger Master has the ability to store multiple charging parameters and recall them for charging.
This is called "program".
Charger Master can store up to 20 types of "program"s.
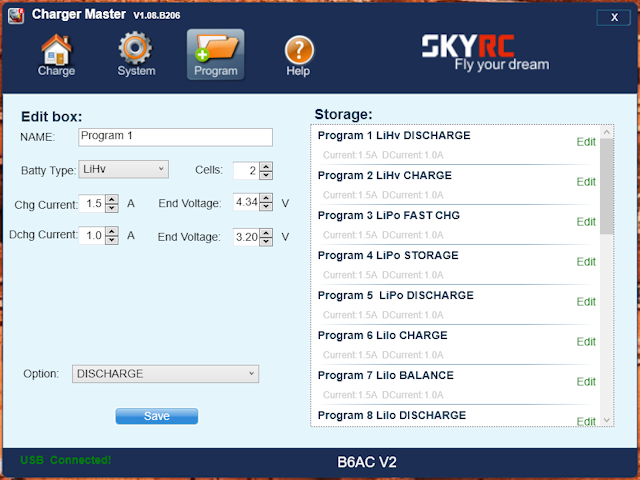 If you select "Program" from the icon on the upper left of the screen, you will see a screen like this.
On the right side of the screen, there are 20 programs with parameters already set.
Click "Edit" at the right end of each program to read parameters of that program in the left field of the screen.
If you click "Save" button at the bottom left of the screen, currently loaded program will be updated with the values on the screen.
If you select "Program" from the icon on the upper left of the screen, you will see a screen like this.
On the right side of the screen, there are 20 programs with parameters already set.
Click "Edit" at the right end of each program to read parameters of that program in the left field of the screen.
If you click "Save" button at the bottom left of the screen, currently loaded program will be updated with the values on the screen.
 Programs can be called from "Program" drop-down list at the top center of "Charge" screen.
Charger Master Help screen
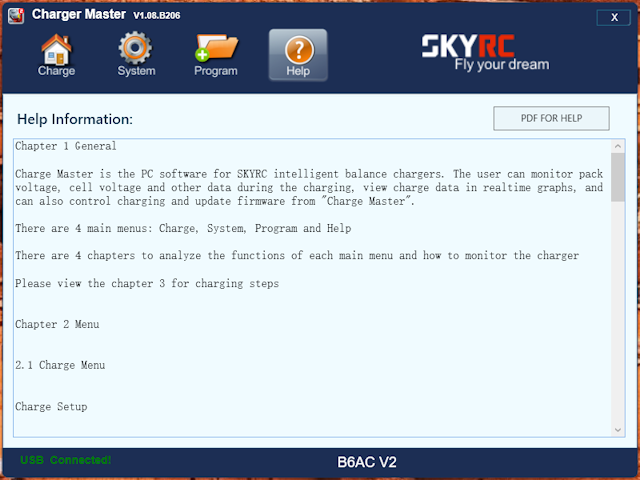 If you select "Help" from the icon on the upper left of the screen, you will see a screen like this.
Simple usage is displayed.
And if you click "PDF FOR HELP" button at the top right of this screen, PDF format instruction manual will be displayed.
However, both have very brief explanations.
If you select "Help" from the icon on the upper left of the screen, you will see a screen like this.
Simple usage is displayed.
And if you click "PDF FOR HELP" button at the top right of this screen, PDF format instruction manual will be displayed.
However, both have very brief explanations.
The text and PDF files displayed here are stored in the Charger Master installation folder.
How to use the charger
This site explains how to use the following chargers. Please click the image.BC-4S15D

iSDT Q6 Nano

SkyRC iMAX B6 Series

To know more about How to Fly Hobby Drone
To know more about iPhone