


 DJI Mavic Mini knowledge
Here, we introduce DJI Mavic Mini knowledge.
Click
here
for more information on DJI Mavic Mini.
DJI Mavic Mini / 2.7K aerial video mini drone weighing 249g
このページを日本語で見る
Table of contents
Quick shot behavior
DJI Mavic Mini has some flight modes for aerial photography called QuickShot as shown below. When either mode is activated, a video of approximately 15 seconds is automatically recorded.- Rocket
- The Mavic Mini moves straight up with the camera pointing at the subject below. The ascending altitude can be set from 40ft (about 12m), 60ft (about 18m), 80ft (about 24m), 100ft (about 30m), or 120ft (about 36m).
- Circle
- The Mavic Mini turns around the subject clockwise while maintaining the altitude and distance at the shooting start position. Shooting ends when turn 360 degrees.
- Dronie
- The Mavic Mini fly backwards and upwards while the subject is captured by the camera. The ascending altitude can be set from 40ft (about 12m), 60ft (about 18m), 80ft (about 24m), 100ft (about 30m), or 120ft (about 36m).
- Helix
- The Mavic Mini starts from the altitude and distance at the shooting start position and flies backward and upward while turning clockwise around the subject. The maximum radius can be set from 40ft (about 12m), 60ft (about 18m), 80ft (about 24m), 100ft (about 30m), or 120ft (about 36m). Shooting ends when turn 360 degrees.
DJI Mavic Mini Flight Mode
standard Position (P) mode
This mode is suitable for normal flight. Positon mode works best when the GPS signal is strong. The aircraft utilizes GPS and the Vision System to locate itself and stabilize. Intelligent Flight Mode is enabled in this mode. When the Downward Vision System is enabled and lighting conditions are sufficient, the maximum flight altitude angle is 20º and the maximum flight speed is 8 m/s. The aircraft automatically changes to Attitude (ATTI) mode when the Vision System is unavailable or disabled and when the GPS signal is weak or the compass experiences interference. When the Vision System is unavailable, the aircraft cannot position itself or brake automatically, which increases the risk of potential flight hazards. In ATTI mode, the aircraft may be more easily affected by its surroundings. Environmental factors such as wind can result in horizontal shifting, which may present hazards, especially when flying in confined spaces.
Sport (S) mode
In Sport mode, the aircraft uses GPS and Vision System for positioning. In Sport mode, aircraft responses are optimized for agility and speed making it more responsive to control stick movements. The maximum flight speed is 13 m/s, maximum ascent speed is 4 m/s, and maximum descent speed is 3 m/s.
- The aircraft's maximum speed and braking distance significantly increase in Sport mode. A minimum braking distance of 30 m is required in windless conditions.
- Descent speed significantly increases in Sport mode. A minimum braking distance of 10 m is required in windless conditions.
- The aircraft's responsiveness significantly increases in Sport mode, which means a small control stick movement on the remote controller translates into the aircraft moving a large distance. Be vigilant and maintain adequate maneuvering space during flight.
CineSmooth (C) mode
This mode is suitable for video shooting. CineSmooth mode is based on Position mode and the flight speed is limited, making the aircraft more stable during shooting. The maximum flight speed is 4 m/s, maximum ascent speed is 1.5 m/s, and maximum descent speed is 1 m/s.
Return to Home function
The Return to Home (RTH) function brings the aircraft back to the last recorded Home Point. You can take your drone back to the takeoff point with one touch. However, Mavic Mini does not have obstacle detection function, so if there is an obstacle such as a standing tree on the way back automatically, it will rush in regardless. Please use RTH function as a last resort in an emergency.There are three types of RTH: Smart RTH, Low Battery RTH, and Failsafe RTH. The default Home Point is the first location where your aircraft received Strong GNSS signals (When the GNSS satellite icon on the screen turns white and at least 4 bars light up). The aircraft status indicator blinks green quickly after the Home Point has been recorded.
Smart RTH
If the GPS signal is sufficiently strong, Smart RTH can be used to bring the aircraft back to the Home Point. Smart RTH is initiated either by tapping in DJI Fly or by pressing and holding the RTH button on the remote controller. Exit Smart RTH by tapping in DJI Fly or by pressing the RTH button on the remote controller.
Low Battery RTH
Low Battery RTH is triggered when the Intelligent Flight Battery is depleted to the point that the safe return of the aircraft may be affected. Return home or land the aircraft immediately when prompted. DJI Fly displays a warning when the battery level is low. The aircraft will automatically return to the Home Point if no action is taken after a 10 second countdown. The user can cancel RTH by pressing the RTH button on the remote controller. If RTH is cancelled following a low battery level warning, the Intelligent Flight Battery may not have enough power for the aircraft to land safely, which may lead to the aircraft crashing or being lost. The aircraft will land automatically if the current battery level can only support the aircraft long enough to descend from its current altitude. The user cannot cancel the auto landing but can use the remote controller to alter the aircraft's direction during the landing process.
Failsafe RTH
If the Home Point was successfully recorded and the compass is functioning normally, Failsafe RTH automatically activates after the remote controller Signal is lost for more than 11 seconds. Other RTH Scenarios If the video link signal is lost during flight while the remote controller is still able to control the movements of the aircraft, there will be a prompt to initiate RTH. RTH can be cancelled.
Notes after starting RTH mode
Once the RTH mode has been activated on the Mavic Mini, it may cause video recording issues afterwards. Pressing the record button will not be recorded or will generate an incorrect video file that cannot be played. After the RTH mode is activated, be sure to land the drone once and restart it by turning the power off and on.
RTH function behavior
- When the drone is turned on and receives GPS signals, the home point is recorded.
- During the flight, the RTH function is activated for some reason.
- If the altitude is lower than 20 m, the aircraft ascends to the RTH altitude or 20 m, and then adjusts its orientation. If the altitude is higher than 20 m, the aircraft adjusts its orientation immediately.
-
- If the aircraft is further than 20 m from the Home Point when the RTH procedure begins, it ascends to the preset RTH altitude and flies to the Home Point at a speed of 8 m/s. If the current altitude is higher than the RTH altitude, the aircraft flies to the Home Point at the current altitude.
- If the aircraft is less than 20 m from the Home Point when the RTH procedure begins, it lands immediately.
- After reaching the Home Point, the aircraft lands and the motors stop.
- The aircraft cannot return to the Home Point if the GPS signal is weak or unavailable. If the GPS signal become weak or unavailable after RTH is triggered, the aircraft will hover in place for a while, and then start landing.
-
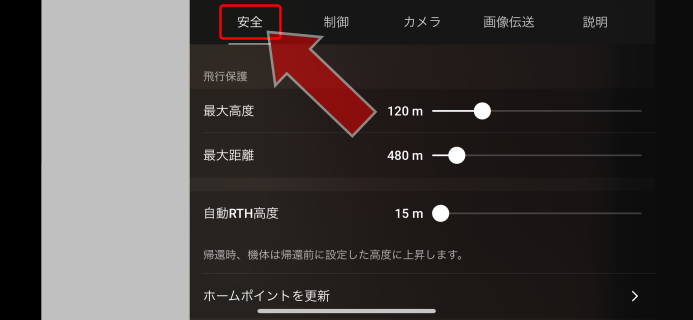
It is important to set a suitable RTH altitude before each flight.
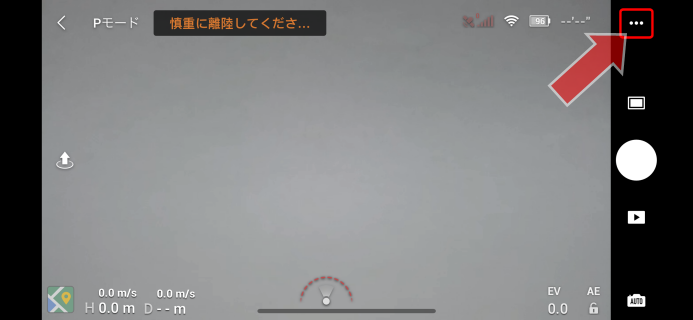
This can be specified in the DJI Fly app by tapping the
 (Settings)
icon at the top right of the screen and selecting [Auto RTH Altitude] from the [Safety] menu.
In Smart RTH and Low Battery RTH, the aircraft automatically ascends to the RTH altitude.
If the aircraft is at an altitude of 65 ft (20 m) or higher and has not yet reached the RTH altitude, the throttle stick can be moved to stop the aircraft from ascending.
The aircraft will fly directly to the Home Point at its current altitude.
(Settings)
icon at the top right of the screen and selecting [Auto RTH Altitude] from the [Safety] menu.
In Smart RTH and Low Battery RTH, the aircraft automatically ascends to the RTH altitude.
If the aircraft is at an altitude of 65 ft (20 m) or higher and has not yet reached the RTH altitude, the throttle stick can be moved to stop the aircraft from ascending.
The aircraft will fly directly to the Home Point at its current altitude.
- During RTH, the aircraft's speed, altitude, and the orientation can be controlled using the remote controller or DJI Fly if the remote controller signal is normal, but the direction of flight cannot be controlled.
- GEO zones will affect RTH. The aircraft may not be able to return to a Home Point when the wind speed is too high. Fly with caution.
Landing Protection
Landing Protection will activate during Smart RTH.- During Landing Protection, the aircraft will automatically detect and gently land on Suitable ground.
- If Landing Protection determines that the ground is not suitable for landing, Mavic Mini will hover and wait for pilot confirmation.
- If Landing Protection is not operational, DJI Fly will display a landing prompt when Mavic Mini descends below 0.5 meters. Pull down on the throttle stick or use the auto landing slider to land.
Propeller replacement
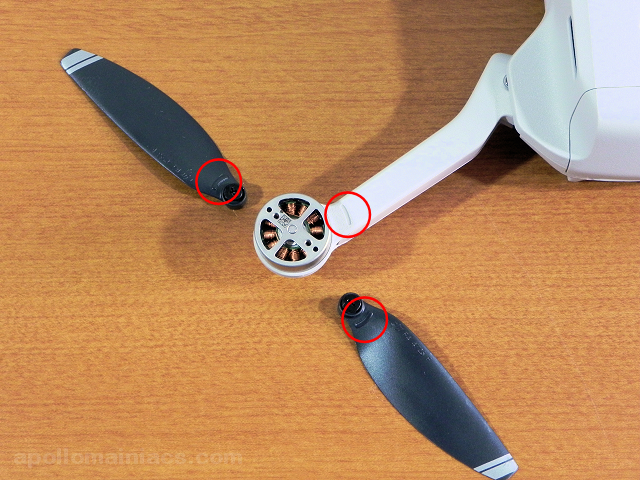 The Mavic Mini propeller comes in two designs depending on the direction of rotation of the motor to be mounted.
These two types can be distinguished by whether there is a mark at the joint, and the pattern of the blade tip.
Attach the marked propeller to the marked arm.
The Mavic Mini propeller comes in two designs depending on the direction of rotation of the motor to be mounted.
These two types can be distinguished by whether there is a mark at the joint, and the pattern of the blade tip.
Attach the marked propeller to the marked arm.
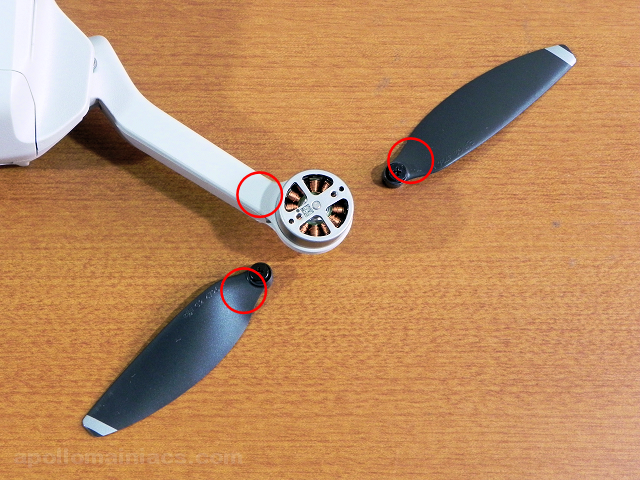 These are unmarked arms and propellers.
One propeller package (one set) contains two marked propellers and two unmarked propellers, a total of four propellers and four screws. Two sets of packages are required to replace the entire propeller of one aircraft. The genuine propeller sold separately (DJI) contains two sets (8 blades : for one aircraft) of packages.
In Japanese version, DJI Mini 2 and Mavic Mini propellers are the same. In the International version, design of propeller has been changed, and color of line at the tip of the propeller has been changed to orange.
Accessories for DJI mini 2 / Mavic Mini
- • The installation and removal of the propellers are done with the screwdriver included with the Mavic Mini. Take out two blades and screws from the same package and replace them at the same time.
- • Before each takeoff, make sure that propellers are not damaged and cracked, and securely attached. Tighten the propeller screws approximately every 30 hours (60 times) flight.
Firmware update
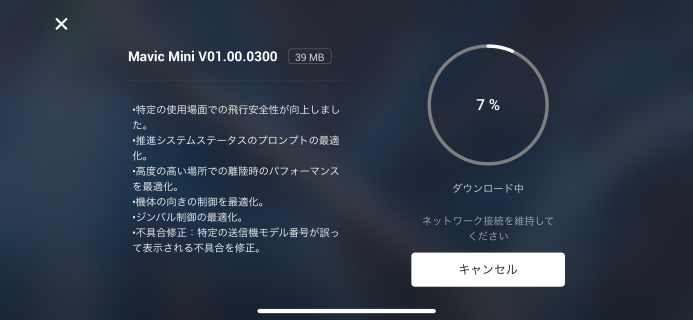
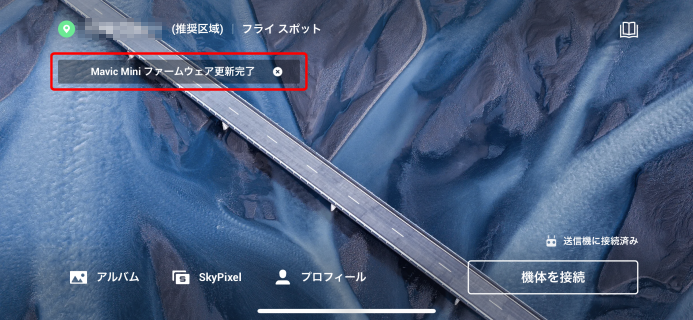
The program (firmware) built into the drone body, controller and battery are updated from time to time due to improvements and bug fixes. Update the Mavic Mini when the latest firmware is available. If you launch the DJI Fly app with your iPhone connected to the Internet, you will be notified if a new firmware update is available.
When such a display appears, tap “Download”.
 Then the firmware download will begin.
If you tap "Details" here ...
Then the firmware download will begin.
If you tap "Details" here ...
 You can check the details of the upgrade and the download progress.
Tap the “x” mark in the upper left to return to the DJI Fly app home screen.
You can check the details of the upgrade and the download progress.
Tap the “x” mark in the upper left to return to the DJI Fly app home screen.
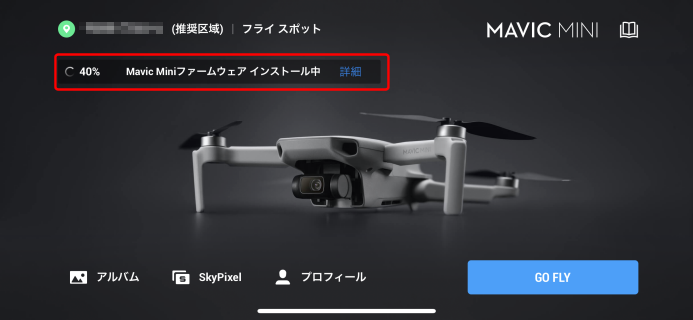
 When the download is complete, “Install” message is displayed.
Connect your iPhone to the remote controller and turn on the Mavic Mini and the remote controller.
Then tap “Install”.
When the download is complete, “Install” message is displayed.
Connect your iPhone to the remote controller and turn on the Mavic Mini and the remote controller.
Then tap “Install”.
Note: Do not “Install” when the battery of iPhone, Mavic Mini, and remote controller is not fully charged. If the power goes off during installation, the Mavic Mini may become unusable.
 Then installation begins.
Wait without doing anything.
Then installation begins.
Wait without doing anything.
Mavic Mini restarts several times along the way. Each time the screen of the DJI Fly app changes. As the installation progresses, the four LEDs on the controller blink in various patterns.
 When the installation is complete, “Firmware update complete” is displayed like this.
At this time, the Mavic Mini may be turned off.
When you want to fly, turn on the Mavic Mini.
When the installation is complete, “Firmware update complete” is displayed like this.
At this time, the Mavic Mini may be turned off.
When you want to fly, turn on the Mavic Mini.
Check for updates manually
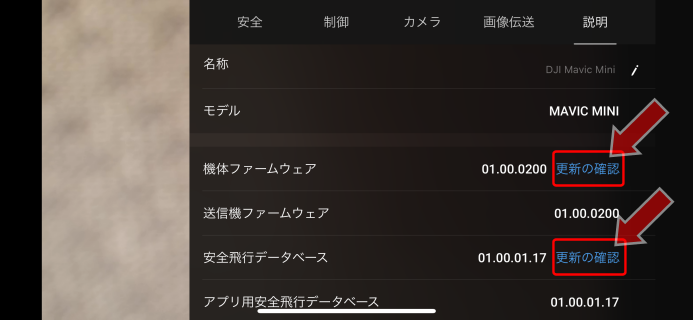 To update manually, connect to Mavic Mini with the DJI Fly app and tap the
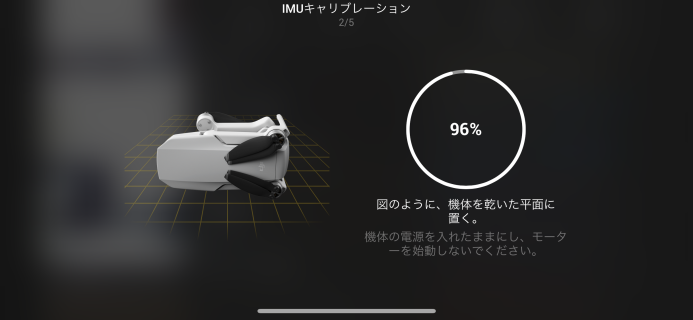
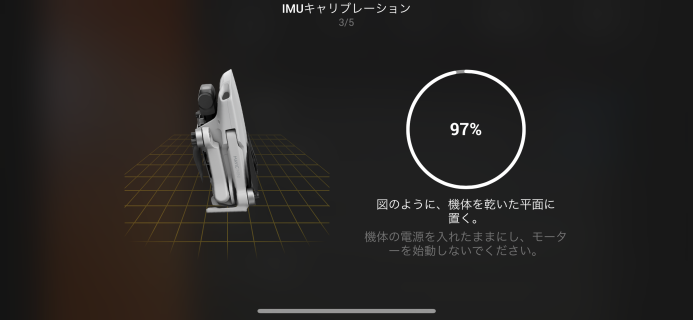
Calibrating the IMU
IMU (Inertial Measurement Unit) is an inertial navigation system consisting of an accelerometer and a gyroscope. It plays an important role in attitude control (pitch, roll) of the drone in flight. If an IMU error appears on the screen of the DJI Fly app, perform calibration. The calibration process takes only about 30 seconds.Calibration Procedure
 Turn on the Mavic Mini and controller, place it on a level desk, and face the nose left toward you.
Leave the arm folded.
Turn on the Mavic Mini and controller, place it on a level desk, and face the nose left toward you.
Leave the arm folded.
 Tap
Tap
 Then select [Safety] from the menu.
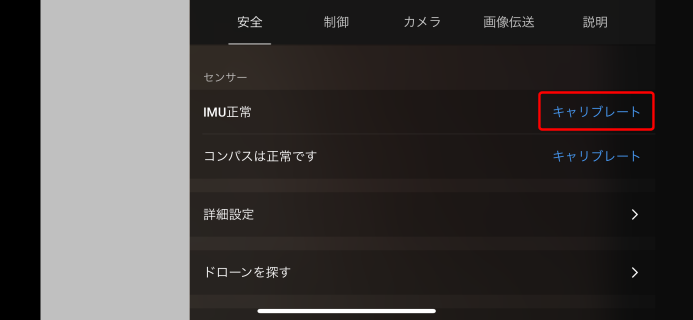 Tap [Calibrate] to the right of the IMU display in the “Sensor” field.
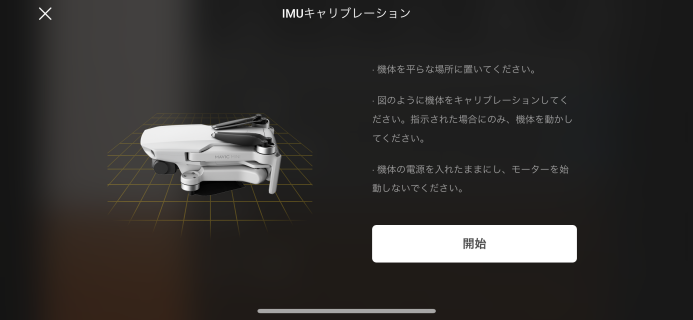 Then the calibration screen is displayed. Tap “Start” and follow the instructions on the app screen.
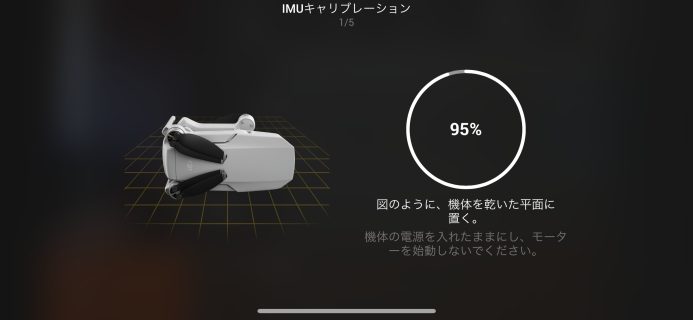 After a few seconds, the app screen will prompt you to change the direction of the Mavic Mini.
Lift the aircraft and hold it with the top of the aircraft facing you and the nose facing to the right.
Hold the aircraft as little as possible and wait for the calibration to finish.
After a few seconds, the app screen will prompt you to change the direction of the Mavic Mini.
Lift the aircraft and hold it with the top of the aircraft facing you and the nose facing to the right.
Hold the aircraft as little as possible and wait for the calibration to finish.
 Next, hold the aircraft with the top of the aircraft facing forward and the nose facing to the left.
 Next, hold the nose up.
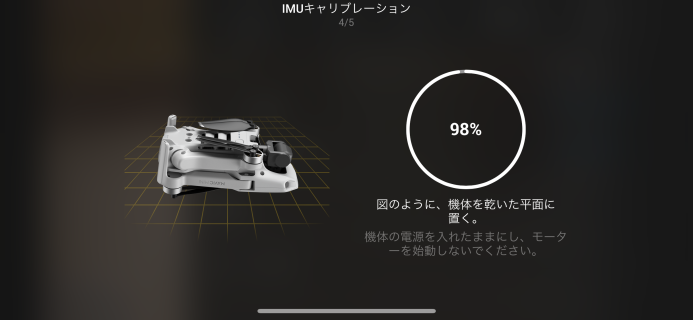 Finally, turn the aircraft over and turn the nose to the right.
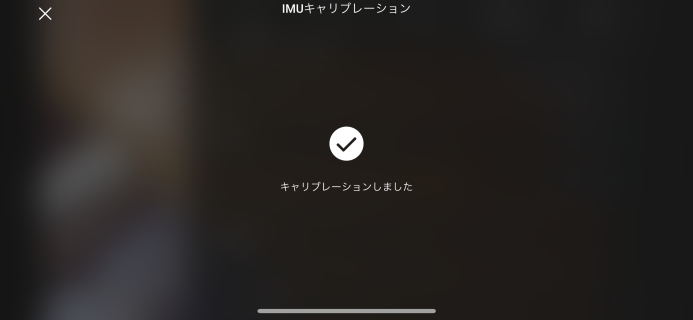 When the completion message appears on the DJI Fly app screen, calibration is complete.
Inertial measurement unit(Wikipedia)
Calibrating the Compass
It is recommended that the compass is calibrated in any of the following situations when flying outdoors:- Flying at a location further than 31 miles (50 km) away from the location the drone was last flown.
- The aircraft has not been flown for more than 30 days.
- A compass interference warning appears in DJI Fly and/or the aircraft status indicator blinks red and yellow alternatively.
- • DO NOT calibrate the compass in locations where magnetic interference may occur, such as close to magnetite deposits or large metallic structures such as parking structures, steel reinforced basements, bridges, cars, or scaffolding.
- • DO NOT carry objects (such as mobile phones) that contain ferromagnetic materials near the aircraft during calibration.
- • It is not necessary to calibrate the compass when flying indoors.
Calibration Procedure
Choose an open area to carry out the following procedure.
Turn on the Mavic Mini.
Tap
Then select [Safety] from the menu.
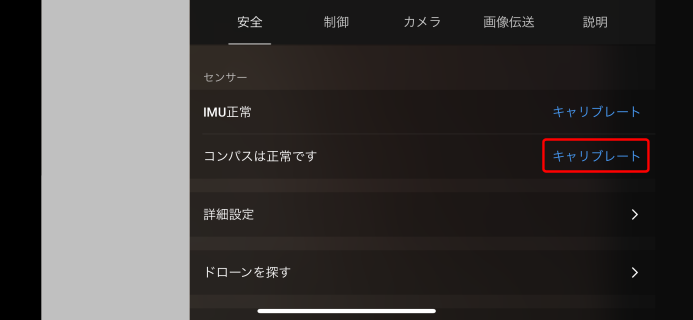 Tap [Calibrate] to the right of the compass display in the “Sensor” field.
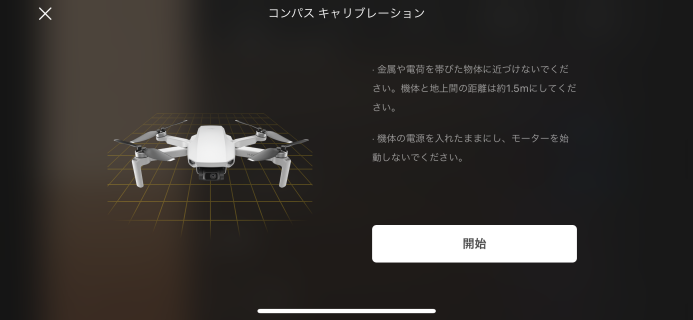 Then the calibration screen is displayed. Tap “Start” and follow the instructions on the app screen.
The aircraft status indicator blinks yellow, indicating calibration has start.
Then the calibration screen is displayed. Tap “Start” and follow the instructions on the app screen.
The aircraft status indicator blinks yellow, indicating calibration has start.
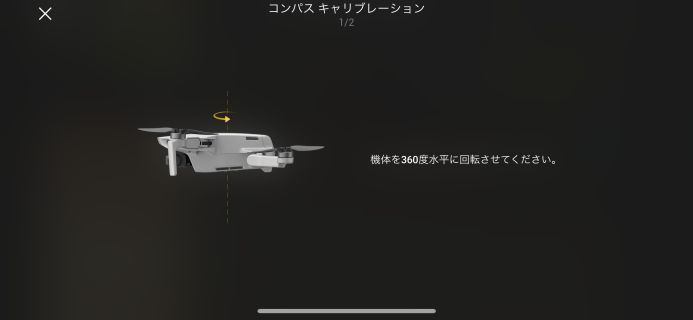 Hold the aircraft horizontally and rotate it 360 degrees.
The aircraft status indicator will turn solid green.
Hold the aircraft horizontally and rotate it 360 degrees.
The aircraft status indicator will turn solid green.
 Hold the aircraft vertically, with its nose pointing upward, and rotate it 360 degrees around a vertical axis.
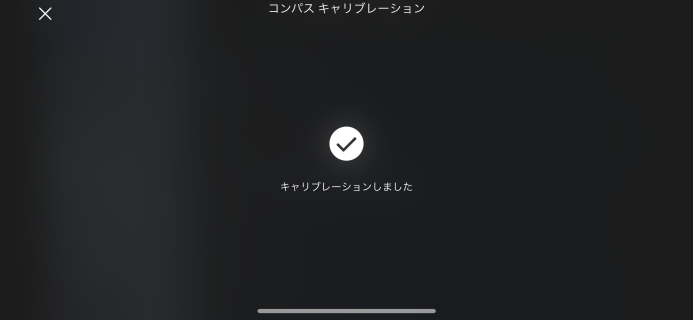 When the completion message appears on the DJI Fly app screen, calibration is complete.
- • If the aircraft status indicator blinks red, the calibration has failed. Change your location and try the calibration procedure again.
- • If the aircraft status indicator blinks red and yellow alternatively after calibration is completed, this indicates that the current location is not suitable for flying the aircraft, due to the level of magnetic interference. Change your location.
- • A prompt will appear in DJI Fly app if compass calibration is required before takeoff.
- • The aircraft can take off immediately once calibration is complete. If you wait more than three minutes to take off after calibration, you may need to repeat the calibration process.
Gimbal Profile
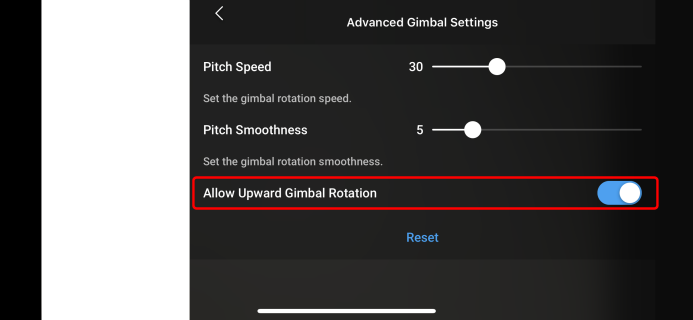

Gimbal Operation Modes
Two gimbal operation modes are available. Switch between the different operation modes in DJI Fly.
- Follow Mode
- The angle between the gimbal's orientation and aircraft front remains constant at all times.
- FPV Mode
- The gimbal synchronizes with the movement of the aircraft to provide a first-person flying experience.
- • When the aircraft is powered on, do not tap or knock the gimbal. To protect the gimbal during takeoff, take off from open, flat surfaces.
- • Precision elements in the gimbal may be damaged in a collision or impact, which may cause the gimbal to function abnormally.
- • Avoid getting dust or sand on the gimbal, especially in the gimbal motors.
-
• A gimbal motor error may occur in the following situations:
- a. The aircraft is on uneven ground or the gimbal is obstructed.
- b. The gimbal experiences excessive external force, such as a collision.
- • DO NOT apply external force to the gimbal after the gimbal is powered on. DO NOT add any extra payload to the gimbal as this may cause the gimbal to function abnormally or even lead to permanent motor damage.
- • Make sure to remove the gimbal cover before powering on the aircraft. Also, make sure to mount the gimbal cover when the aircraft is not in use.
- • Flying in heavy fog or clouds may make the gimbal wet, leading to temporary failure. The gimbal recovers full functionality once it is dry.
Vision System and Infrared Sensing System
Mavic Mini is equipped with a Downward Vision System and Infrared Sensing System. The Downward Vision System consists of one camera and the Infrared Sensing System consists of two 3D infrared modules. The Downward Vision System and Infrared Sensing System help the aircraft maintain its current position, hover in place more precisely, and to fly indoors or in other environments where GPS is unavailable.
Detection Fields
The Downward Vision System works best when the aircraft is at an altitude of 0.5 to 10 m, and its operating range is 0.5 to 30 m.


Using the Vision System
When GPS is unavailable, the Downward Vision System is enabled if the surface has a discernable surface and sufficient light. The Downward Vision System works best when the aircraft is at an altitude of 0.5 to 10 m. If the aircraft's altitude is above 10 m, the Vision System may be affected, so extra caution is required.

To enable Downward Vision System
- Make sure the aircraft is on a flat surface. Power on the aircraft.
- The aircraft hovers in place after takeoff. The aircraft status indicator blinks green twice, which indicates the Downward Vision System is working.
- • The max hover altitude of the aircraft is 5 m if there is no GPS.
- • The Vision System may not function properly when the aircraft is flying over water or snow-covered areas.
- • Note that the Vision System may not function properly when the aircraft is flying too fast. Fly with caution when flying at over 10 m/s (32.8 ft/s) at 2 m (6.6 ft) or over 5 m/s (16.4 ft) at 1 m (3.3 ft).
-
• The Vision System cannot work properly over surfaces that do not have clear pattern variations. The Vision System cannot work property in any of the following situations. Operate the aircraft cautiously.
- a. Flying over monochrome surfaces (e.g., pure black, pure white, pure green).
- b. Flying over highly reflective surfaces.
- c. Flying over water or transparent surfaces
- d. Flying over moving surfaces or objects.
- e. Flying in an area where the lighting changes frequently or drastically.
- f. Flying over extremely dark (< 10 lux) or bright (> 40,000 lux) surfaces.
- g. Flying over surfaces that strongly reflect or absorb infrared waves (e.g., mirrors).
- h. Flying over surfaces without clear patterns or texture.
- i. Flying over surfaces with repeating identical patterns or textures (e.g., tiles with the same design).
- J. Flying over obstacles with small surface areas (e.g., tree branches).
- • Keep the sensors clean at all times. DO NOT tamper with the sensors. DO NOT use the aircraft in environment with dust and humidity. DO NOT obstruct the Infrared Sensing System.
- • DO NOT fly on days that are rainy, smoggy, or if there is limited visibility.
-
• Check the following every time before takeoff:
- a. Make sure there are no stickers or any other obstructions over the Infrared Sensing and Vision System.
- b. If there is any dirt, dust, or water on the Infrared Sensing and Vision System, clean it with a soft cloth. Do not use any cleanser that contains alcohol.
- C. Contact DJI Support if there is any damage to the glass of the Infrared Sensing and Vision System.