


 How to take videos and photos with DJI Mavic Mini
Here, we introduce how to take videos and photos with DJI Mavic Mini.
Click
here
for more information on DJI Mavic Mini.
DJI Mavic Mini / 2.7K aerial video mini drone weighing 249g
このページを日本語で見る
Table of contents
Taking a video / photo

Take a video
The button with a red circle in the left back of the controller is the video recording button. Recording starts and ends each time you press the button. When in photo shooting mode (DJI Fly app shutter button is white), press this button to switch to video mode.
Take a photo
The button on the right back of the controller with the camera illustration is the shutter button. Each time you press it, a photo is taken. When in video mode (DJI Fly app shutter button is red), press this button to switch to photo mode.
Switch video format

First, select resolution from "2.7K" or "1080P", and then select frame rate to the left. You can choose up to 30fps for 2.7K and up to 60fps for 1080P.
Switch photo format
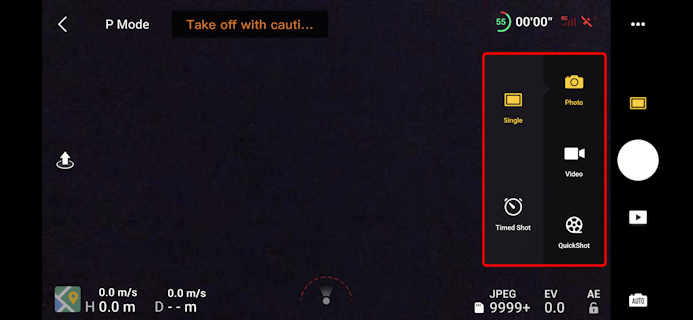
“Single” takes one photo each time you press the shutter.
In “Timed Shot”, when you press the shutter once, photo is taken continuously every specified number of seconds. Press the shutter button again to stop shooting. You can shoot at the shortest every 2 seconds.
Change camera direction

By tapping
Retrieve videos and photos taken
See Enjoy photos and videos taken with DJI drone / How to use DJI Mimo function page for retrieve videos and photos.
Enjoy photos and videos taken with DJI drone / How to use DJI Mimo function
Format of video / photo taken
| Video format (2.7k) | |
|---|---|
| Video | H.264 (MPEG4-AVC) 2720 x 1530 pixel, 25 or 30 frames per second, Bit rate about 40.36Mbps, Level5.0 high profile, GPS location information included (tag xyz) |
| Audio | none |
| Subtitle | flight log |
| Container | .mp4 file format |
| File size | About 291MB per minute |
| Video format (FHD) | |
| Video | H.264 (MPEG4-AVC) 1920 x 1080 pixel(1080p), 25/30/50/60 frames per second, Bit rate about 34.51Mbps, Level 4.0 high profile, GPS location information included (tag xyz) |
| Audio | none |
| Subtitle | flight log |
| Container | .mp4 file format |
| File size | About 248MB per minute |
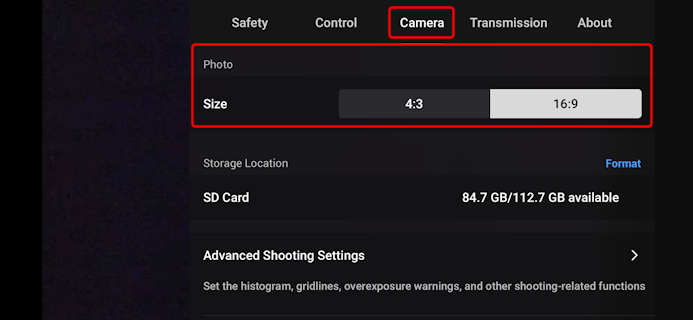
| Photo format (16:9) | |
| Photo | 4000 x 2250 (9 million)pixel, Focal length 4.49mm (24mm in 35mm equivalent), GPS location information included, JPG format YUV, sRGB |
| Photo format (4:3) | |
| Photo | 4000 x 3000 (12 million)pixel, Focal length 4.49mm (24mm in 35mm equivalent), GPS location information included, JPG format YUV, sRGB |
Drone Aerial View MavicMini Saipan Aqua Resort Club
Watch on YouTube
How to use Quick Shot
With Quick Shot, you can shoot a dramatic video clip of about 15 seconds with one touch. If you find stunning views while traveling, or if your family or friends get together, try quick shots.If the GPS signal mark displayed on the upper right of the DJI Fly app is not white, Quick Shot cannot be used.
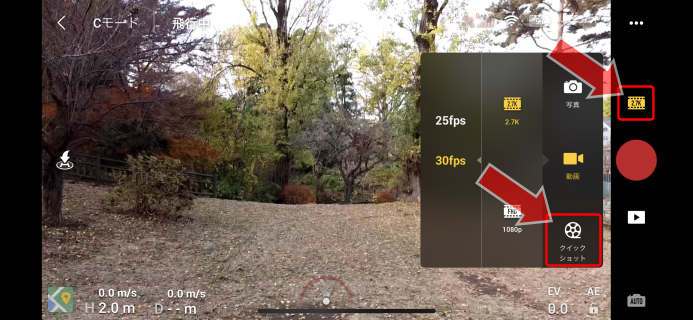 Tap the icon above the shutter button of the DJI Fly app.
Then, a menu like this will be displayed, so select “Quick Shot”.
Tap the icon above the shutter button of the DJI Fly app.
Then, a menu like this will be displayed, so select “Quick Shot”.
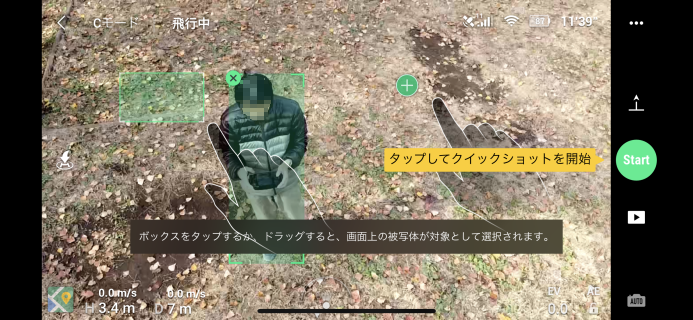
 Select the shooting mode from “Dronie”, “Rocket”, “Circle”, “Helix”, and then select the distance or altitude.
When you start Quick Shot for the first time, an explanation video will be displayed. Tap the
For details on the operation of “Dronie”, “Rocket”, “Circle”, “Helix” mode, see DJI Mavic Mini knowledge .
DJI Mavic Mini knowledge
 On the screen of the DJI Fly app, tap the
During quick shot shooting, press the pause / RTH button on the controller or tap the
- • If the subject and the surrounding scenery are similar in color, it may not work properly.
- • Do not specify fast-moving or flying objects as subjects.
- • Do not use quick shots in extremely dark (< 300 lux) or bright (> 10,000 lux) locations.
Enjoy photos and videos taken with DJI drone / How to use DJI Mimo function