How to use Insta360 GPS Preview Remote
Insta360 GPS Preview Remote is a shutter remote control that can be used with Insta360 action cameras.- What is Insta360 GPS Preview Remote?
- Introducing Insta360 GPS Preview Remote
- How to charge Insta360 GPS Preview remote
- First boot and firmware update
- Pairing with Insta360 camera
- Basic operation
- How to use 1: Clock screen
- How to use 2: Connect/disconnect with camera
- How to use 3: Remotely control the camera
- How to use 4: Add a dashboard to a video
- Setting screen
- Waterproof performance of Insta360 GPS Preview Remote
- Insta360 GPS Preview Remote specifications
What is Insta360 GPS Preview Remote?


Supported cameras
As of spring 2024, the cameras supported by the GPS Preview Remote are Insta360 X4 , Insta360 Ace Pro, and Insta360 Ace. It is expected that the number of compatible models will increase with future firmware updates.
-
Insta360 GPS Preview Remote

Insta360 2023/11/7 USD149.99
Remotely adjust settings, preview your shot in real time, and control the camera. With X4, preview is available for the whole 360° image. Utilizes different GNSS systems for improved data quality and accuracy (GPS, BeiDou, Galileo and GLONASS). Add accurate dashboard data to your videos in the Insta360 app or Studio. Remote control up to 65.6ft (20m) away. Preview up to 26.2ft (8m) away.
(For Insta360 X4/Ace Pro/Ace)

 (US)
(UK)
(US)
(UK)
-
Insta360 GPS Action Remote
Insta360 2022/12/9 USD79.99
Bluetooth 5.0 for a rock-solid connection between remote and camera. Utilizes 3 different GNSS systems to ensure faster search times and an overall better connection (GPS, BeiDou, GLONASS). Up to 5m (16.4ft) waterproof. Adjustable with two different band orientations for maximum flexibility. Remote wake the camera even when it's turned off.
(For Insta360 Ace Pro/Ace/GO3/X3/ONE RS/ONE X2/ONE R)
(US)
(UK)
Introducing Insta360 GPS Preview Remote
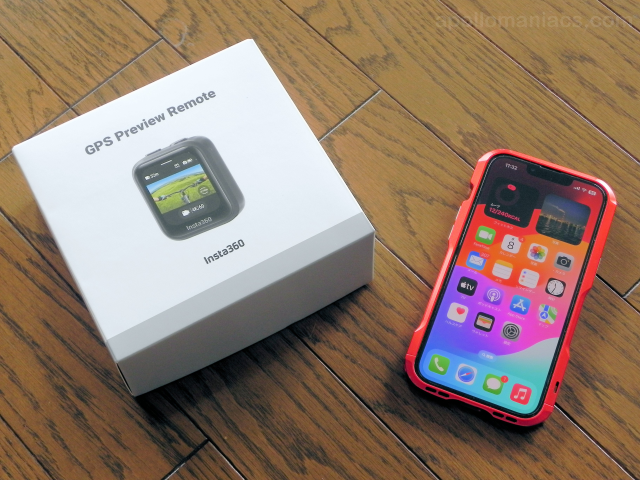 It comes in a box like this photo.
This is a size comparison with an iPhone.
It comes in a box like this photo.
This is a size comparison with an iPhone.
 The box contains something like this photo.
The top row from left is the GPS Preview Remote, Charge Cable, and instruction manual.
The bottom row is a Wrist Strap, a Universal Strap, and Disposable Double-Sided Stickers.
The box contains something like this photo.
The top row from left is the GPS Preview Remote, Charge Cable, and instruction manual.
The bottom row is a Wrist Strap, a Universal Strap, and Disposable Double-Sided Stickers.
The input of the charger is USB Type-A. A USB AC adapter is required.
The Wrist Strap is used to attach the remote control to your wrist. The Universal Strap is used to attach the remote control to a selfie stick, tripod, bicycle or motorcycle handlebar, etc.
Disposable Double-Sided Stickers are used to attach the strap and the Remote when using it in water areas. Prevents the Remote from falling out of the strap when wet. The waterproof performance of the GPS Preview Remote is IP68 (submersible at a depth of 1.5 m for 30 minutes). It's okay to get wet in the rain, but it cannot be used underwater.
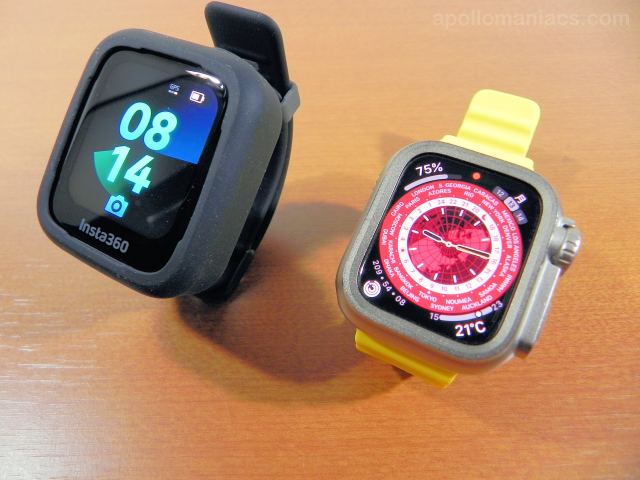 This photo is a comparison with Apple Watch Series 8 (41mm).
The weight of the GPS Preview Remote is 72g including Wrist Strap.
It's about 10~20g heavier than the Apple Watch, but once you wear it on your wrist, you won't notice it.
However, it is thick (about 15mm) so it gets in the way. Not suitable for everyday wear.
Normally, it might be a good idea to attach it to a selfie stick or handle.
In the example in this photo, it is attached to a
114cm Invisible Selfie Stick
.
This photo is a comparison with Apple Watch Series 8 (41mm).
The weight of the GPS Preview Remote is 72g including Wrist Strap.
It's about 10~20g heavier than the Apple Watch, but once you wear it on your wrist, you won't notice it.
However, it is thick (about 15mm) so it gets in the way. Not suitable for everyday wear.
Normally, it might be a good idea to attach it to a selfie stick or handle.
In the example in this photo, it is attached to a
114cm Invisible Selfie Stick
.
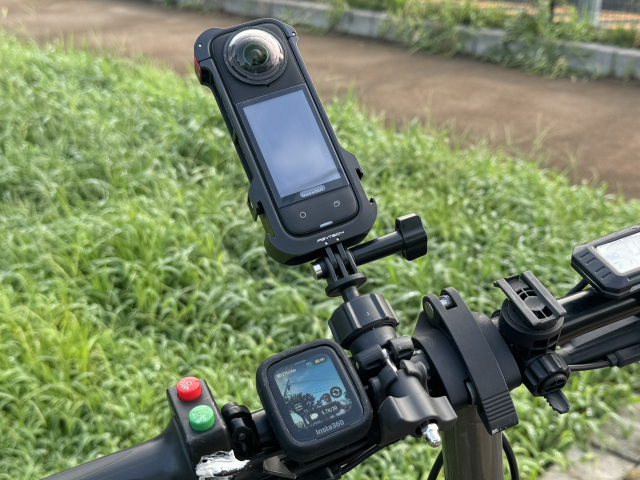 When using on a bicycle or motorcycle, the shutter button on the GPS preview remote control attached to the handlebar is easier to operate than the shutter button on the camera.
You can easily start and stop recording while riding.
When using on a bicycle or motorcycle, the shutter button on the GPS preview remote control attached to the handlebar is easier to operate than the shutter button on the camera.
You can easily start and stop recording while riding.
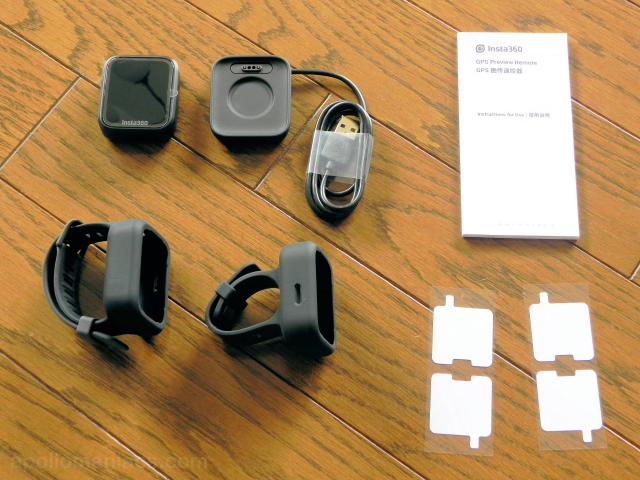
 There are two buttons on the top of the remote control.
The power button is black and long.
The shutter button is marked with a red circle.
Also, the four holes on the side are speakers.
There are two buttons on the top of the remote control.
The power button is black and long.
The shutter button is marked with a red circle.
Also, the four holes on the side are speakers.
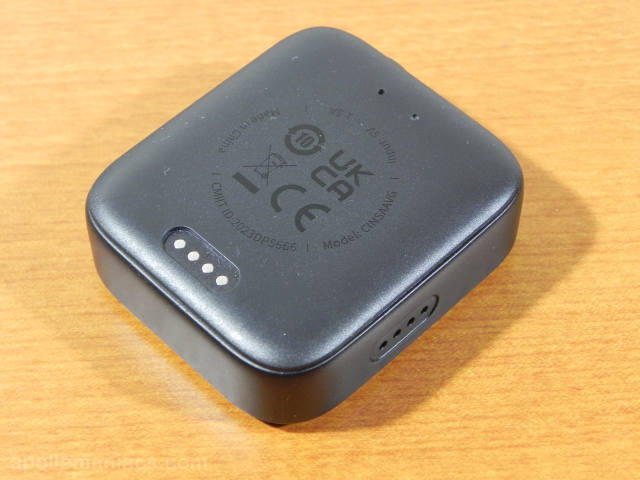 There is a charging electrode on the back of the Remote.
How to charge Insta360 GPS Preview remote
 Simply connect the charger that comes with the Remote to an AC adapter or battery with a USB Type-A connector, and place the remote control on the charger to start charging.
It is recommended to use an AC adapter with an output of 5V-1.5A (7.5W) or higher.
The charger and Remote stick together with magnets.
Simply connect the charger that comes with the Remote to an AC adapter or battery with a USB Type-A connector, and place the remote control on the charger to start charging.
It is recommended to use an AC adapter with an output of 5V-1.5A (7.5W) or higher.
The charger and Remote stick together with magnets.
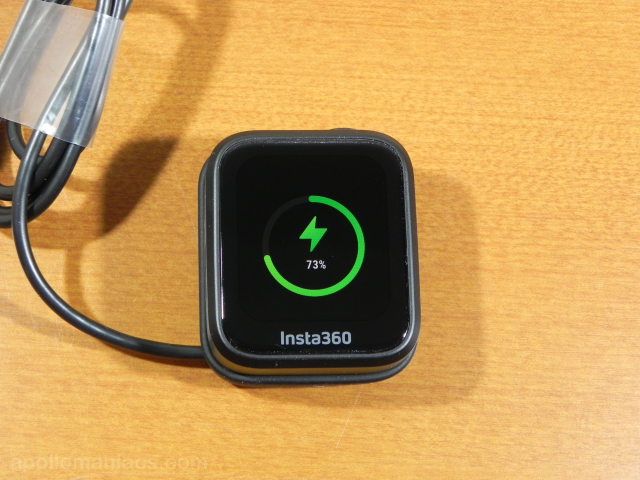 When charging starts correctly, an image like this will be displayed on the remote control screen.
The battery capacity is 950mAh.
If you use an AC adapter with an output of 10W, it will be fully charged in about 90 minutes.
When charging starts correctly, an image like this will be displayed on the remote control screen.
The battery capacity is 950mAh.
If you use an AC adapter with an output of 10W, it will be fully charged in about 90 minutes.
Battery life is 6 hours with the screen on and showing a preview of the camera screen, and 60 hours with the screen off and with the "Raise your wrist to turn on the screen" option turned off. Once fully charged, I think you can use it for an entire day of shooting.
First boot and firmware update
Before using the GPS Preview Remote, first update the firmware (control software built into the device). Please also update the connected camera to the latest firmware.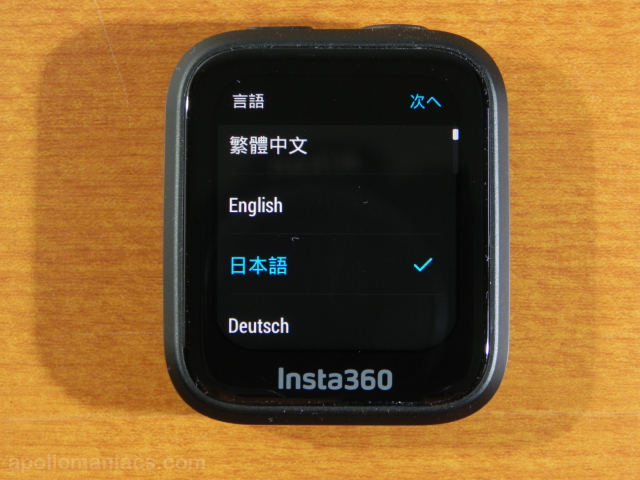 Long press the power button on the top of the GPS Preview Remote to start it.
The first language selection screen will appear.
Select your preferred language and tap Next at the top right of the screen.
Long press the power button on the top of the GPS Preview Remote to start it.
The first language selection screen will appear.
Select your preferred language and tap Next at the top right of the screen.
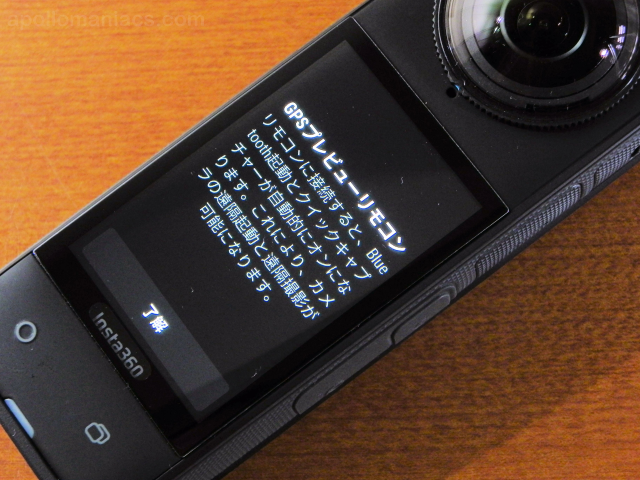
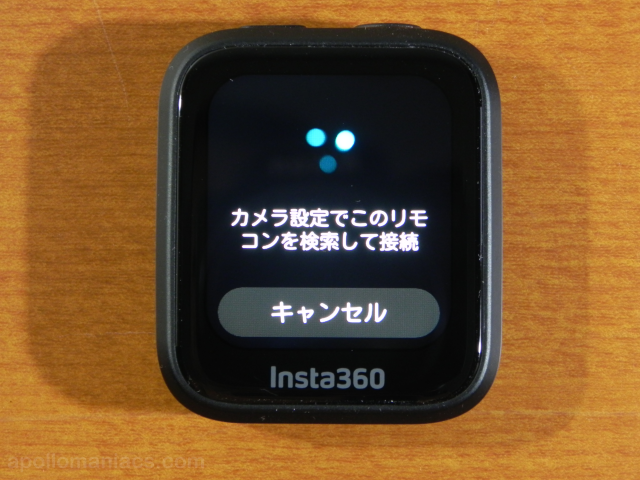 The Remote will then go into Bluetooth pairing mode with the camera.
Here, tap "Cancel" to display the clock screen.
The Remote will then go into Bluetooth pairing mode with the camera.
Here, tap "Cancel" to display the clock screen.
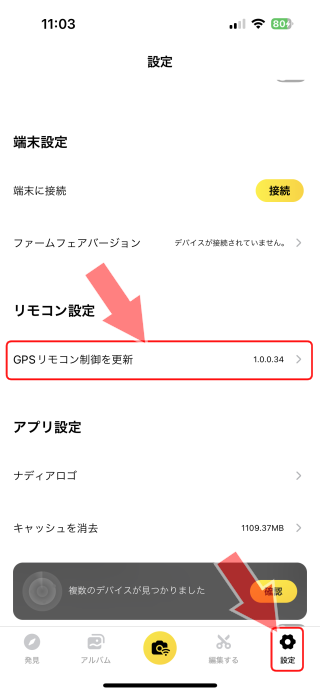 Open the
 Displays the name of the GPS Preview Remote.
Tap this.
Displays the name of the GPS Preview Remote.
Tap this.
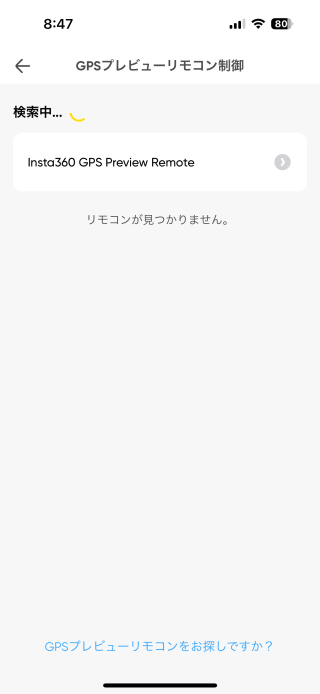
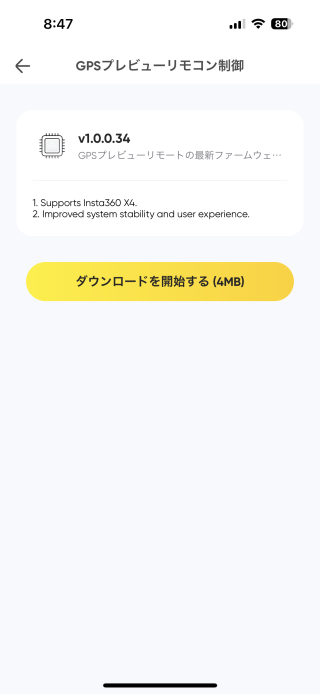 Then you will see a screen like this.
Tap "Start download".
Then you will see a screen like this.
Tap "Start download".
 The firmware will be downloaded from the internet and transferred to the GPS Preview Remote.
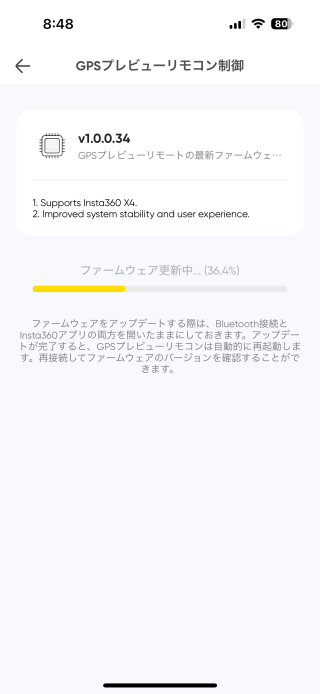
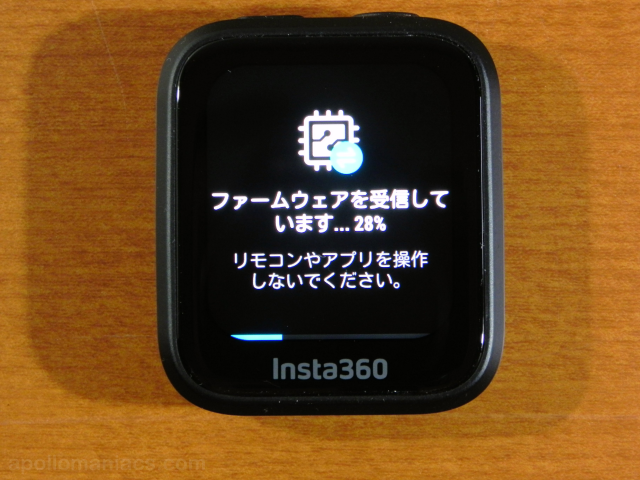 During the firmware transfer, the Remote screen will look like this.
The transfer takes only a few minutes.
During the firmware transfer, the Remote screen will look like this.
The transfer takes only a few minutes.
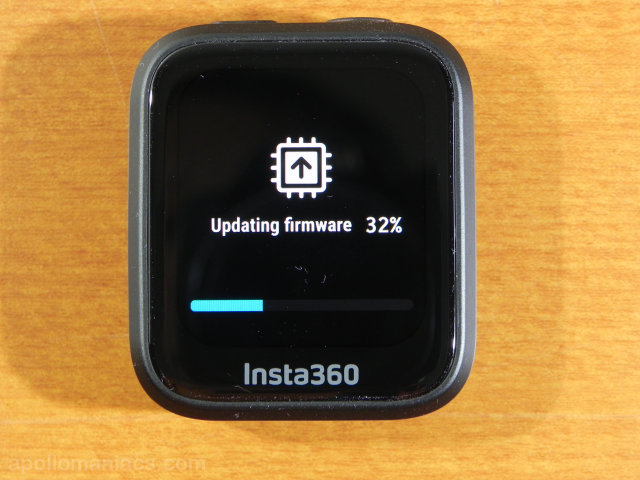 Once the transfer is complete, the Remote will restart.
Next, the firmware update will begin.
Once the transfer is complete, the Remote will restart.
Next, the firmware update will begin.
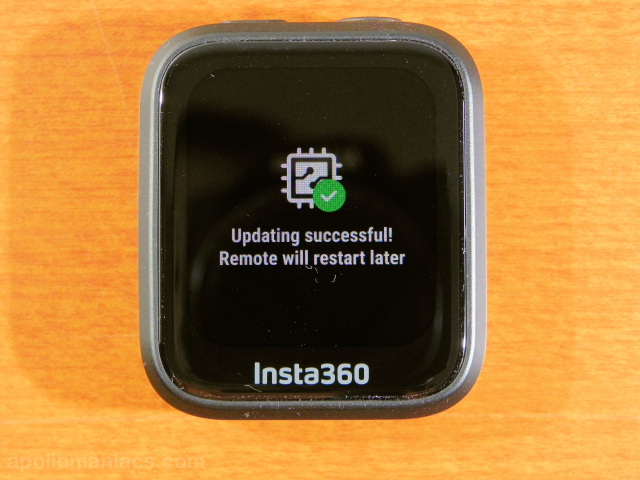 When the firmware update is complete, a screen like this will appear.
The Remote will restart again.
The update takes only a few minutes too.
When the firmware update is complete, a screen like this will appear.
The Remote will restart again.
The update takes only a few minutes too.
Please continue to connect to the
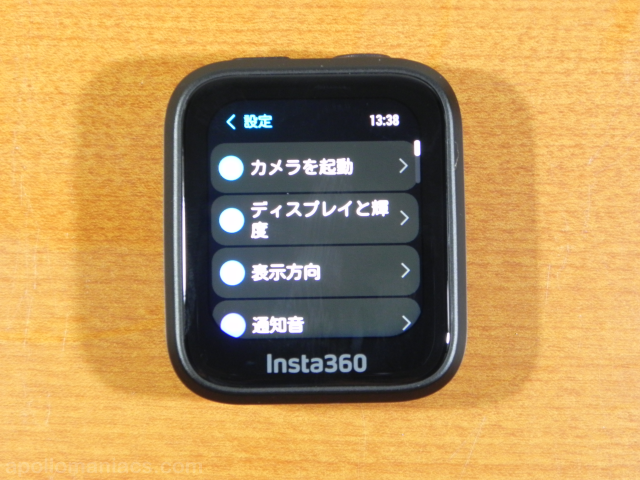 After restarting, open the
settings screen
and set the time zone according to your region in the [Time] - [Time Zone] field.
The initial value of the time zone is UTC+08:00 (Hong Kong, China, Singapore, Australia, etc.).
Please adjust the time zone to match your location
After restarting, open the
settings screen
and set the time zone according to your region in the [Time] - [Time Zone] field.
The initial value of the time zone is UTC+08:00 (Hong Kong, China, Singapore, Australia, etc.).
Please adjust the time zone to match your location

Pairing with Insta360 camera
The GPS Preview Remote and Insta360 camera need to be "Pairing" once first. The GPS Preview Remote can be paired with up to 4 Insta360 cameras. However, only one camera can be controlled at the same time.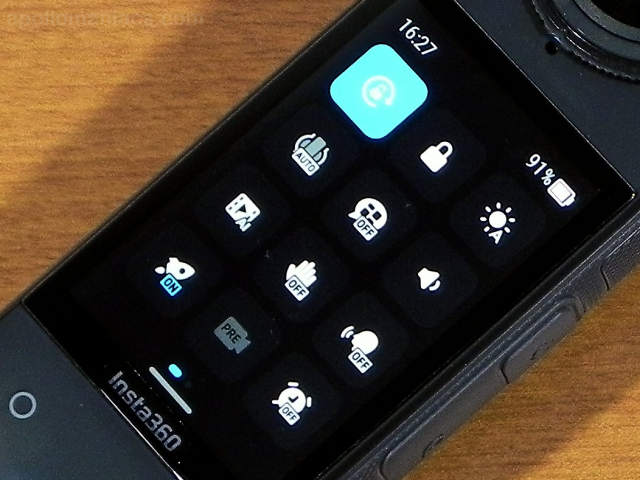 Open the Insta360 camera's camera settings screen and tap the
Then, on the GPS Preview Remote, swipe down from the top of the clock screen. Then tap the
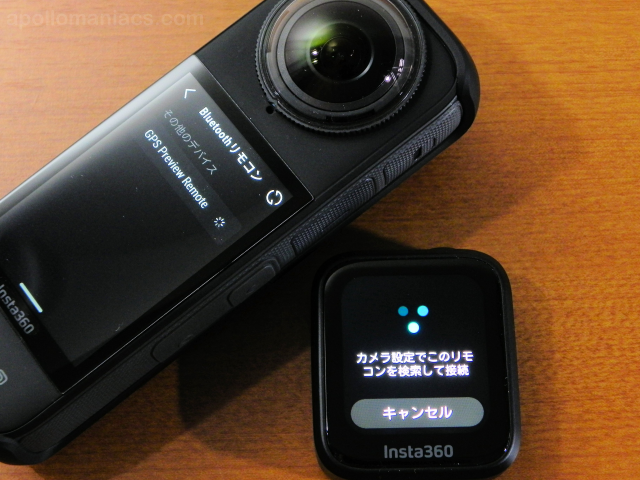 The name "GPS Preview Remote" will appear on the Insta360 camera screen, so tap it.
Pairing will then begin.
The name "GPS Preview Remote" will appear on the Insta360 camera screen, so tap it.
Pairing will then begin.
Pairing takes time. It may take several minutes.
Pairing may also fail. At this time, repeatedly touch the "GPS Preview Remote" name displayed on the Insta360 camera screen.
In my case, the connection failed about 3 times...
 If pairing is successful, the Insta360 camera screen will look like this.
Tap OK.
If pairing is successful, the Insta360 camera screen will look like this.
Tap OK.
 Then, the Insta360 camera screen will be displayed on the GPS Preview Remote screen.
Pairing is now successful.
You can now control the Insta360 camera using the Remote.
Then, the Insta360 camera screen will be displayed on the GPS Preview Remote screen.
Pairing is now successful.
You can now control the Insta360 camera using the Remote.

Basic operation
The operation method for each button on the Remote is as follows.| Button | Action | Function |
|---|---|---|
| Power | Click |
Turn on the touch screen if it is off.
Not connected to a camera and the touch screen is on, turn off the touch screen. Switch the shooting mode when the preview screen is displayed. Clicking continuously will switch to the next shooting mode. While shooting, mark highlight scenes. |
| Long press |
If the Remote is turned off, turn on the Remote.
When the Remote is on and not connected to the camera, turn off the Remote. When the Remote is on and connected to the camera, you can choose from "Turn off camera," "Turn off remote," and "Turn off remote and camera." |
|
| Shutter | Click |
When the camera is powered off, launch the camera's quick capture function.
However, the quick capture function must be turned on in the camera settings screen in advance.
When the camera is on and the Remote is on the preview screen, shooting will begin in the current shooting mode. When the camera is on and the Remote is not in the preview screen, it will switch to the preview screen. If recording is in progress, it will end recording. |
| Long press | If recording is in progress, cancel the recording and delete the file. However, you must turn on "Long press Shutter Button to cancel recording" on the camera's advanced settings screen. |
How to use 1: Clock screen

Use the screen by switching as shown below.
- Swipe down from the top of the screen to connect/disconnect with the Insta360 camera .
- While connected to the camera, swipe up from the bottom of the screen, or tap the camera icon on the watch face, to switch the Insta360 camera preview screen . You can remotely control the camera.
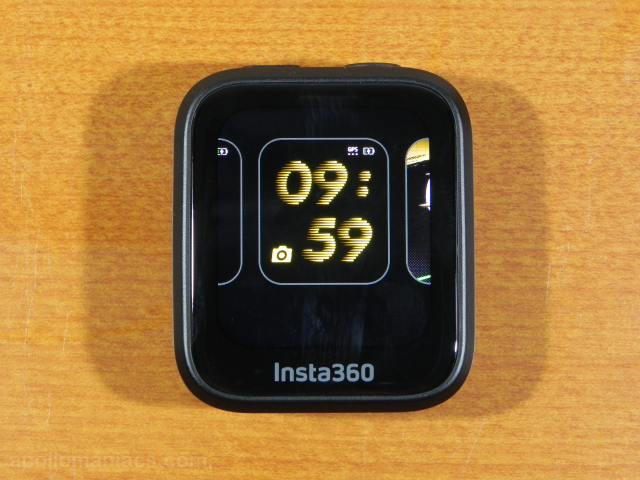
- By swiping from the left edge of the screen to the right or from the right edge to the left, you can switch the clock screen to the dashboard screen, compass screen, etc.
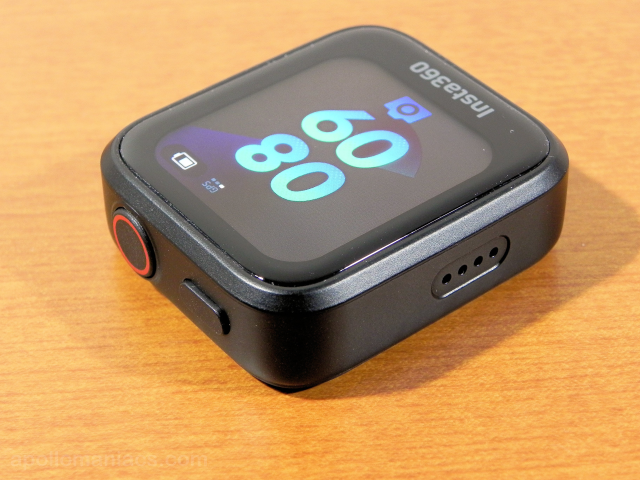
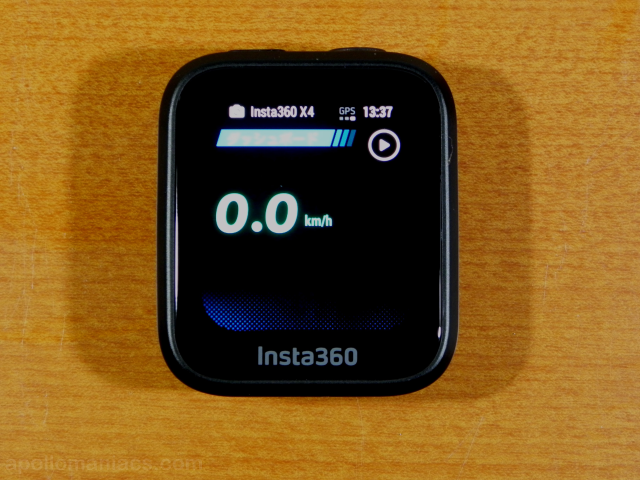 Swipe the clock screen from the right edge to the left to access the dashboard screen.
When receiving GPS signals, the current moving speed is displayed.
Tap the
Swipe the clock screen from the right edge to the left to access the dashboard screen.
When receiving GPS signals, the current moving speed is displayed.
Tap the
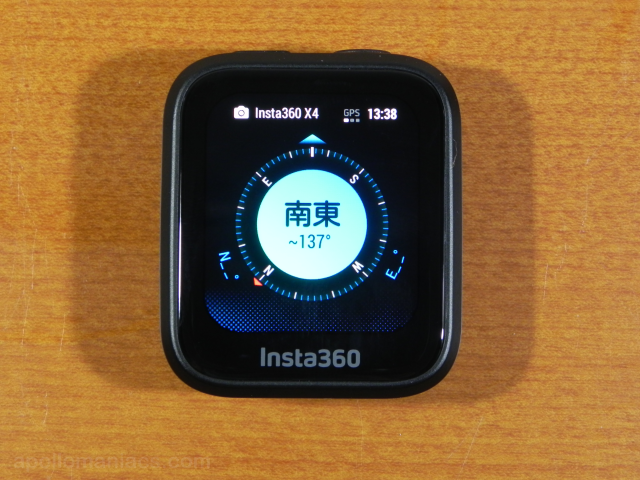 Swipe the clock screen further from the right edge to the left to display the compass screen.
Using information from the built-in digital compass, the direction in which the top of the GPS Preview Remote screen is facing is displayed.
Swipe the clock screen further from the right edge to the left to display the compass screen.
Using information from the built-in digital compass, the direction in which the top of the GPS Preview Remote screen is facing is displayed.
When receiving GPS signals, latitude and longitude are also displayed.
Immediately after turning on the power, an instruction to calibrate the digital compass will be displayed here. Refer to the illustration on the screen and walk around with the GPS Preview Remote to calibrate and switch to the compass screen.
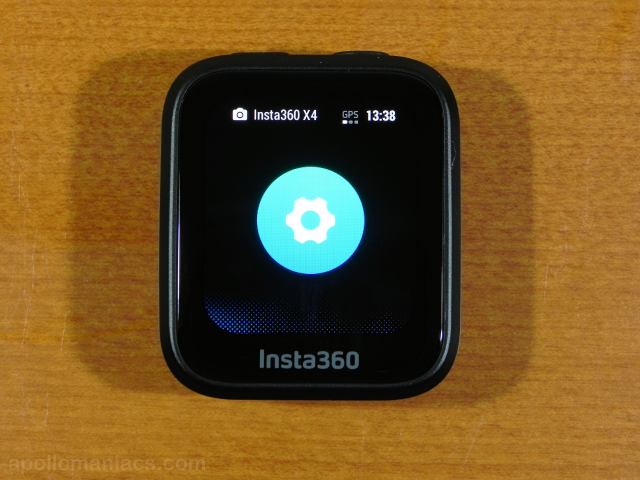 Swipe the clock screen further from the right edge to the left to display the settings icon.
Tap this screen to switch to the
settings screen
.
Swipe the clock screen further from the right edge to the left to display the settings icon.
Tap this screen to switch to the
settings screen
.
If you swipe further from the right edge to the left, you will return to the initial clock screen.
 You can change the design of the watch face by long-pressing the watch screen.
The screen will look like this, so swipe left or right and tap the design you like.
There are 3 types of designs in total.
You can change the design of the watch face by long-pressing the watch screen.
The screen will look like this, so swipe left or right and tap the design you like.
There are 3 types of designs in total.
How to use 2: Connect/disconnect with camera
After you turn on your Insta360 camera and remote control, you must first connect them before you start using them. Paired cameras can be turned on remotely by connecting them with the Remote.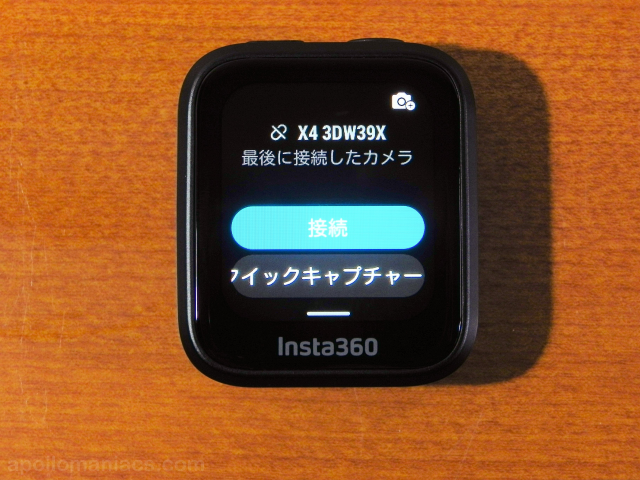 On the clock screen, swipe down from the top of the screen to connect/disconnect with the Insta360 camera.
Tap the "Connect" button to connect with the recently connected Insta360 camera. If you turn on "Bluetooth Wakeup" in the "Advanced Camera Settings" screen of the Insta360 camera, the camera will wake up and connect even if it is turned off (although this feature currently seems to be unstable).
Tap the "Quick Capture" button to launch the quick capture function of the recently connected Insta360 camera. However, you need to complete the quick capture settings on the Insta360 camera in advance.
You can also start pairing with your new Insta360 camera by tapping
Note: Remote power on of cameras is not possible when the Remote is paired with multiple cameras. Please manually turn on the camera and then perform the connection operation.
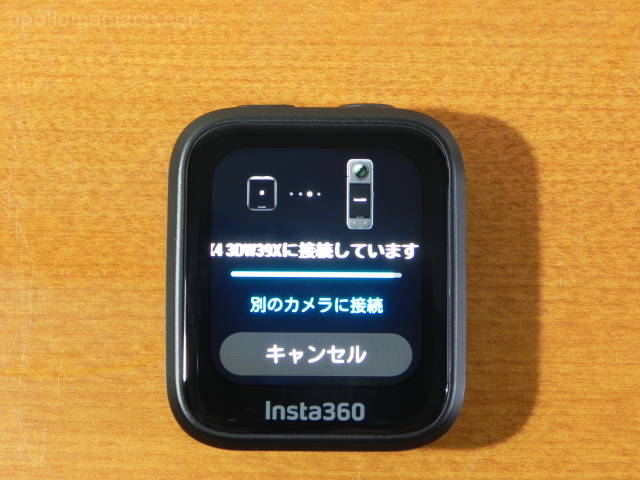 A screen like this will appear while the connection is being processed.
Tap "Connect to another camera" to connect with another Insta360 camera.
If the connection is successful, the Insta360 camera preview screen will be displayed on the Remote screen.
A screen like this will appear while the connection is being processed.
Tap "Connect to another camera" to connect with another Insta360 camera.
If the connection is successful, the Insta360 camera preview screen will be displayed on the Remote screen.
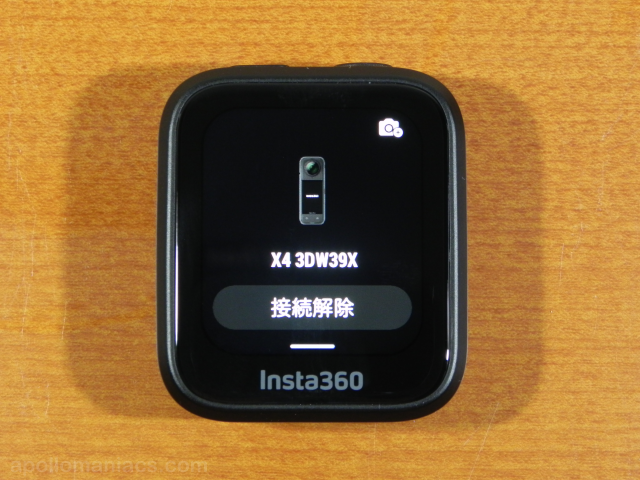 If you want to operate another camera, disconnect the current camera.
If you swipe down from the top of the screen while connected to the Insta360 camera, a screen like this will appear.
Tap "Disconnect".
If you want to operate another camera, disconnect the current camera.
If you swipe down from the top of the screen while connected to the Insta360 camera, a screen like this will appear.
Tap "Disconnect".
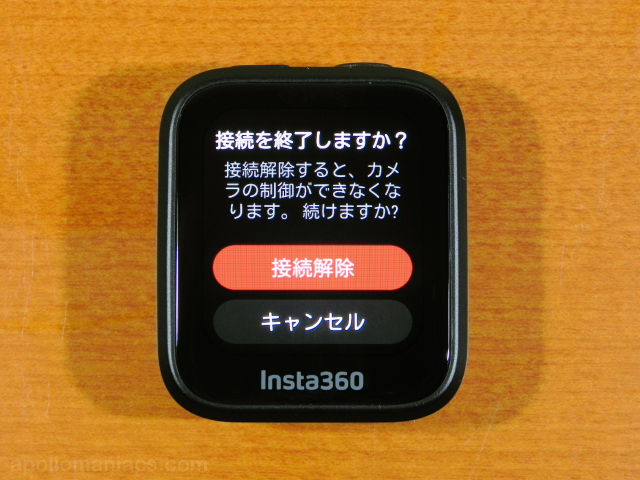 Then you will see a screen like this.
Tap "Disconnect" again to disconnect.
Then you will see a screen like this.
Tap "Disconnect" again to disconnect.
Although this feature currently seems to be unstable. On the camera side, the connection may remain (the Remote icon may remain displayed on the camera's preview screen). In this case, manually turn off the camera.
Note: Disconnecting does not automatically turn off the camera. Be careful not to forget to turn off the camera.
How to use 3: Remotely control the camera
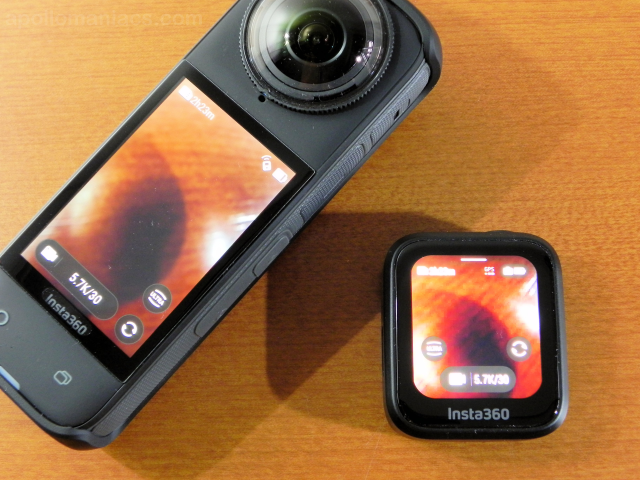
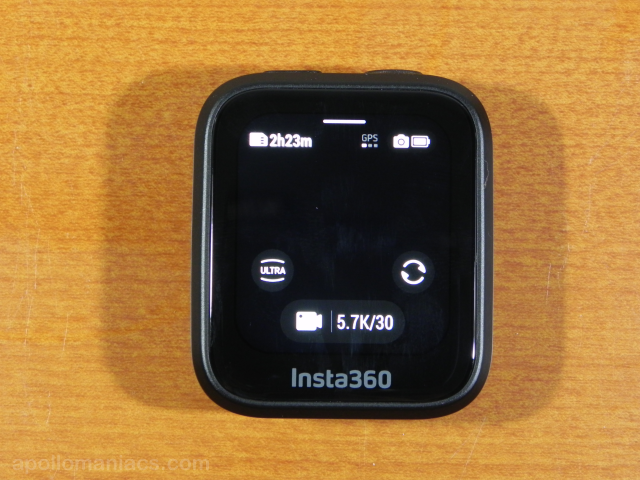 On the watch screen, while connected to the camera, swipe up from the bottom edge of the screen or tap the camera icon to switch to the preview screen.
This screen allows you to operate in the same way as the Insta360 camera's preview screen.
Press the shutter button to start shooting. You can switch the shooting mode and shooting format by tapping the icon. In 360 degree mode, you can drag the screen to adjust the viewing position.
For more information, please see How to use Insta360 X4 - 360 degree action camera that can shoot 8K .
From this screen, swipe down from the top edge of the screen to return to the clock screen.
 If you tap the
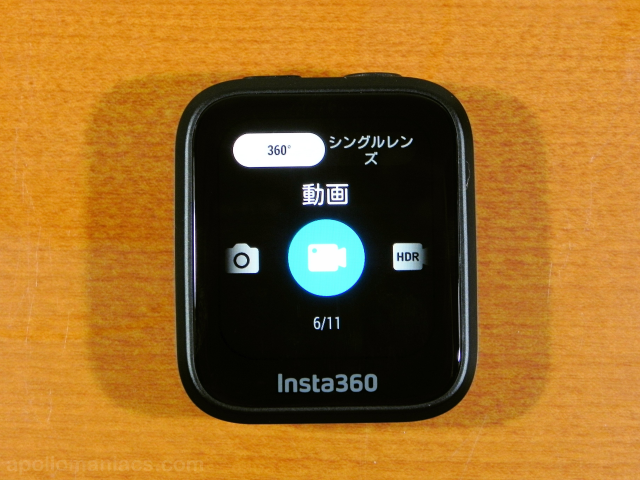
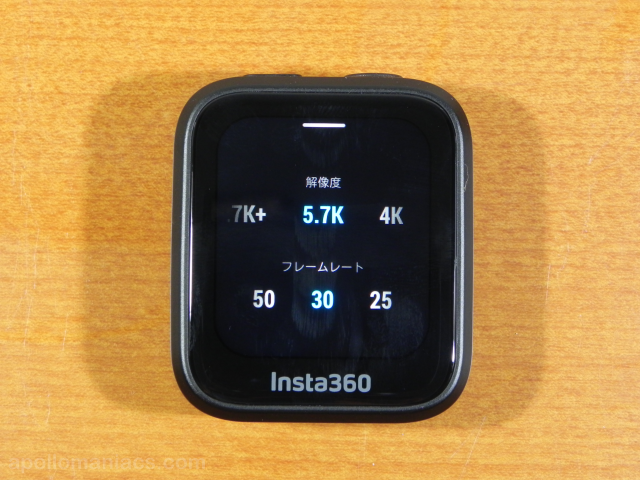 If you swipe the touch panel up from the bottom edge on the preview screen, a screen like this will appear.
You can switch shooting formats such as resolution and frame rate.
If you swipe the touch panel up from the bottom edge on the preview screen, a screen like this will appear.
You can switch shooting formats such as resolution and frame rate.
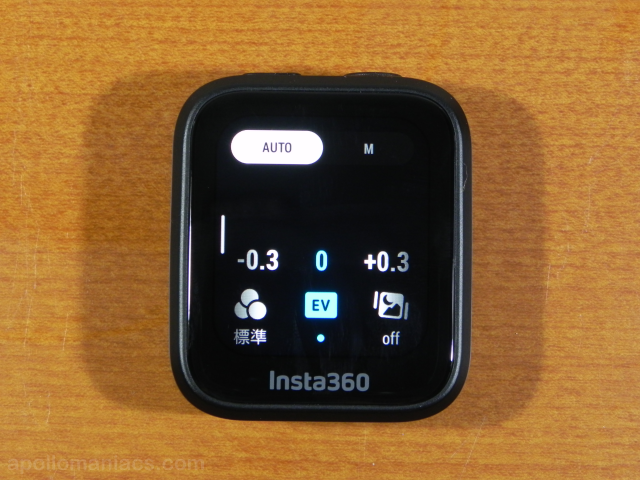 Swipe the touch screen from the right edge to the left on the preview screen to access the shooting parameter setting screen.
Various parameters can be specified and changed for each shooting mode currently selected.
Swipe the touch screen from the right edge to the left on the preview screen to access the shooting parameter setting screen.
Various parameters can be specified and changed for each shooting mode currently selected.
How to use 4: Add a dashboard to a video
When you connect to the GPS Preview Remote and shoot video, you can later display information such as acceleration, incline angle, altitude, and pace as an overlapping "dashboard."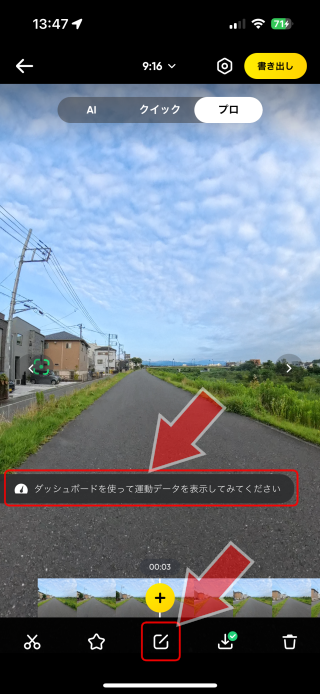 On the
When you open a video that can use the dashboard, you'll see a message like this saying "Try using the dashboard to view your exercise data." Tap this.
Or tap the "Edit" icon at the bottom center of the screen.
 When you tap the "Edit" icon, a menu like this will appear.
Tap "Dashboard."
When you tap the "Edit" icon, a menu like this will appear.
Tap "Dashboard."
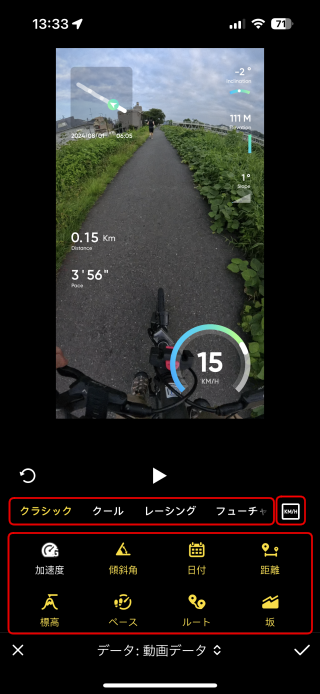 You'll then see a screen like this.
You can change the dashboard design by flicking left and right and tapping the area that says "Classic Cool Racing...".
If you tap the icon next to it that says [KM/H], you can switch the speed unit to "km/h" or "MPH".
If you tap the icons below it, you can select the information you want to display on the dashboard. Each time you tap an icon, you can turn the display of that item on or off.
Once you've finished setting up, tap the check mark at the bottom right of the screen.
A dashboard has been added to the video you shot.

Setting screen
Swipe left or right on the watch screen a few times to see the settings icon.
Tap this screen to switch to the settings screen.
This is the settings screen.
Scroll up and down the screen and tap each item to make detailed settings as shown in the table below.
| Item | Description |
|---|---|
| Camera Wake Up |
You can link the power operation of the connected camera with the GPS Preview Remote.
If you turn on "Wake up camera automatically when remote powers on", power operations will be linked.
(although this feature currently seems to be unstable)
However, you need to turn on "Bluetooth Wakeup" in the "Advanced camera settings screen" of the Insta360 camera. |
| Display | Here, you can set the brightness of the screen, turn on the screen by raising your wrist, wake from sleep by tapping the screen, time to enter sleep (10s, 30s, 60s, 90s, 3min, disabled), and turn on/off auto sleep during preview. By default, "Brightness" is set to maximum. Lowering this will improve battery life. |
| Orientation | You can switch the screen display direction (0, 90, 180, 270 degrees). The initial setting is 0 degrees (button position upward). Please select according to the location where you will install the Remote. |
| Sound | Set the notification sound volume. You can choose from Mute, Low, Medium, and High. The initial value is high. |
| Time | Set the time. You can also set the time zone. By default, the time zone is UTC+08:00 (Hong Kong, China, Singapore, Australia, etc.). Please adjust the time zone to match your location |
| Dashboard | You can switch the unit of movement speed displayed on the dashboard. You can choose between Km or Miles. |
| Language | You can select the language of messages displayed on the touch screen. You can choose from 16 languages. |
| Remote Info | You can check the product model number, serial number, firmware version, hardware version, etc. |
| Factory Data Reset | Resets various settings on the Remote. |
| Certification | Displays the device certification information of each country that the Remote has obtained. |
Waterproof performance of Insta360 GPS Preview Remote
The waterproof performance of Insta360 GPS Preview Remote is IP68 (submersible at a depth of 1.5m for 30 minutes). It's okay to get wet in the rain, but it cannot be used underwater. After contact with water, wipe and dry as soon as possible. Also, do not wear it when swimming or diving.When using in water sports, to prevent falling, please apply a dry Disposable Double-Sided Stickers to the back of the Remote and stick it to the strap.
If you are not diving deep, such as swimming at the beach, it may be a good idea to put it in a pouch-type smartphone waterproof case and carry it along with your camera (untested).
Insta360 GPS Preview Remote specifications
| item | description |
|---|---|
| Dimention | 41.8mm x 48.4mm x 15.5mm |
| Weight | 43g |
| Wrist Strap Diameter | 5.5in–8.3in (14cm–21cm) |
| Universal Strap Diameter | 0.8in–1.4in (2cm–3.5cm) |
| Work Environment | -4°F to 104°F (-20°C to 40°C) |
| Charging Environment | 32°F–104°F (0°C–40°C) |
| Water Resistant | IP68 (up to 4.9ft/1.5m for 30 minutes) |
| Battery | 950mAh |
| Connection | Bluetooth 5.0 |
| Operation Frequency | 2402-2480MHz |
| Output Power (E.I.R.P.) | < 10dBm |
| GNSS | GPS, BeiDou, Galileo, GLONASS |
| Max. pairing | 4 cameras |
To know more about How to Fly Hobby Drone
To know more about iPhone