

How to add lights/illumination to MSFS scenery
Another way to combine these techniques is to export Blender light objects as parts and place them in large quantities within the MSFS SDK.
このページを日本語で見る
Contents

Installation of various development tools
To create add-on content for Microsoft Flight Simulator, first install various tools on your computer. Please refer to the page below.Naming the package and creating the project
Think about the package name of the scenery you want to create. MSFS SDK has strict package naming rules. Think about a correct package name that follows the rules.Once you have decided on the package name, create an empty project.
Please refer to the page below.
Adding lights/illumination to scenery with MSFS SDK
By using the MSFS SDK, you can easily add light objects that are provided as standard in MSFS to your scenery.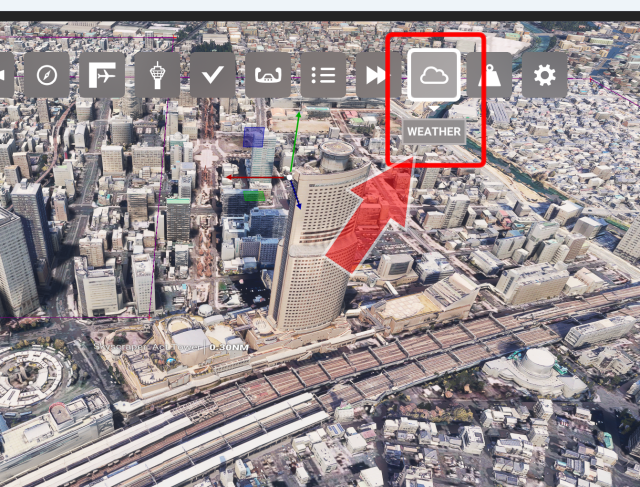 Start MSFS, load the project, and start the simulation.
Then switch the scene to night.
Select [WEATHER] from the toolbar.
Start MSFS, load the project, and start the simulation.
Then switch the scene to night.
Select [WEATHER] from the toolbar.
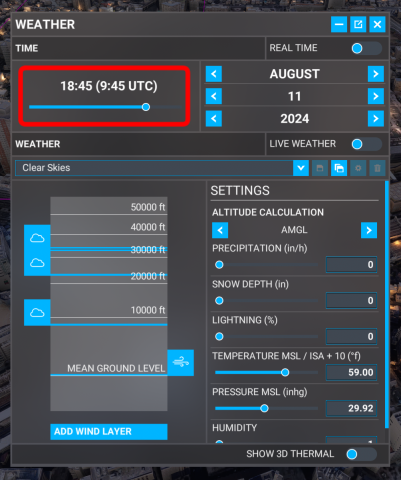 The WEATHER settings screen will open.
Drag the slider bar in the TIME column to set it to night.
However, if you set it to a time when it is completely dark, you will not be able to see the buildings, so we recommend setting it to a time just before sunset.
The WEATHER settings screen will open.
Drag the slider bar in the TIME column to set it to night.
However, if you set it to a time when it is completely dark, you will not be able to see the buildings, so we recommend setting it to a time just before sunset.
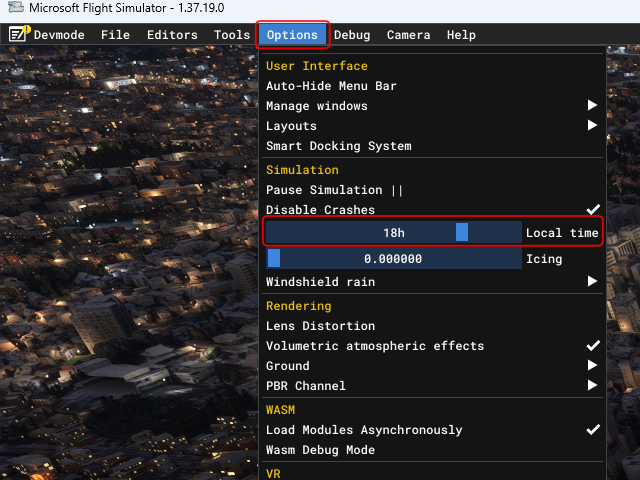 You can also change the time in the [Options]-[Local time] section of the developer menu, but the WEATHER settings screen allows you to adjust the time (=brightness) more precisely.
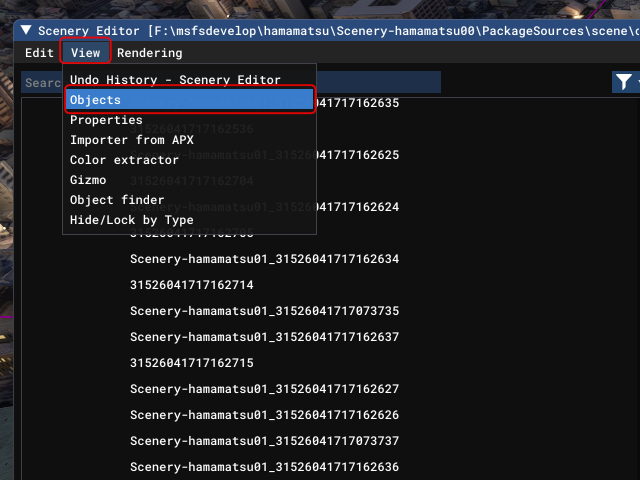 The standard lights provided with MSFS are "Objects."
On the Scenery Editor screen, select [View]-[Objects] to open the Objects screen.
The standard lights provided with MSFS are "Objects."
On the Scenery Editor screen, select [View]-[Objects] to open the Objects screen.
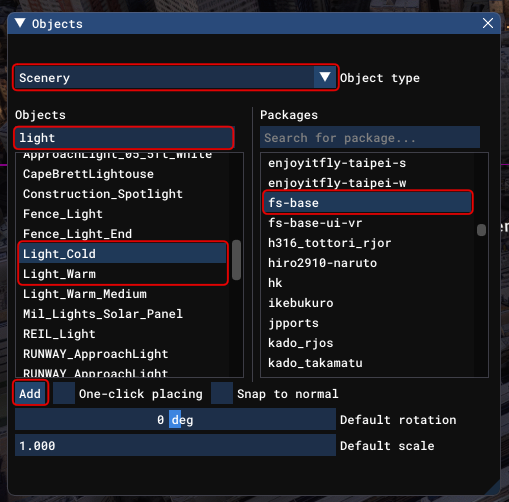 On the Objects screen, make sure that "Scenery" is selected in the "Object Type" column.
Search for and click "fs-base" in the "Packages" column on the right of the screen.
Next, search for "light" or "lamp" in the "Objects" column on the left side of the screen.
On the Objects screen, make sure that "Scenery" is selected in the "Object Type" column.
Search for and click "fs-base" in the "Packages" column on the right of the screen.
Next, search for "light" or "lamp" in the "Objects" column on the left side of the screen.
You will then find the light objects that come standard with MSFS. The two most popular lights are "Light_Cold" and "Light_Warm". "Light_Cold" is a white light (daylight color). "Light_Warm" is a light with a slight orange tint (incandescent color).
There are many other light objects available. Try them out!
After selecting a light object, click the [Add] button at the bottom left of the screen.
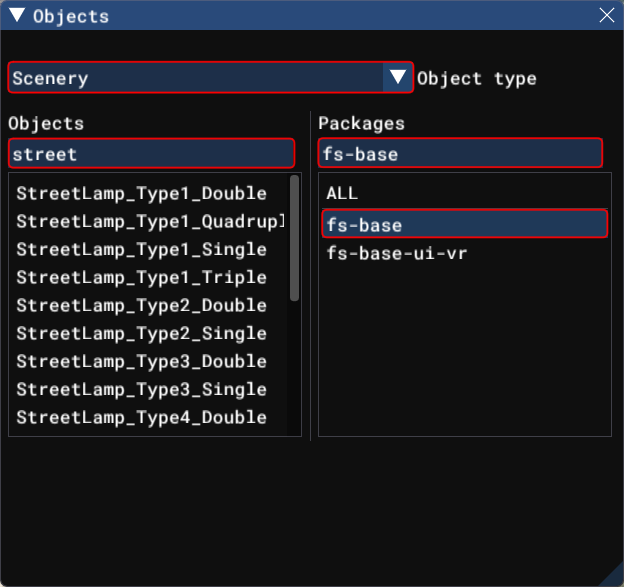 Alternatively, select "fs-base" in the "Packages" column and search for "street" in the "Objects" column.
You will then find a light object named "StreetLamp-", as shown on the right.
These are the street lights that come standard with MSFS.
There are street lights in a variety of designs available.
Alternatively, select "fs-base" in the "Packages" column and search for "street" in the "Objects" column.
You will then find a light object named "StreetLamp-", as shown on the right.
These are the street lights that come standard with MSFS.
There are street lights in a variety of designs available.
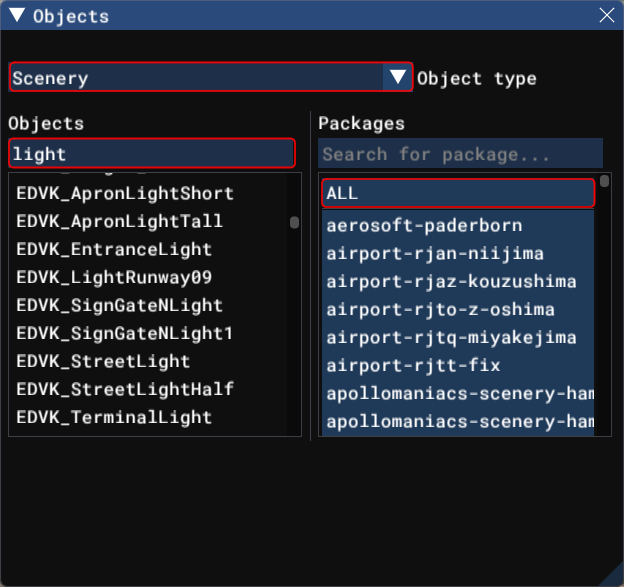 If you select "ALL" in the "Packages" column and search for "light" or "lamp" in the "Objects" column, it will search for light objects in all scenery installed in your MSFS.
However, this will also include light objects that are not included as standard in MSFS (other users may not have them) and objects that are not lights at all. Be careful when selecting objects from this list.
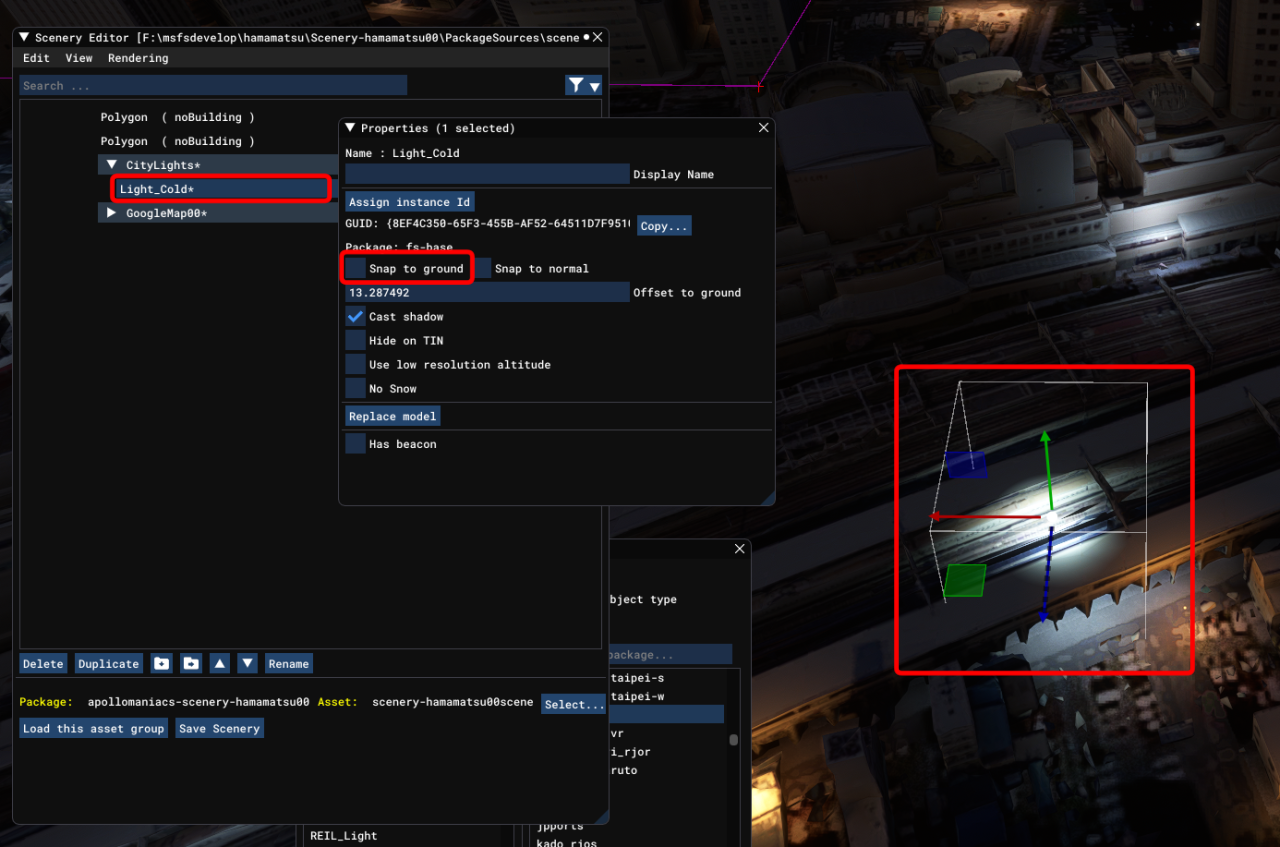 Select a light object and click the [Add] button to add a light object ("Light_Cold*" in this example) to the Scenery Editor screen.
The light will also be displayed on the game screen.
However, initially you will only be able to see the coordinate axes, not the light itself.
Right-click on the light object in the Scenery Editor screen to display the properties screen and uncheck "Snap to ground".
Select a light object and click the [Add] button to add a light object ("Light_Cold*" in this example) to the Scenery Editor screen.
The light will also be displayed on the game screen.
However, initially you will only be able to see the coordinate axes, not the light itself.
Right-click on the light object in the Scenery Editor screen to display the properties screen and uncheck "Snap to ground".
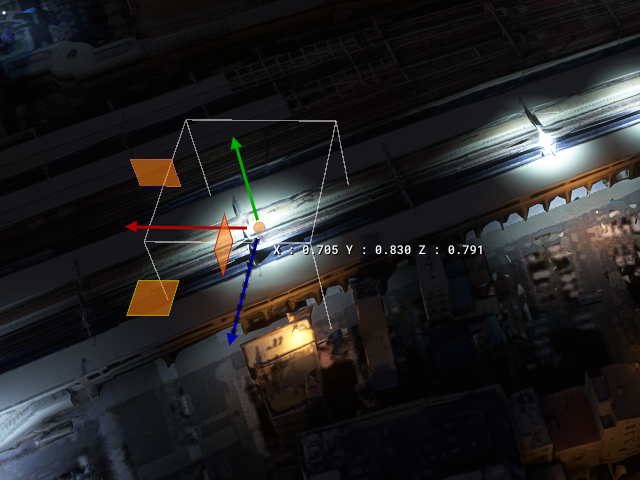 First, drag the Green arrows on the light's coordinate axis and drag it upwards (on the Y axis).
Look at the Y coordinate value displayed next to the coordinate axis and gradually increase the height of the light.
The light will then appear on the screen, illuminating the area around it.
First, drag the Green arrows on the light's coordinate axis and drag it upwards (on the Y axis).
Look at the Y coordinate value displayed next to the coordinate axis and gradually increase the height of the light.
The light will then appear on the screen, illuminating the area around it.
Next, drag the green square next to the coordinate axis to move the light only on the horizontal plane. Repeat adjusting the altitude and moving the light on the horizontal plane to place the light where you want it.
Now all you have to do is repeat the steps above to set up your lights. Click the [Save Scenery] button on the Scenery Editor screen from time to time to save the scenery as you work.
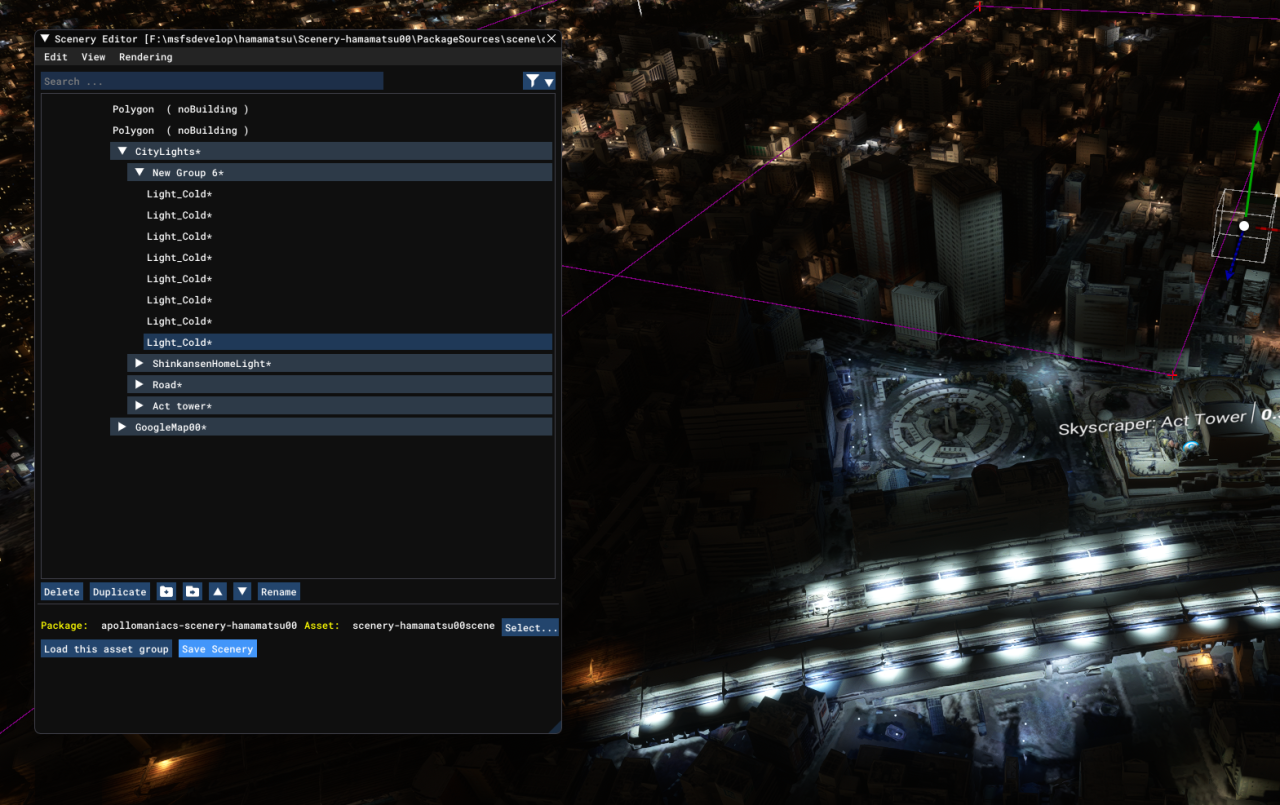 A large number of lights will be placed in your scenery.
It is a good idea to group them into smaller groups on the Scenery Editor screen so that you can quickly find the light object you need later.
A large number of lights will be placed in your scenery.
It is a good idea to group them into smaller groups on the Scenery Editor screen so that you can quickly find the light object you need later.
Please note that simply placing a light in MSFS will not render the light source itself (a light bulb or fluorescent light). It will only brighten the area around the light source. To make the light source itself visible, you will need to create the light source as a 3D model and set the "emission" material. However, since Google Maps scenery is usually viewed from high in the sky, you can still enjoy it even if you cannot see the light source itself.
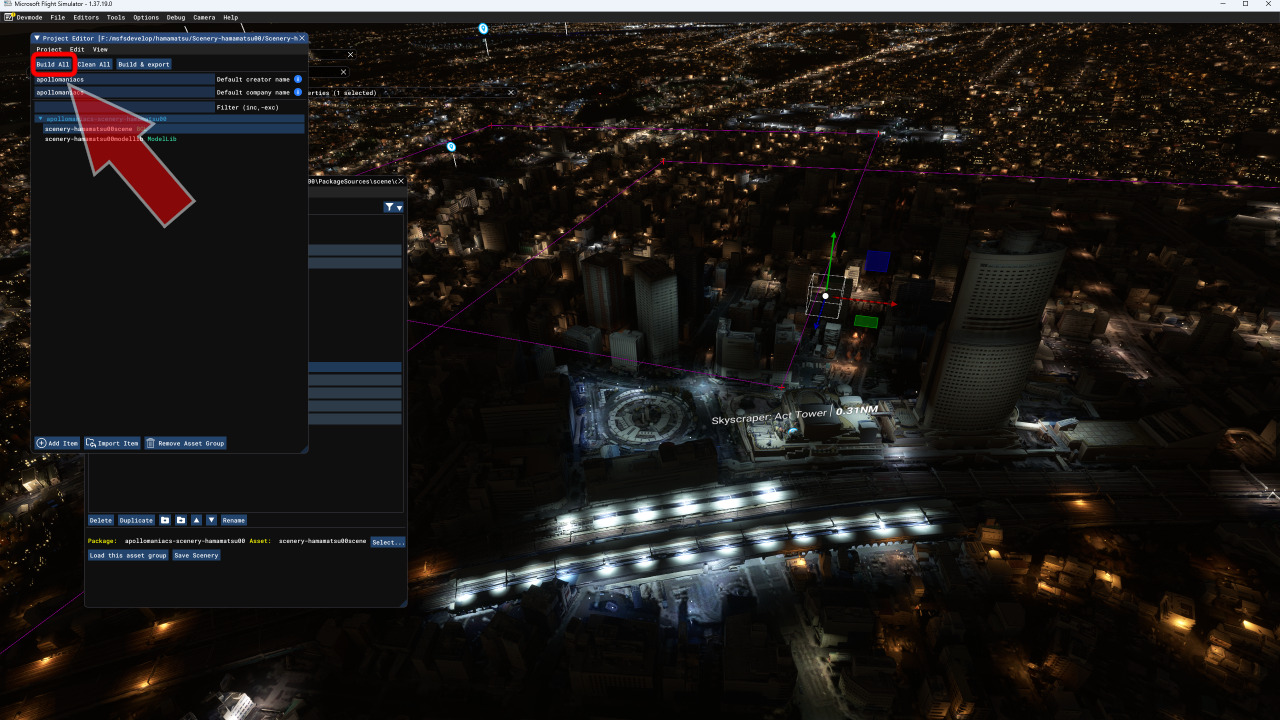 Once you've finished setting up the lights, click the [Save Scenery] button on the Scenery Editor screen to save the scenery, then click the [Build All] button on the Project Editor screen.
Once the build finishes without errors, copy the completed package to the "Community" folder and restart MSFS.
Once you've finished setting up the lights, click the [Save Scenery] button on the Scenery Editor screen to save the scenery, then click the [Build All] button on the Project Editor screen.
Once the build finishes without errors, copy the completed package to the "Community" folder and restart MSFS.
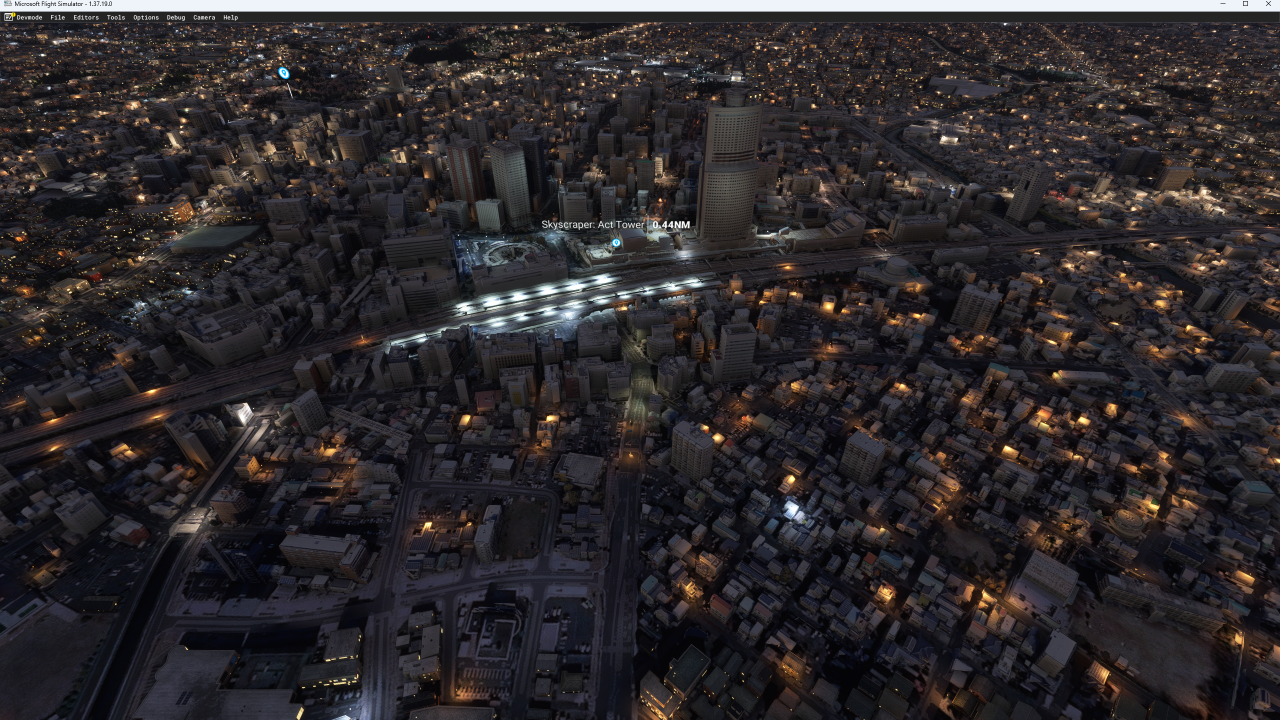 For now, I placed lights on the station platform and around the buildings in front of the station.
The night view looks much better now.
For now, I placed lights on the station platform and around the buildings in front of the station.
The night view looks much better now.
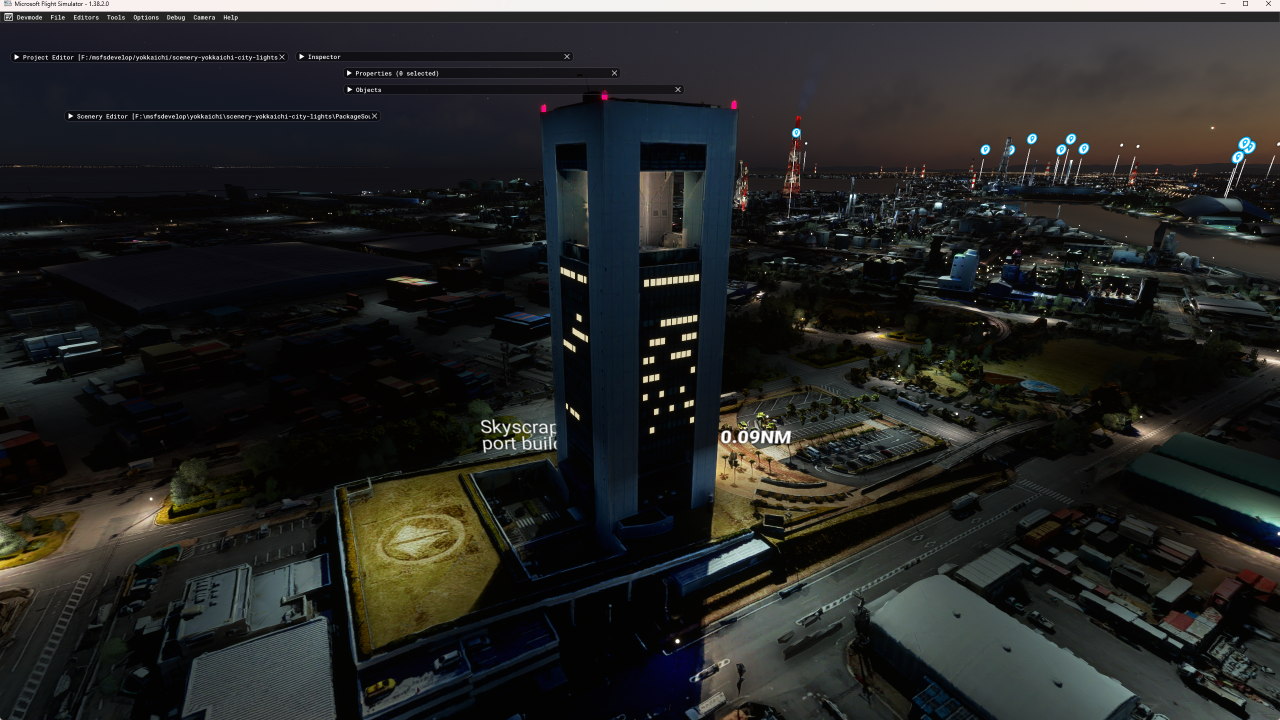
The brightness of the light is adjusted by the distance from the scenery object. In this example, two "Light_Cold" lights are placed on each side of the skyscraper (Act Tower).
Where light objects are stored
The light information added to the scenery using the steps above will be added and saved in the "objects.xml" file under the "PackageSources\scene" folder.
Adding lights/illumination to scenery and editing meshes with Blender
By using the free 3D modeling software : Blender and the "glTF-Blender-IO-MSFS" exporter plugin, you can add lights/illuminations to the objects created in Blender and MSFS scenery generated by the Google Earth Decoder, and edit its mesh. You can add four types of lights prepared in Blender: spotlight, point light, sun, and area light. You can also freely set the color and brightness. You can also add blinking lights.However, if you want to edit a scenery generated by Google Earth Decoder, you cannot process the entire scenery at once. You need to add lights and edit meshes for each tile and LOD. As this is a very time-consuming process, it is recommended that you only process landmarks that stand out in the scenery.
Note: The "glTF-Blender-IO-MSFS" exporter plugin must be used with Blender versions 3.3 or 3.6.
 Import the glTF file of the scenery (Google Map tiles) into Blender.
For importing procedures, see the page
How to use glTF-Blender-IO-MSFS to export and import 3D data between Blender and MSFS
.
Import the glTF file of the scenery (Google Map tiles) into Blender.
For importing procedures, see the page
How to use glTF-Blender-IO-MSFS to export and import 3D data between Blender and MSFS
.
You can then process and export the meshes for each LOD to transform the scenery.
Be sure to optimize the scenery data before importing into Blender. If you process the scenery in Blender, an error will occur when optimizing it with Google Earth Decoder Optimization Tools (GEDOT).
How to use glTF-Blender-IO-MSFS to export and import 3D data between Blender and MSFS
Optimize scenery data
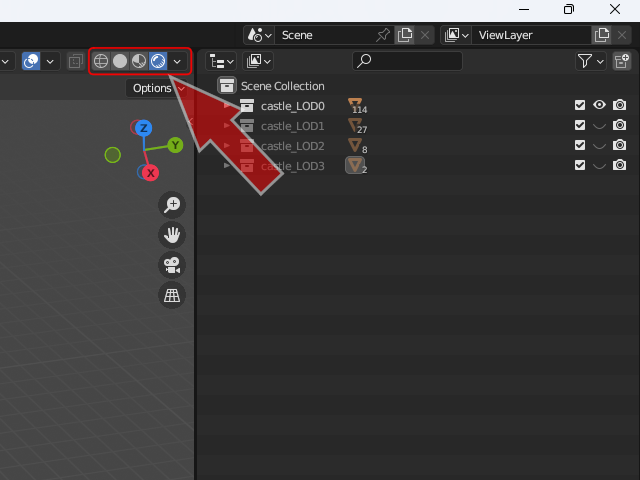 To add lights/illumination, switch Blender's display mode to "Render Preview".
Click the
To add lights/illumination, switch Blender's display mode to "Render Preview".
Click the
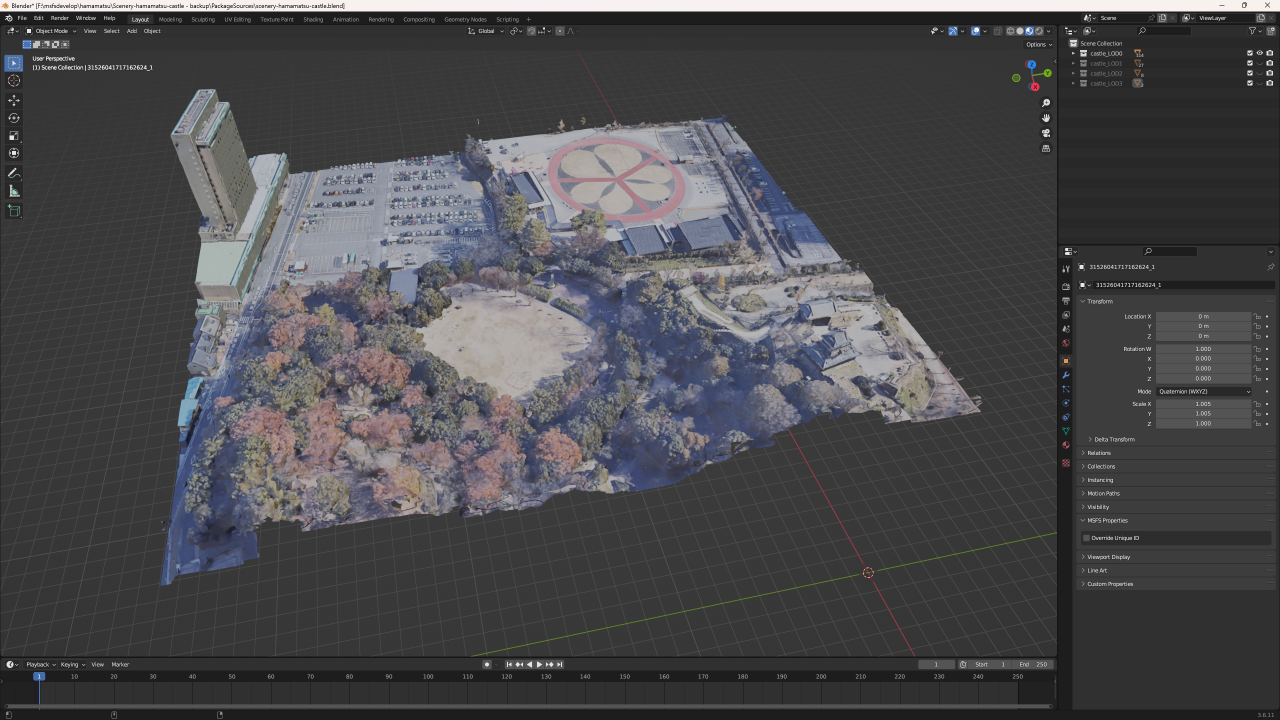
 You will then see a screen like this.
Since no light sources have been set in the scenery yet, it will be completely dark.
You will then see a screen like this.
Since no light sources have been set in the scenery yet, it will be completely dark.
 The lights you add in Blender must be copied to the meshes of each LOD at the end.
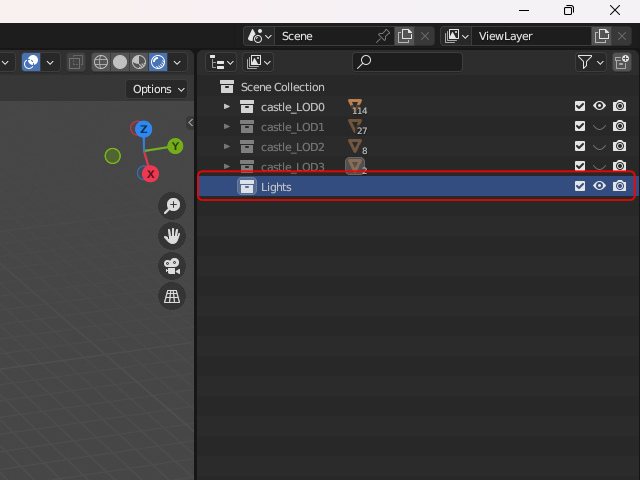
First, create a collection (folder) for lights, and then create the original light there.
Then, copy it to each LOD at the end.
The lights you add in Blender must be copied to the meshes of each LOD at the end.
First, create a collection (folder) for lights, and then create the original light there.
Then, copy it to each LOD at the end.
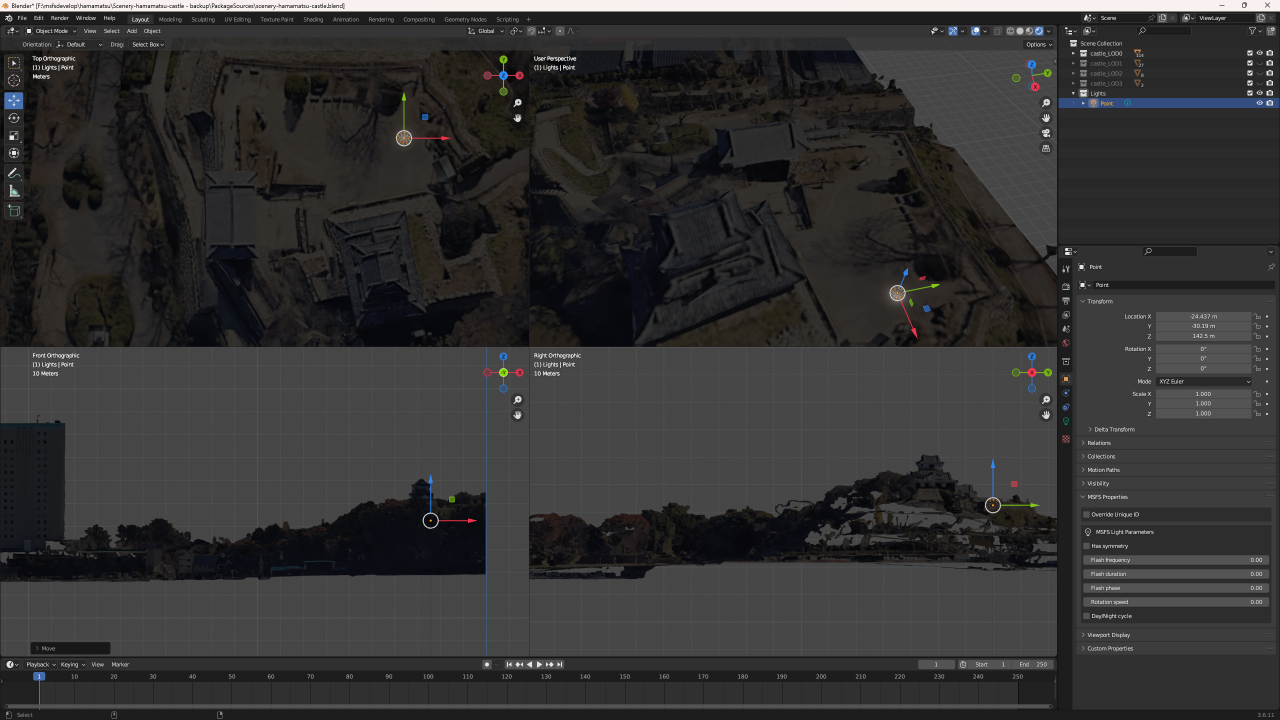
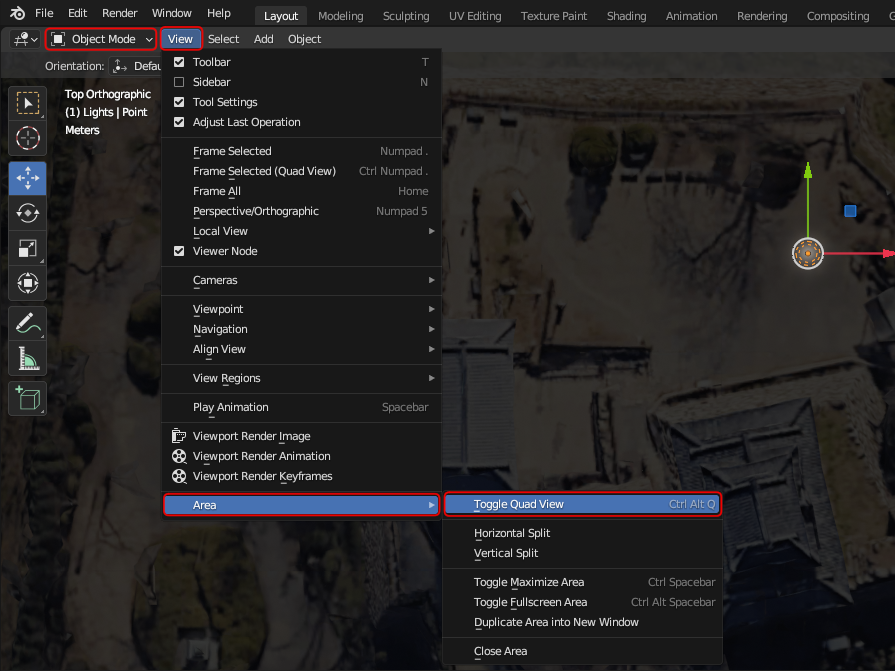 When working with large meshes, such as scenery generated by Google Earth Decoder, it is recommended to use Blender's "Quad View".
This makes it easier to precisely align the objects you add.
Select [View]-[Area]-[Toggle Quad View] from the menu.
When working with large meshes, such as scenery generated by Google Earth Decoder, it is recommended to use Blender's "Quad View".
This makes it easier to precisely align the objects you add.
Select [View]-[Area]-[Toggle Quad View] from the menu.
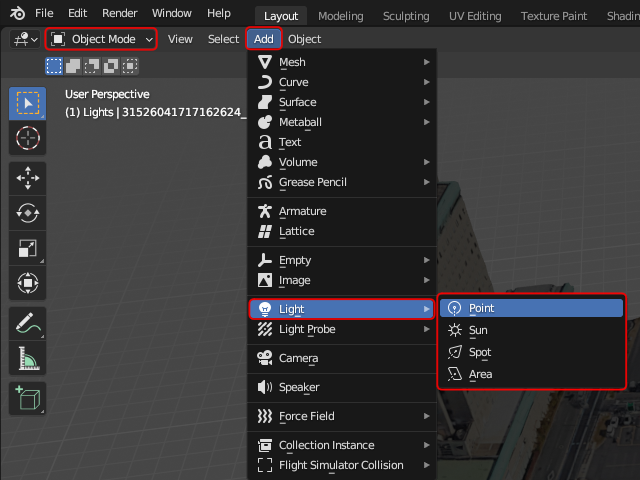 To add a light, switch to "Object Mode" and select a light from the [Add]-[Light] menu.
If you want to add detail to a night scene, a Point or Spot light would be good.
To add a light, switch to "Object Mode" and select a light from the [Add]-[Light] menu.
If you want to add detail to a night scene, a Point or Spot light would be good.
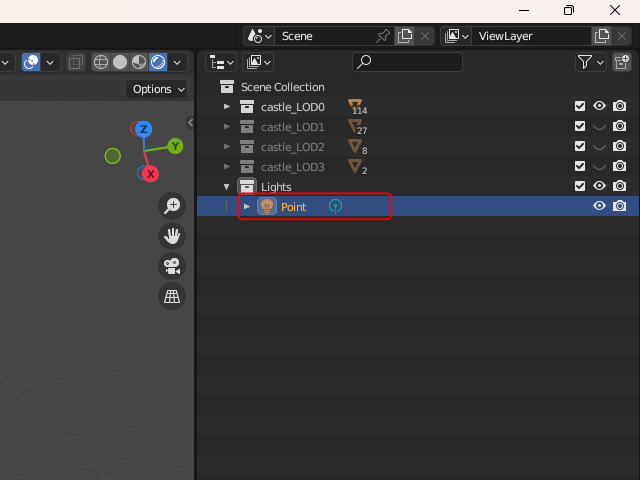 The light will then be added to the selected collection.
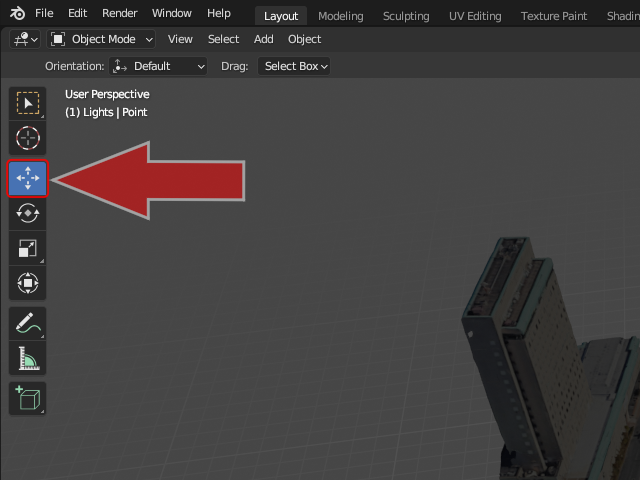 Position the light.
Switch to "Move" mode.
Position the light.
Switch to "Move" mode.
 Drag the light's coordinate axis to determine the position.
The default light is dim, so it will not illuminate the object unless you get very close to it.
However, if you get too close to the object, the light may be buried in the object if you switch to a model with a lower resolution LOD.
Position it carefully while switching the LOD of the model you want to display.
Drag the light's coordinate axis to determine the position.
The default light is dim, so it will not illuminate the object unless you get very close to it.
However, if you get too close to the object, the light may be buried in the object if you switch to a model with a lower resolution LOD.
Position it carefully while switching the LOD of the model you want to display.
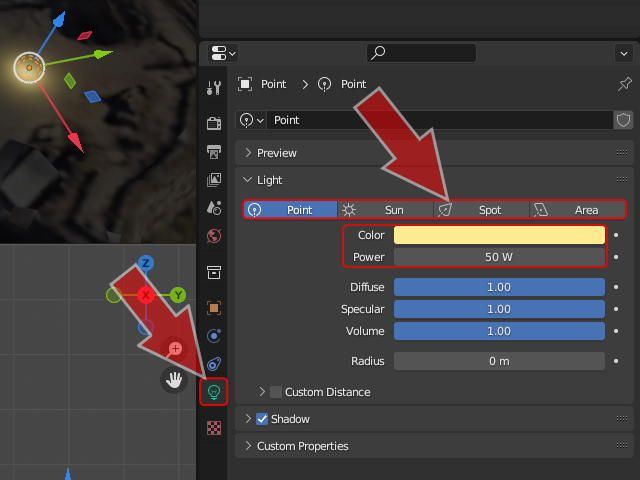 Click on the green
You can change the type of light by clicking the [Point], [Sun], [Spot], or [Area] at the top. You can select the light color by clicking the "Color" column. You can select the brightness of the light in the "Power" column. Street lights of around 20~30W, store lighting of around 50W, red flashing lights on top of buildings (Aviation Obstruction Lights) of around 30W, and spotlights used to light up landmarks of around 300W would be a good choice I think.
When exporting to MSFS, the lights appear brighter than they do in Blender.
 Next, click the orange
If the light you want to edit is not selected, select it from the drop-down list at the top of the properties screen.
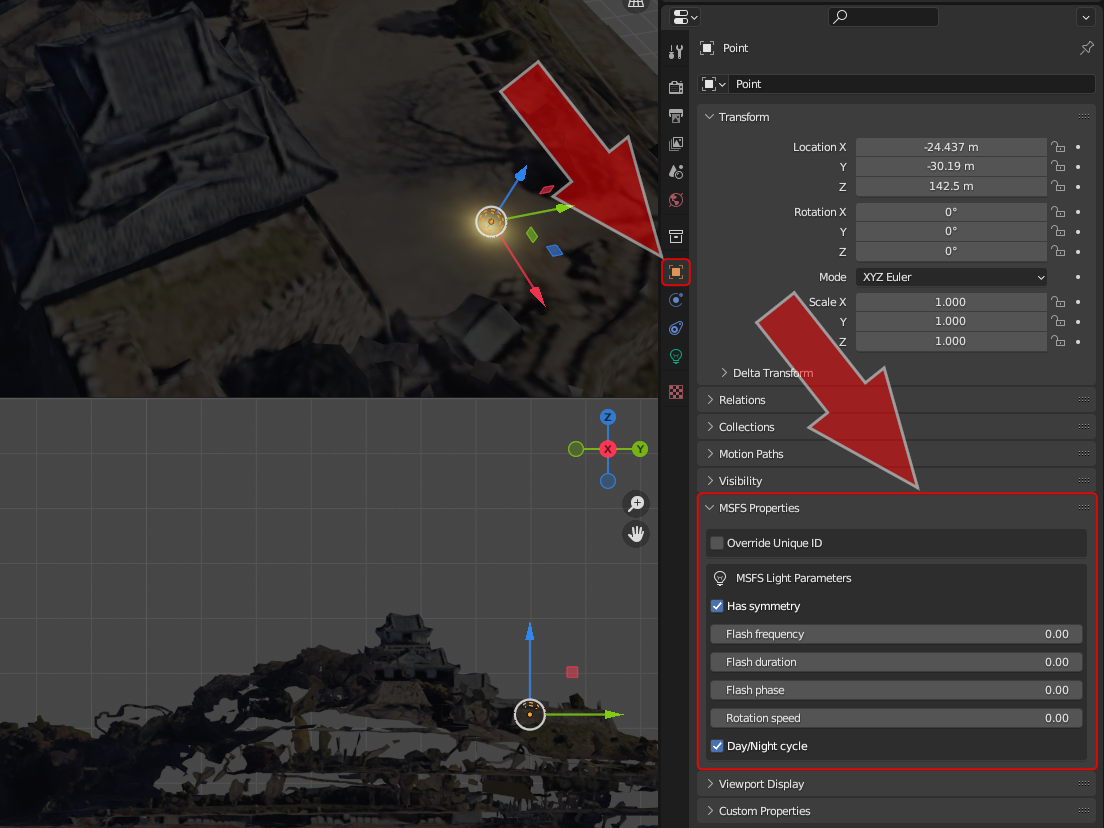 Expand the "MSFS Light Parameters" section on the properties screen.
Checking the "Has symmetry" box will make the light symmetrical. A light cone will be generated on the opposite side of the light's direction. This is effective for spot lights. However, I have not yet been able to confirm the effect.
If you check the "Day/Night cycle" box, the light will only be turned on at night.
The other parameters are for blinking and rotating lights. See the table below.
| Keyword | description |
|---|---|
| Flash frequency (Number of flashes) |
The number of times the light will "blink" per minute.
For example, if you specify 6 here, the light will turn on once every 10 seconds (= 60 sec / 6 times).
If you set this to 0, the light will not blink (it will remain on).
Flash frequency = 60 / Blink interval(sec) |
| Flash duration (Lighting time) | The duration of one flash (in seconds). This parameter has no effect when "Flash frequency" is 0. |
| Flash phase (Lighting start time) | This is the time (in seconds) from when the model is generated in the simulator until the first flash occurs. This parameter is used to flash multiple lights in the same *.gltf synchronously or asynchronously. This parameter has no effect when "Flash frequency" is 0. |
| rotation speed | The number of revolutions per minute of the light. This value only has meaning if the light angle is less than 360° (spotlight). |
For more information about these parameters, see the following pages of the MSFS SDK documentation.
LIGHTS (MSFS 2024 SDK Documentation)
LIGHTS (MSFS SDK Documentation)
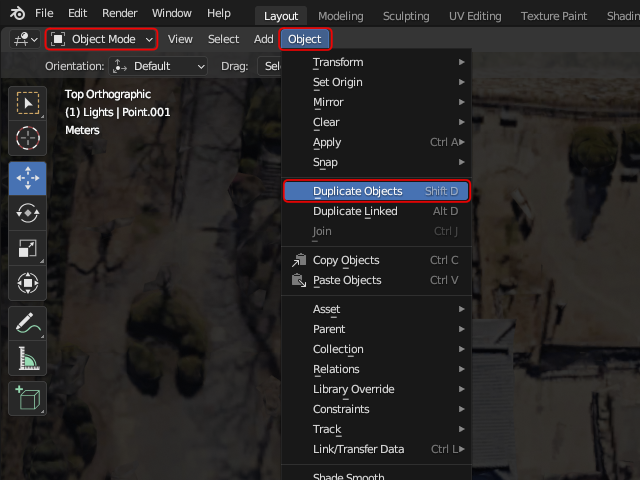 To create multiple lights with the same color and brightness, copy them.
Select a light and then choose [Object]-[Duplicate Objects] to immediately make a copy and enter the mode for moving it.
Click the location where you want to place the new light.
To create multiple lights with the same color and brightness, copy them.
Select a light and then choose [Object]-[Duplicate Objects] to immediately make a copy and enter the mode for moving it.
Click the location where you want to place the new light.
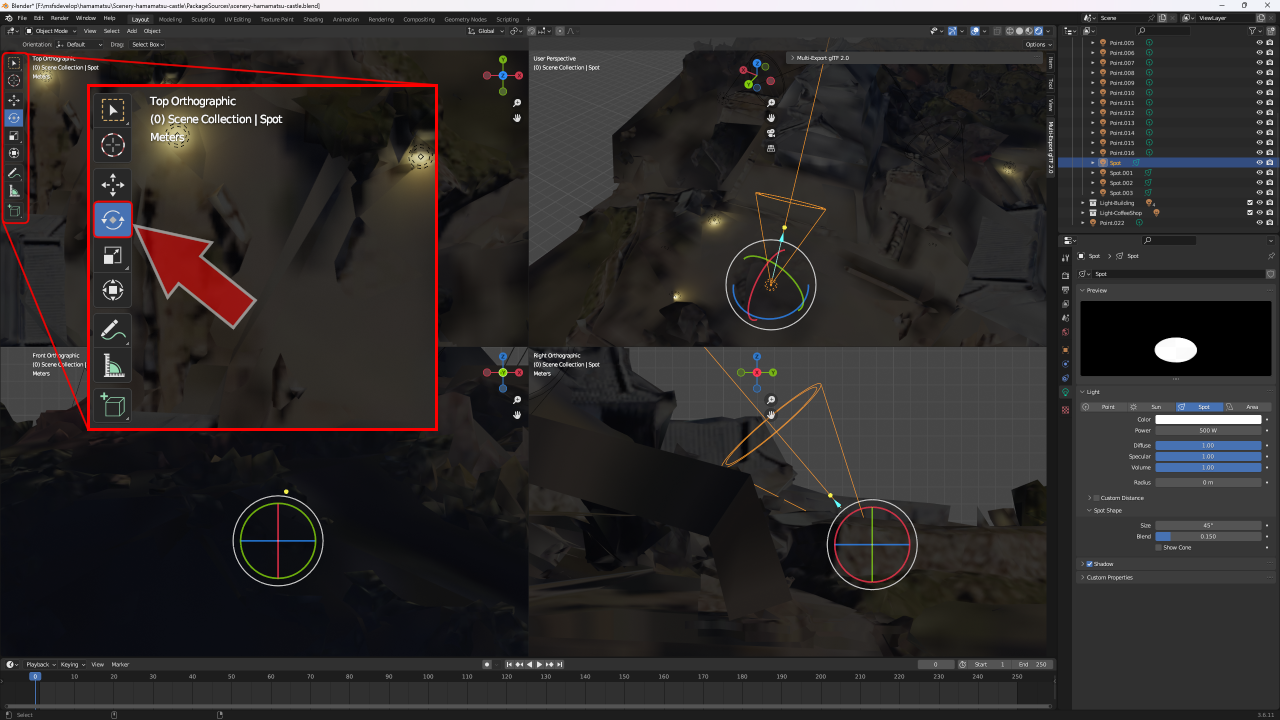 When placing a spotlight, select "Rotate" mode using the icon on the left side of the screen to determine the direction of the light cone.
Every time you place a new light, don't forget to set its color and brightness, as well as the properties for the MSFS exporter.
Make the lights a child of a mesh object
The light setup is now complete, but if you export the object in this state, the light will not turn on in the MSFS game. All lights placed in Blender must be children of any mesh object.
For objects with LODs, copy the light to all LODs and make it a child of one of the mesh objects in each LOD. Even for objects that don't have LODs, make all placed lights a child of one of the mesh objects in your 3D model.
 Once you've finished placing all the lights in a tile, copy the originals under the mesh for each LOD.
Lights must be copied to all LODs, otherwise the lights will turn on and off every time the object's LOD changes on the game screen.
Conversely, remove lights that aren't needed when viewed from a distance from lower resolution LODs.
Once you've finished placing all the lights in a tile, copy the originals under the mesh for each LOD.
Lights must be copied to all LODs, otherwise the lights will turn on and off every time the object's LOD changes on the game screen.
Conversely, remove lights that aren't needed when viewed from a distance from lower resolution LODs.
First, copy the collection containing the light to the collection for each LOD. Select the collection containing the original light and select "Copy" from the right-click menu.
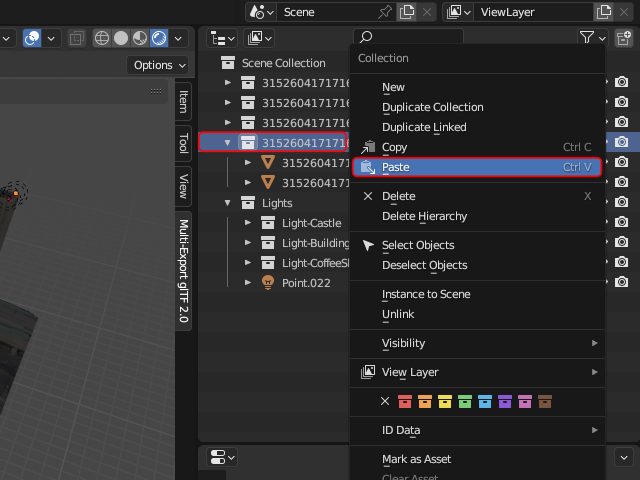 Next, select the destination LOD collection and choose "Paste" from the right-click menu.
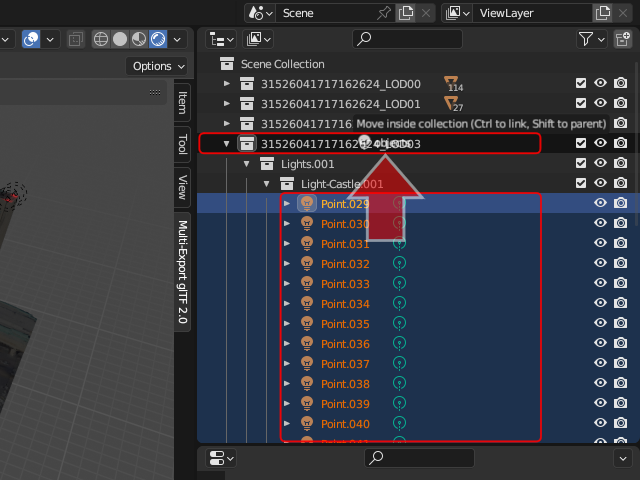 Next, extract all lights from the copied light collection.
Select all the lights and move them to the root of the LOD collection.
If you have grouped the lights into multiple collections, move them from each collection to the root of the LOD.
Next, extract all lights from the copied light collection.
Select all the lights and move them to the root of the LOD collection.
If you have grouped the lights into multiple collections, move them from each collection to the root of the LOD.
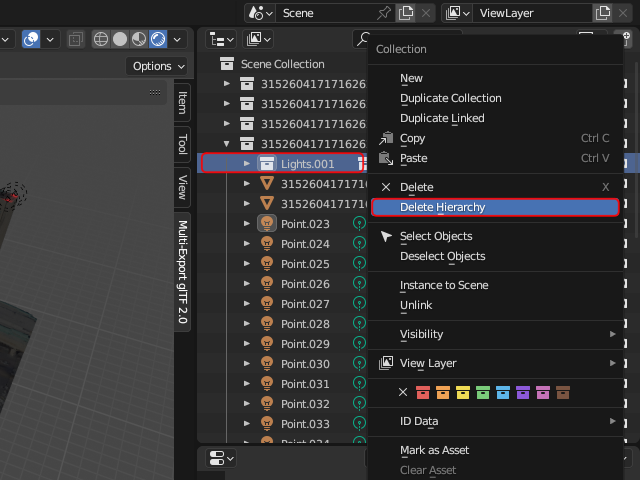 Now that the light collection is empty, delete it by right-clicking and selecting "Delete Hierarchy" from the menu.
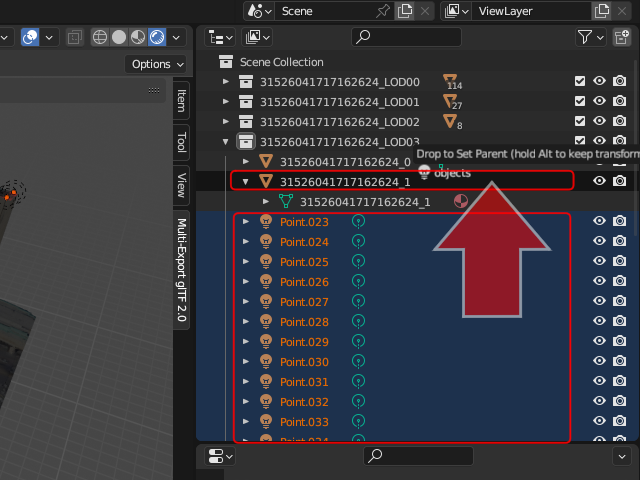 Next, make all lights "children" of one of the meshes in the LOD.
Select all the lights and move them to one of the meshes in the LOD.
Hold down the [Shift] key while dragging and dropping the lights to place them inside a mesh.
Next, make all lights "children" of one of the meshes in the LOD.
Select all the lights and move them to one of the meshes in the LOD.
Hold down the [Shift] key while dragging and dropping the lights to place them inside a mesh.
Do this for all LODs.
 Export the completed scenery to the MSFS project.
For the export procedure, see the page
How to use glTF-Blender-IO-MSFS to export and import 3D data between Blender and MSFS
.
Export the completed scenery to the MSFS project.
For the export procedure, see the page
How to use glTF-Blender-IO-MSFS to export and import 3D data between Blender and MSFS
.
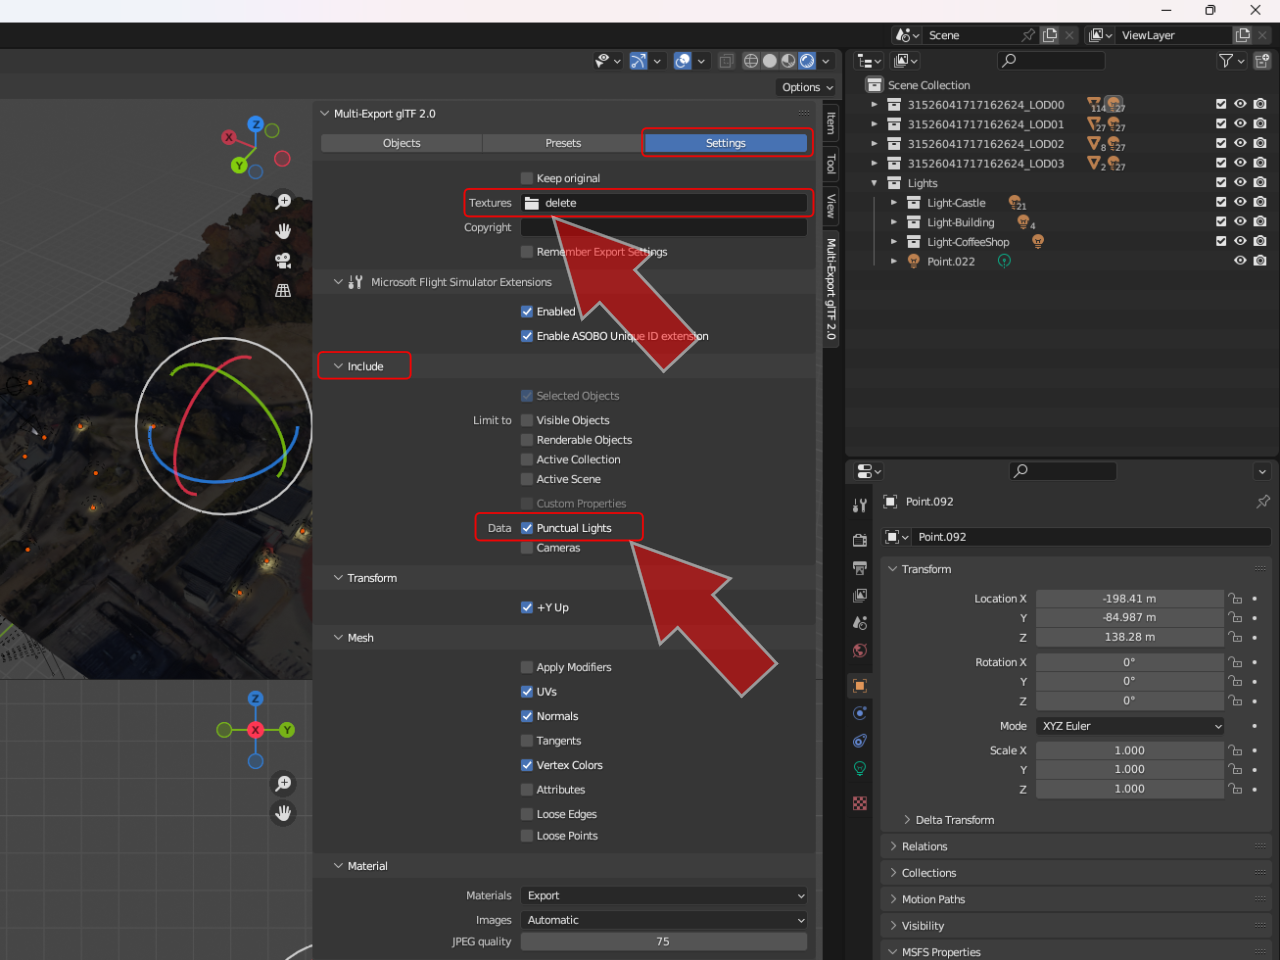
However, to export lights, you need to set some options. Open the "Settings" screen of the "glTF-Blender-IO-MSFS" exporter plugin.
The texture should already exist in the project. There is no need to output a new one this time, so create a dummy output folder and specify it in the "Textures" column.
Also, check the "Punctual Lights" box in the "Include"-"Data" section.
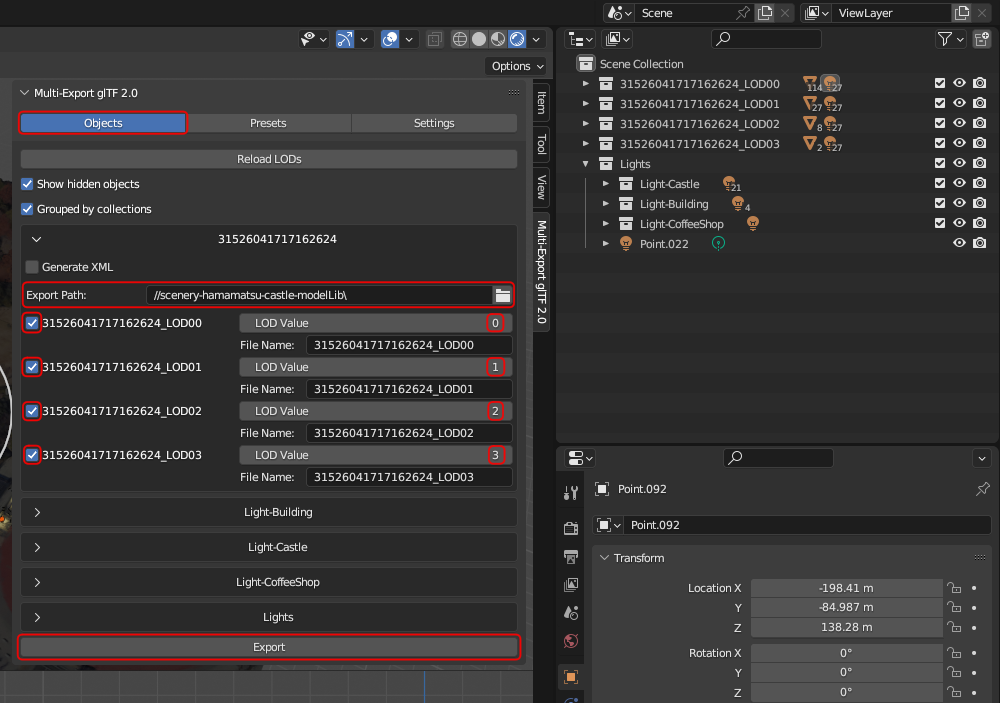 Next, open the "Objects" screen of the exporter plugin.
Specify the project's "PackageSources\modelLib" folder as the output destination.
If you don't want to overwrite the existing scenery data, you can output it to a different folder and then replace it with the one under the modelLib folder later.
Check each LOD you want to output and set the number of each LOD to the right.
Next, open the "Objects" screen of the exporter plugin.
Specify the project's "PackageSources\modelLib" folder as the output destination.
If you don't want to overwrite the existing scenery data, you can output it to a different folder and then replace it with the one under the modelLib folder later.
Check each LOD you want to output and set the number of each LOD to the right.
On the other hand, uncheck all collections that store the original lights so that they are not output.
And finally click the "Export" button at the bottom.
 If you look in the modelLib folder of the project, you can see that the timestamps of the ".bin" and ".gltf" files for each LOD have been updated.
Textures have been output to the dummy texture output folder.
You can delete this.
If you look in the modelLib folder of the project, you can see that the timestamps of the ".bin" and ".gltf" files for each LOD have been updated.
Textures have been output to the dummy texture output folder.
You can delete this.
Also, if you open the ".gltf" file in a text editor and search for the string "ASOBO_macro_light", you will see that the parameters of the added light are reflected.
 Start MSFS,
load the project into the game screen
, and build it with the MSFS SDK to complete the project.
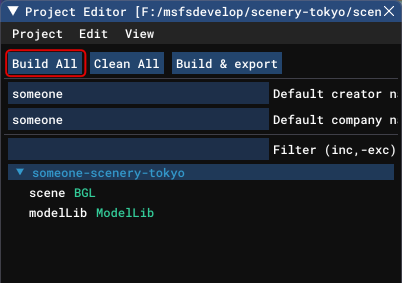
Clicking the [Clean All] button on the Project Editor screen will delete old packages under the "Packages" folder.
Next, click the [Build All] button to start the build.
Start MSFS,
load the project into the game screen
, and build it with the MSFS SDK to complete the project.
Clicking the [Clean All] button on the Project Editor screen will delete old packages under the "Packages" folder.
Next, click the [Build All] button to start the build.
Please note that simply placing a light in Blender will not render the light source itself (a light bulb or fluorescent light). It will only brighten the area around the light source. To make the light source itself visible, you will need to create the light source as a 3D model and set the "emission" material. However, since Google Maps scenery is usually viewed from high in the sky, you can still enjoy it even if you cannot see the light source itself.
Let's
check the completed scenery on the game screen
.
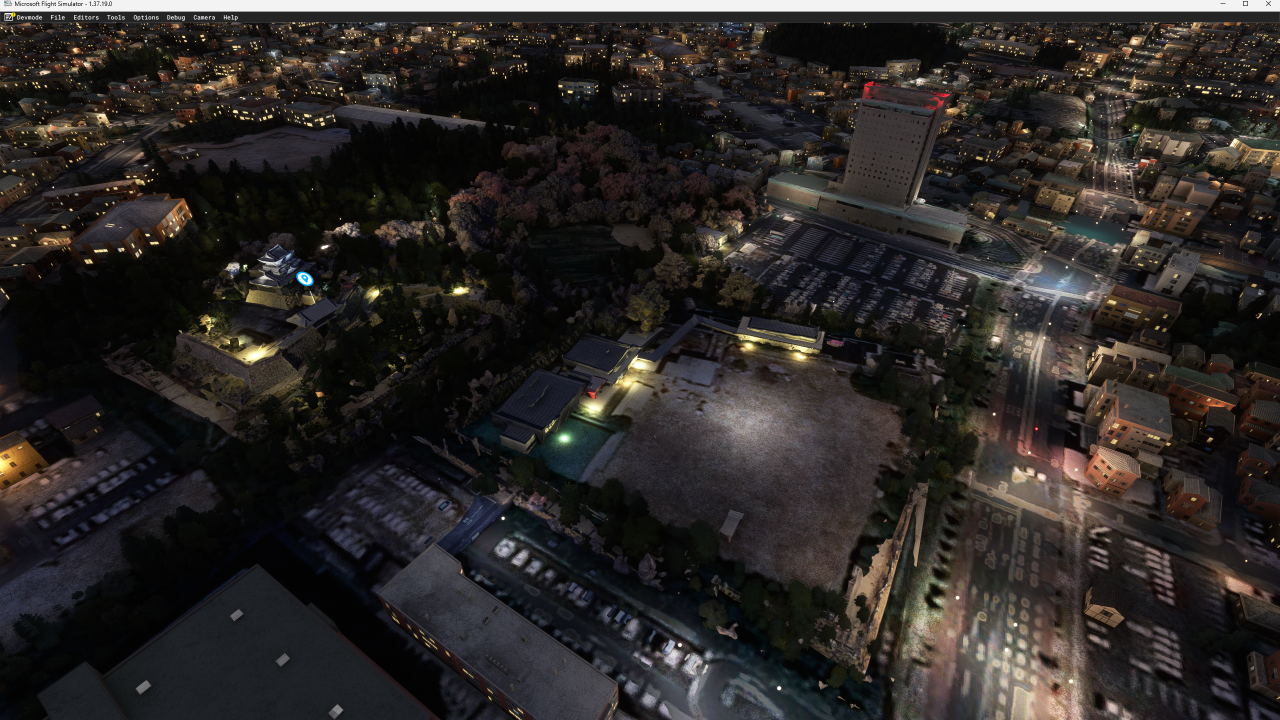
The castle on the left of the screen (Hamamatsu Castle) is lit up from four directions with white spotlights.
I placed several yellow point light sources as street lights on the castle grounds.
In the square at the bottom center of the screen, I placed one white point light source to illuminate the entire area, and five yellow point light sources in front of the surrounding buildings.
There is also a point light source in the small building to the left of the parking lot at the back (Starbucks Coffee Hamamatsu Castle Park Branch).
In addition, red flashing lights (Aviation Obstruction Lights) were blinking on the four corners of the top of the high-rise building (hotel) behind them.
Check the project build result on the game screen
Where light objects are stored
The light information added to the scenery in the above steps will be saved as text data in the "[tile name]_LODnn.gltf" file under the "PackageSources\[scenery name]-modelLib" folder. You can find the light object by searching for "ASOBO_macro_light". You can modify the parameters of a light object using a text editor.
Place the light objects created in Blender in the MSFS scenery
Lights created in Blender can be placed in the MSFS scenery as parts, just like buildings and other objects. It is useful to create parts for lights of various colors, blinking lights, spotlights, etc. that are not provided in the MSFS SDK.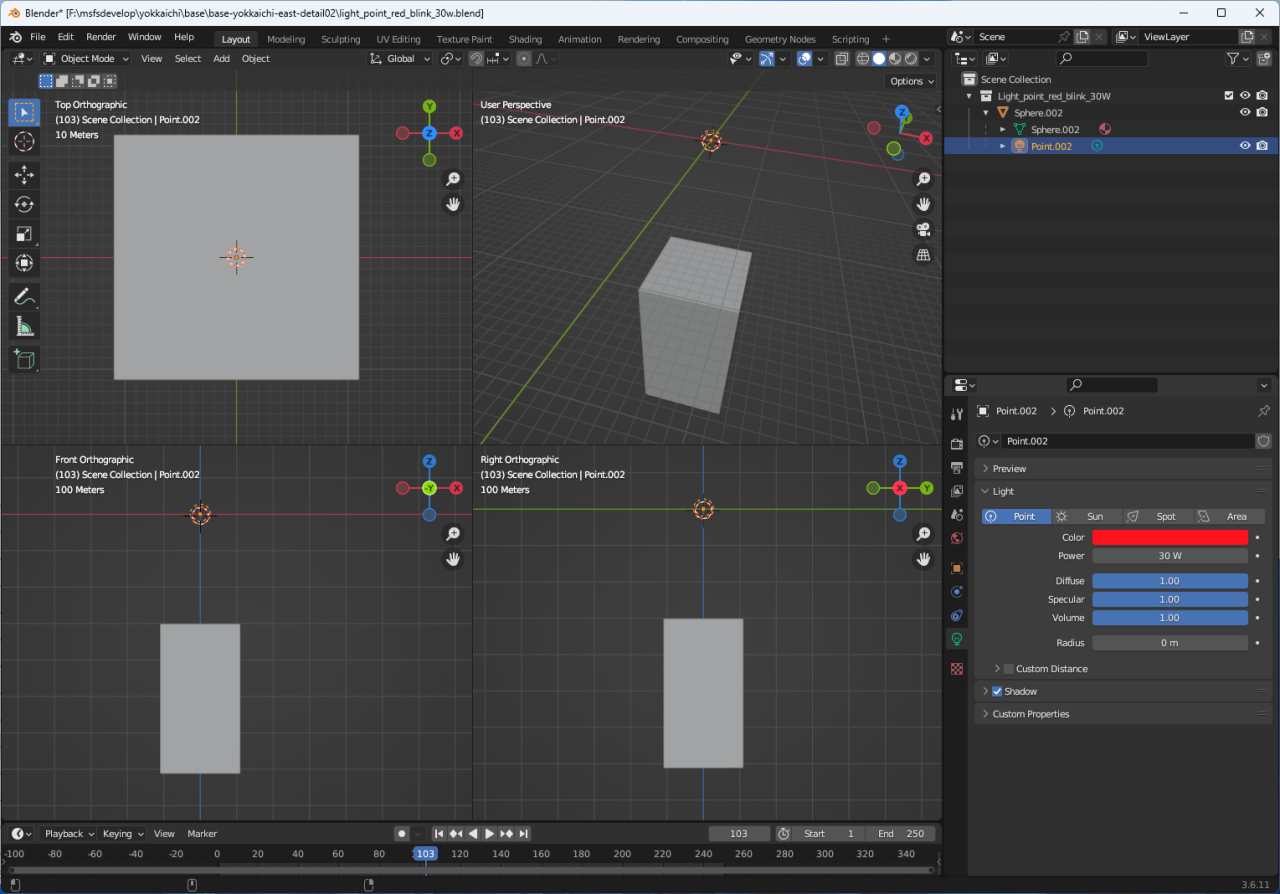 I created a light like this as an object.
I placed a sphere with a diameter of about 40cm near the origin to act as a "light bulb."
I then placed a Blender point light source just above it.
The point light source is set as a child of the "light bulb" object.
I created a light like this as an object.
I placed a sphere with a diameter of about 40cm near the origin to act as a "light bulb."
I then placed a Blender point light source just above it.
The point light source is set as a child of the "light bulb" object.
I created three different output levels for the point light source; 30W, 100W, and 1000W, so that they could be used depending on the location where they were installed.
Then, within the same mesh as the sphere, I placed a large cube measuring 200x200x400m about 300m below the origin. By creating a huge cube in a part that does not appear on the ground's surface, I was able to make light objects appear in the game even from a certain distance.
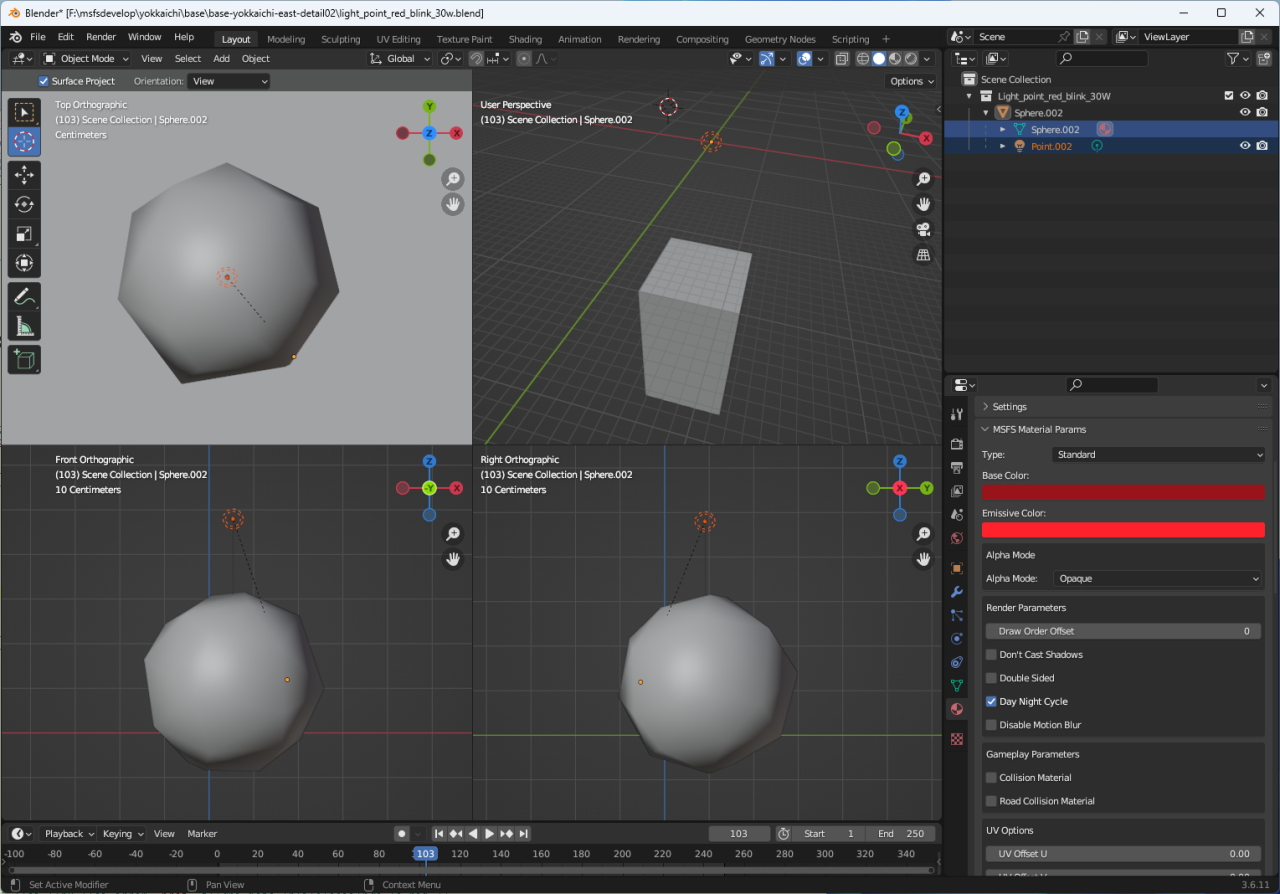 The image on the right shows a close-up of the light.
To create the "light bulb", I use the "UV Sphere" mesh that comes standard with Blender, and shrink it to 0.2 times the size using the Scale parameter.
Then in Edit Mode, I use the [Mesh]-[Clean UP]-[Decimate Geometry] function to reduce the number of polygons by setting the Ratio to 0.1.
Finally, I smooth the normals using the [Mesh]-[Normals]-[Smooth Vectors] function.
This will create a "light bulb" using the minimum number of polygons.
The image on the right shows a close-up of the light.
To create the "light bulb", I use the "UV Sphere" mesh that comes standard with Blender, and shrink it to 0.2 times the size using the Scale parameter.
Then in Edit Mode, I use the [Mesh]-[Clean UP]-[Decimate Geometry] function to reduce the number of polygons by setting the Ratio to 0.1.
Finally, I smooth the normals using the [Mesh]-[Normals]-[Smooth Vectors] function.
This will create a "light bulb" using the minimum number of polygons.
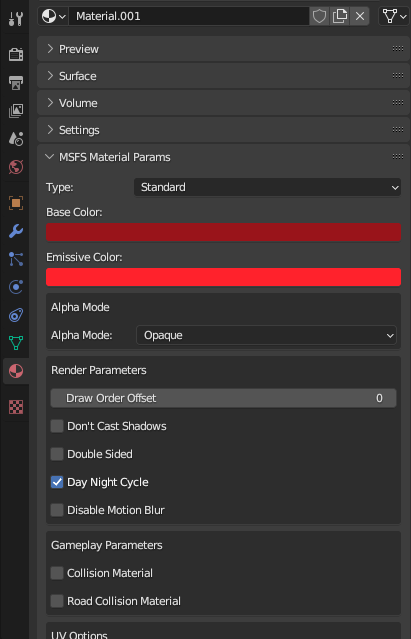 For the mesh, in the MSFS Material Params section, specify an Emissive Color and check the Day Night Cycle option.
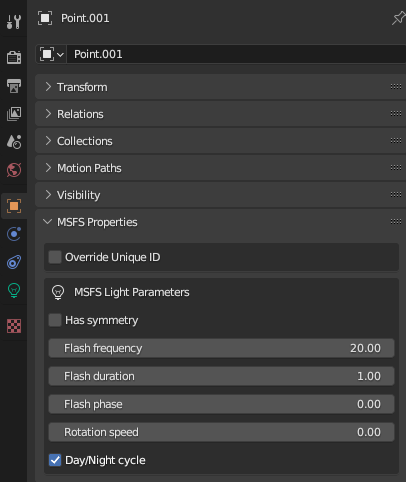 For lights, in the MSFS Light Parameters section, specify blinking as necessary and check the Day/Night Cycle option.
However, the Day/Night Cycle option for lights doesn't seem to work properly.
Even with this option specified, the lights will stay on during the day.
For lights, in the MSFS Light Parameters section, specify blinking as necessary and check the Day/Night Cycle option.
However, the Day/Night Cycle option for lights doesn't seem to work properly.
Even with this option specified, the lights will stay on during the day.
 Export this light object as a part using the "glTF-Blender-IO-MSFS" exporter plug-in, and place it in the MSFS scenery to complete the process.
Arranging lights of various colors as shown in the picture on the right will make the shopping street lively.
Export this light object as a part using the "glTF-Blender-IO-MSFS" exporter plug-in, and place it in the MSFS scenery to complete the process.
Arranging lights of various colors as shown in the picture on the right will make the shopping street lively.
For information on how to use the exporter plug-in and how to place objects in the MSFS scenery, please see the page How to use glTF-Blender-IO-MSFS to export and import 3D data between Blender and MSFS
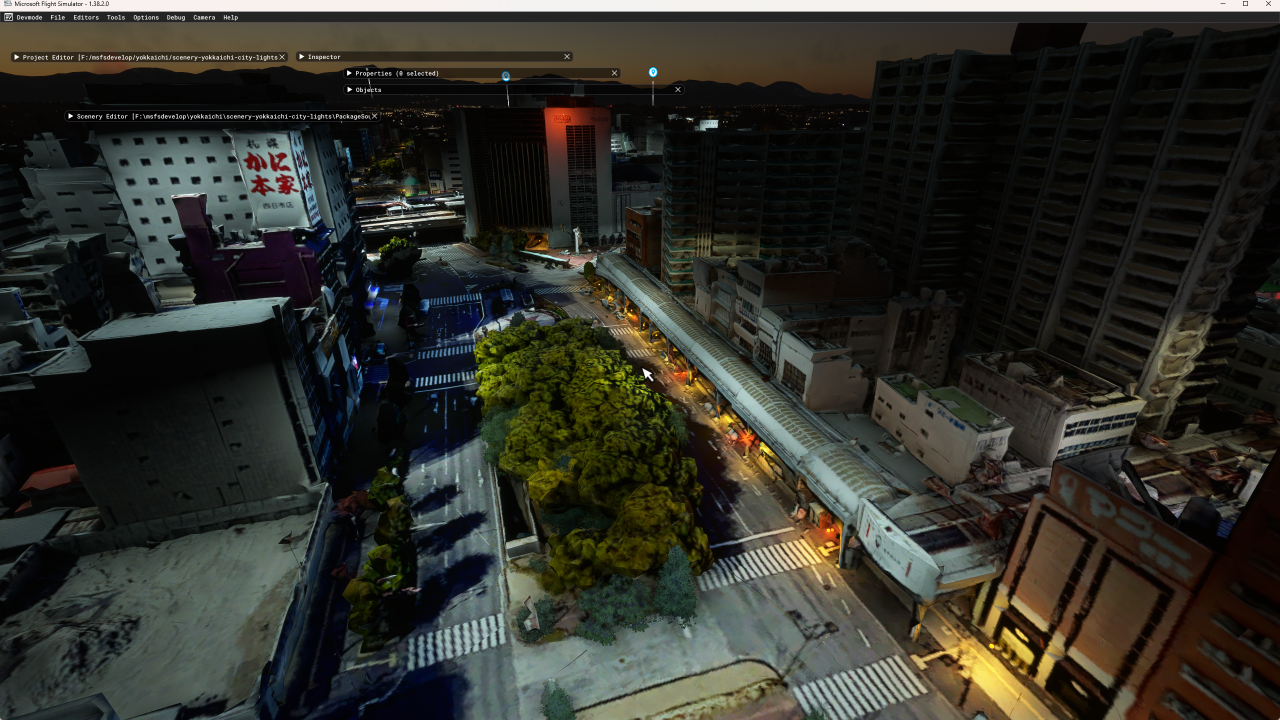
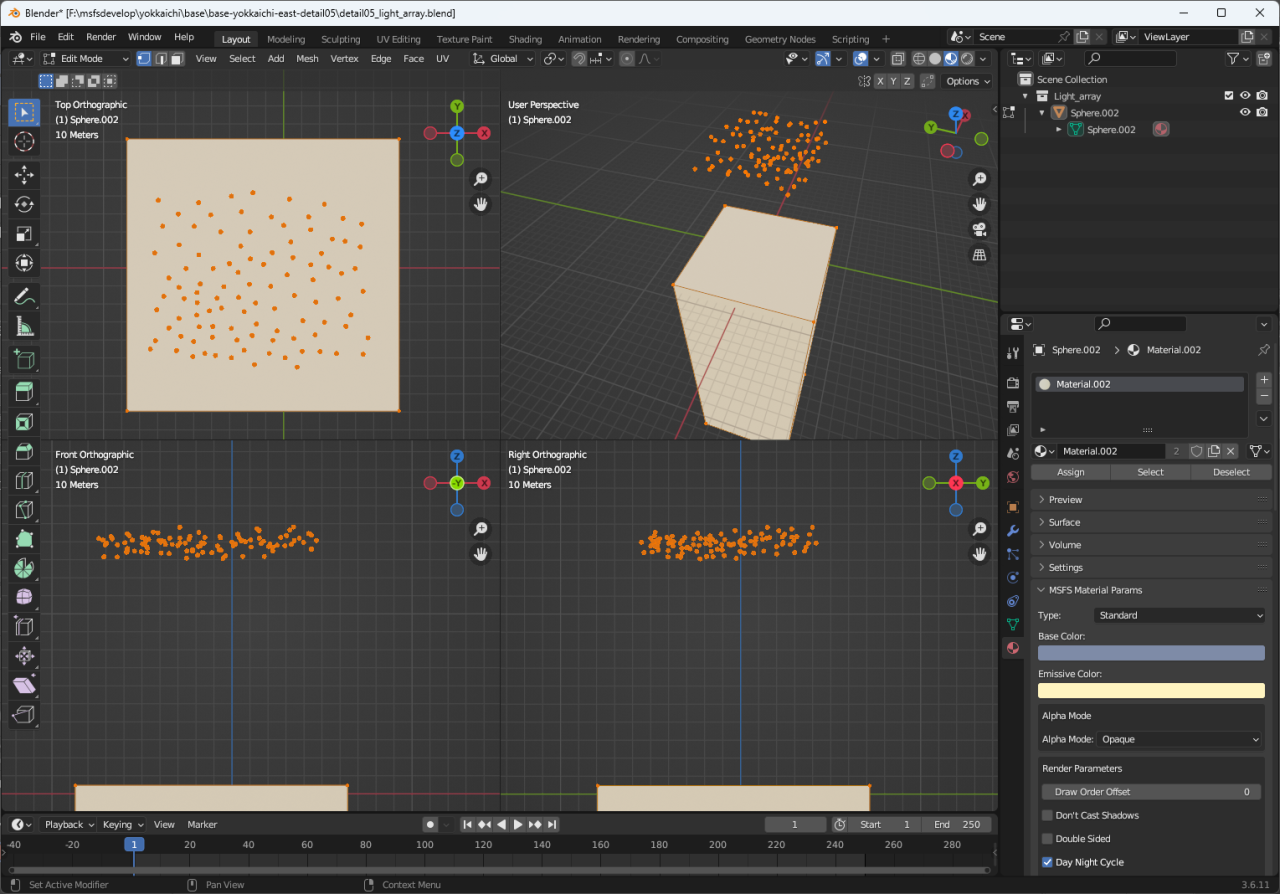 If you create an object like the one in this image and place a large number of them in an MSFS scene, you can easily cover the ground with lights.
Multiple "light bulbs" are manually placed in one mesh.
Note that no Blendar light sources are set for this object.
An MSFS light is used as the light source to softly illuminate a wide area.
If you create an object like the one in this image and place a large number of them in an MSFS scene, you can easily cover the ground with lights.
Multiple "light bulbs" are manually placed in one mesh.
Note that no Blendar light sources are set for this object.
An MSFS light is used as the light source to softly illuminate a wide area.
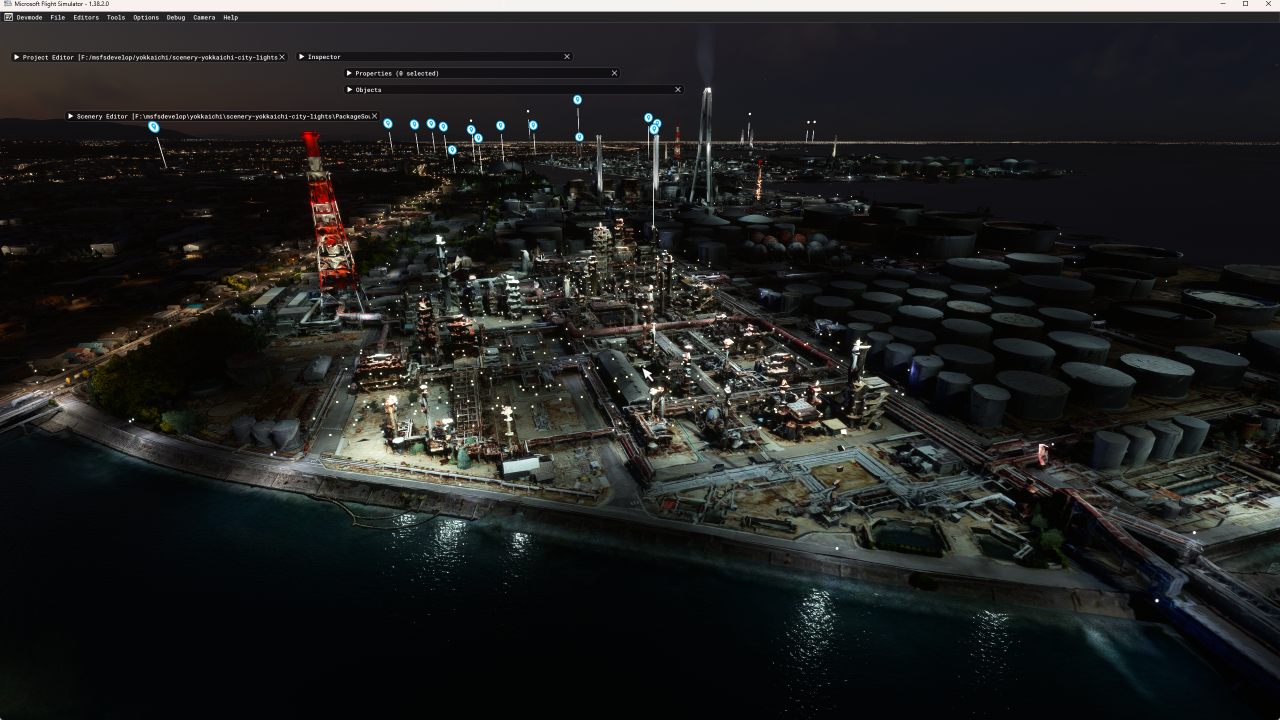 As shown on the right, you can sprinkle lights in industrial areas.
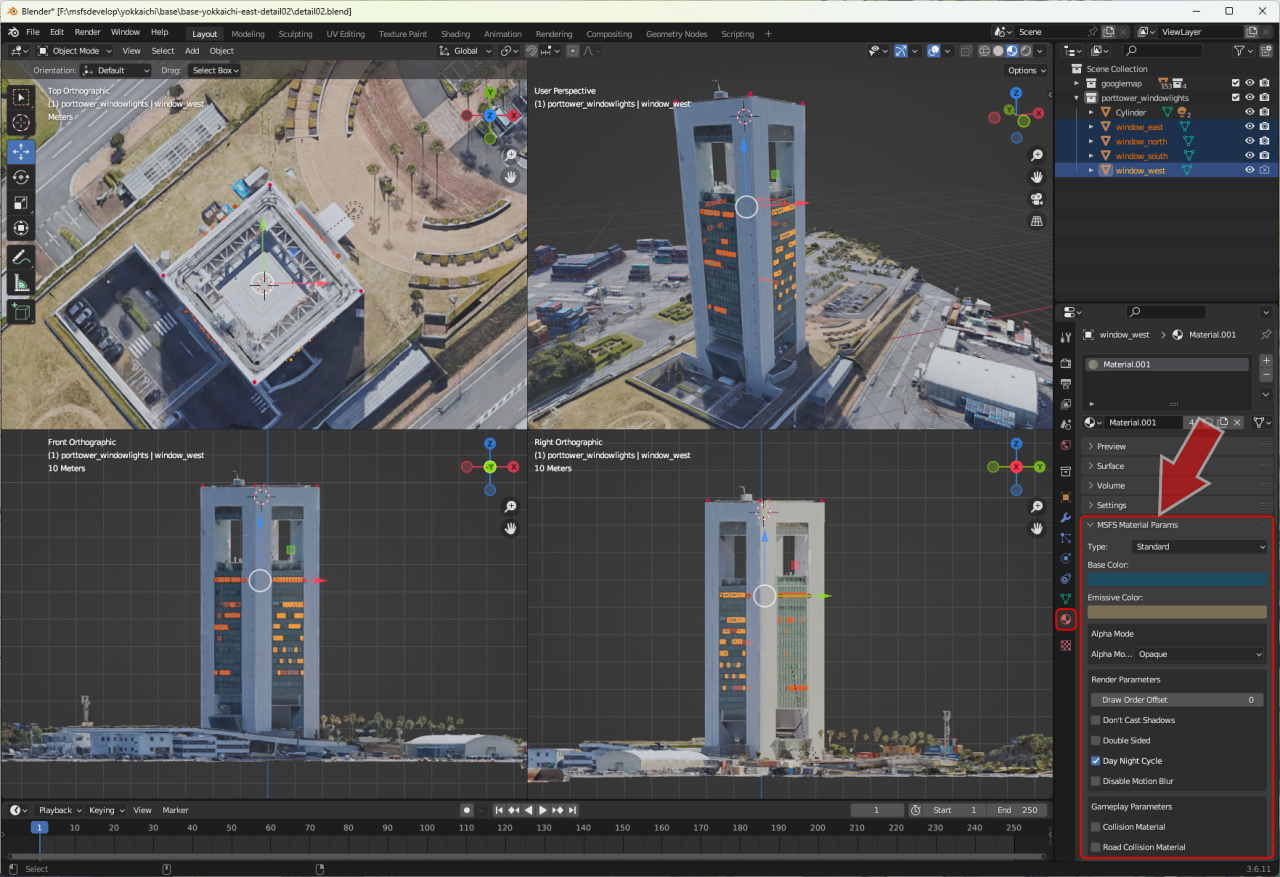 To light the windows of a building, place a flat mesh in the area of the windows, as shown on the right.
Then in the MSFS Material Param section, set the daytime window color in Base Color, and the nighttime window color in Emissive Color.
If you check Day Night Cycle, the windows will be lit at night.
To light the windows of a building, place a flat mesh in the area of the windows, as shown on the right.
Then in the MSFS Material Param section, set the daytime window color in Base Color, and the nighttime window color in Emissive Color.
If you check Day Night Cycle, the windows will be lit at night.
As you can see in the image on the right, the window color at night works best if you set it to a very dark color.
 As shown in the image on the right, the night view of the building becomes more realistic.