

How to export animated objects from Blender for MSFS
This article explains how to create 3D objects in Blender that rotate, scale, or perform other animations, and import them into Microsoft Flight Simulator (MSFS) scenery. To do this, we will use glTF-Blender-IO-MSFS , a plugin that allows Blender to export 3D data for MSFS. In the game, you can rotate radar antennas, lighthouse lights, windmills, and more, and use scaling to make lights (light-emitting objects) blink.
このページを日本語で見る
Contents

Installing the Blender plugin glTF-Blender-IO-MSFS
To create add-on content for Microsoft Flight Simulator, you will need to install various tools onto your computer, including the Blender plugin glTF-Blender-IO-MSFS. Please refer to the page below.Creating animated 3D objects with Blender
First, we will explain how to create a 3D object with a simple animation (action).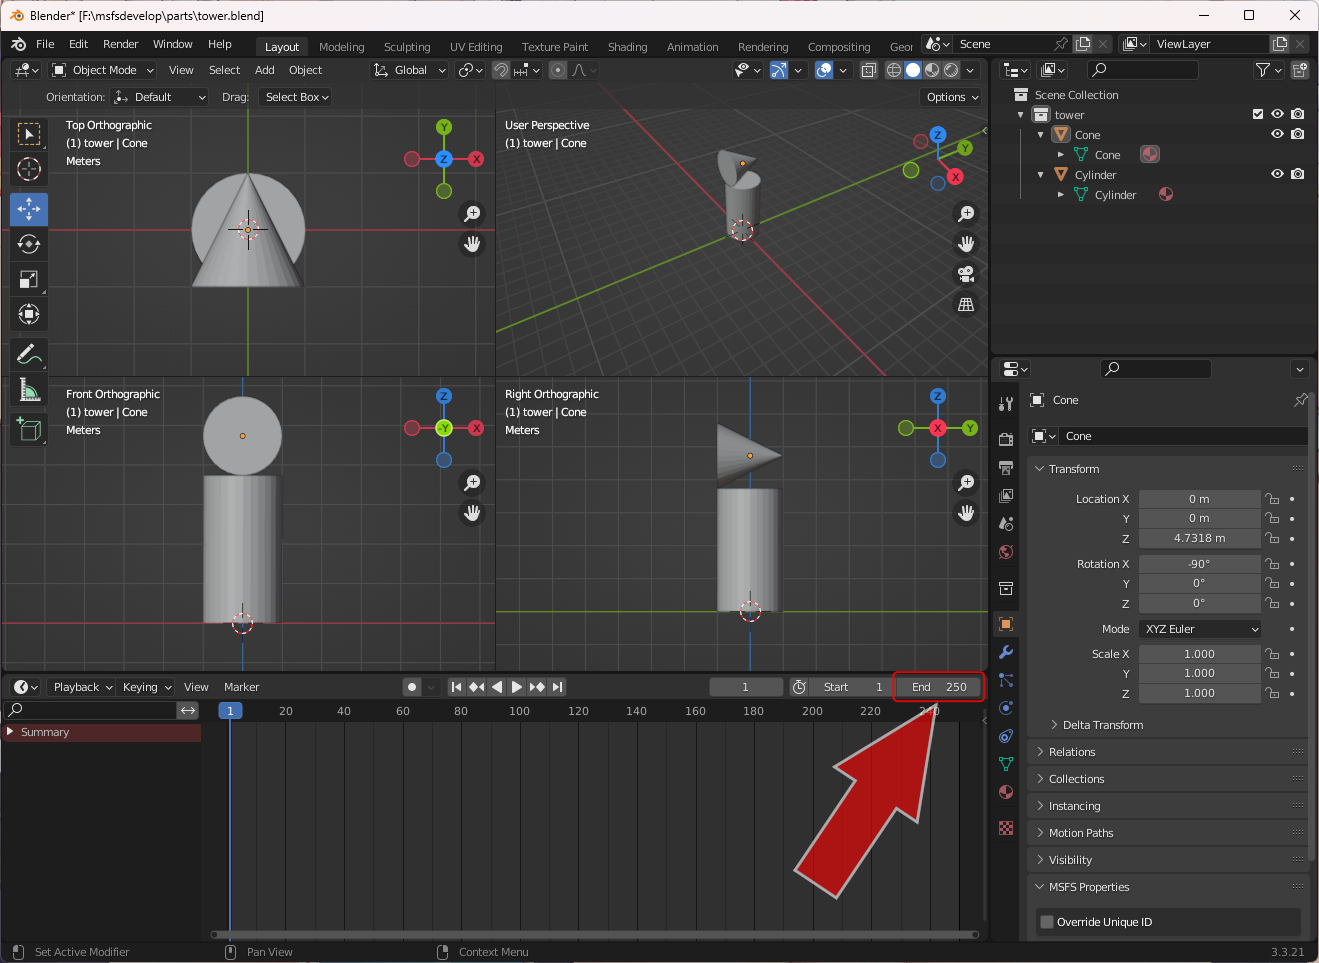 Here we will animate an object like this.
We will rotate a cone placed on a cylinder horizontally (around the Z axis) like a radar or lighthouse light.
Here we will animate an object like this.
We will rotate a cone placed on a cylinder horizontally (around the Z axis) like a radar or lighthouse light.
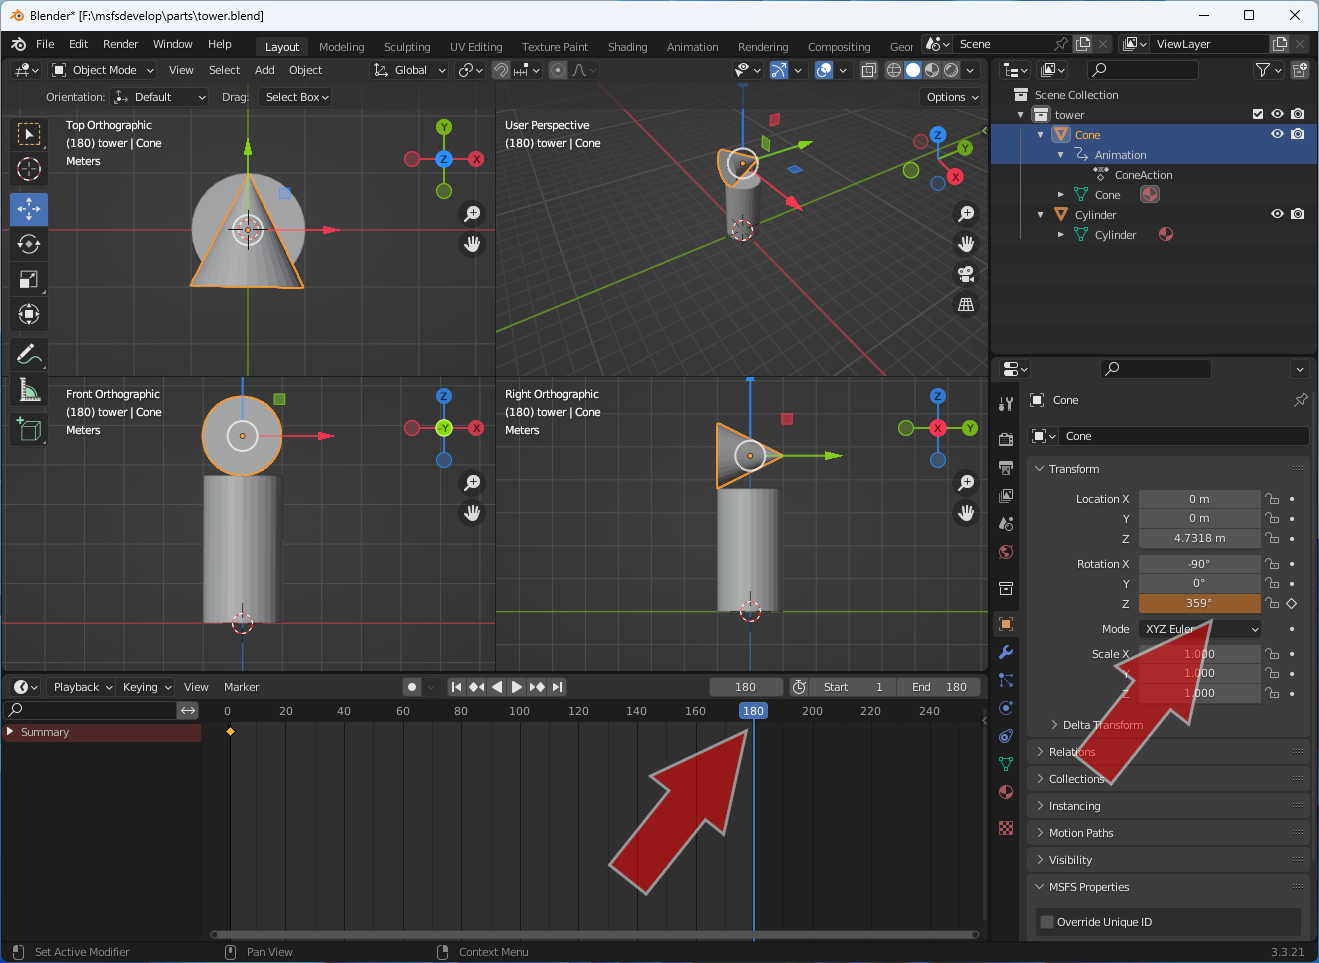
First, decide the number of frames for your animation. Click on the area indicated by the arrow in the image and enter the number of frames.
Here we'll define a 180 frame animation. Blender's animation playback speed is about 22.5 fps, so specifying 180 frames will result in a roughly 8 second animation.
 For the cone part, define an "Action" to rotate 360 degrees around the Z axis (horizontal direction).
To do this, define "keyframes" on the first and last frames.
For the cone part, define an "Action" to rotate 360 degrees around the Z axis (horizontal direction).
To do this, define "keyframes" on the first and last frames.
First, in the top right of the screen, click to select the part you want to animate, "Cone." Next, drag the blue square left and right on the timeline at the bottom left of the screen to select 1 (frame). Finally, click the
However, with regards to the "Scale" column, regardless of which axis you specify, the scale will be the same in all axis directions when imported it into MSFS. You cannot change the shape of an object using the "Scale" column. When using the "Scale" field, it is sufficient to specify only one axis.
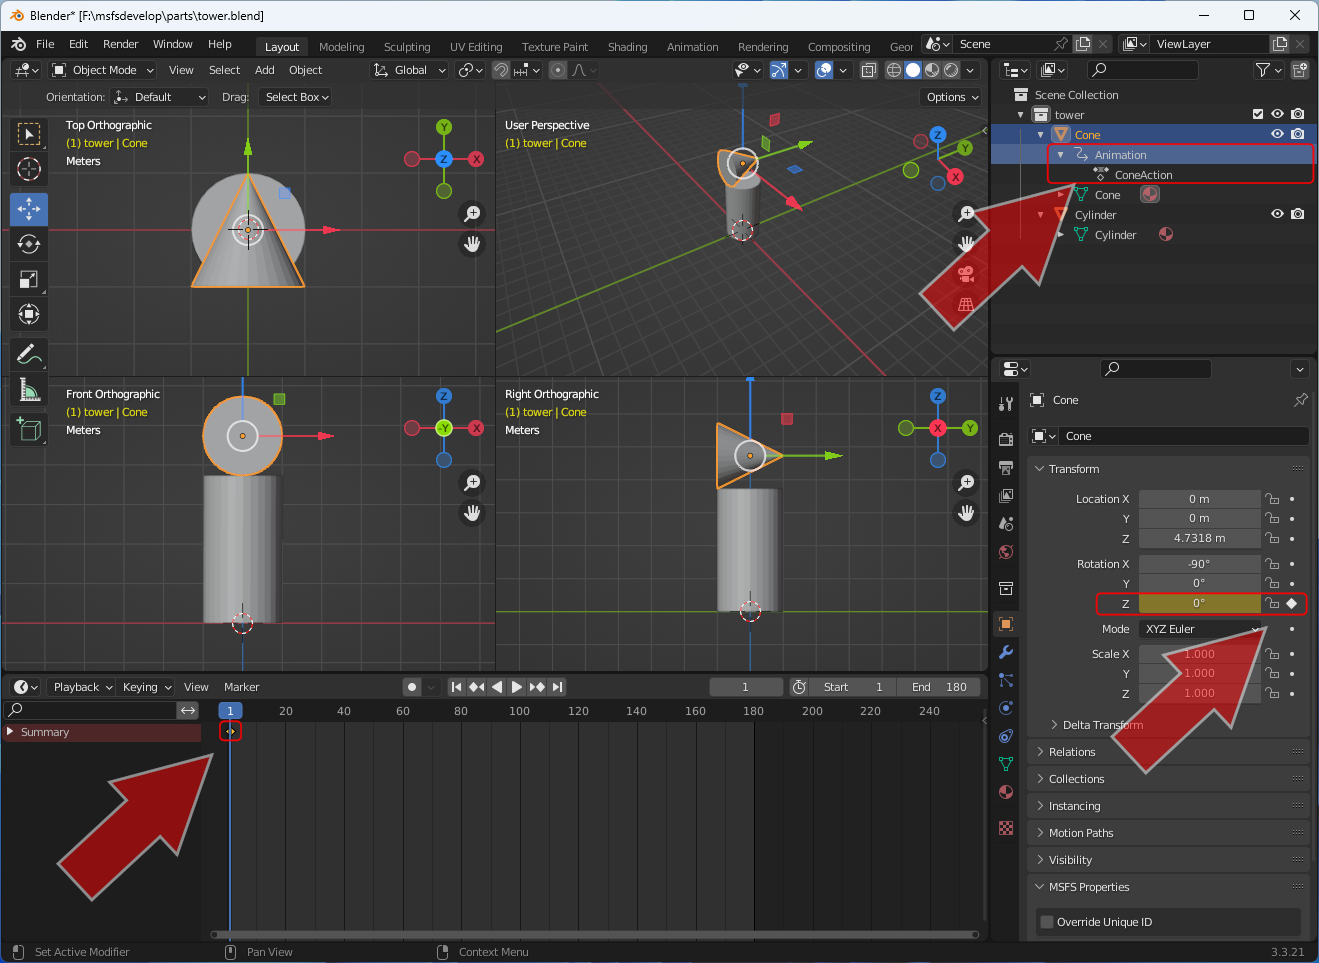 Then, a node called "Animation" will be created under the "Cone" collection in the upper right of the screen, and a node called "ConeAction" will be created under that.
This is where keyframe/animation information will be stored.
Then, a node called "Animation" will be created under the "Cone" collection in the upper right of the screen, and a node called "ConeAction" will be created under that.
This is where keyframe/animation information will be stored.
Additionally, an orange dot will appear on the first frame of the timeline at the bottom left of the screen, indicating that a keyframe has been set. The color of the Z-axis field under "Transform" - "Rotation" at the bottom right of the screen will turn yellowish, and the "・" mark on the right will change to a "◆" mark.
The generated node name "ConeAction" can be changed by clicking on it. You can delete this animation by selecting "Clear Animation Data" from the right-click menu.
 Next, define the final keyframe.
Drag the blue square on the timeline at the bottom left of the screen left or right to select 180 (frame).
Then in the "Transform" - "Rotation" Z axis field at the bottom right of the screen, enter "359°", which will be the angle for the 180th frame, and click the "◇" mark at the right end.
Next, define the final keyframe.
Drag the blue square on the timeline at the bottom left of the screen left or right to select 180 (frame).
Then in the "Transform" - "Rotation" Z axis field at the bottom right of the screen, enter "359°", which will be the angle for the 180th frame, and click the "◇" mark at the right end.
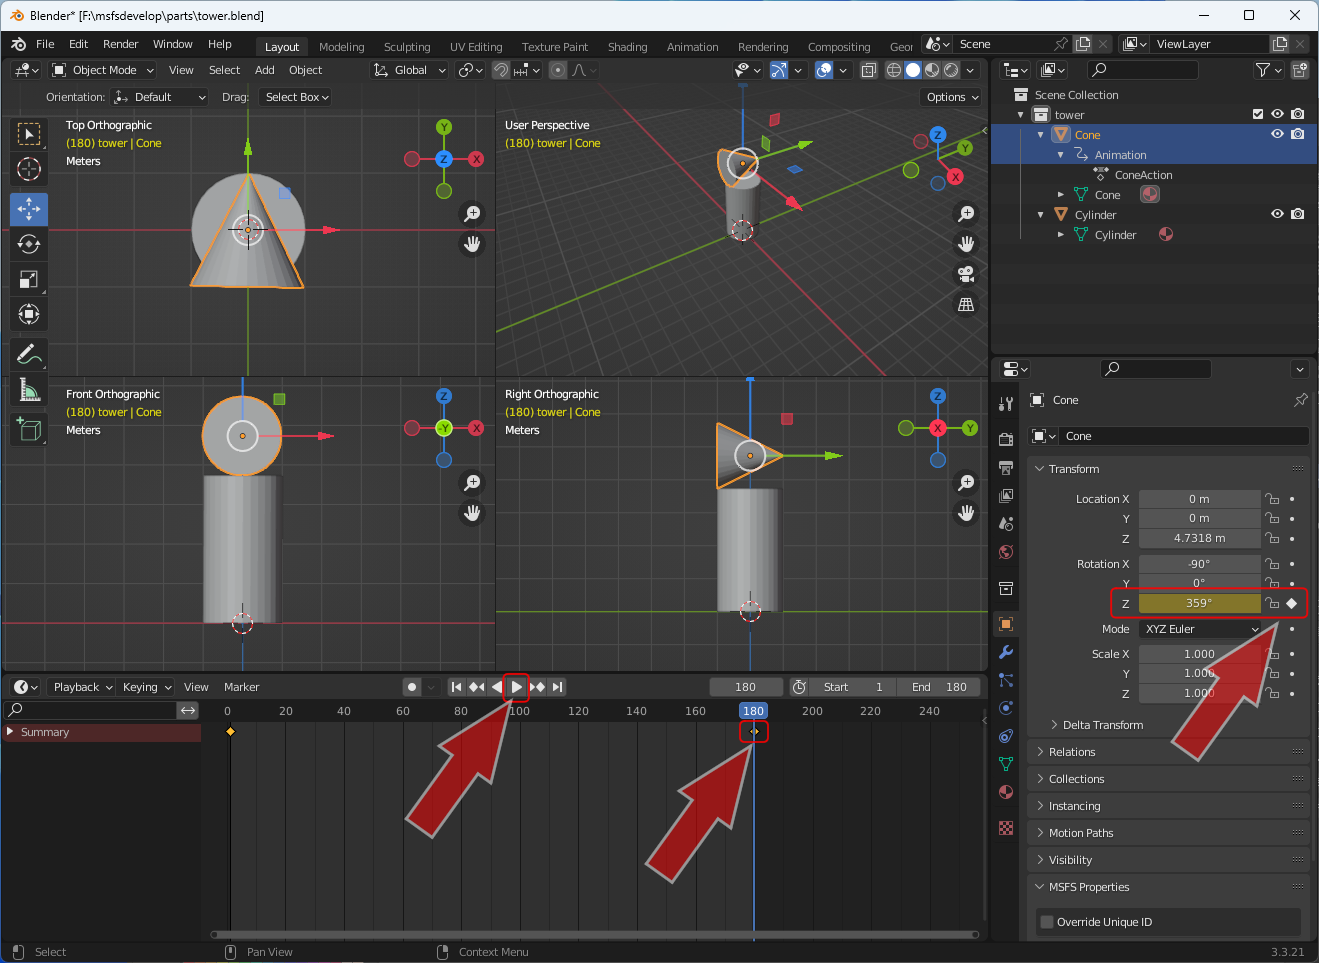 When you do this, an orange dot will appear on the 180th frame of the timeline at the bottom left of the screen, indicating that a keyframe has been set.
The color of the Z axis field under "Transform" - "Rotation" at the bottom right of the screen will also turn yellowish, and the "◇" mark on the right will change to a "◆" mark.
When you do this, an orange dot will appear on the 180th frame of the timeline at the bottom left of the screen, indicating that a keyframe has been set.
The color of the Z axis field under "Transform" - "Rotation" at the bottom right of the screen will also turn yellowish, and the "◇" mark on the right will change to a "◆" mark.
Now try clicking the [▶] button at the bottom centre of the screen. The cone parts should rotate 360 degrees approximately once every 8 seconds. You can also see the cone parts rotating by dragging the blue square left and right on the timeline at the bottom left of the screen.
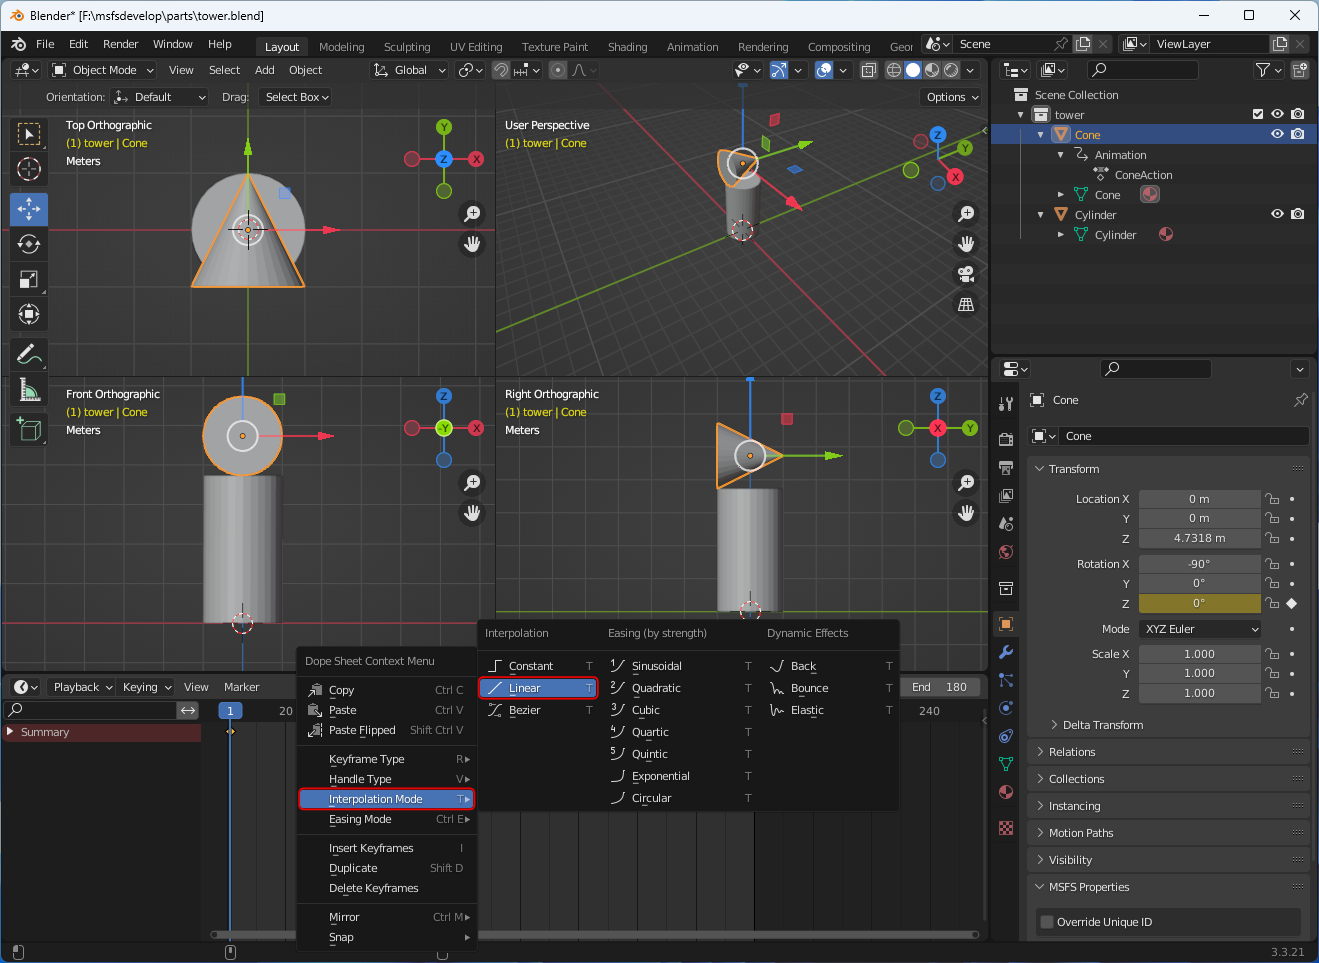 Right-click anywhere on the timeline at the bottom left of the screen and the menu shown in the figure will appear.
Select [Interpolation Mode] - [Linear].
Then click the "▶" button at the bottom centre of the screen.
It should now rotate at a constant speed from start to finish.
Right-click anywhere on the timeline at the bottom left of the screen and the menu shown in the figure will appear.
Select [Interpolation Mode] - [Linear].
Then click the "▶" button at the bottom centre of the screen.
It should now rotate at a constant speed from start to finish.
But this setting is not absolutely required. For example, animations such as opening and closing a door may be better suited to Bézier curve animations.
Setting Blender animation for MSFS
From here onwards, we will be configuring for MSFS. The task is to "add the generated actions to the NLA (NonLinear Animation) stack." However, you don't need to understand what this means :P[Technical explanation]
Converts individual actions into new NLA strips (tracks) that are placed on top of the NLA stack. You can then use the NLA Editor to edit multiple animations at the same time. The NLA stack allows you to assign and manage multiple actions to a single object.
 Click the
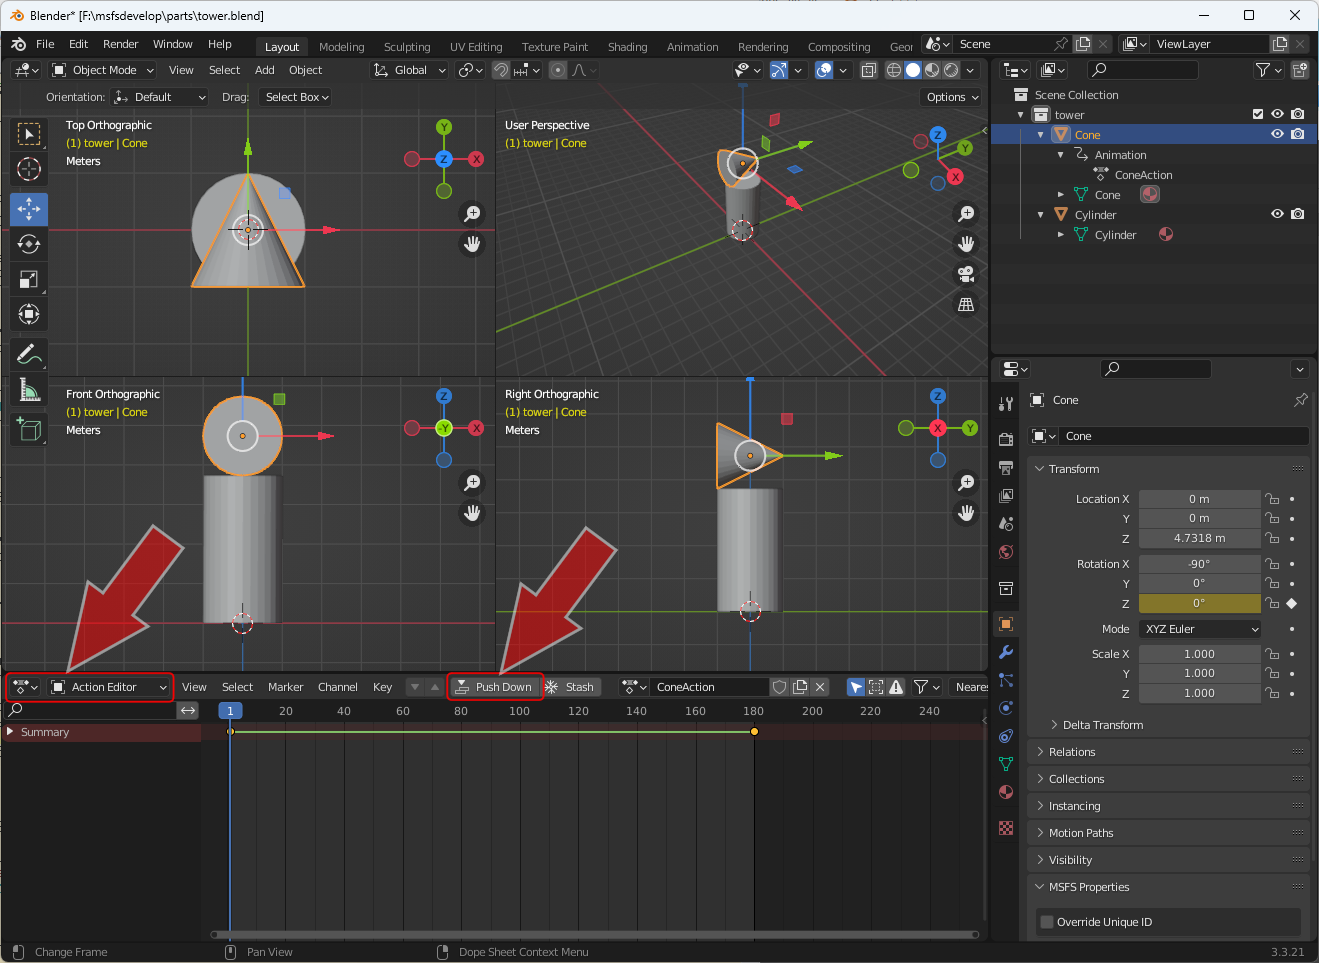 The timeline will then change as shown in the figure.
The
The timeline will then change as shown in the figure.
The
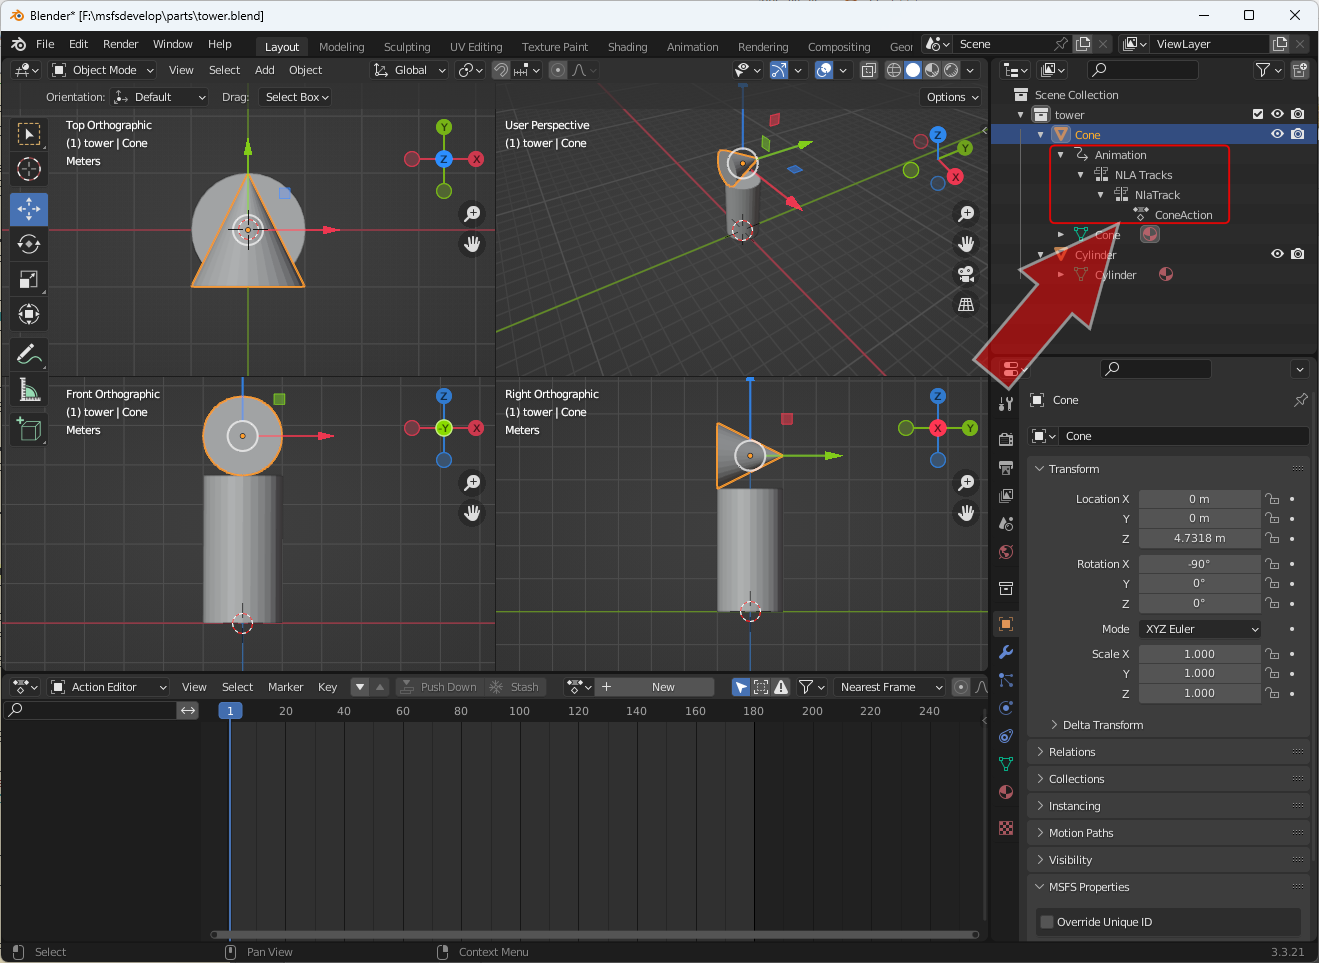 Then, "CoreAction" which was in the upper right corner of the screen will move under "NLA Tracks" - "NlaTrack".
Your animated object is now ready, export it using the plugin glTF-Blender-IO-MSFS .
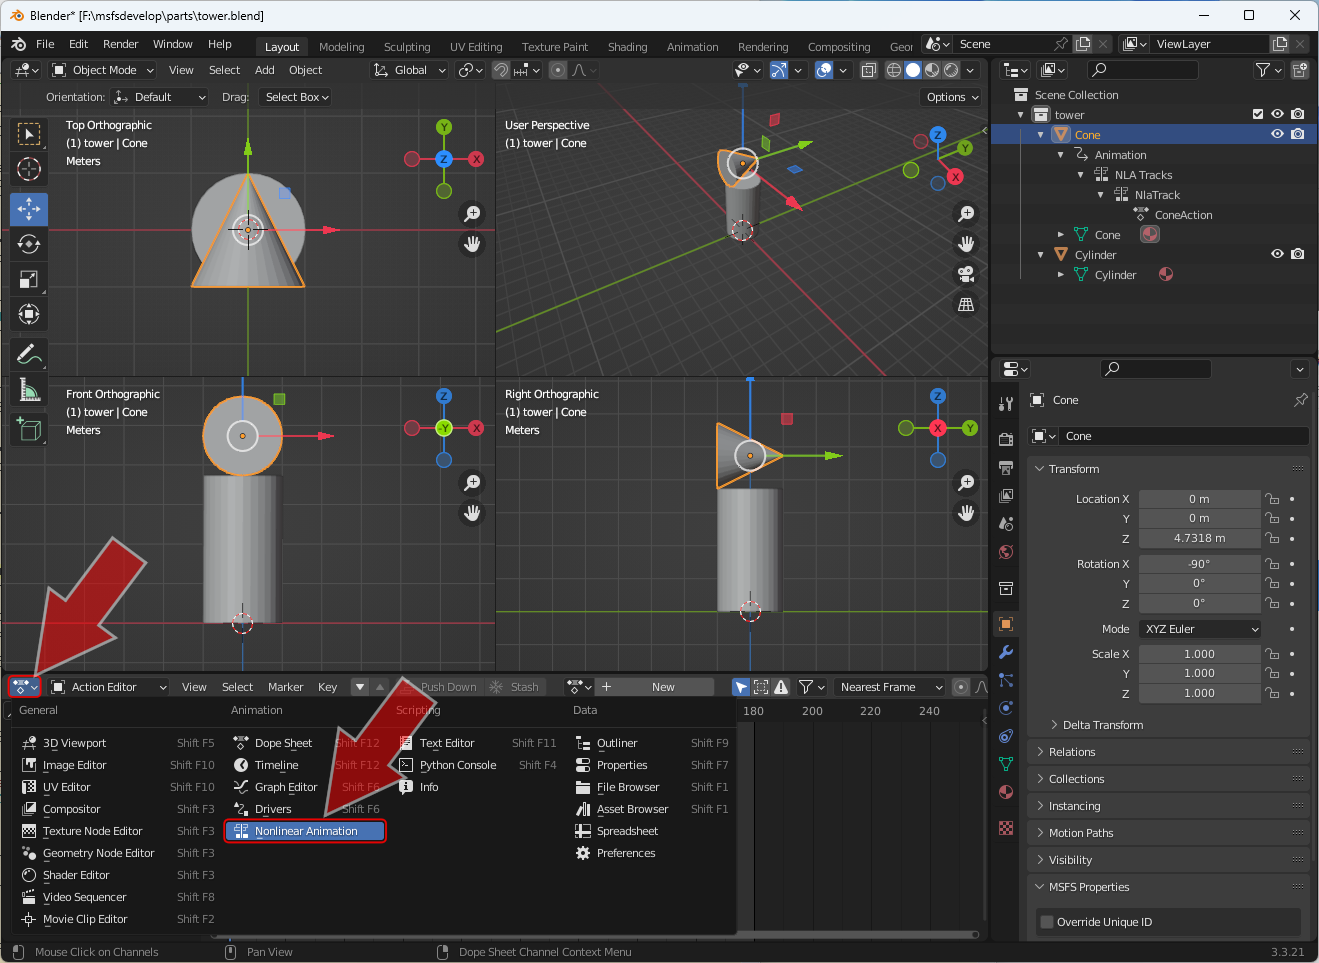 By the way, if you click on the
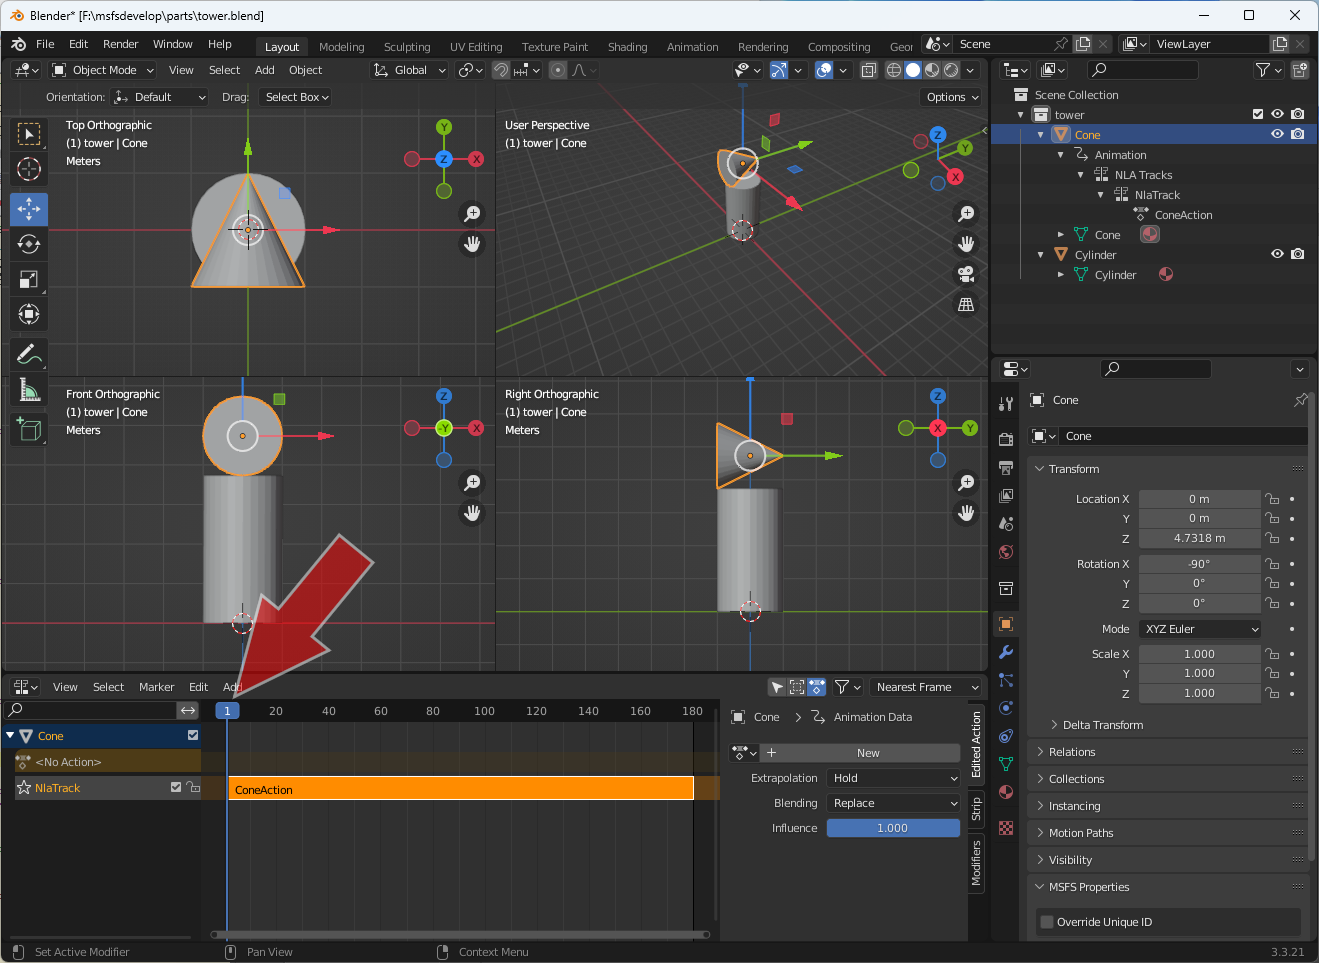 The timeline section will change to look like this (NLA Editor).
If you drag the blue square indicated by the arrow left and right, you can see how the cone parts rotate.
The timeline section will change to look like this (NLA Editor).
If you drag the blue square indicated by the arrow left and right, you can see how the cone parts rotate.
Output animation objects to glTF format files for MSFS
Use the plugin glTF-Blender-IO-MSFS to output the animation object you created to a glTF format file for MSFS. For information on how to use glTF-Blender-IO-MSFS, see the page How to use glTF-Blender-IO-MSFS to export and import 3D data between Blender and MSFS .
How to use glTF-Blender-IO-MSFS to export and import 3D data between Blender and MSFS
 Open the plugin glTF-Blender-IO-MSFS (Multi-Export glTF 2.0) screen.
In the "Object" tab, specify the objects to export. Select the collection you want to export from the collection list in the upper right of the screen. Next, click the "Reload LODs" button. Then, each mesh data in the scene will be recognized and displayed in a list. Check "Grouped by collections".
Check "Genete XML" when exporting for the first time. Uncheck "Genete XML" if you are exporting for the second or subsequent time to correct the model.
In the "Export Path" field, specify the destination folder for the .glTF file.
In the field below that, select the name of the collection to export (here, "tower").
 The "Settings" tab allows you to set the output method.
This screen will change depending on the version of Blender, even for the same glTF-Blender-IO-MSFS.
The "Settings" tab allows you to set the output method.
This screen will change depending on the version of Blender, even for the same glTF-Blender-IO-MSFS.
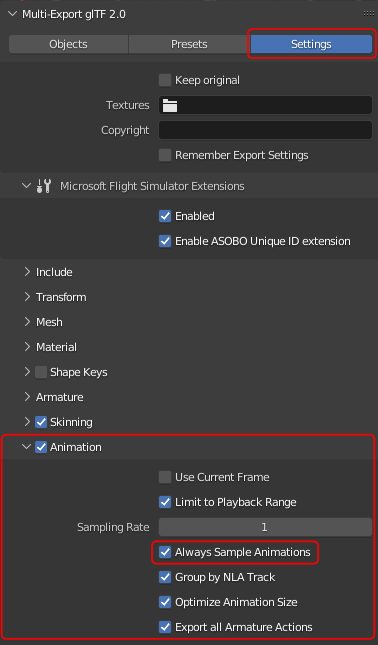
This image shows an example for Blender version 3.3.
Check the boxes in the "Animation" column as shown in this image. "Always Sample Animations" is unchecked by default. Check this box manually. If this box is not checked, animations will not work properly in-game.
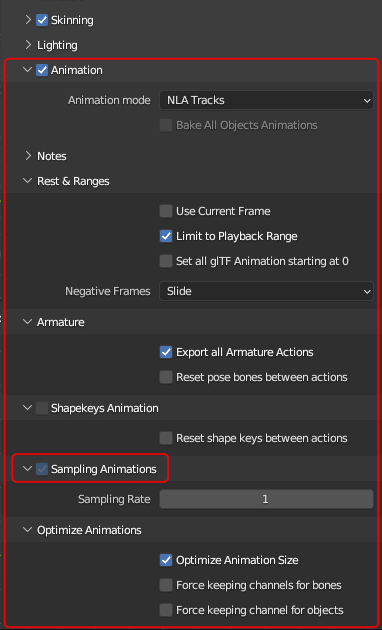 This figure is an example of the "Animation" section in Blender version 3.6.
For “Animation Mode”, select “NLA Tracks”. And check the boxes in the "Animation" column as shown in this image. "Sampling Animations" is unchecked by default. Check this box manually. If this box is not checked, animations will not work properly in-game.
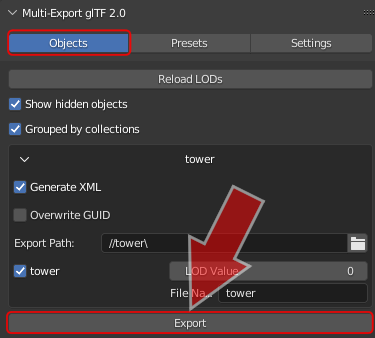 Finally, click the “Export” button in the “Object” tab.
 This will generate three files in the specified folder: ".bin", ".gltf" and ".xml".
If you have applied a texture to the model, an image file of the texture will also be output to the same folder.
Import this into your MSFS project.
This will generate three files in the specified folder: ".bin", ".gltf" and ".xml".
If you have applied a texture to the model, an image file of the texture will also be output to the same folder.
Import this into your MSFS project.
Note that even if you do not specify [Interpolation Mode]-[Linear] in Blender, "LINEAR" will be set here. In that case, the animation will generate a Bézier curve movement.
	"animations":[
		{
			"channels":[
				{
					"sampler":0,
					"target":{
						"node":1,
						"path":"rotation"
					}
				}
			],
			"name":"ConeAction",
			"samplers":[
				{
					"input":8,
					"interpolation":"LINEAR",
					"output":9
				}
			]
		}
	],
Add animation tag to object XML file
To make animations exported from Blender work in MSFS games, you need to add animation tags to the ".xml" file automatically generated by the exporter plugin. This is done only once at the beginning. If you re-export the model after making corrections, you don't need to add it again. Instead, use the xml file you added last time as is. Be careful not to overwrite this xml file when exporting.For more information on the xml files that define 3D models and animation tags, see the following page.
MODEL DEFINITIONS (MSFS SDK docs)
MODEL ANIMATION DEFINITIONS (MSFS SDK docs)
The content of the xml file automatically generated by the exporter plugin will be one of the following.
<?xml version="1.0" encoding="utf-8"?>
<ModelInfo guid="{xxxxxxxx-xxxx-xxxx-xxxx-xxxxxxxxxxxx}" version="1.1">
	<LODS>
		<LOD minSize="0" ModelFile="tower.gltf"/>
	</LODS>
</ModelInfo><?xml version="1.0" encoding="utf-8"?>
<ModelInfo guid="{xxxxxxxx-xxxx-xxxx-xxxx-xxxxxxxxxxxx}" version="1.1"/> <Animation name="ConeAction" guid="yyyyyyyy-yyyy-yyyy-yyyy-yyyyyyyyyyyy" type="Standard" typeParam="Autoplay"/>In the name="ConeAction" field, write the name of the animation action you incorporated in Blender (the NlaTrack track name).
In the guid="yyyyyyyy-yyyy-yyyy-yyyy-yyyyyyyyyyyy" field, obtain a globally unique GUID and write it there.
How to obtain a GUID
There are several tools to generate GUIDs, including the software development tool "Microsoft Visual Studio." Here we will use the Online GUID / UUID Generator , which is available for free online.
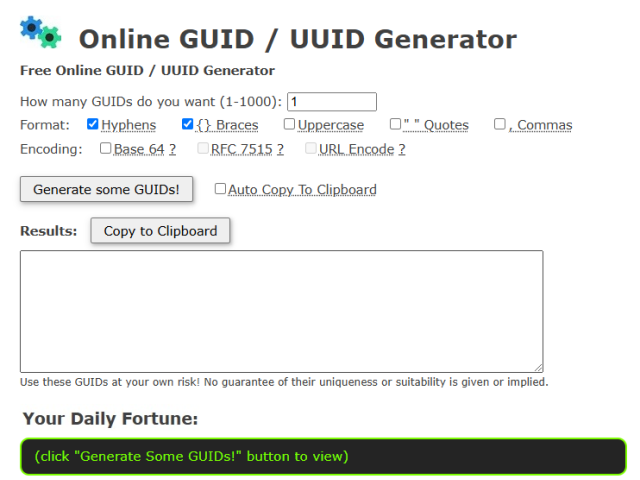 When you open the
Online GUID / UUID Generator
in your browser, you will see the following screen.
When you open the
Online GUID / UUID Generator
in your browser, you will see the following screen.
You can specify the output format in the "Format:" field. Check "Hyphens".
You can specify the encoding format in the "Encording:" field. There is no need to check anything. Then click the [Generate some GUIDs!] button.
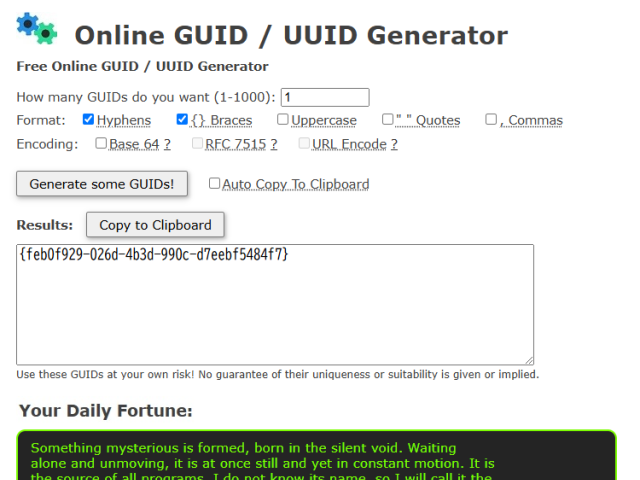 A GUID will then be generated in the "Results:" field.
Click the [Copy to Clipboard] button to copy it to the clipboard.
Embed this in the guid="yyyyyyyy-yyyy-yyyy-yyyy-yyyyyyyyyyyy" field of the animation tag.
The curly brackets around the GUID can be included or not.
A GUID will then be generated in the "Results:" field.
Click the [Copy to Clipboard] button to copy it to the clipboard.
Embed this in the guid="yyyyyyyy-yyyy-yyyy-yyyy-yyyyyyyyyyyy" field of the animation tag.
The curly brackets around the GUID can be included or not.
GUIDs (MSFS SDK docs)
Completed xml file
After adding the animation tag, the completed xml file will look like this:
<?xml version="1.0" encoding="utf-8"?>
<ModelInfo guid="{xxxxxxxx-xxxx-xxxx-xxxx-xxxxxxxxxxxx}" version="1.1">
	<LODS>
		<LOD minSize="0" ModelFile="tower.gltf"/>
	</LODS>
	<Animation name="ConeAction" guid="yyyyyyyy-yyyy-yyyy-yyyy-yyyyyyyyyyyy" type="Standard" typeParam="Autoplay"/>
</ModelInfo><?xml version="1.0" encoding="utf-8"?>
<ModelInfo guid="{xxxxxxxx-xxxx-xxxx-xxxx-xxxxxxxxxxxx}" version="1.1">
<Animation name="ConeAction" guid="yyyyyyyy-yyyy-yyyy-yyyy-yyyyyyyyyyyy" type="Standard" typeParam="Autoplay"/>
</ModelInfo>Note that if the ModelInfo line originally ended with "/>", don't forget to delete this "/".
Checking animated objects in-game

How to use glTF-Blender-IO-MSFS to export and import 3D data between Blender and MSFS
When animations don't work
If the animation doesn't work, please check the following two points:Exporter Plugin "Settings" Tab
Make sure the "Sampling Animations" or "Always Sample Animations" option is checked in the "Settings" tab of the exporter plugin.
 on the Collection screen")
animation tag in xml file
Make sure that the name of the animation action you incorporated in Blender (the NlaTrack track name) is correctly written in the "name=" field of the animation tag in the xml file. If there is a spelling mistake here, the animation will not work.
When you delete an animation (Clear Animation Data) and reset it in Blender, a sequence number such as ".001" is added to the end of the action's name. In this case, rename the action (remove the sequence number) in the Collection screen before adding it to the NLA stack. Or modify the animation tag in the xml file.