
How to create a project for MSFS SDK/Create a project for Google Earth Decoder
Users can use the MSFS SDK to create add-on content for Microsoft Flight Simulator. This is stored in a folder structure called "projects" defined by the SDK.Here we will explain the MSFS SDK project and how to create a project for Google Earth Decoder (a tool that converts Google Earth 3D maps to MSFS).
このページを日本語で見る
Contents
Installation of various development tools
To create add-on content for Microsoft Flight Simulator, first install various tools on your computer. Please refer to the page below.
How to download and install MSFS SDK, Blender, plugin
Projects, packages and asset groups
You can create multiple "packages" in an MSFS SDK "project". Each "package" can include multiple "asset groups".A "package" is a unit distributed as an add-on. Add-ons such as scenery, aircraft, and airports distributed on sites such as flightsim.to are compressed versions of this "package" folder.
The "asset group" is a component that is included in a package. Types of "asset groups" include ModelLib, ArtProj, BGL, Mission, SimObject, etc. You can read more about these asset groups on the ASSET TYPES page of the MSFS SDK docs.
If you save the "Package" folder in the "Community" folder in the MSFS data storage folder, it will be loaded (installed) into the game. Add-on "Package"s downloaded and purchased from the in-game marketplace are saved in the "Official" folder in the MSFS data storage folder.
USING THE SDK (MSFS SDK docs)
ASSET TYPES (MSFS SDK docs)
Project structure
Inside each project folder, the following folders are generated:| Folder | Description |
|---|---|
| _PackageInt | As development progresses, information such as the history of changes made to the package and various parameters will be recorded. Generated by SDK. |
| PackageDefinitions | Contains information about the internal structure of a package, such as information about asset groups included in the package. Generated by SDK. |
| Packages | This is where the finished package is stored. This content can be distributed to other users as an add-on. It is generated by the SDK by performing an operation called build. |
| PackagesMetadata | (??) |
| PackageSources | Saves the original data (asset group) that makes up the package, such as the 3D model of the scenery. Prepared by the developer. |
| [Project name].xml | Contains basic information about the project. Specify this file when opening your project with MSFS SDK. Generated by SDK. |
USING THE SDK (MSFS SDK docs)
Package naming conventions
The MSFS SDK has strict package naming conventions. If you want to widely distribute your add-on to other users, you should name it according to this naming convention. Additionally, the package name must be within 128 alphanumeric characters.| Basic rules | developer - type ( - subtype ) - name-of-asset ( - variation-of-named-asset ) ( - subcontent ) |
|---|
"Type" is a word that indicates the type of add-on, and is determined as shown in the table below.
Follow this with a descriptive name for the add-on.
| Package Type | Naming conventions |
|---|---|
| Airports | <company>-airport-<ICAO>-<airport_name> |
| Aircraft | <company>-aircraft-<aircraft_name> |
| Aircraft paint (Aircraft Liveries) | <company>-aircraft-<aircraft_name>-livery-<livery_name> |
| Landing Challenges | <company>-landingchalenge-<ICAO>-<name> |
| Discovery mission | <company>-discovery-<name> |
| Bush trip | <company>-bushtrip-<name> |
| Model library | <company>-modellib-<name> |
| Moving object (SimObjects) | <company>-simobjects-<type> |
| Scenery | <company>-scenery-<name> |
For example, if developer name "someone" wants to distribute a scenery named "tokyo", the package must be named "someone-scenery-tokyo".
You can read more about naming conventions on the THE PROJECT EDITOR page of the MSFS SDK docs.
THE PROJECT EDITOR (MSFS SDK docs)
Create a project with MSFS SDK
As an example, we will introduce the steps to create a scenery project for Google Earth Decoder (a tool that converts Google Earth 3D maps to MSFS). There are two ways to create this: one using the MSFS SDK and the other using the Blender plugin. First, we will show you how to create one using the MSFS SDK.Determining the package name
Here, let's assume that the developer name is "someone" and the scenery name is "tokyo". Then, according to the naming convention shown above, the package name will be "someone-scenery-tokyo".
Create a project
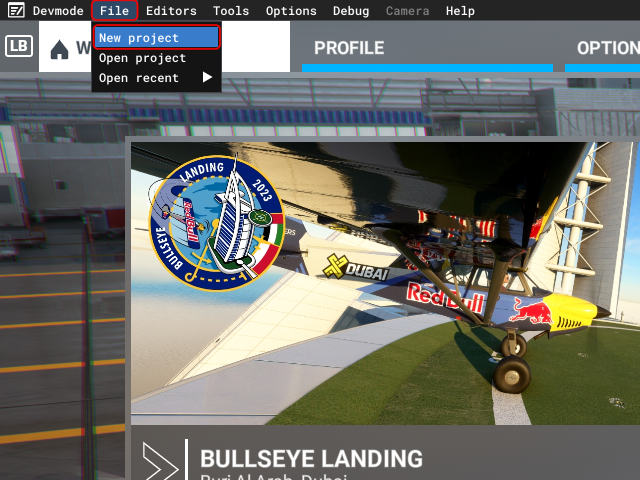 Start MSFS and select [File]-[New project] from the developer menu.
 A window like this will open.
In the Projects Folder field, specify the folder in which to save the project. Since large amounts of data will be read and written many times, we recommend using a large-capacity hard disk rather than an SSD.
In the Project Name field, specify the project name without the developer name part. In this example, it will be "scenery-tokyo".
In the Default creator name field, enter the developer's name. Specify your name, pen name, etc. In this example, it will be "someone".
In the Default company name field, enter the production company name. If you are an individual developer, it should be the same as the Default creator name field. In this example, it will be "someone".
Then click the [Create new project] button at the bottom right of the screen. Then, a project folder named "scenery-tokyo" will be created under the folder specified in the Projects Folder field.
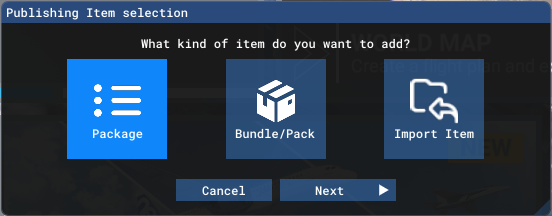 Next, a wizard screen like this will open.
Since we are creating a package this time, click the [Package] button on the far left of the screen.
Then click [Next] at the bottom right of the screen.
Next, a wizard screen like this will open.
Since we are creating a package this time, click the [Package] button on the far left of the screen.
Then click [Next] at the bottom right of the screen.
When creating Packs (distributing multiple created packages as a set) or Bundles (selling packages that have already been published on the marketplace as a set), select [Bundle/Pack]. In this case, one project will contain multiple packages.
Also, when creating Packs or Bundles as a new project, you can add existing packages to the new project. In this case, select [Import Item].
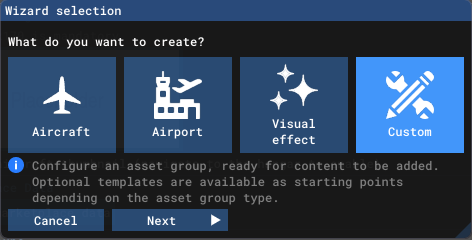
 Next, you will see a screen like this.
Click [Aircraft] to create an aircraft, [Airport] to create an airport, and [Visual effect] to create visual effects such as flames, smoke, etc.
If you want to create other types of add-ons, such as scenery, click the [Custom] button on the far right of the screen.
Next, you will see a screen like this.
Click [Aircraft] to create an aircraft, [Airport] to create an airport, and [Visual effect] to create visual effects such as flames, smoke, etc.
If you want to create other types of add-ons, such as scenery, click the [Custom] button on the far right of the screen.
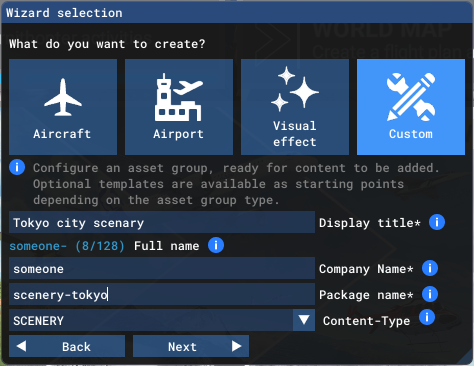
When you click [Custom], the following items will appear below it.
in the Display title field, specify the display name for this package. This will be displayed as the title when distributed on marketplaces, etc.
In the Company name field, enter the production company name. If you are an individual developer, specify your name, pen name, etc.
In the Package name field, specify the package name "scenery-tokyo" determined according to the naming rules.
In the Content-Type field's drop-down list, specify the package type. This time, specify "SCENARY".
Then click [Next] at the bottom right of the screen.
 Next, you will be taken to the asset group specification screen.
A package requires at least one asset group.
First, create a "BGL" type asset group that will store the most basic information.
Next, you will be taken to the asset group specification screen.
A package requires at least one asset group.
First, create a "BGL" type asset group that will store the most basic information.
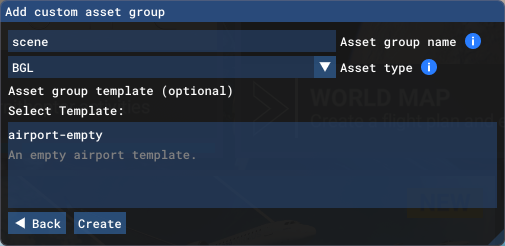
In the Asset group name field, specify the name of the asset group. When using Google Earth Decoder, a BGL asset group called "scene" is generated. This time, we will input "scene" accordingly.
In the Asset type field, specify the type of asset group. Here, select "BGL".
Then click [Create] at the bottom of the screen.
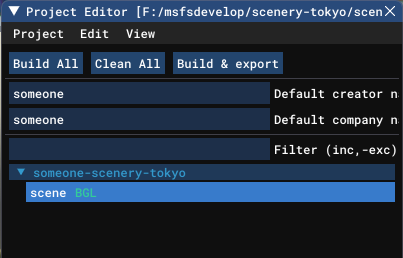
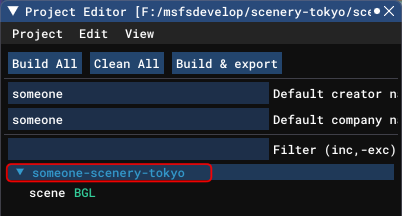
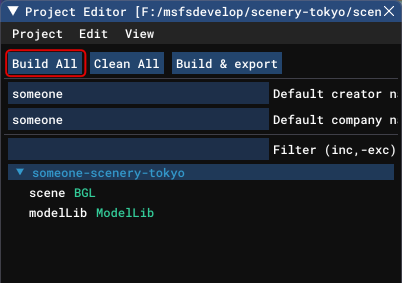
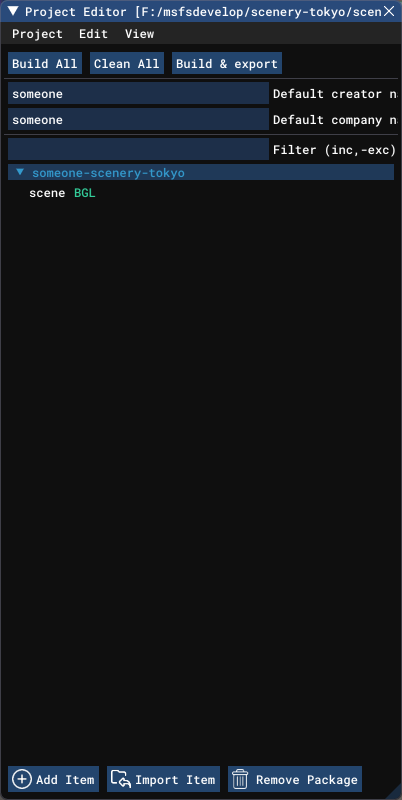 "Project Editor" is displayed on the MSFS screen.
Inside you will see a list of package names included in this project in blue text.
In the example shown, only one package called "someone-scenery-tokyo" is included.
"Project Editor" is displayed on the MSFS screen.
Inside you will see a list of package names included in this project in blue text.
In the example shown, only one package called "someone-scenery-tokyo" is included.
Click on the package name to see a list of the asset groups it contains. The example shown contains only one asset group of type "BGL" named "scene".
You can add new packages by using the [Add Item] button at the bottom of this screen. You can also add existing packages (Bundle/Pack) using the [Import Item] button.
 Up to this point, you have completed creating a scenery project for Google Earth Decoder.
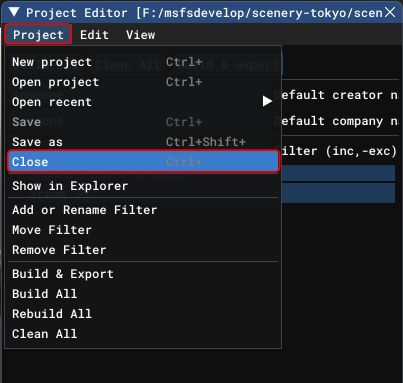
Select [Project]-[Save] in the Project Editor to save the project, select [Project]-[Close] to close the project, and exit MSFS.
Up to this point, you have completed creating a scenery project for Google Earth Decoder.
Select [Project]-[Save] in the Project Editor to save the project, select [Project]-[Close] to close the project, and exit MSFS.
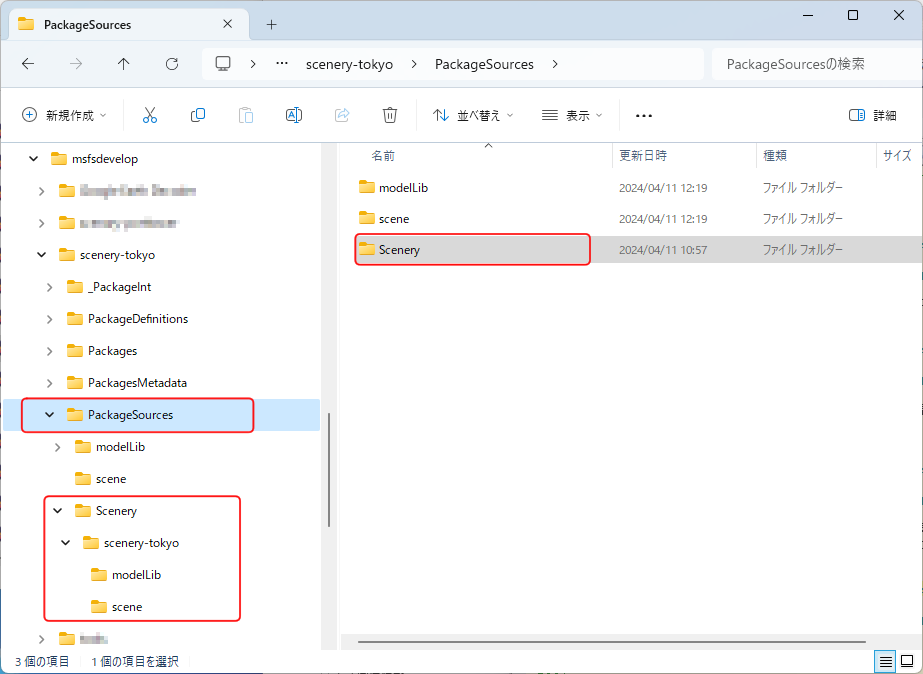
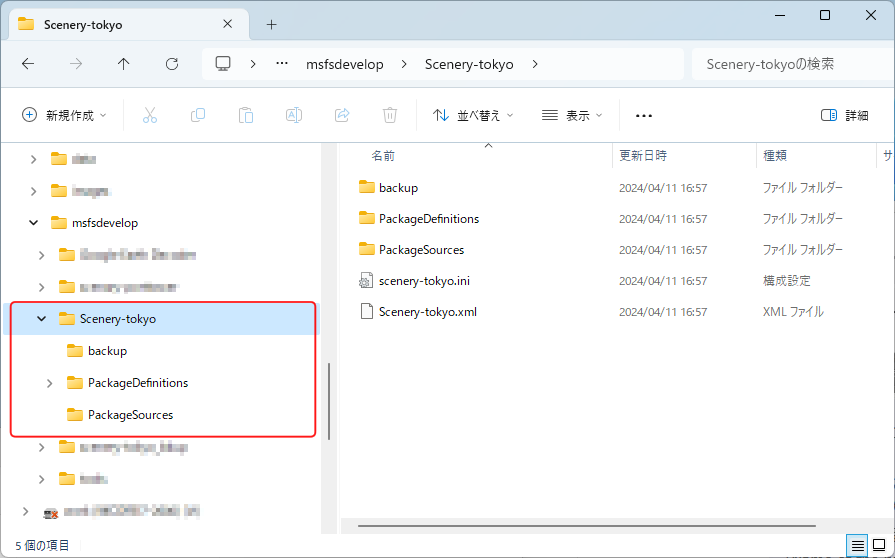
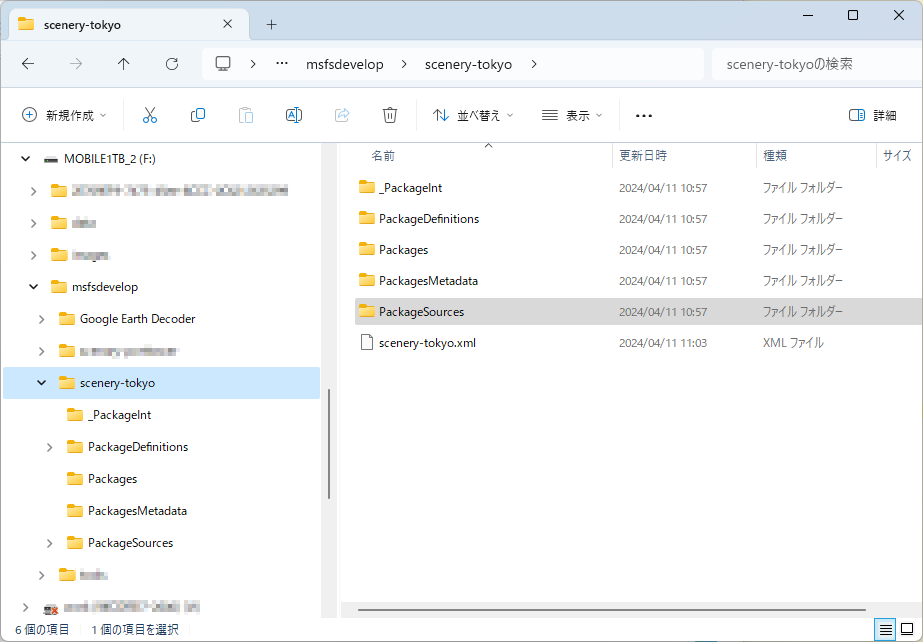 Folders like these will be generated under the project storage folder.
Specify the "PackageSources" folder inside this as the output destination for Google Earth Decoder.
Folders like these will be generated under the project storage folder.
Specify the "PackageSources" folder inside this as the output destination for Google Earth Decoder.
Settings after using Google Earth Decoder
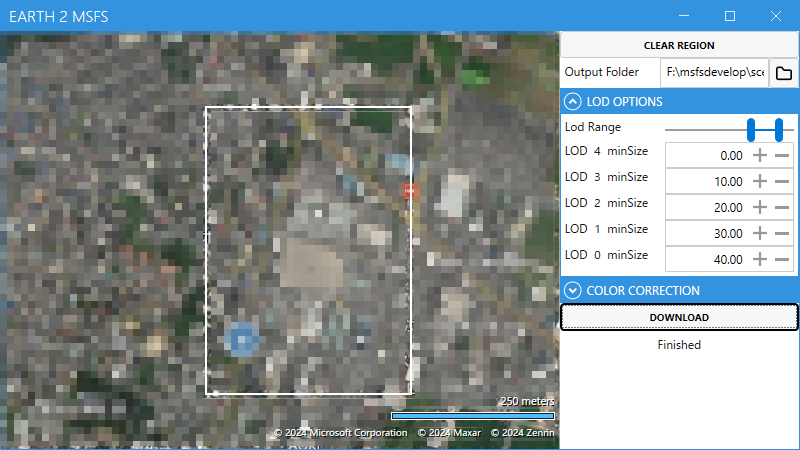 Start Google Earth Decoder and download the map data.
Please see below for instructions on how to install Google Earth Decoder.
How to download and install MSFS SDK, Blender, plugin
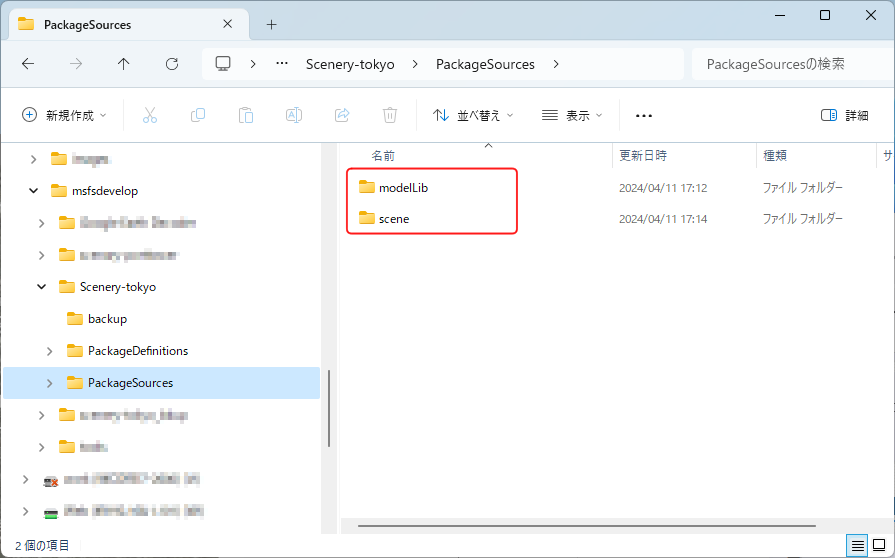
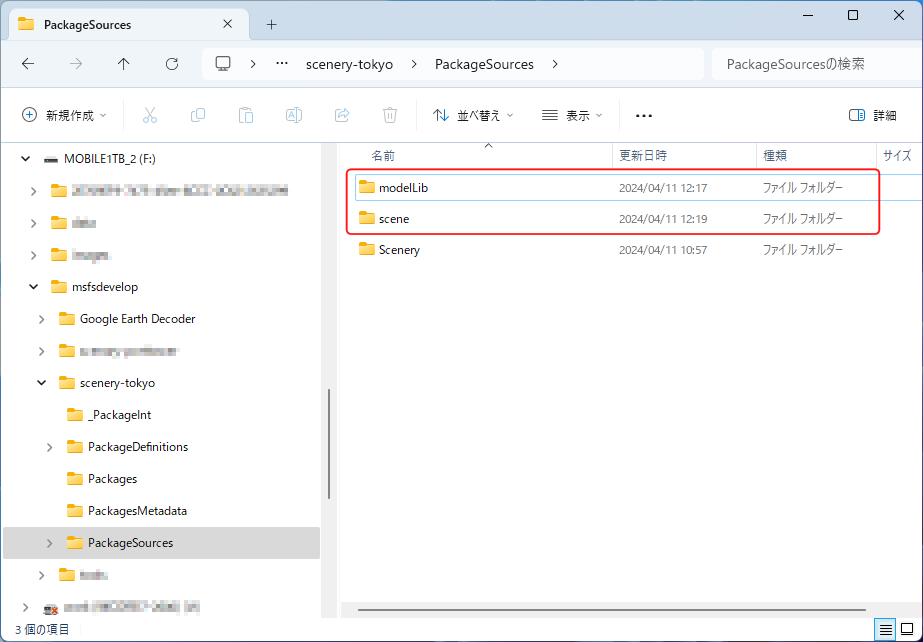 Then, two asset groups called "modelLib" and "scene" will be generated under the "PackageSources" folder.
Add these to your project.
Then, two asset groups called "modelLib" and "scene" will be generated under the "PackageSources" folder.
Add these to your project.
The folder called "Scenery" that you can see in this figure was automatically generated by the SDK when you added the BGL asset group to the project using the SDK.
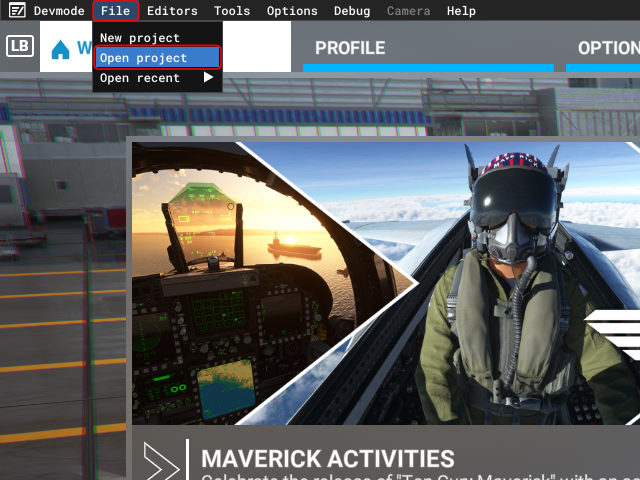 Start MSFS and select [File]-[Open project] from the developer menu.
Alternatively, you can select [Open resent] below to select from a list of recently opened projects.
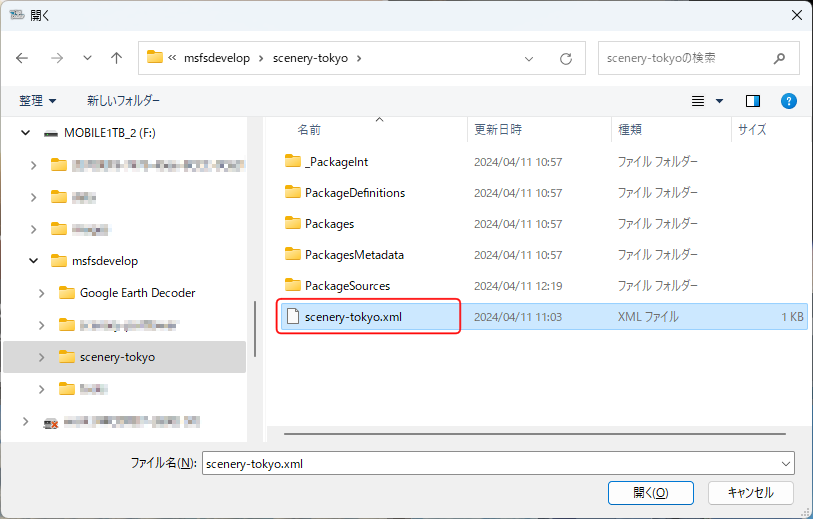 A file selection dialog box will then appear, so select the "[package name].xml" file located directly under the project folder.
Note that if you create multiple packages in one project, multiple "[package name].xml" files will be generated here.
 The project will be loaded and the "Project Editor" will be displayed.
Click on the package name in blue text ("someone-scenery-tokyo") to display a list of asset groups.
Then select the "BGL" asset group named "scene" that was added when creating a new project.
The project will be loaded and the "Project Editor" will be displayed.
Click on the package name in blue text ("someone-scenery-tokyo") to display a list of asset groups.
Then select the "BGL" asset group named "scene" that was added when creating a new project.
 Change the settings of the asset group "scene".
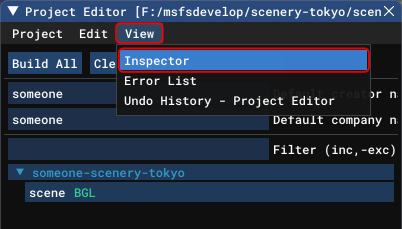
Select [View]-[Inspector] from the Project Editor menu.
Change the settings of the asset group "scene".
Select [View]-[Inspector] from the Project Editor menu.
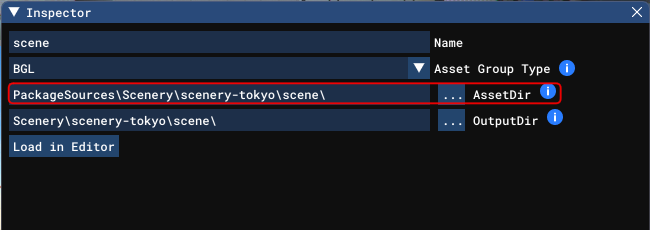 The Inspector will then open and display detailed information for the asset group "scene".
The source folder (AssetDir field) is a folder automatically generated by the SDK, so change it to the "scene" folder generated by Google Earth Decoder.
The Inspector will then open and display detailed information for the asset group "scene".
The source folder (AssetDir field) is a folder automatically generated by the SDK, so change it to the "scene" folder generated by Google Earth Decoder.
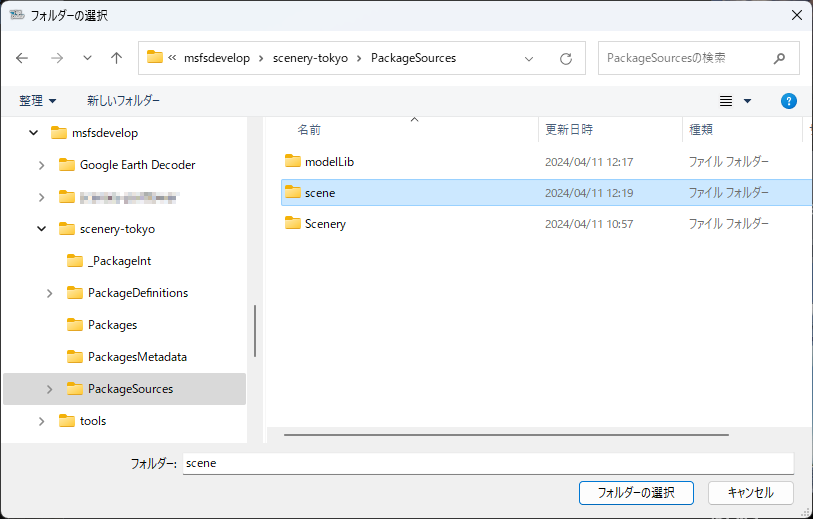 Click [...] to the left of where it says "AssetDir" to display the folder selection dialog screen.
Select the "scene" generated by Google Earth Decoder located directly under the "PackageSources" folder.
Click [...] to the left of where it says "AssetDir" to display the folder selection dialog screen.
Select the "scene" generated by Google Earth Decoder located directly under the "PackageSources" folder.
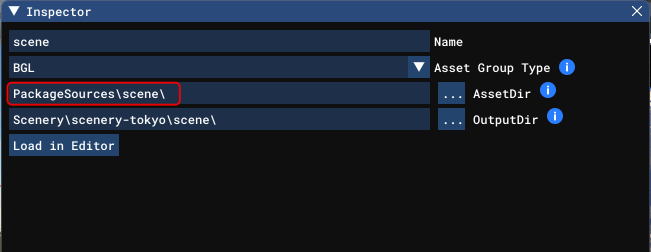 Set it like this.
No particular changes are required for "OutputDir". Modify as desired to suit your packaging design. In the commonly distributed scenery add-on generated from Google Earth, "scenery/world/scenery" is often specified here.
 Next, add "modelLib" where the 3D map data is saved to the project.
On the Project Editor screen, click the blue package name ("someone-scenery-tokyo").
Next, add "modelLib" where the 3D map data is saved to the project.
On the Project Editor screen, click the blue package name ("someone-scenery-tokyo").
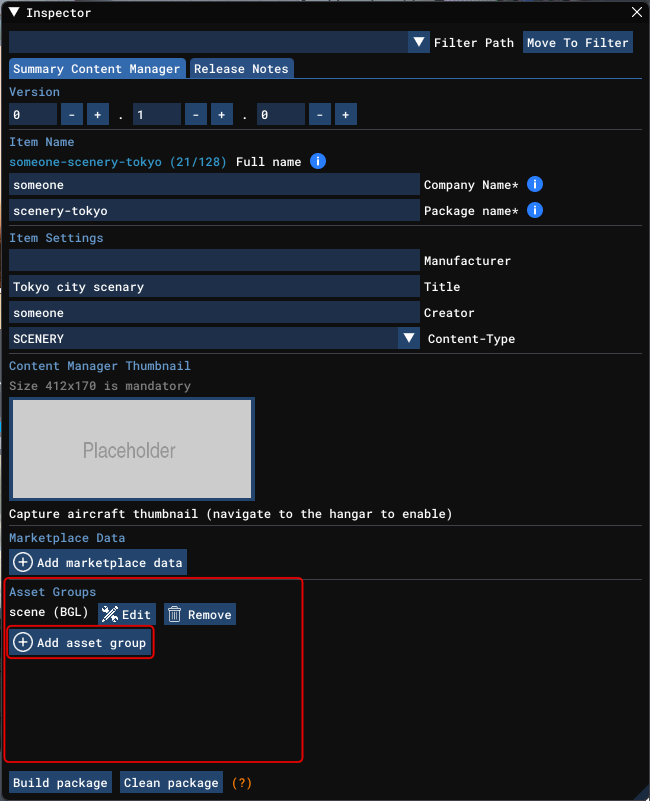 The Inspector screen will then switch to the entire package information.
Click the [Add asset group] button in the asset group list at the bottom of the screen.
The Inspector screen will then switch to the entire package information.
Click the [Add asset group] button in the asset group list at the bottom of the screen.
If you have closed the Inspector, select [View] - [Inspector] on the Project Editor screen.
 Select [Custom] as the type of asset group to add.
Then click [Next] at the bottom of the screen.
Select [Custom] as the type of asset group to add.
Then click [Next] at the bottom of the screen.
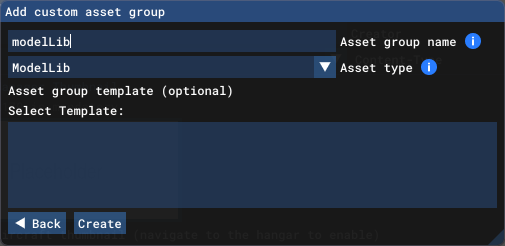 Next, enter the information for the asset group to be added.
In the Asset group name field, specify the name of the asset group. When using Google Earth Decoder, a ModelLib asset group called "modelLib" is generated. This time, we will input "modelLib" accordingly.
In the Asset type field, specify the type of asset group. Here, select "ModelLib". Then click [Create] at the bottom of the screen.
Then click [Create] at the bottom of the screen.
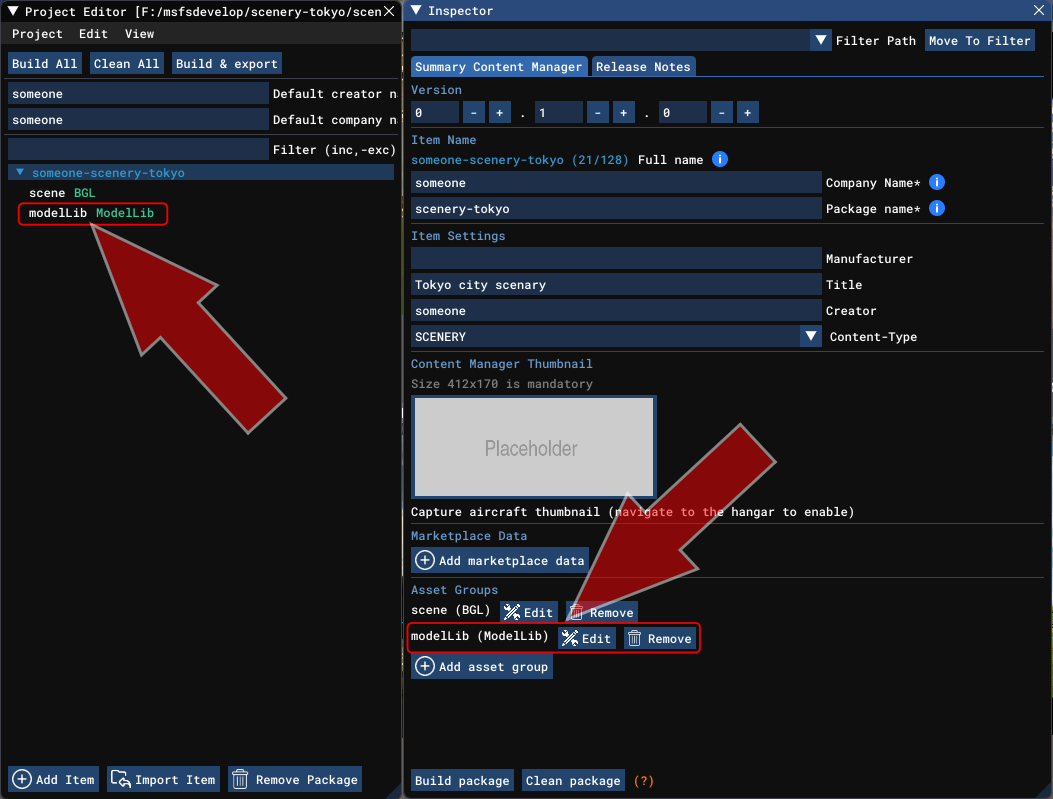 A "ModelLib" asset group named "modelLib" is then added to the package.
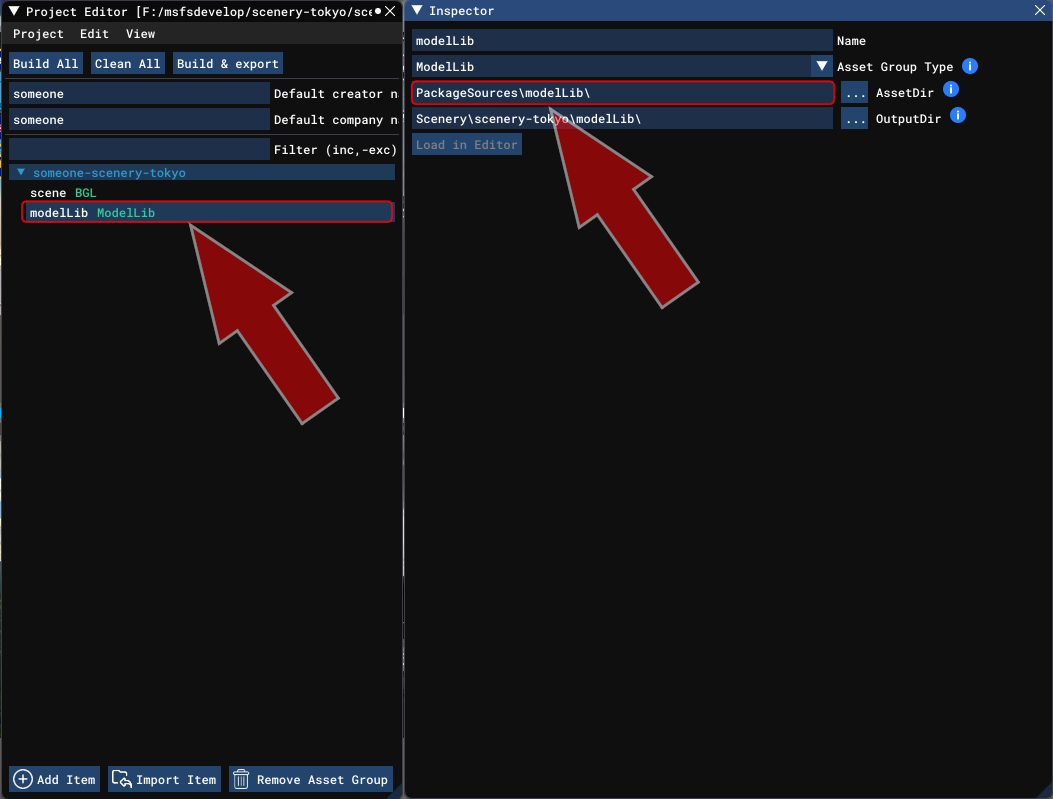 Change the settings of the asset group "modelLib".
In the same way as when changing the "scene BGL" settings, click "modelLib" on the Project Editor screen and change the source folder (AssetDir) on the Inspector screen.
Change the settings of the asset group "modelLib".
In the same way as when changing the "scene BGL" settings, click "modelLib" on the Project Editor screen and change the source folder (AssetDir) on the Inspector screen.
No particular changes are required for "OutputDir". Modify as desired to suit your packaging design. In the commonly distributed scenery add-on generated from Google Earth, "scenery/global/scenery" is often specified here.
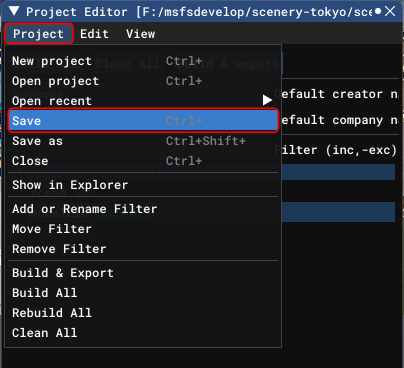 At this point, you have completed creating a project for Google Earth Decoder.
Select [Project]-[Save] on the Project Editor screen to save the project.
Next, let's move on to
building the project
.
At this point, you have completed creating a project for Google Earth Decoder.
Select [Project]-[Save] on the Project Editor screen to save the project.
Next, let's move on to
building the project
.
Build the project
 The "Scenery" folder under the PackageSources folder is an asset group folder automatically generated by the MSFS SDK.
If you use an asset group generated with Google Earth Decoder, this folder will not be used, so delete it.
The "Scenery" folder under the PackageSources folder is an asset group folder automatically generated by the MSFS SDK.
If you use an asset group generated with Google Earth Decoder, this folder will not be used, so delete it.
Create a project with Blender plugins
Here, we will explain how to create a scenery project for Google Earth Decoder using the Blender plug-in "Google Earth Decoder Optimization Tools".Installing plugins
Please see below for instructions on how to install "Google Earth Decoder Optimization Tools".
How to download and install MSFS SDK, Blender, plugin
Determining the package name
Here, let's assume that the developer name is "someone" and the scenery name is "tokyo". Then, according to the naming convention shown above, the package name will be "someone-scenery-tokyo".
Create a project
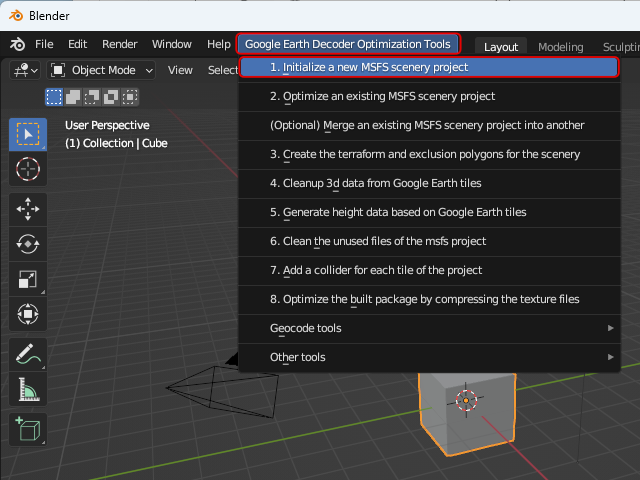 Start Blender and select [Google Earth Decoder Optimization Tools]-[1. Initialize a new MSFS scenery project] from the menu.
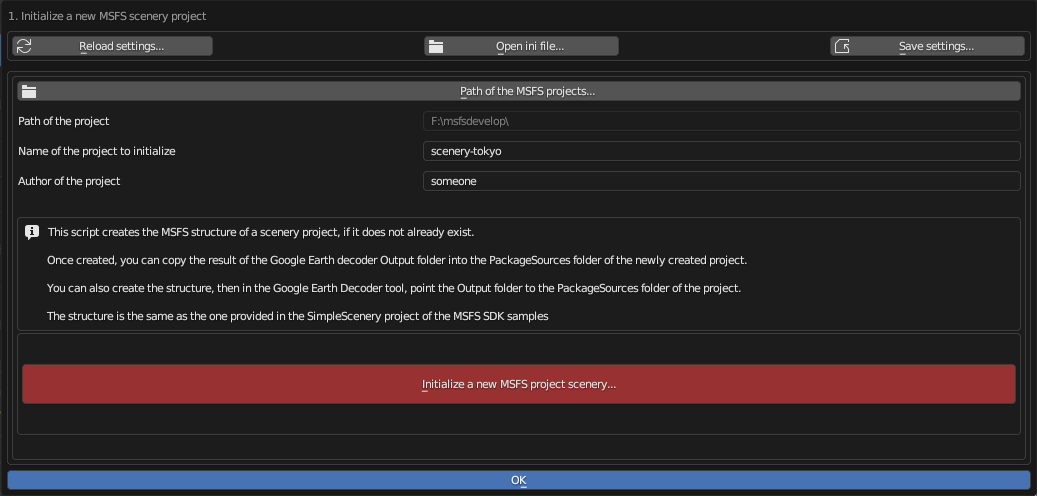 A dialog box like this will then appear.
Click on the area labeled Path of the MSFS projects... in the top center of the screen to open the folder selection screen. Specify where to save the project.
In the Name of the project to initialize field, specify the package name determined according to the naming rules (in this example, "scenery-tokyo").
In the Author of the project field, specify your name/pen name (in this example, "someone").
Click the red "Initialize a new MSFS project scenery..." button and a new project folder will be generated.
Note that when opening an existing project, press the blue [OK] button.
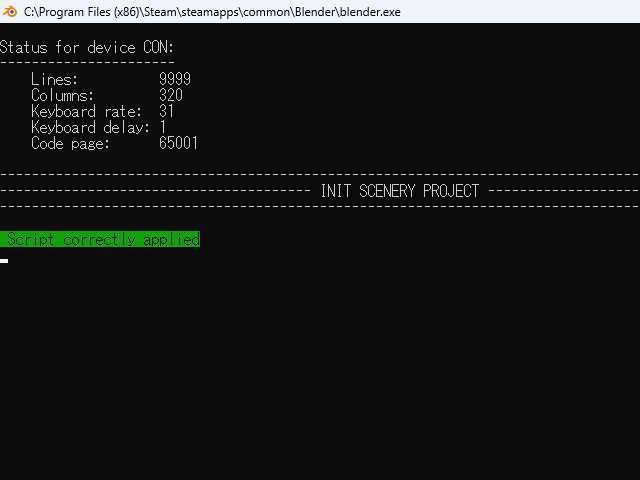 Then a screen like this will appear.
After a few seconds, "Script correctly applied" will be displayed.
Then a screen like this will appear.
After a few seconds, "Script correctly applied" will be displayed.
 A project folder has been generated in the specified folder.
You can close Blender.
A project folder has been generated in the specified folder.
You can close Blender.
Specify the "PackageSources" folder inside this as the output destination for Google Earth Decoder.
Settings after using Google Earth Decoder
Start Google Earth Decoder and download the map data.
Please see below for instructions on how to install Google Earth Decoder.
How to download and install MSFS SDK, Blender, plugin
 Then, two asset groups called "modelLib" and "scene" will be generated under the "PackageSources" folder.
These are added by the plugin to the generated project's configuration file.
Then, two asset groups called "modelLib" and "scene" will be generated under the "PackageSources" folder.
These are added by the plugin to the generated project's configuration file.
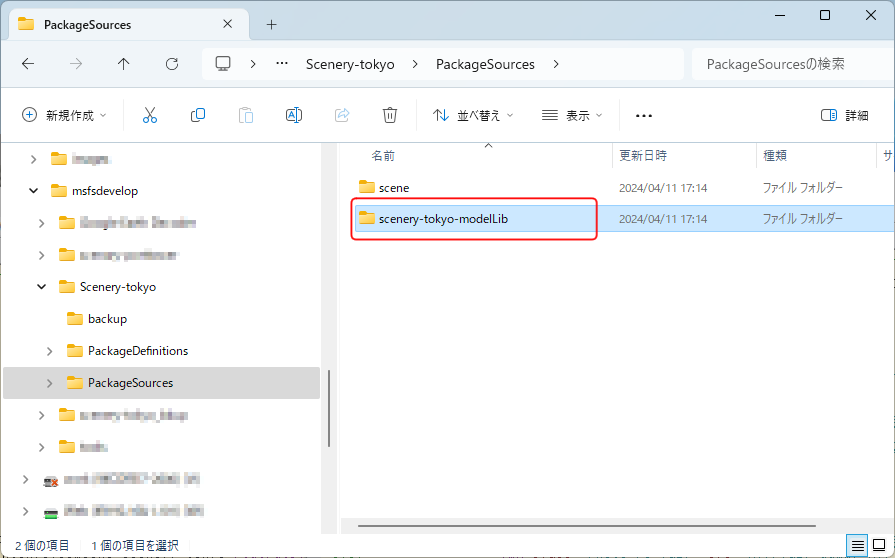 However, the name of the ModelLib asset group of the project generated by the plugin is defined as "[package name]-modelLib".
Rename the generated "modelLib" folder accordingly.
Alternatively, you can rename the ModelLib asset group to "modelLib" in the SDK's Inspector.
Names of the asset groups included in the package is written in "[Package name (in this example, "someone-scenery-tokyo")].xml" under the "PackageDefinitions" folder.
Instead of using the SDK, you can edit this file directly with a text editor.
At this point, you have completed creating a project for Google Earth Decoder.
Select [Project]-[Save] on the Project Editor screen to save the project.
Next, let's move on to
building the project
.
However, the name of the ModelLib asset group of the project generated by the plugin is defined as "[package name]-modelLib".
Rename the generated "modelLib" folder accordingly.
Alternatively, you can rename the ModelLib asset group to "modelLib" in the SDK's Inspector.
Names of the asset groups included in the package is written in "[Package name (in this example, "someone-scenery-tokyo")].xml" under the "PackageDefinitions" folder.
Instead of using the SDK, you can edit this file directly with a text editor.
At this point, you have completed creating a project for Google Earth Decoder.
Select [Project]-[Save] on the Project Editor screen to save the project.
Next, let's move on to
building the project
.
Build the project
Build the project
 Select [File]-[Open project] from the developer menu and select the "[package name].xml" file directly under the project folder.
The project will then be loaded into the SDK.
Select [File]-[Open project] from the developer menu and select the "[package name].xml" file directly under the project folder.
The project will then be loaded into the SDK.
When building for the first time, it is necessary to save the project beforehand. Click [Project]-[Save] on the Project Editor screen.
Next, click the [Build All] button on the Project Editor screen to start the build.
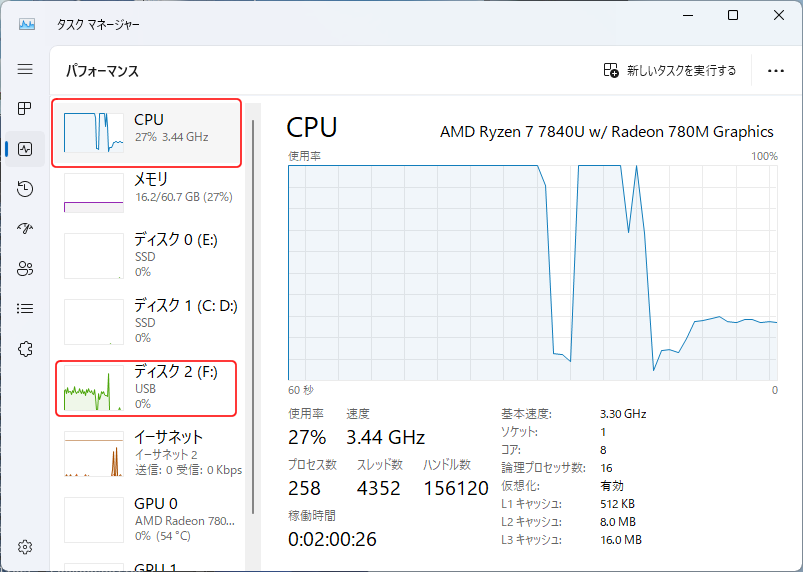 You can check the build status in Windows Task Manager.
During the build, the CPU usage is stuck at 100%, and the usage of the disk where the project was created also increases.
You can check the build status in Windows Task Manager.
During the build, the CPU usage is stuck at 100%, and the usage of the disk where the project was created also increases.
The build time will vary depending on the size of the area cropped from Google Earth and the LOD level.
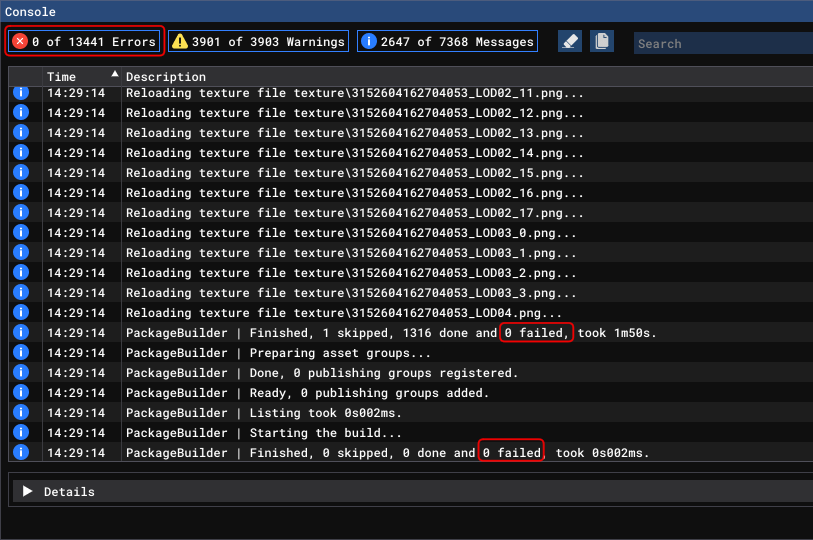 When the build is finished, the SDK Console screen will open and the results will be displayed.
If Errors at the top left of the screen is not 0, scroll up the screen, check the error details, and take action.
When the build is finished, the SDK Console screen will open and the results will be displayed.
If Errors at the top left of the screen is not 0, scroll up the screen, check the error details, and take action.
Most of the errors that occur here are mismatches between the storage path/folder name of the asset group as recognized by the SDK and the actual storage path/folder name. Open "[package name].xml" stored in the PackageDefinitions folder with a text editor, etc., and check that the contents of the "<AssetDir>" tag match the actual storage path/folder name.
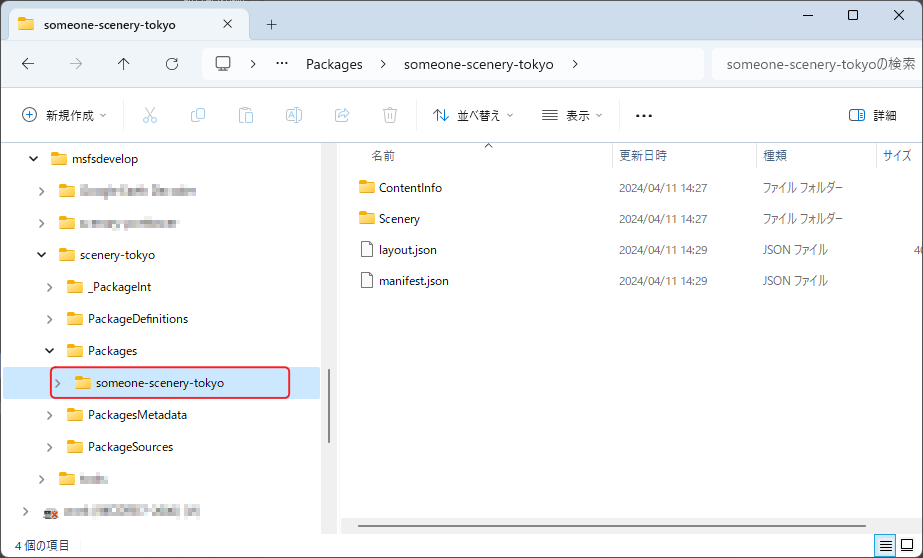 If the build is successful, a folder with the package name "someone-scenery-tokyo" will be created under the Packages folder.
Copy this to the "Community" folder in the MSFS data storage folder and it will be installed on your MSFS.
When distributing the package, compress this folder and upload it to a distribution site, etc.
If the build is successful, a folder with the package name "someone-scenery-tokyo" will be created under the Packages folder.
Copy this to the "Community" folder in the MSFS data storage folder and it will be installed on your MSFS.
When distributing the package, compress this folder and upload it to a distribution site, etc.
Check the project build result on the game screen
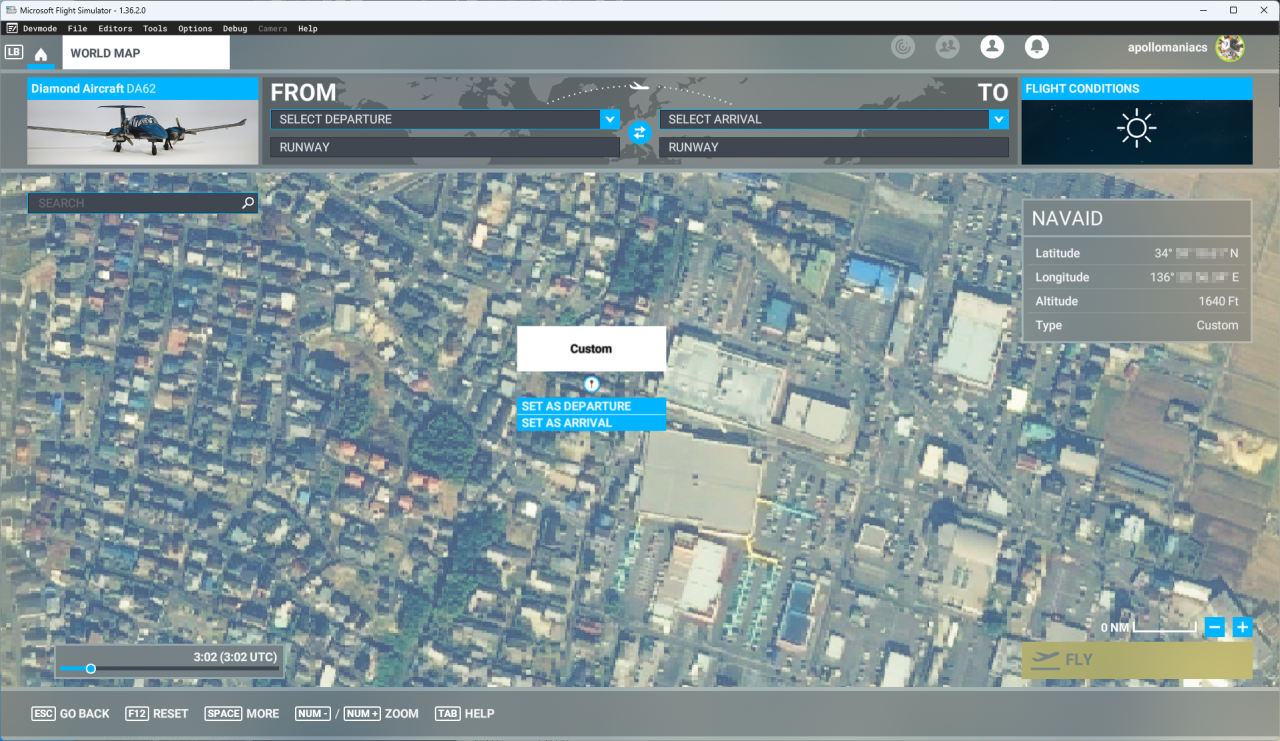 Open the WORLD MAP screen in MSFS, click on the location where you can see the scenery you created this time, and click [SET AS DEPARTURE].
Set flight conditions such as time and weather as necessary and click the [FLY] button.
Open the WORLD MAP screen in MSFS, click on the location where you can see the scenery you created this time, and click [SET AS DEPARTURE].
Set flight conditions such as time and weather as necessary and click the [FLY] button.
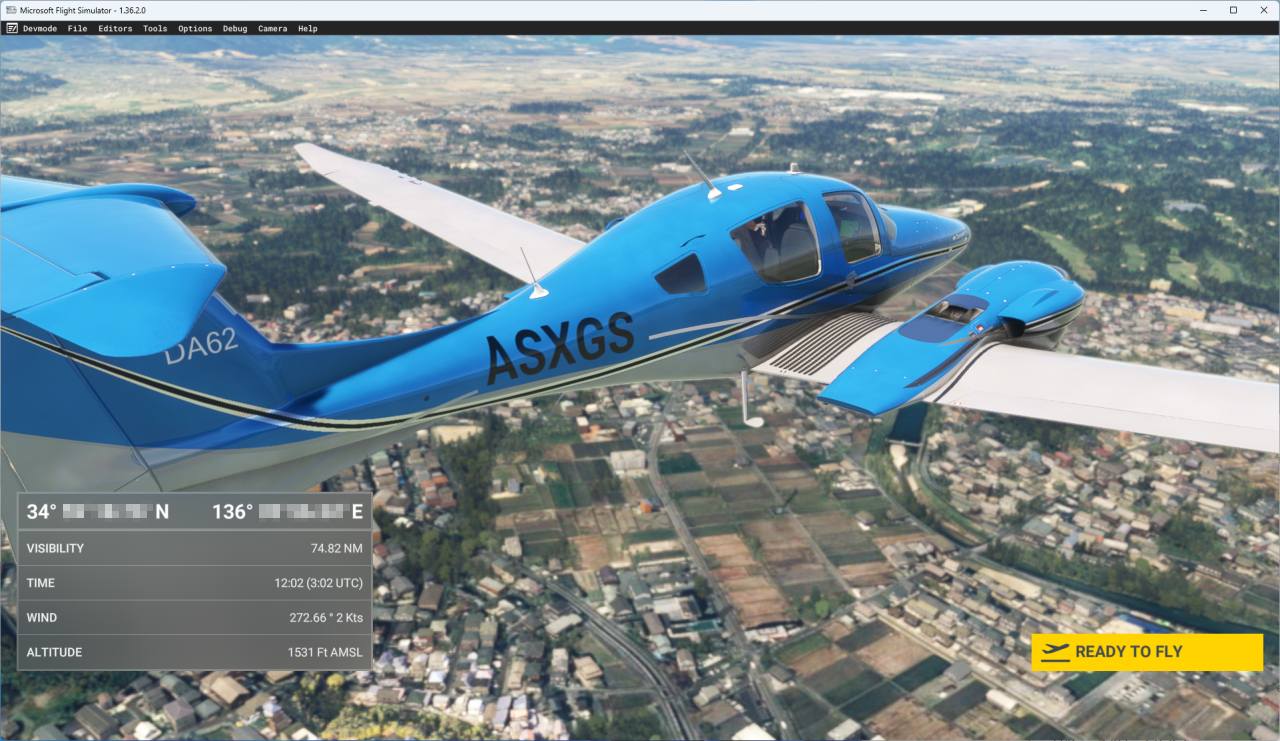 Flight begins approximately 1,500 feet above the designated location heading north.
(Flight altitude varies depending on the selected aircraft.)
Flight begins approximately 1,500 feet above the designated location heading north.
(Flight altitude varies depending on the selected aircraft.)
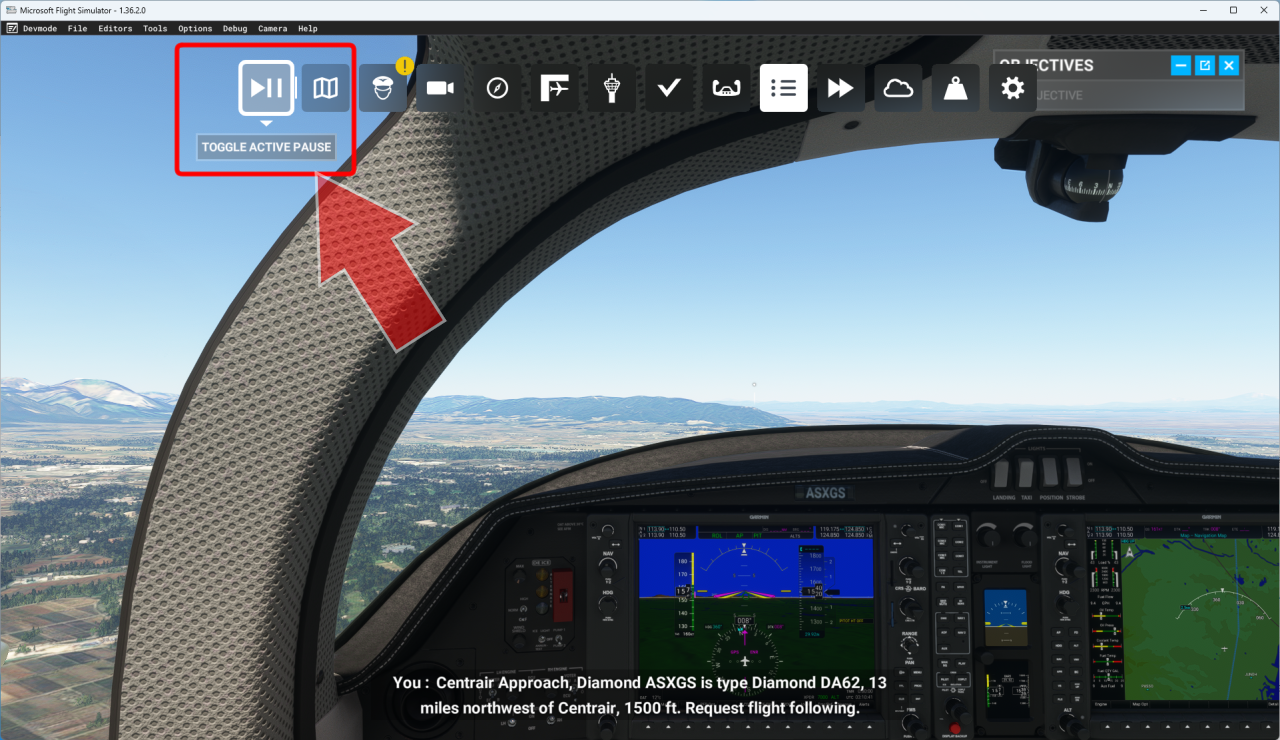 Pause immediately.
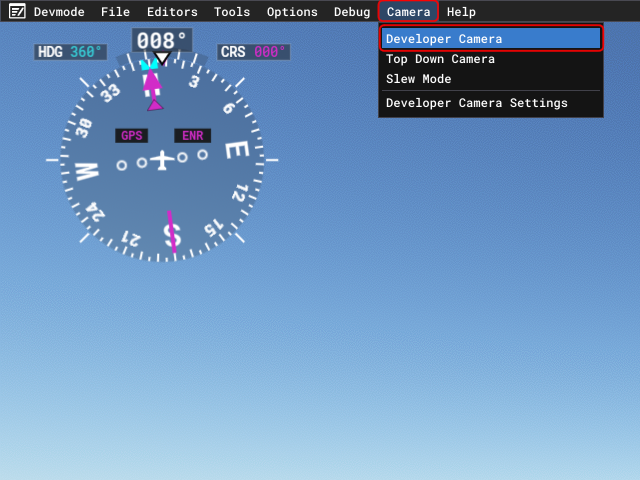 Switch to Developer Camera.
| Switch | Controll |
|---|---|
| left analog stick | Move the camera parallel to the front, back, left, or right |
| right analog stick | Rotate the camera up, down, left, right |
| left and right trigger | Move the camera vertically (up/down) |
| left and right buttons | Roll the camera left and right |
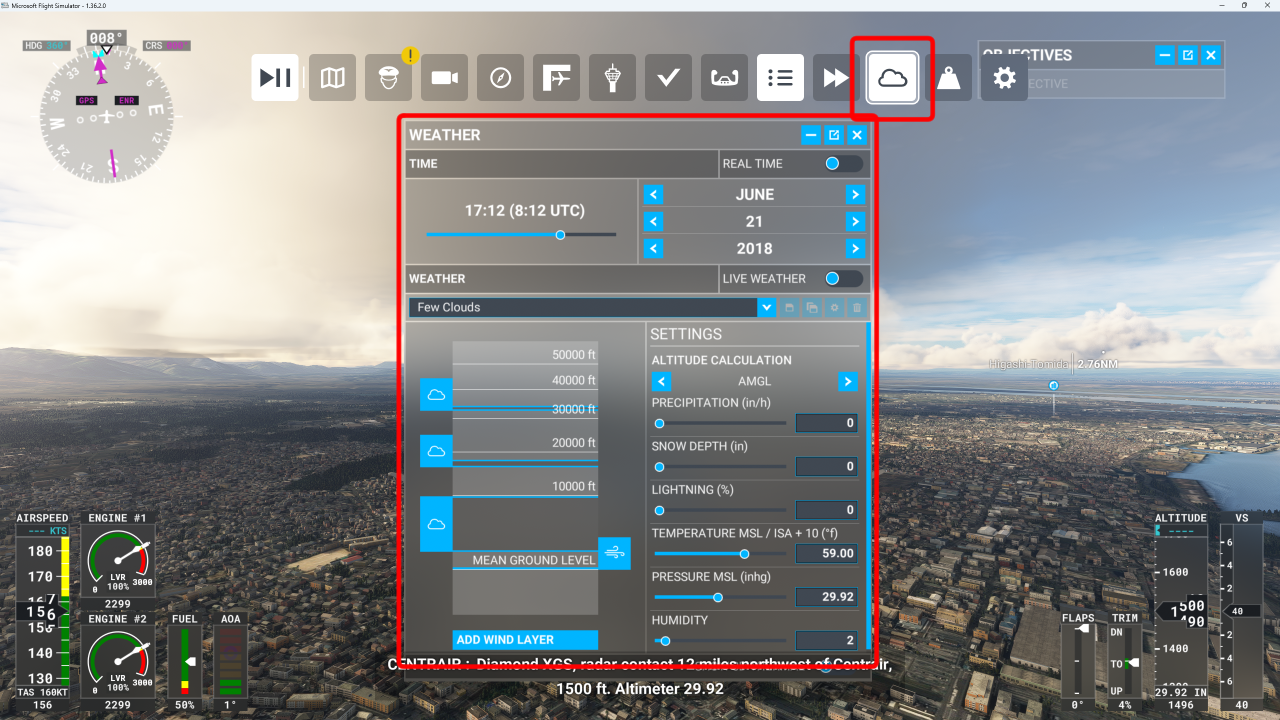 You can also change the time and weather from the toolbar.
You can check the night view.
You can also change the time and weather from the toolbar.
You can check the night view.
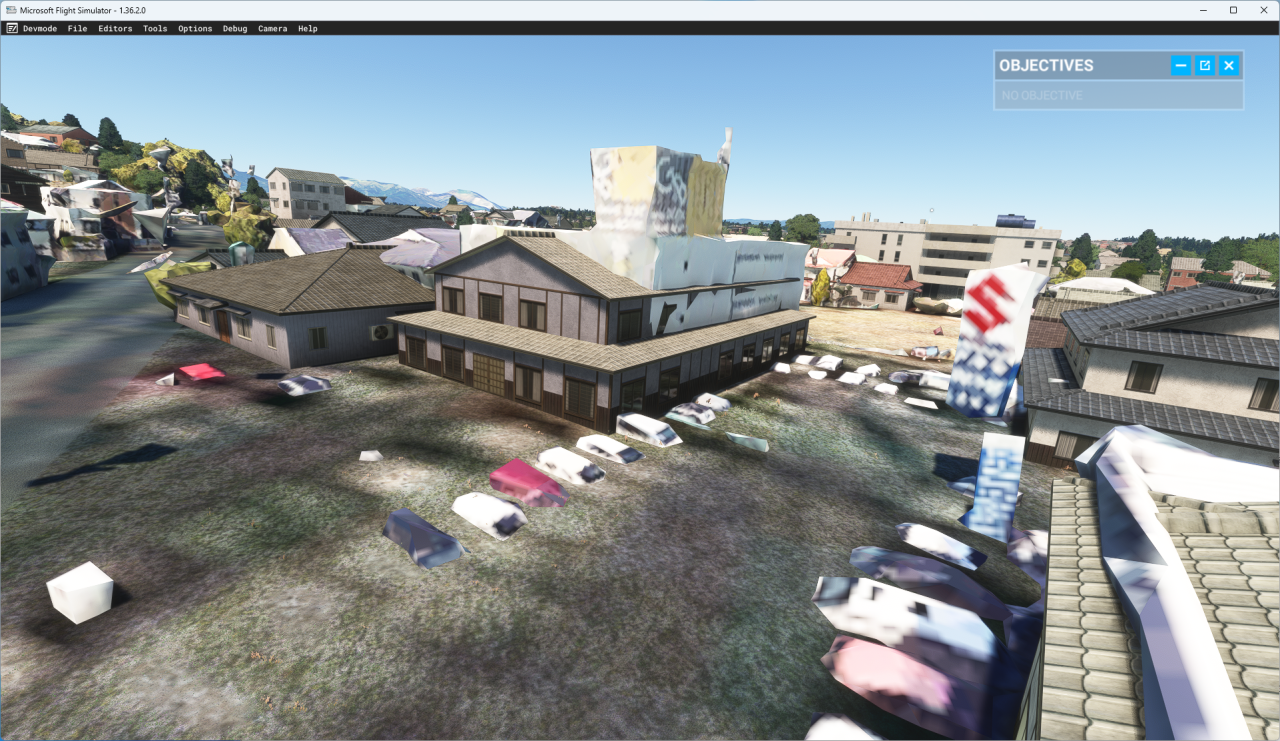 If you have just built it, the generated Google 3D map will be displayed on the simulation screen.
Buildings automatically generated by MSFS are also displayed at the same time. In this example, a building captured from Google Earth overlaps a house automatically generated by MSFS. From here you need to refine and tune your project.
To erase buildings automatically generated by MSFS, add an Exclude Polygon asset group to the package.
Also, for night scenes, lighting must be arranged. Especially for famous buildings, tourist facilities, and skyscrapers, the trick to creating a good-looking night view is to place some flashy lighting so that they can be seen from a distance.
 When MSFS is restarted, the created scenery will not appear on the simulation screen unless you load the built project into the SDK or copy the package to the "Community" folder.
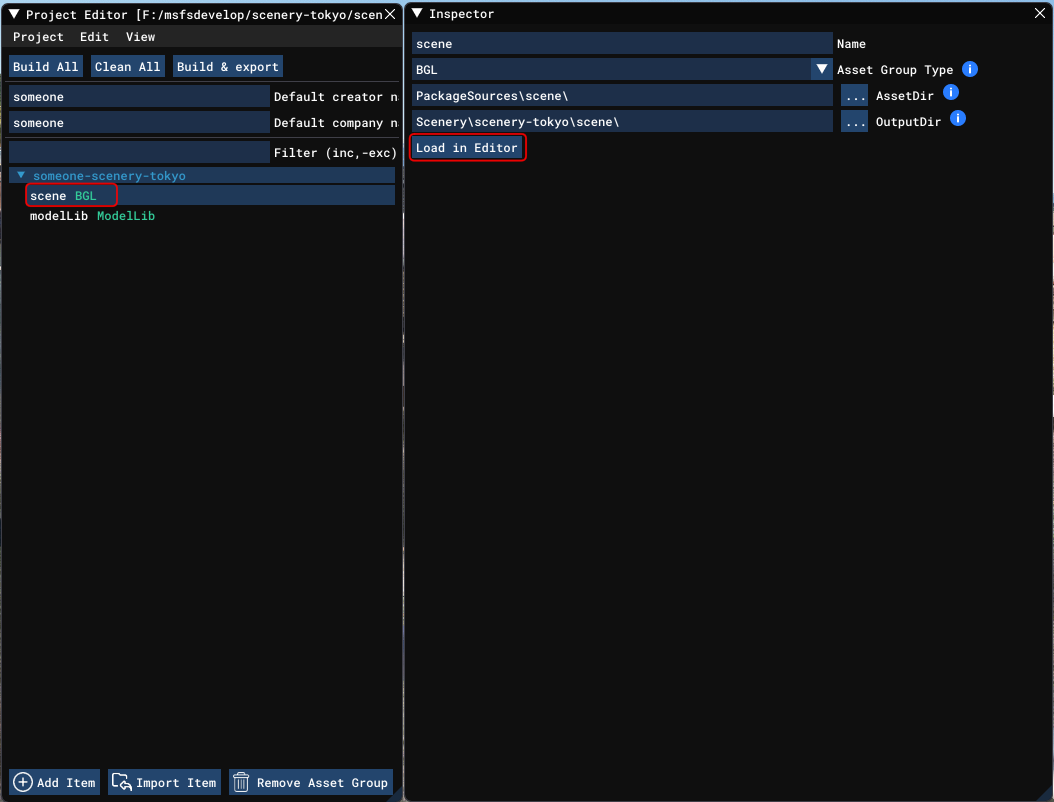
Select [File]-[Open project] in the developer menu. Then select the "[package name].xml" file directly under the project folder.
Once the project is loaded, select the asset group "BGL" on the Project Editor screen and click [Load in Editor] on the Inspector. The created scenery will be displayed on the simulation screen.
Many of the features you include in your package will not work on the developer mode screen. To check full functionality, you need to copy the completed package to the "Community" folder, restart MSFS, and play in normal mode.