

How to download and install MSFS SDK, Blender, plugin
Users can create their own content for Microsoft Flight Simulator by using the SDK (Software Development Kit) provided by Microsoft. In the world of MSFS, you can display your favorite buildings such as your home, or create airports that are not built into the product or imaginary airports. You can then distribute it to other users for a fee or for free.Here we will explain how to download and install the MSFS SDK and tools necessary or useful for content development.
このページを日本語で見る
Contents
- Create optional content for MSFS yourself
- Enabling DEVELOPER MODE
- Download and install the MSFS SDK
- How to install LTS version of Blender, past versions of Blender
- How to install exporter/importer plugin between Blender and MSFS
- Other importer plugins for Blender
- How to install Google Earth Decoder
- How to install Google Earth Decoder Optimization Tools
- How to install Lily Texture Packer plugin
Create optional content for MSFS yourself
To create content for MSFS yourself, switch MSFS to [DEVELOPER MODE] and use the SDK (Software Development Kit) that can be downloaded from the [HELP] menu. Microsoft has published a site that explains this SDK: Flight Simulator SDK Documentation page.And as for how to use the SDK, YouTube is a waste of time, Mr./Mrs. superspud has published his A Written MSFS SDK Scenery Creation Tutorial on flightsim.to, which is very helpful as it provides detailed explanations for beginners. It includes a wealth of samples and documentation, but start with "MSFS Airport and Scenery Creation.pdf".
Flight Simulator SDK Documentation (Microsoft)
A Written MSFS SDK Scenery Creation Tutorial (Flightsim.to)
Enabling DEVELOPER MODE
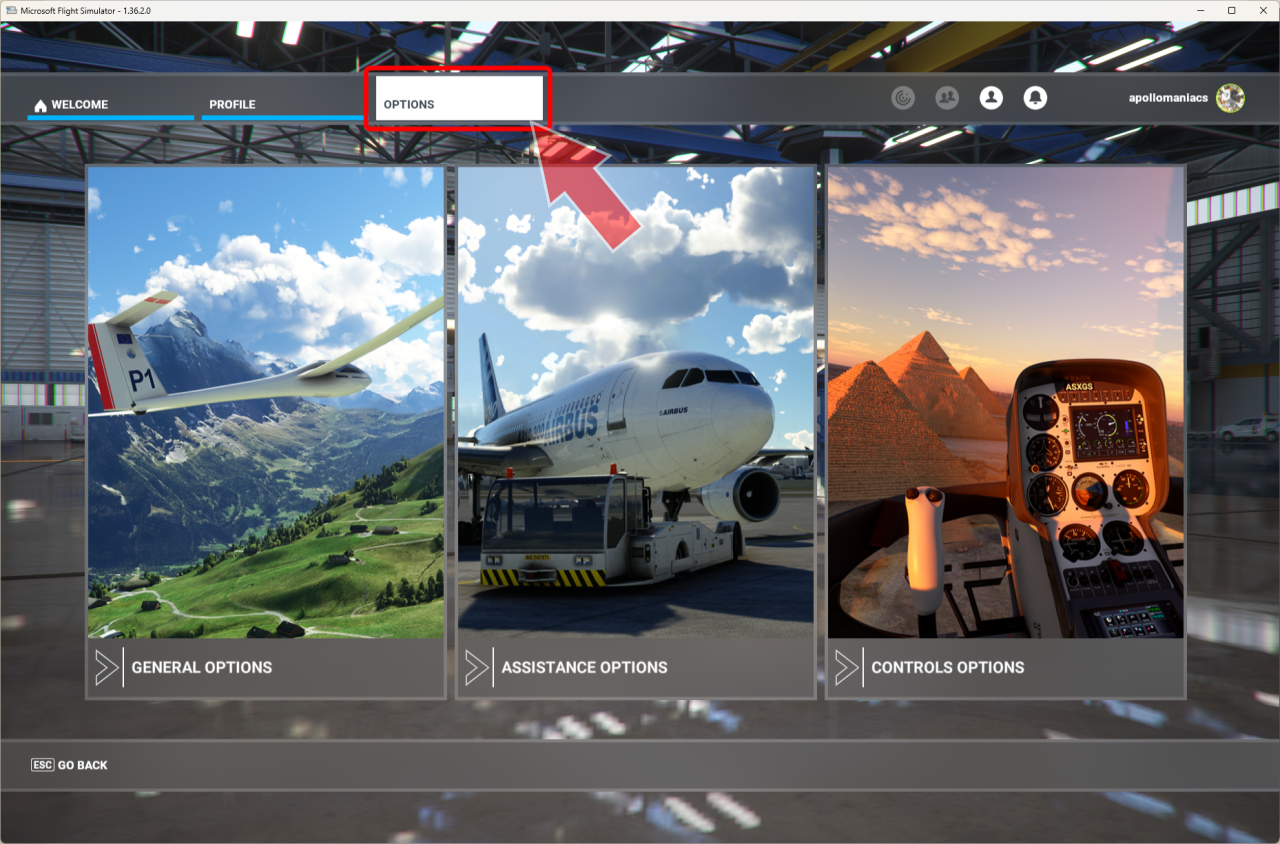 Select [OPTIONS] from the main screen.
Then you will see a screen like this.
Click [GENERAL OPTIONS] on the far left.
Select [OPTIONS] from the main screen.
Then you will see a screen like this.
Click [GENERAL OPTIONS] on the far left.
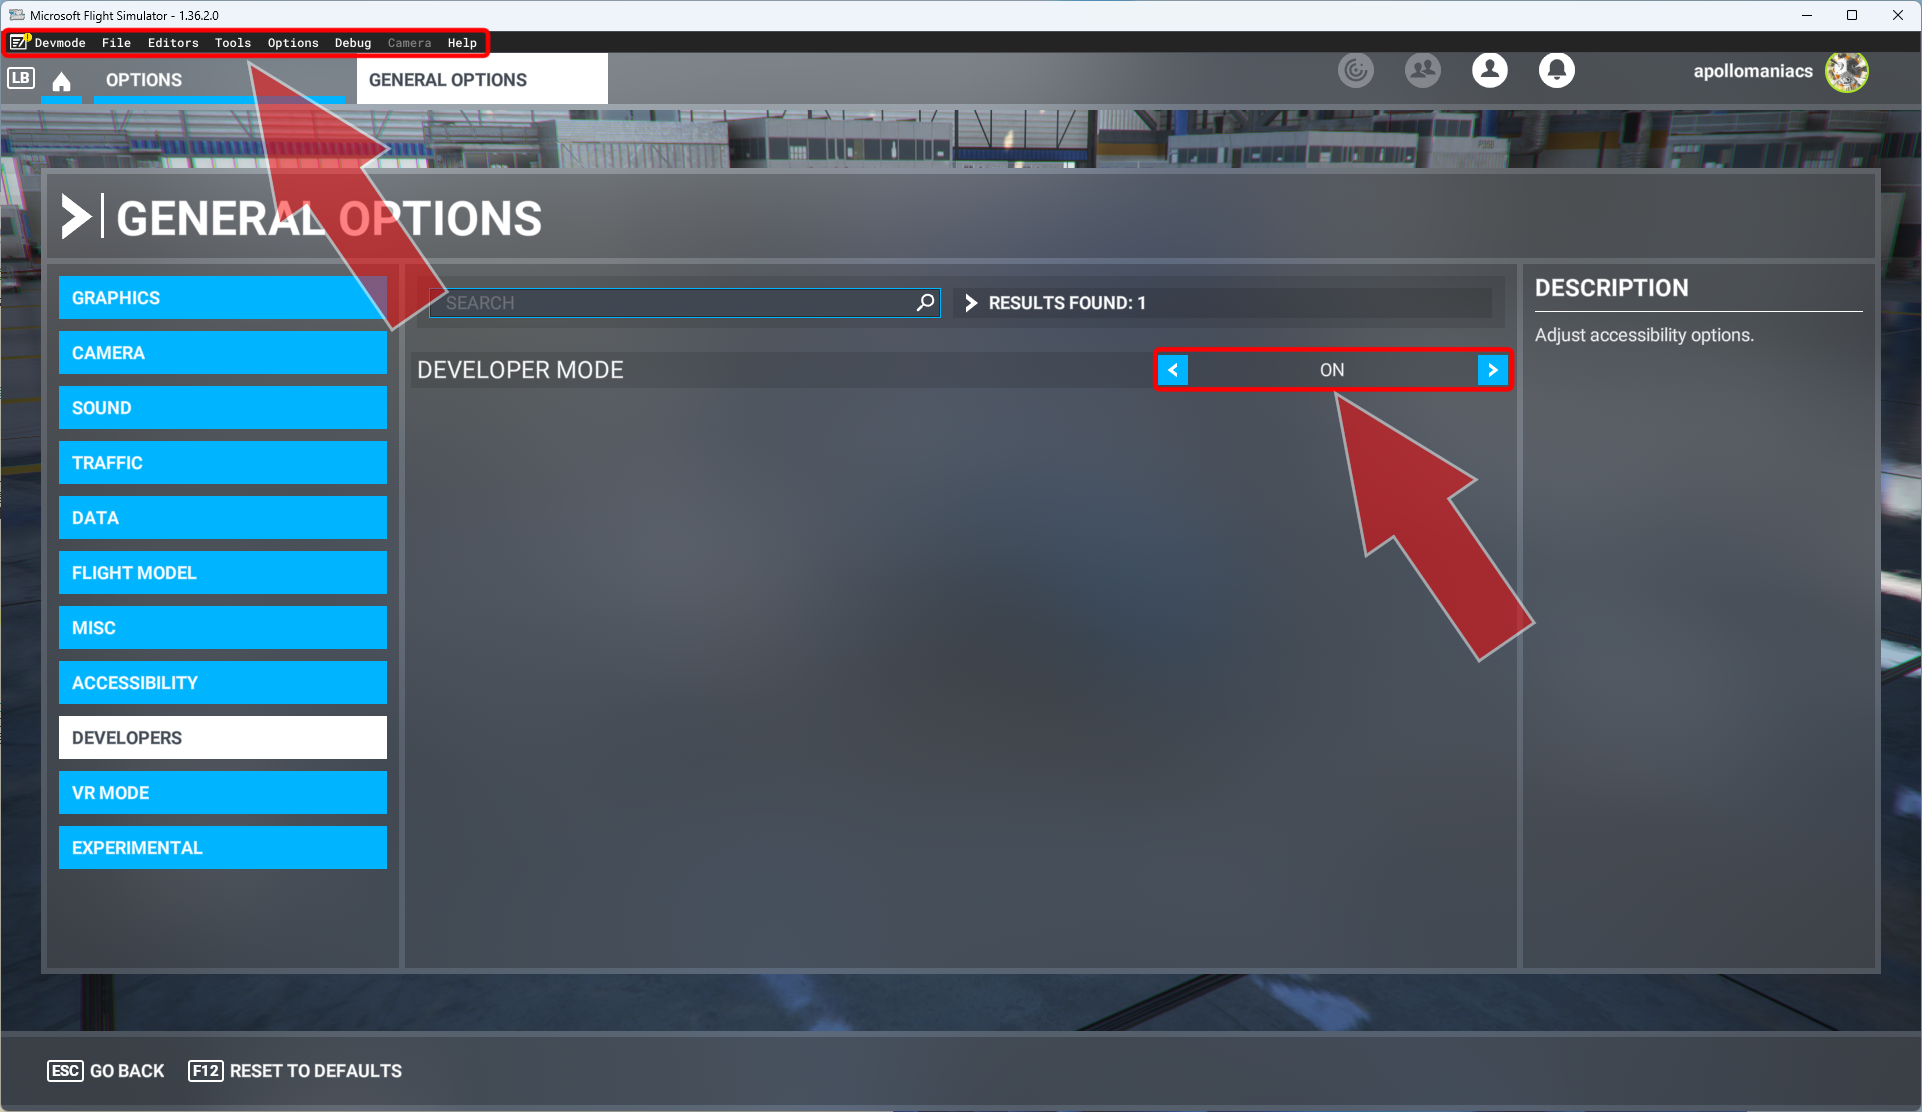 Select [DEVELOPERS] from the menu on the left side of the screen,
Set the [DEVELOPER MODE] field to [ON].
Finally, click [APPLY AND SAVE] at the bottom left of the screen.
A developer menu like this will then appear at the top left of the screen.
Select [DEVELOPERS] from the menu on the left side of the screen,
Set the [DEVELOPER MODE] field to [ON].
Finally, click [APPLY AND SAVE] at the bottom left of the screen.
A developer menu like this will then appear at the top left of the screen.
Download and install the MSFS SDK
How to download and install MSFS SDK
 In the developer menu, click [Help]-[SDK Installer (Core)].
A folder selection screen will open, so select the folder where you want to save the SDK installer.
You can download a file with a name such as "MSFS_SDK_Core_Installer_0.23.1.0.msi".
This file is just under 120MB in size and takes only a few seconds to download.
In the developer menu, click [Help]-[SDK Installer (Core)].
A folder selection screen will open, so select the folder where you want to save the SDK installer.
You can download a file with a name such as "MSFS_SDK_Core_Installer_0.23.1.0.msi".
This file is just under 120MB in size and takes only a few seconds to download.
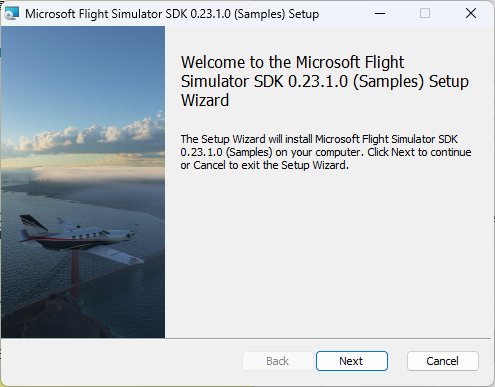
 Click on the downloaded installer to launch it.
Click [Next].
Click on the downloaded installer to launch it.
Click [Next].
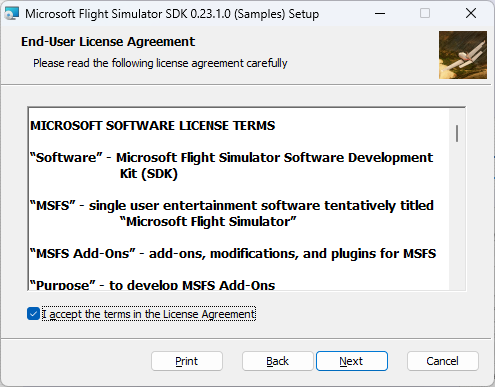
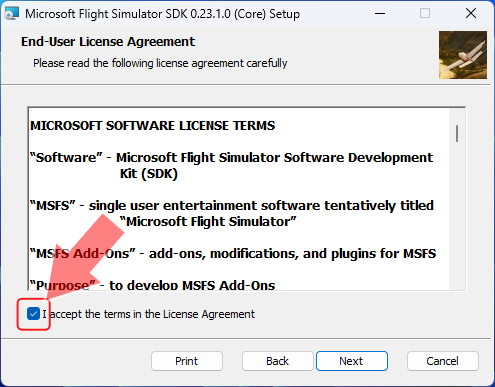 The End User License Agreement screen will be displayed.
Check the "I accept.." checkbox and click [Next].
The End User License Agreement screen will be displayed.
Check the "I accept.." checkbox and click [Next].
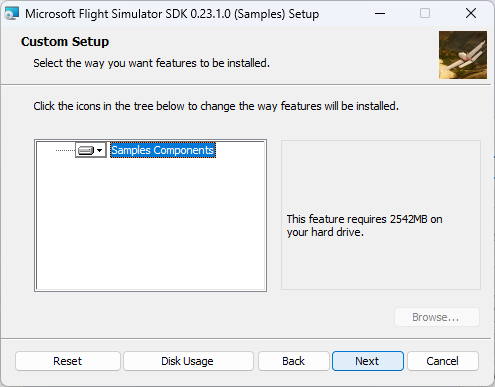
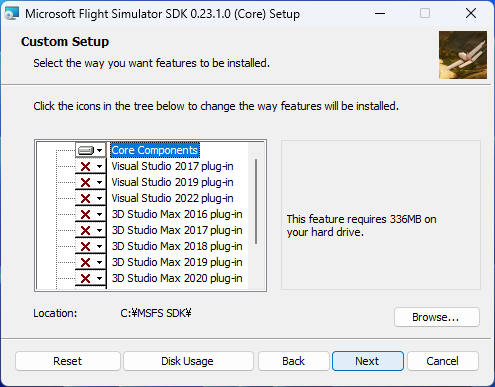 A screen will appear asking you to confirm the installation module and installation destination.
The SDK is installed to "C:\MSFS SDK\" by default. Including the documentation, the SDK capacity is over 1GB. Change the installation destination drive if necessary.
Additionally, if "3D Studio Max" or "Microsoft Visual Studio 2019" is installed on your computer, its related tools will also be installed.
"3D Studio Max" is a tool that can be used to create 3D object data. However, many users use the free " Blender " instead. Tools for "Blender" can be downloaded from AsoboStudio's Github . However, please note that it is only compatible with the LTS version of Blender (Ver.3.3/3.6) .
"Microsoft Visual Studio 2019" is only required when developing original aircraft (cockpit and avionics). It is not necessary when creating scenery or airports.
How to install LTS version of Blender, past versions of Blender
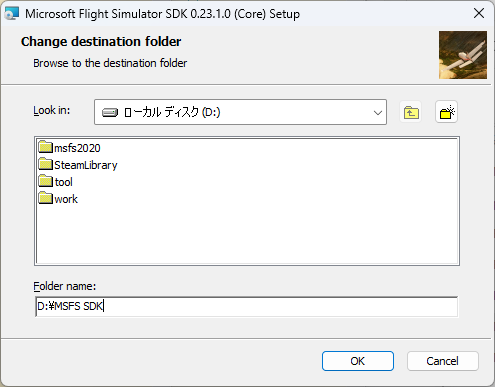 On the screen above, click the [Browse...] button at the bottom right of the screen, and a screen like this will appear.
Please change to a drive with sufficient capacity.
On the screen above, click the [Browse...] button at the bottom right of the screen, and a screen like this will appear.
Please change to a drive with sufficient capacity.
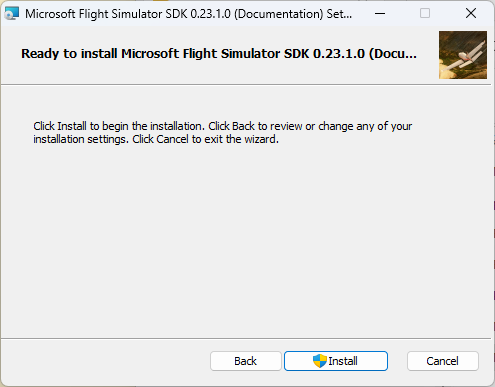
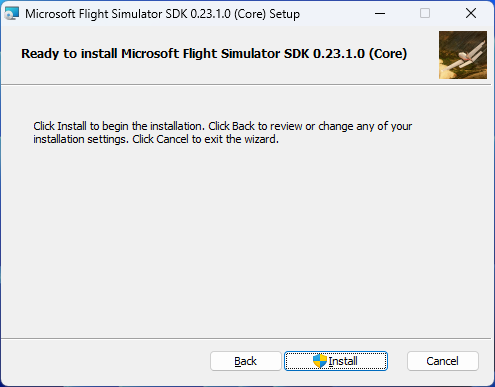 Next, you will see a screen like this.
Click [Install].
Next, you will see a screen like this.
Click [Install].
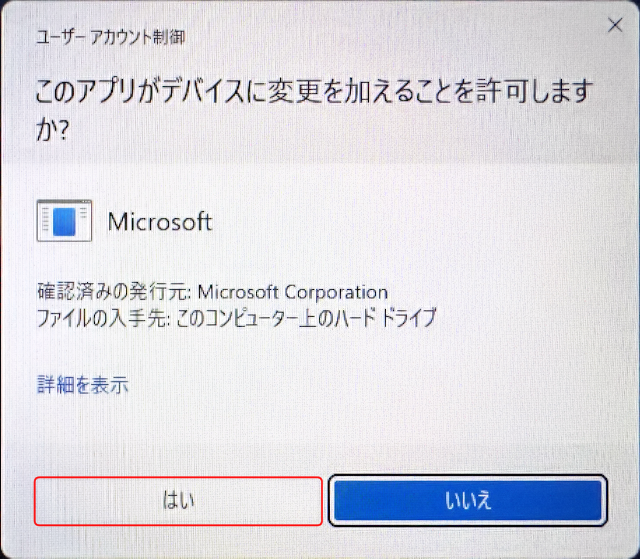 Then, Windows will display a "User Account Control" warning as shown in this figure.
Click [Yes].
Then, Windows will display a "User Account Control" warning as shown in this figure.
Click [Yes].
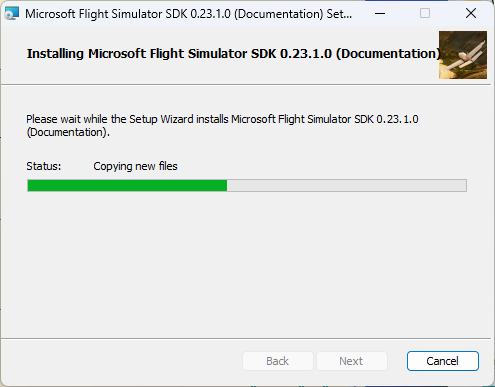
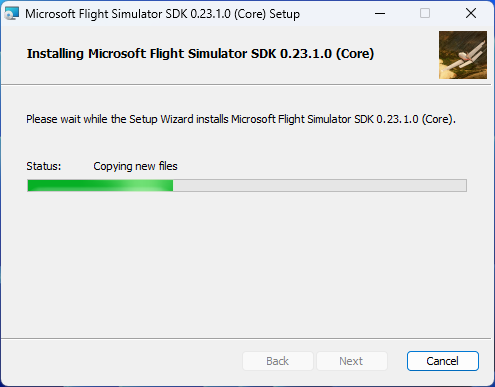 Installation will begin.
The installation takes about several tens of seconds to several minutes.
Installation will begin.
The installation takes about several tens of seconds to several minutes.
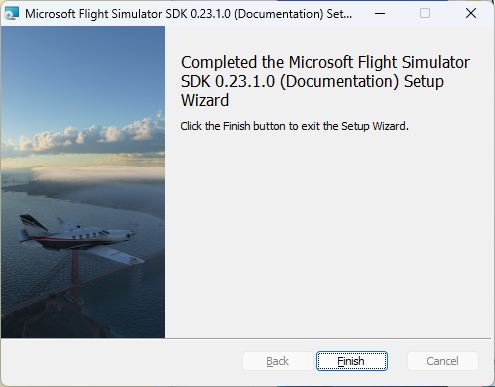
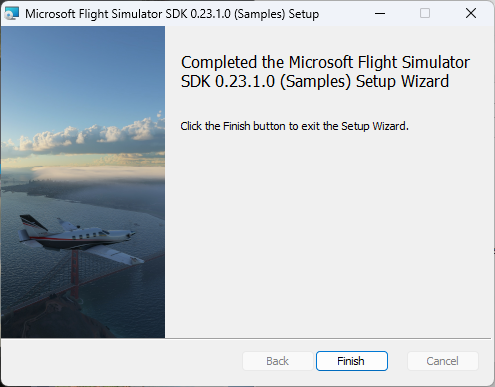
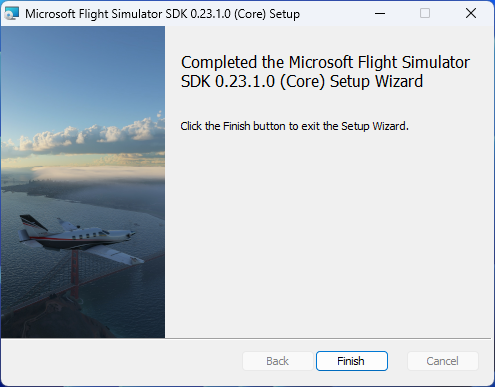 When you see a screen like this, the installation is complete.
Click [Finish].
When you see a screen like this, the installation is complete.
Click [Finish].
You can now call the SDK tools from the MSFS developer menu.
How to download and install MSFS SDK documentation
The MSFS SDK documentation is available online at Flight Simulator SDK Documentation , but installing it on your local disk speeds up viewing and reduces Internet traffic.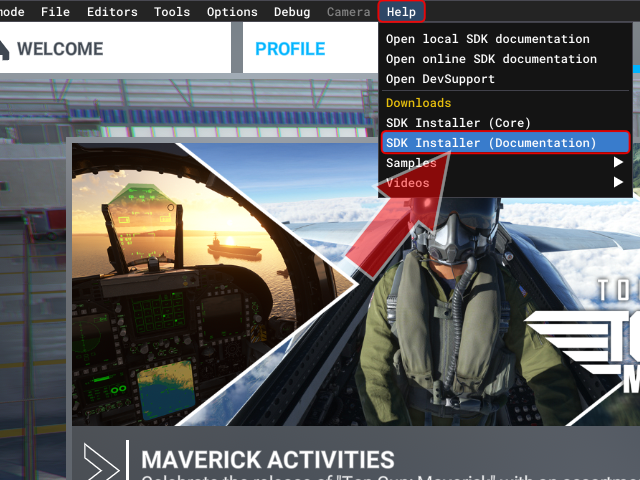 In the developer menu, click [Help]-[SDK Installer (Documentation)].
This will open a folder selection screen, so select the folder where you want to save the SDK document installer.
You can download a file with a name such as "MSFS_SDK_Documentation_Installer_0.23.1.0.msi".
This file is approximately 700MB in size and takes approximately 5 minutes to download.
In the developer menu, click [Help]-[SDK Installer (Documentation)].
This will open a folder selection screen, so select the folder where you want to save the SDK document installer.
You can download a file with a name such as "MSFS_SDK_Documentation_Installer_0.23.1.0.msi".
This file is approximately 700MB in size and takes approximately 5 minutes to download.
 Click on the downloaded installer to launch it.
Click [Next].
Click on the downloaded installer to launch it.
Click [Next].
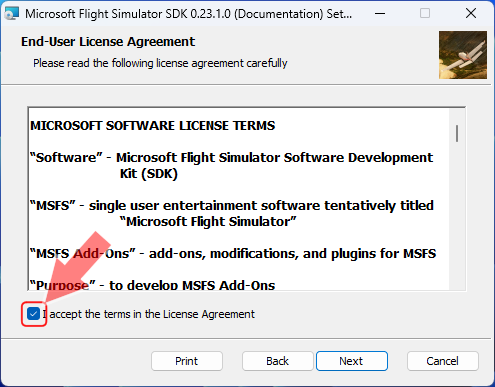 The End User License Agreement screen will be displayed.
Check the "I accept.." checkbox and click [Next].
The End User License Agreement screen will be displayed.
Check the "I accept.." checkbox and click [Next].
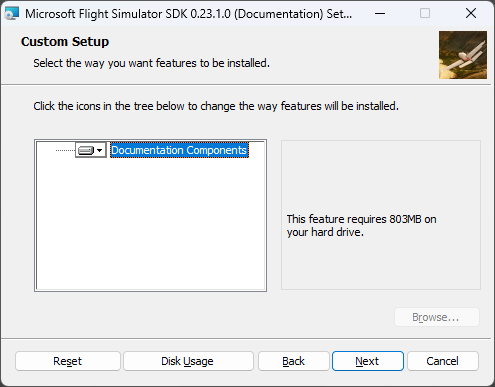 The installation module confirmation screen will appear.
Please note that you cannot choose where the SDK documents will be installed.
It will be installed in the same folder where the SDK is installed.
The installation module confirmation screen will appear.
Please note that you cannot choose where the SDK documents will be installed.
It will be installed in the same folder where the SDK is installed.
If you wish to change the installation location, please cancel the installation of the SDK documentation, uninstall the SDK, and reinstall the SDK in the appropriate folder.
 Next, you will see a screen like this.
Click [Install].
Then, Windows will display a "User Account Control" warning as shown in this figure.
Click [Yes].
Next, you will see a screen like this.
Click [Install].
Then, Windows will display a "User Account Control" warning as shown in this figure.
Click [Yes].
 Installation will begin.
The installation takes about several tens of seconds to several minutes.
Installation will begin.
The installation takes about several tens of seconds to several minutes.
 When you see a screen like this, the installation is complete.
Click [Finish].
When you see a screen like this, the installation is complete.
Click [Finish].
A folder called "Documentation" will be created in the SDK installation folder, and the SDK document file in HTML format will be saved there.
How to open MSFS SDK documentation
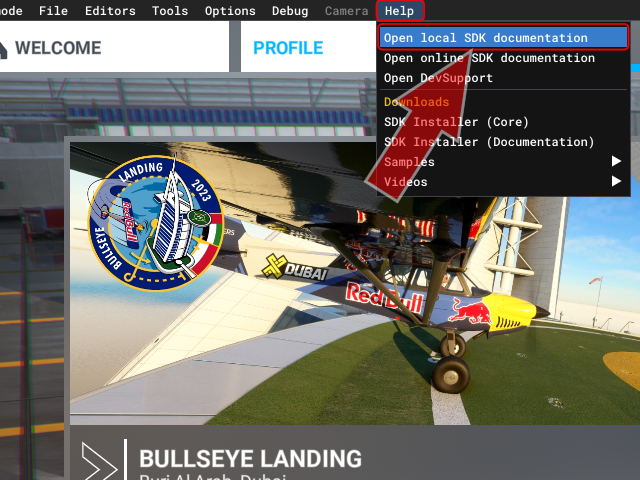 To open the SDK documentation, open "index.html" in the "Documentation" folder with any browser, or click [Help]-[Open local SDK documentation] in the developer menu.
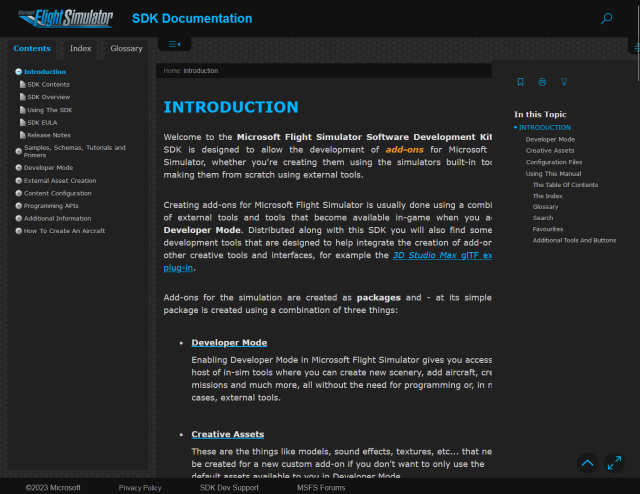 This will launch your default browser and open the SDK documentation.
How to download and install MSFS SDK sample files
The MSFS SDK includes a wealth of samples, amounting to 2.5GB, but they must be downloaded and installed separately from the SDK. The steps are the same as for SDKs and documentation.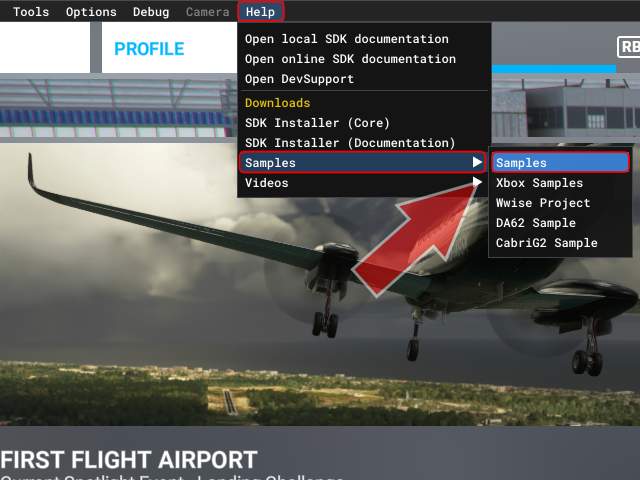 In the developer menu, click [Help]-[Samples]-[Samples].
This will open a folder selection screen, so select the folder where you want to save the SDK sample installer.
You can download a file with a name such as "MSFS_SDK_Samples_Installer_0.23.1.0.msi".
This file is approximately 1.7GB in size and takes approximately 15 minutes to download.
In the developer menu, click [Help]-[Samples]-[Samples].
This will open a folder selection screen, so select the folder where you want to save the SDK sample installer.
You can download a file with a name such as "MSFS_SDK_Samples_Installer_0.23.1.0.msi".
This file is approximately 1.7GB in size and takes approximately 15 minutes to download.
 Click on the downloaded installer to launch it.
Click [Next].
Click on the downloaded installer to launch it.
Click [Next].
 The End User License Agreement screen will be displayed.
Check the "I accept.." checkbox and click [Next].
The End User License Agreement screen will be displayed.
Check the "I accept.." checkbox and click [Next].
 The installation module confirmation screen will appear.
Please note that you cannot choose where the SDK sample files will be installed.
It will be installed in the same folder where the SDK is installed.
The installation module confirmation screen will appear.
Please note that you cannot choose where the SDK sample files will be installed.
It will be installed in the same folder where the SDK is installed.
If you wish to change the installation location, please cancel the installation of the SDK documentation, uninstall the SDK, and reinstall the SDK in the appropriate folder.
 The rest is the same as installing the SDK and documentation.
Installation takes only a few tens of seconds.
The rest is the same as installing the SDK and documentation.
Installation takes only a few tens of seconds.
When you see a screen like this, the installation is complete. Click [Finish].
A folder called "Samples" will be created in the SDK installation folder, and a large number of samples will be saved there.
How to uninstall MSFS SDK/Documentation
 Uninstalling the MSFS SDK and its documentation is the same as for any regular Windows application.
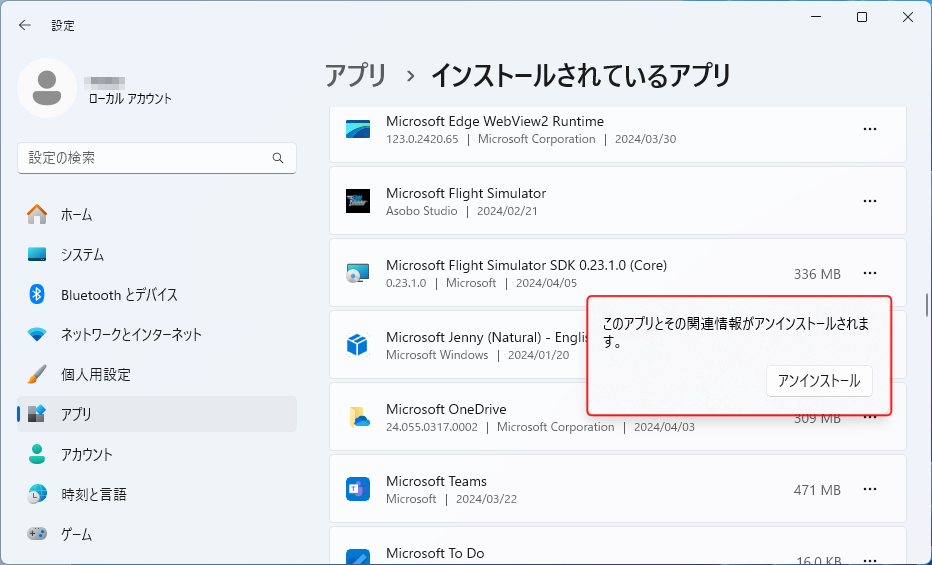
Open the [Windows]-[Settings]-[Apps]-[Installed apps] screen and look for SDK/Documentation.
Then click the [...] icon on the far right and select [Uninstall].
Uninstalling the MSFS SDK and its documentation is the same as for any regular Windows application.
Open the [Windows]-[Settings]-[Apps]-[Installed apps] screen and look for SDK/Documentation.
Then click the [...] icon on the far right and select [Uninstall].
 Then you will see a screen like this.
Click [Uninstall].
Then you will see a screen like this.
Click [Uninstall].
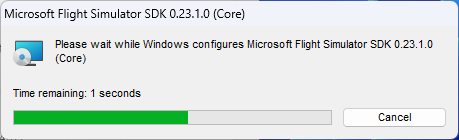 Uninstallation will be completed in just a few tens of seconds.
Even if you uninstall it, you can install it again by clicking the downloaded ".msi" file.
Uninstallation will be completed in just a few tens of seconds.
Even if you uninstall it, you can install it again by clicking the downloaded ".msi" file.
How to install LTS version of Blender, past versions of Blender
Blender is a free tool that can be used to create 3D object data. If you install using the normal procedure, the latest version will be installed. However, the MSFS plug-in only supports the LTS (Long-Term Support) version. You need to install the LTS version of Blender. See below for details.How to install exporter/importer plugin between Blender and MSFS
Many types of exporters and importers from Blender to MSFS have been developed by users, such as the Blender2MSFS toolkit. AsoboStudio, the developer of MSFS, has released the plug-in "glTF-Blender-IO-MSFS" that aims to bring these together. This tool is still under development and is updated several times a year. The latest version only supports Blender 3.3.x LTS and 3.6.x LTS. Additionally, to protect content rights, models that have been built using the SDK cannot be imported.Download glTF-Blender-IO-MSFS plugin
glTF-Blender-IO-MSFS is distributed on Github. This file is also included in the "\Tools\Blender" folder of the MSFS SDK.
 Open the
Asobo Studio page
on Github.
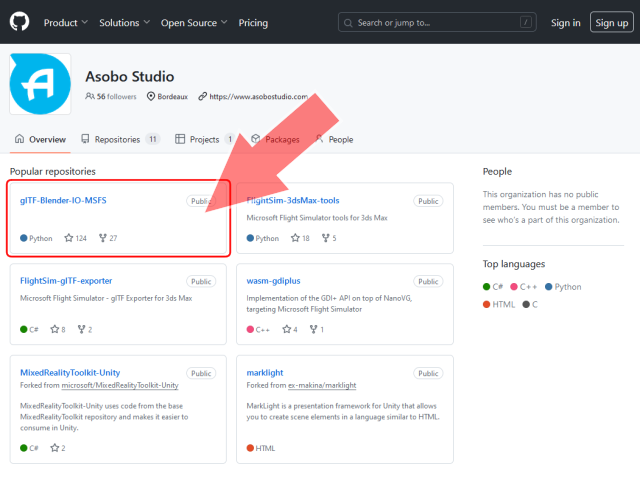
A screen like this will appear, so click "glTF-Blender-IO-MSFS".
Open the
Asobo Studio page
on Github.
A screen like this will appear, so click "glTF-Blender-IO-MSFS".
AsoboStudio (Github)
 The
glTF-Blender-IO-MSFS page
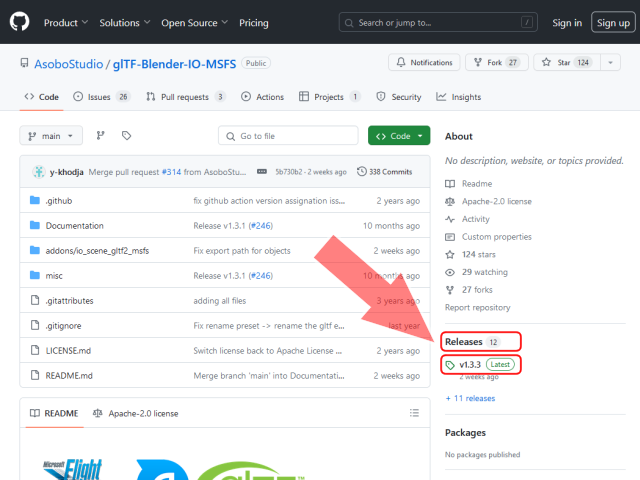
will open, so click "Releases" on the right side of the screen.
If you click on the "Latest" button here, you can go directly to the latest version of the page.
The
glTF-Blender-IO-MSFS page
will open, so click "Releases" on the right side of the screen.
If you click on the "Latest" button here, you can go directly to the latest version of the page.
You can also scroll this page to read a detailed description about this tool.
glTF-Blender-IO-MSFS (Github)
 The
release page for glTF-Blender-IO-MSFS
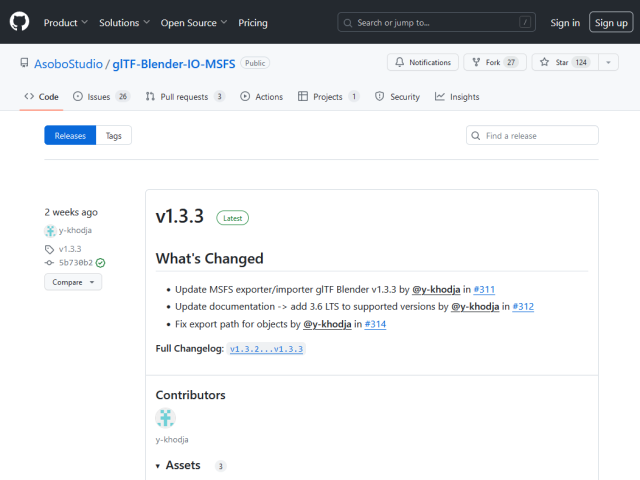
opens.
From this screen, you can download any version of glTF-Blender-IO-MSFS, including past versions.
The latest version is at the top.
If you scroll this screen...
The
release page for glTF-Blender-IO-MSFS
opens.
From this screen, you can download any version of glTF-Blender-IO-MSFS, including past versions.
The latest version is at the top.
If you scroll this screen...
glTF-Blender-IO-MSFS Releases (Github)
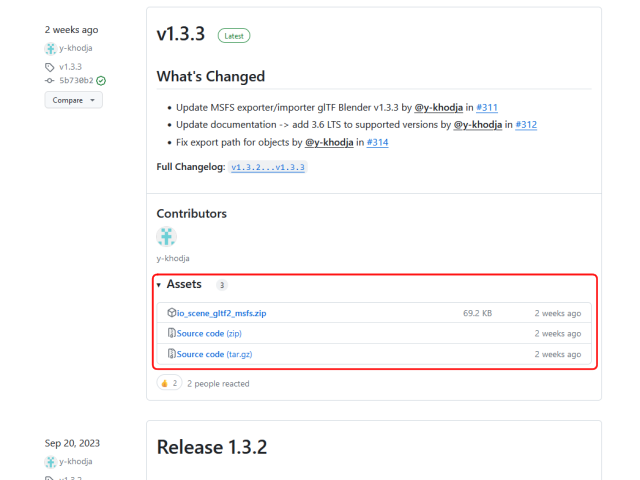 There is a download link in the “Assets” column.
Click “io_scene_gltf2_msfs.zip” to download the plugin.
Save this in any folder.
This file is approximately 70KB in size and downloads in seconds.
There is a download link in the “Assets” column.
Click “io_scene_gltf2_msfs.zip” to download the plugin.
Save this in any folder.
This file is approximately 70KB in size and downloads in seconds.
Installing the glTF-Blender-IO-MSFS plugin
The installation method is also explained in detail with images on the glTF-Blender-IO-MSFS page on Github.
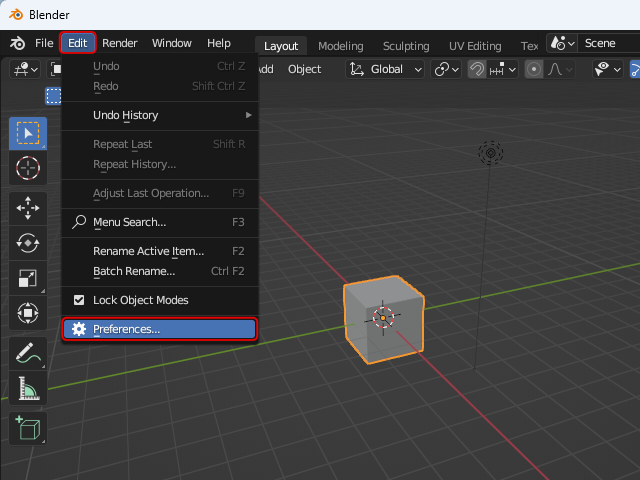 Start Blender and select [Edit]-[Preferences] from the menu.
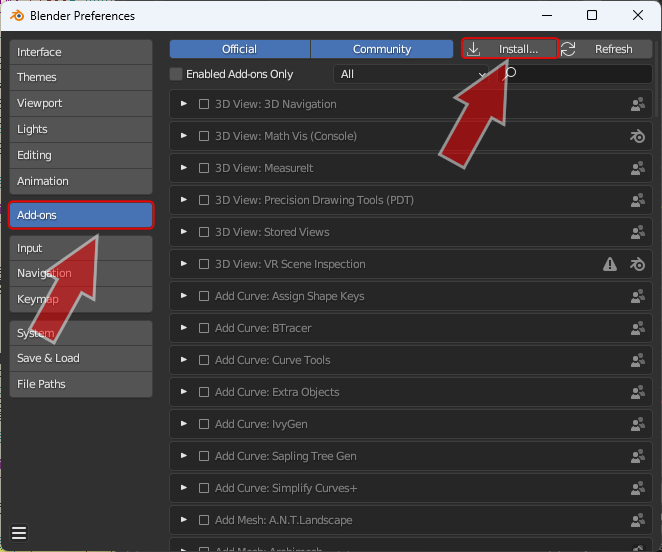 Then a window like this will open.
Select [Add-ons] from the menu on the left, and click [Install an add-on] at the top right of the screen.
Then a window like this will open.
Select [Add-ons] from the menu on the left, and click [Install an add-on] at the top right of the screen.
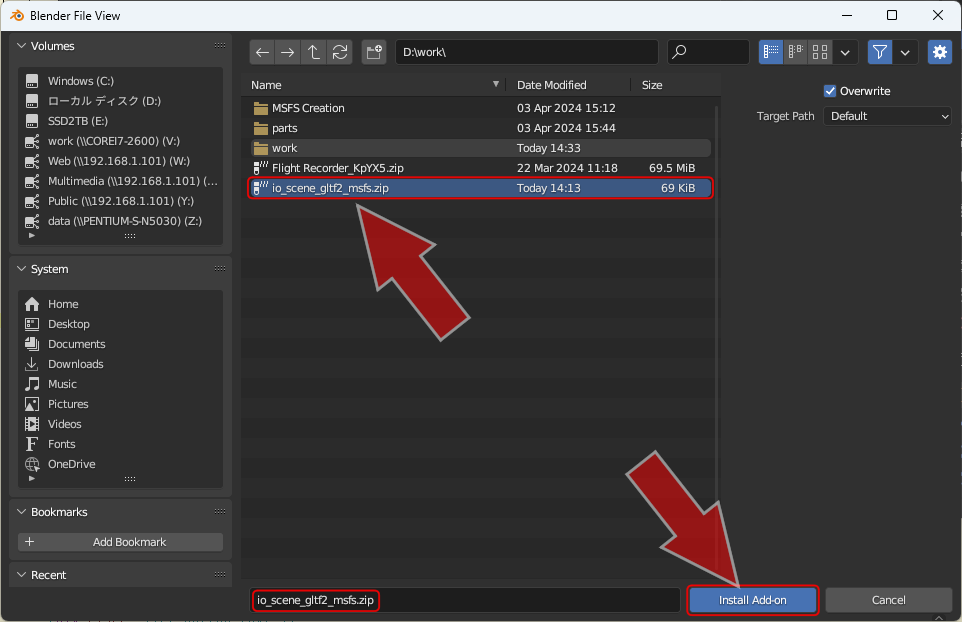 The file selection screen will then appear.
Find and click the downloaded “io_scene_gltf2_msfs.zip” and click [Install Add-on] at the bottom right of the screen.
The file selection screen will then appear.
Find and click the downloaded “io_scene_gltf2_msfs.zip” and click [Install Add-on] at the bottom right of the screen.
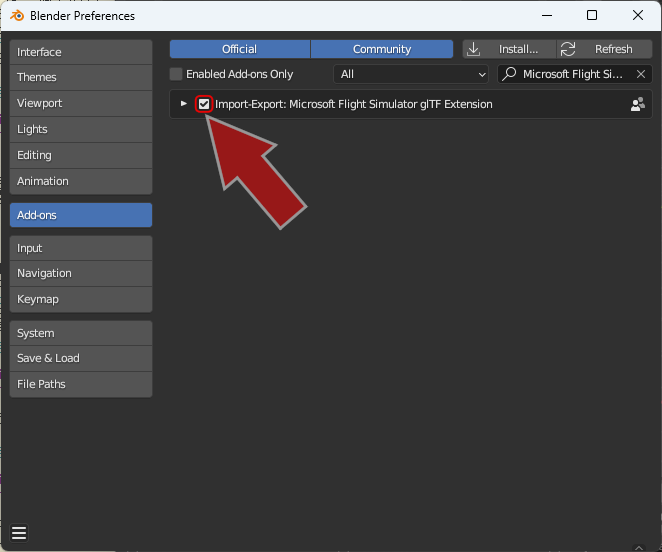 The screen will then switch to [Preferences] - [Add-ons] and the installed plug-ins will be displayed.
Activate this plugin by clicking the checkbox to the left of the plugin's name.
It takes several tens of seconds for it to take effect after you click it.
The screen will then switch to [Preferences] - [Add-ons] and the installed plug-ins will be displayed.
Activate this plugin by clicking the checkbox to the left of the plugin's name.
It takes several tens of seconds for it to take effect after you click it.
The installation is now complete.
If you cannot find the plug-in on this screen, try typing "Microsoft Flight Simulator glTF Extension" in the search box at the top right of the screen.
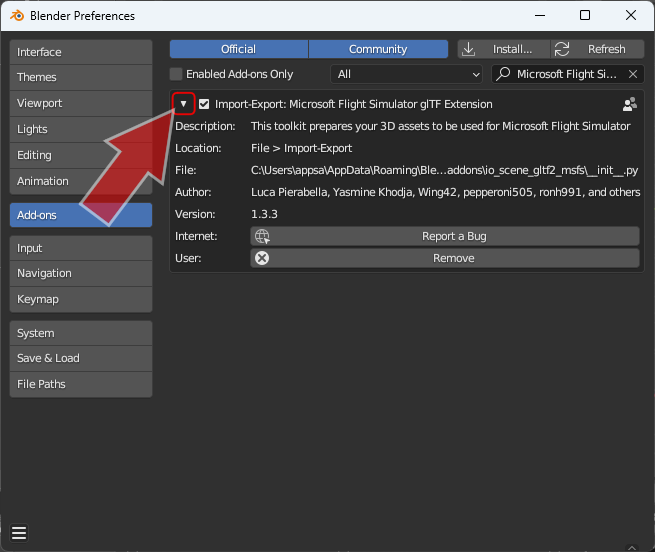 Click [>] to the left of the plug-in name on the screen above to display the plug-in details.
You can remove the plugin by clicking [Remove] on this screen.
When replacing with the latest version, please delete the old version from here.
Click [>] to the left of the plug-in name on the screen above to display the plug-in details.
You can remove the plugin by clicking [Remove] on this screen.
When replacing with the latest version, please delete the old version from here.
Import MSFS 3D model (glTF) with Blender
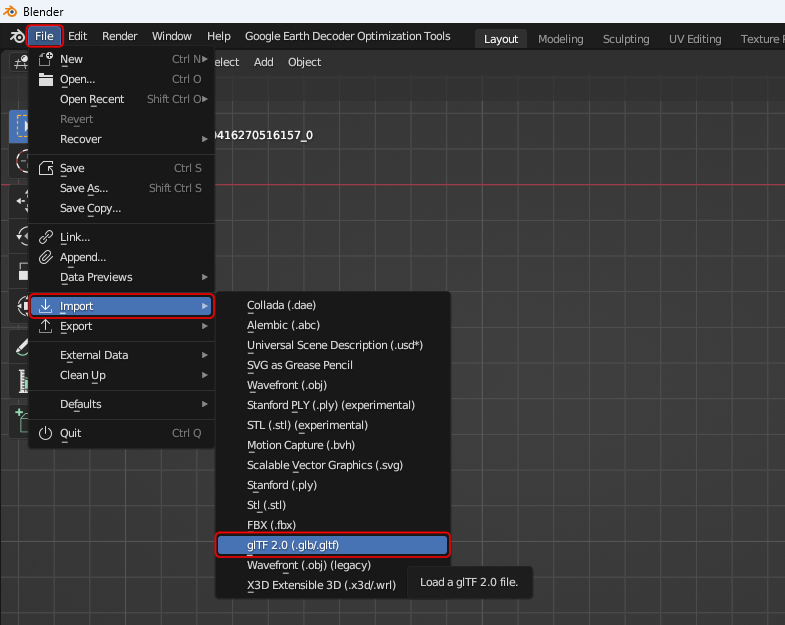 To import an MSFS 3D model (glTF) in Blender, select the [File]-[Import]-[glTF 2.0 (.glb/.gltf)] menu.
Note that the MSFS SDK's ModelLib type asset group requires texture files to be collected in a dedicated "texture" folder before build, but in this state Blender cannot read the texture files. Depending on the configuration when creating the glTF file, you will typically need to move the texture file to the same folder as the glTF file.
 To display the object with the texture pasted on the Blender screen, click the
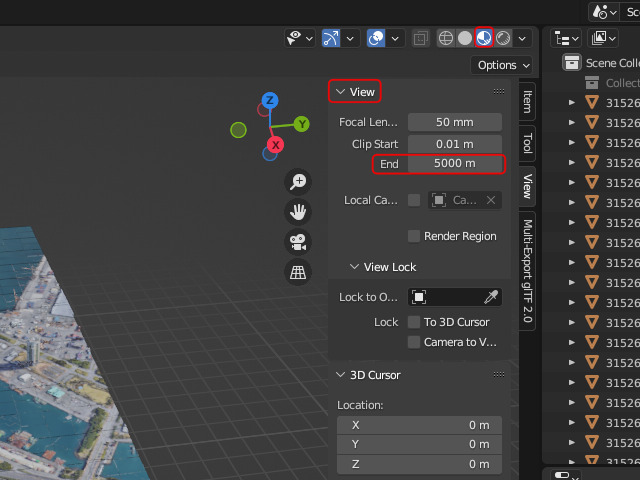
Also, by default, Blender only displays a range of 0.01m to 1,000m from the camera. To display a vast scenery, you need to increase the value in the [Clip End] field on the [View] screen.
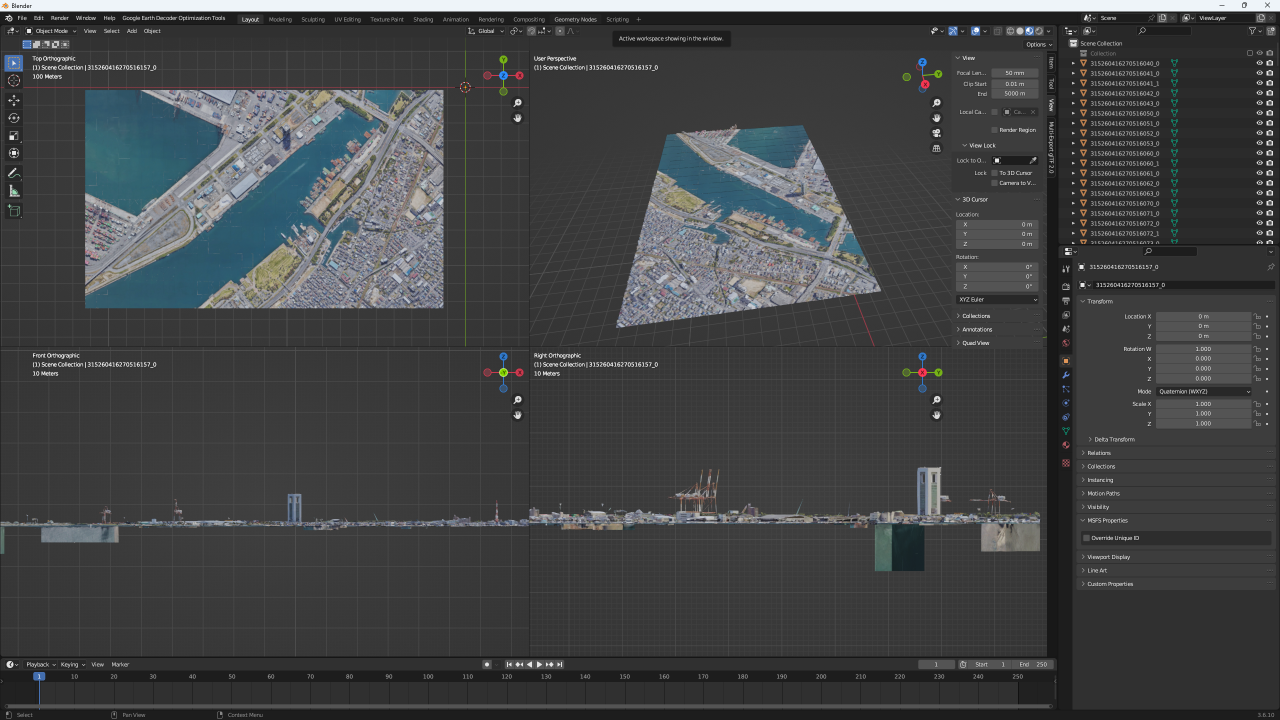 If you pay attention to the above points, you can edit modelLib generated with Google Earth Decoder with textures.
Sites related to how to use plugins
Documentation for Microsoft Flight Simulator glTF 2.0 Importer and Exporter for Blender (Github)
THE BLENDER PLUGIN (Microsoft)
BLENDER PLUGIN PROPERTIES (Microsoft)
THE BLENDER EXPORTER (Microsoft)
New Blender Exporter (MSFS DevSupport)
msfs2blend (Github)
Blender2MSFS toolkit (FSDeveloper)
Other importer plugins for Blender
In addition to "glTF-Blender-IO-MSFS" shown above, there are other importer plug-ins that can import MSFS 3D models (glTF) into Blender, such as the following.msfs2blend
This is a plug-in developed by Daniel that is mainly used to paint aircraft models. For Blender version 3.0 and above.
msfs2blend (Github)
msfs2blender2msfs
This is a plugin developed by flybywire group. Maintenance has been completed for both.
msfs2blender2msfs (Github)
msfs-blender-tools (Github)
This will also be helpful.
Fly By Wire addon for Blender 3.x (FSDeveloper.com)
The installation method is the same as How to install exporter/importer plugin between Blender and MSFS shown above.
In other words, start Blender, select [Edit]-[Preferences] from the menu, open the [Add-ons] screen, and click [Install an add-on].
How to install Google Earth Decoder
Using the free software "Google Earth Decoder" developed by Mr./Mrs. Jonahex111, you can read Google Earth's 3D map data from Google's server and convert it to 3D data (modelLib) for the MSFS SDK.Downloading Google Earth Decoder
Google Earth Decoder is distributed in a reddit article.
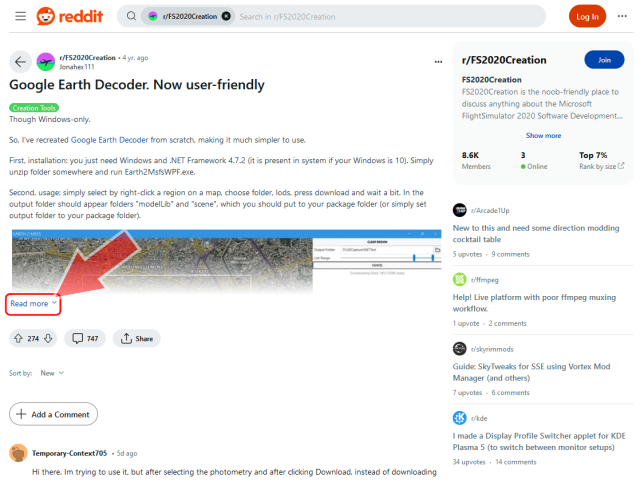 Open the
Google Earth Decoder post
on reddit.
A screen like this will appear, so click "Read more".
Open the
Google Earth Decoder post
on reddit.
A screen like this will appear, so click "Read more".
Google Earth Decoder. Now user-friendly (reddit)
Google Earth Decoder (reddit)
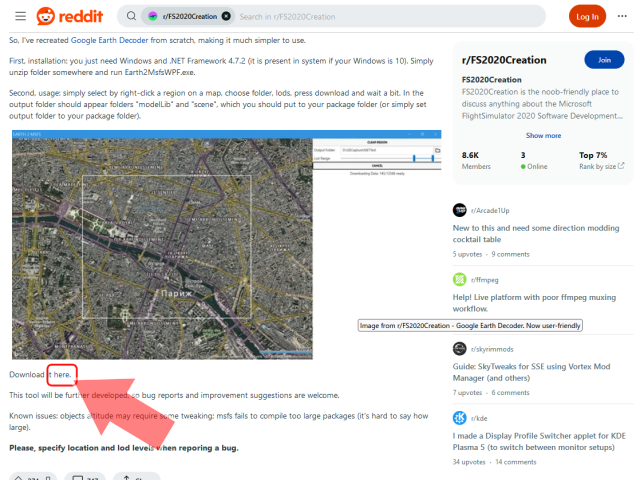 The entire article will be displayed, so scroll down and click on the "here" part where it says "Download it here."
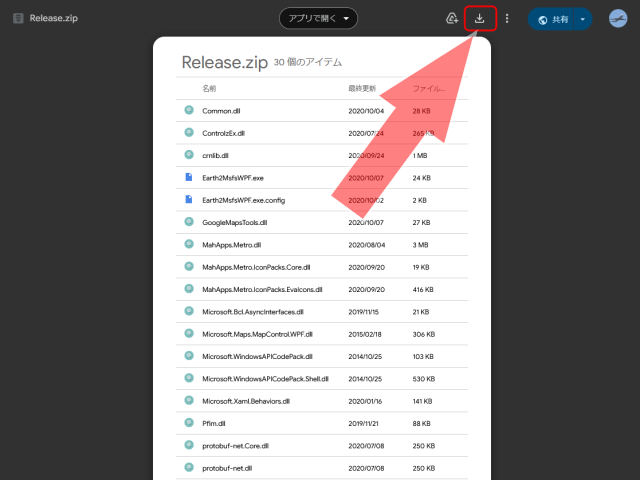 Google Drive will then open and a list of files will be displayed.
Click the download icon at the top right of the screen.
Google Drive will then open and a list of files will be displayed.
Click the download icon at the top right of the screen.
 You will have to wait here for about around ten seconds.
Then, a folder selection screen like this will be displayed, so select any folder.
Then you can download a file called "Release.zip".
This file is approximately 3MB in size and can be downloaded instantly.
You will have to wait here for about around ten seconds.
Then, a folder selection screen like this will be displayed, so select any folder.
Then you can download a file called "Release.zip".
This file is approximately 3MB in size and can be downloaded instantly.
Please note that a warning screen may appear indicating that virus scanning is not possible. Select "Download" regardless.
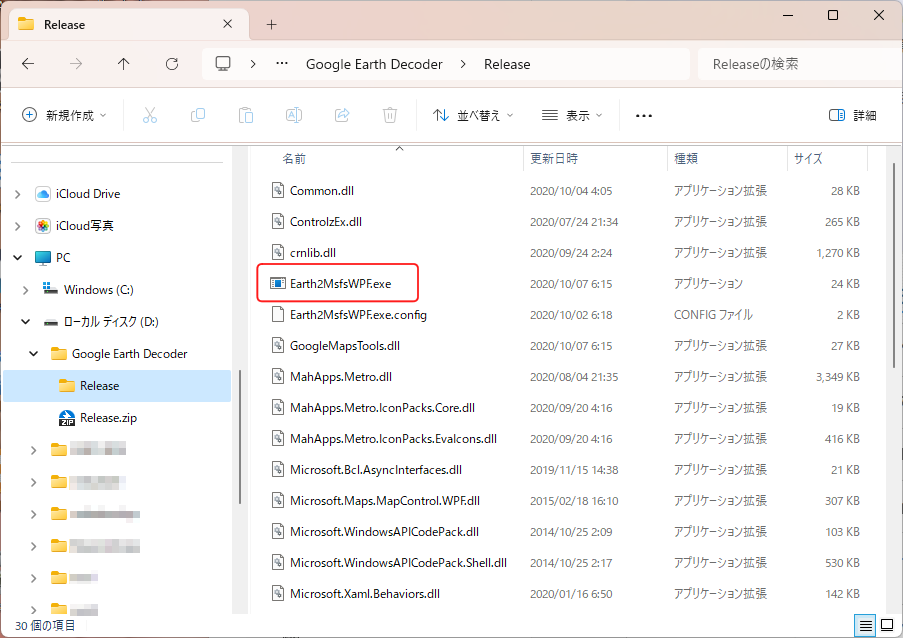 When you unzip "Release.zip", a file like this will appear.
"Earth2MsfsWPF.exe" in this is the executable file.
When you unzip "Release.zip", a file like this will appear.
"Earth2MsfsWPF.exe" in this is the executable file.
Download Google Earth Decoder update
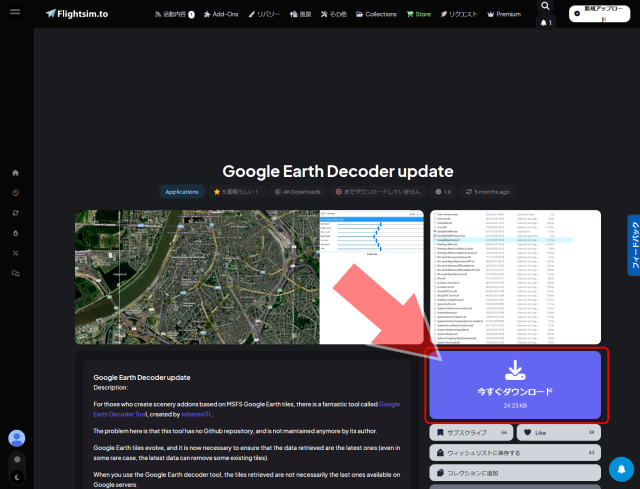
Google Earth Decoder has not been maintained since 2020 and is not compatible with the latest Google Earth. A module to update this has been published by Mr./Mrs. Thalixte on flightsim.to .
 Open the
Google Earth Decoder update page
on flightsim.to.
A screen like this will appear, so click "Download now".
Open the
Google Earth Decoder update page
on flightsim.to.
A screen like this will appear, so click "Download now".
Then you can download a file such as "Google Earth Decoder_xxxxx.zip". This file is approximately 25KB in size and can be downloaded instantly.
For information on how to log in and use flightsim.to, please see Install free add-ons to MSFS, add airplanes, airports, and scenery How to use flightsim.to .
Google Earth Decoder update (flightsim.to)
Install free add-ons to MSFS, add airplanes, airports, and scenery How to use flightsim.to
 When you unzip "Google Earth Decoder_xxxxx.zip", two files like this will appear.
Move (overwrite) these to the "Google Earth Decoder" folder.
The installation of Google Earth Decoder is now complete.
When you unzip "Google Earth Decoder_xxxxx.zip", two files like this will appear.
Move (overwrite) these to the "Google Earth Decoder" folder.
The installation of Google Earth Decoder is now complete.
This update module is updated frequently. Please check back from time to time and download the latest version again when it is released.
How to install Google Earth Decoder Optimization Tools
Mr./Mrs. Thalixte, who developed Google Earth Decoder update, has released a useful plug-in for Blender (2.83 or later). You can use this to generate a scenery project folder for the MSFS SDK, and to optimize the textures, Lods, and CTDs of 3D model data saved in that project. You can also combine textures in your project to reduce the number of files, Also adds Asobo extension tags to manage collisions, road traffic, and lightning generation. Furthermore, it has many correction and update functions for 3D model data generated with Google Earth Decoder.You can read the explanation by the tool's developer in the article below.
New optimisation tool for Google Earth Decoder MSFS sceneries (reddit)
Download the Google Earth Decoder Optimization Tools plugin
Google Earth Decoder Optimization Tools is distributed on Github.
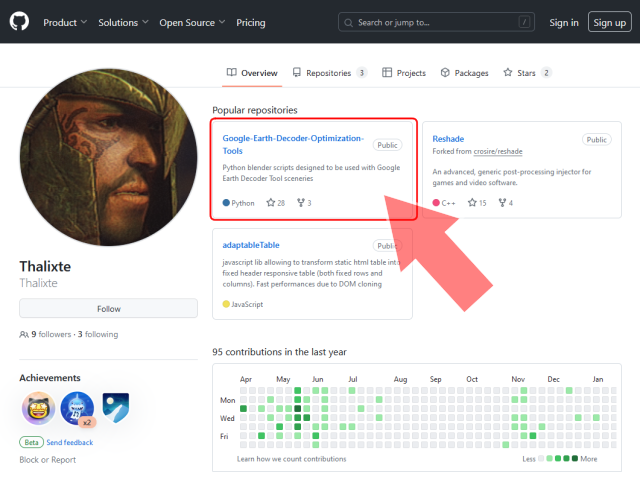 Open the
Thalixte page
on Github.
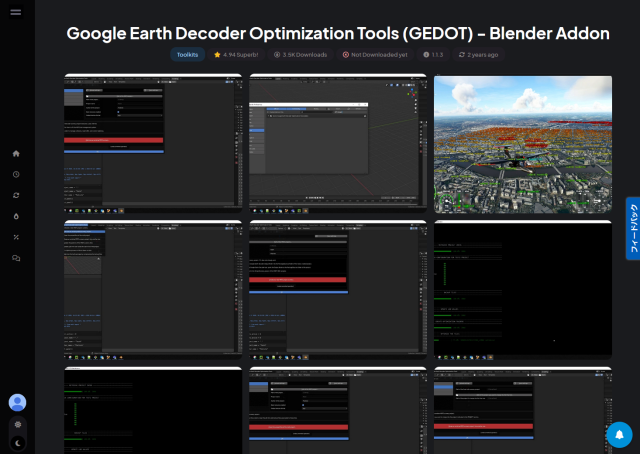
A screen like this will appear, so click "Google Earth Decoder Optimization Tools".
Open the
Thalixte page
on Github.
A screen like this will appear, so click "Google Earth Decoder Optimization Tools".
Thalixte (Github)
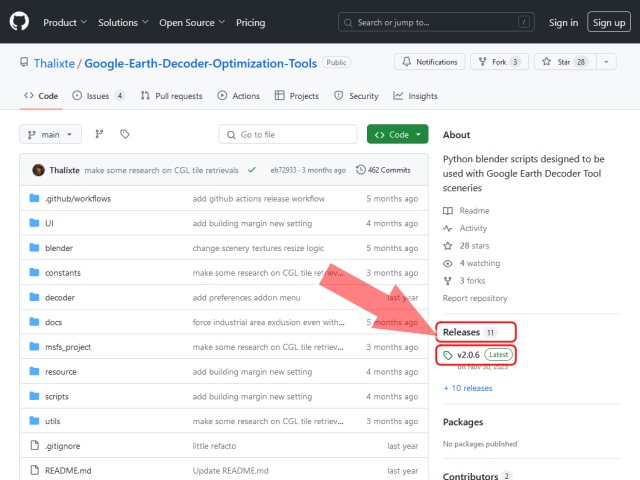 The
Google Earth Decoder Optimization Tools page
will open, so click "Releases" on the right side of the screen.
If you click on the "Latest" button here, you can go directly to the latest version of the page.
The
Google Earth Decoder Optimization Tools page
will open, so click "Releases" on the right side of the screen.
If you click on the "Latest" button here, you can go directly to the latest version of the page.
You can also scroll this page to read a detailed description about this tool.
Google Earth Decoder Optimization Tools (Github)
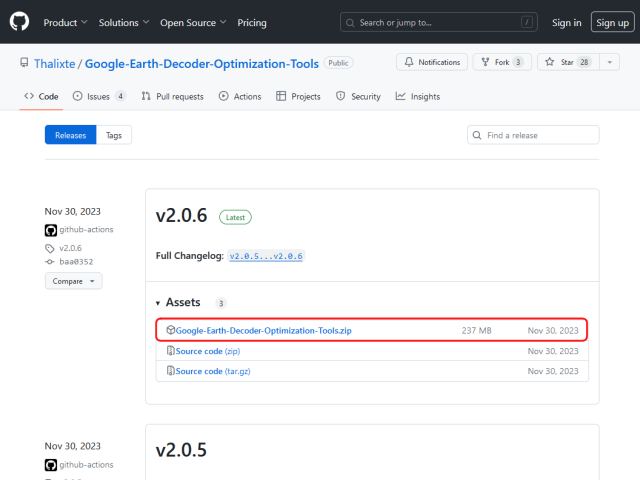 The
Google Earth Decoder Optimization Tools release page
opens.
From this screen, you can download any version of Google Earth Decoder Optimization Tools, including past versions.
The latest version is at the top.
The
Google Earth Decoder Optimization Tools release page
opens.
From this screen, you can download any version of Google Earth Decoder Optimization Tools, including past versions.
The latest version is at the top.
There is a download link in the “Assets” column. Click “Google-Earth-Decoder-Optimization-Tools.zip” to download the plugin. Save this in any folder. The size of this file is approximately 250MB, and the download will be completed in a few tens of seconds to a few minutes.
Google Earth Decoder Optimization Tools Releases (Github)
 This tool is also distributed on
flightsim.to
, a website that collects mods, coloring, and add-ons for Microsoft Flight Simulator 2020.
However, the published files seem to be a little old.
This tool is also distributed on
flightsim.to
, a website that collects mods, coloring, and add-ons for Microsoft Flight Simulator 2020.
However, the published files seem to be a little old.
Google Earth Decoder Optimization Tools (flightsim.to)
Installing the Google Earth Decoder Optimization Tools plugin
 The installation method is the same as
How to install exporter/importer plugin between Blender and MSFS
shown above.
The installation method is the same as
How to install exporter/importer plugin between Blender and MSFS
shown above.
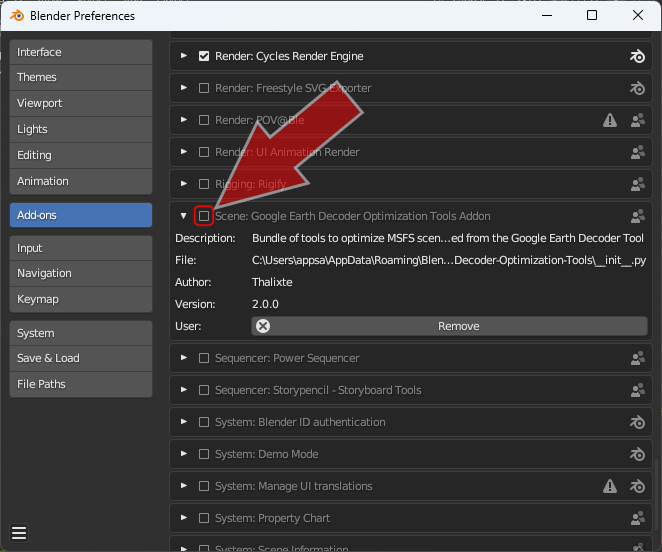
In other words, start Blender, select [Edit]-[Preferences] from the menu, open the [Add-ons] screen, and click [Install an add-on]. The name of the plugin will then be displayed on the right side of the screen. Then click the checkbox to the left of the plugin's name.
 Then an error like this will appear.
This is an error message saying that the Python "pygeodesy" package is not found.
But the package is actually downloaded under "C:\Users\ [USERNAME]\ AppData\ Roaming\ Python\ Python[VERSION]\ site-packages".
At this point, close Blender and restart Blender.
Then click the checkbox to the left of the plugin's name again.
This time the error will not be displayed.
A blue circle will rotate next to the mouse cursor to indicate that the process is in progress.
A large number of Python packages related to this plugin will be downloaded under "C:\Users\ [USERNAME]\ AppData\ Roaming\ Python\ Python[VERSION]\ site-packages".
Then an error like this will appear.
This is an error message saying that the Python "pygeodesy" package is not found.
But the package is actually downloaded under "C:\Users\ [USERNAME]\ AppData\ Roaming\ Python\ Python[VERSION]\ site-packages".
At this point, close Blender and restart Blender.
Then click the checkbox to the left of the plugin's name again.
This time the error will not be displayed.
A blue circle will rotate next to the mouse cursor to indicate that the process is in progress.
A large number of Python packages related to this plugin will be downloaded under "C:\Users\ [USERNAME]\ AppData\ Roaming\ Python\ Python[VERSION]\ site-packages".
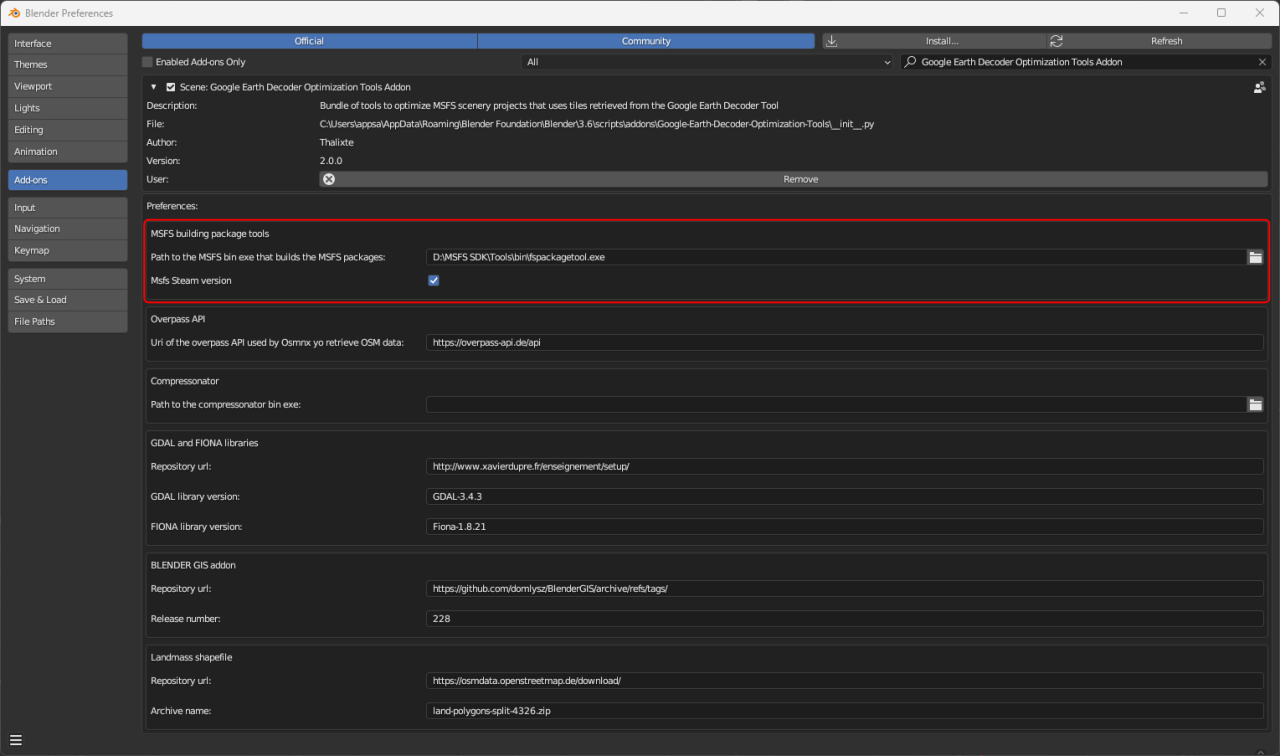 If you wait for a few minutes, a screen like this will appear and the plugin will be activated.
Here, by filling in the [MSFS building package tools]-[Path to the MSFS bin...] field, you can build MSFS from the tool.
Specify the location of "fspackagetool.exe" in the MSFS SDK here.
This is usually located under "[MSFS SDK INSTALL FOLDER]\Tools\bin".
If you wait for a few minutes, a screen like this will appear and the plugin will be activated.
Here, by filling in the [MSFS building package tools]-[Path to the MSFS bin...] field, you can build MSFS from the tool.
Specify the location of "fspackagetool.exe" in the MSFS SDK here.
This is usually located under "[MSFS SDK INSTALL FOLDER]\Tools\bin".
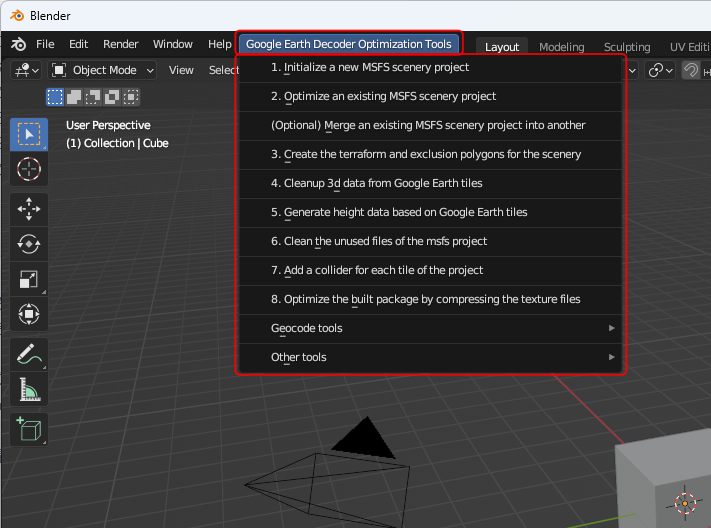 If the installation is successful, "Google Earth Decoder Optimization Tools" like this will be added to the Blender menu.
Call each function from here.
If the installation is successful, "Google Earth Decoder Optimization Tools" like this will be added to the Blender menu.
Call each function from here.
How to install Lily Texture Packer plugin
The Blender plug-in "Lily Texture Packer" developed by Élie Michel is a tool that combines textures pasted to polygons into a single file. Simply select all the polygons that make up the tiles generated by Google Earth Decoder, and then click [Objects] - [Lily Texture Packer] from the Blender menu.Also, by installing this plug-in and using the "2. Optimize an existing Msfs scenery project" menu in Google Earth Decoder Optimization Tools, you can combine a large number of texture files into a single file. Textures are combined into one texture for each LOD of each tile that makes up the ground surface. Since the number of file accesses is drastically reduced, the performance (FPS value) when flying in 3D space generated from Google Earth with MSFS can be improved.
Please note that Lily Texture Packer is shareware that requires a minimum donation of USD5.00.
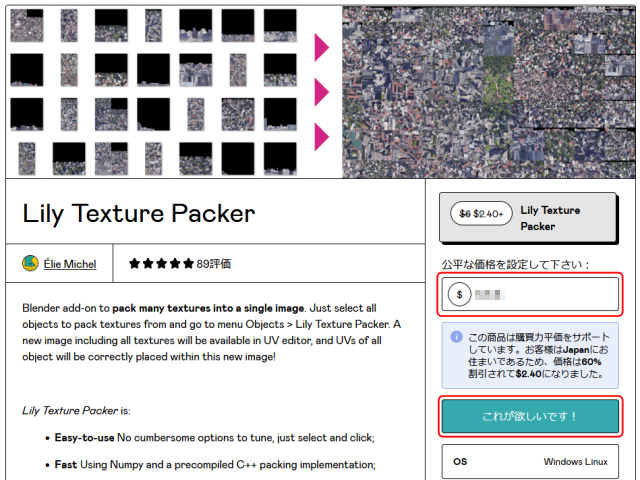 Open Gumroad's
Lily Texture Packer page
.
A screen like this will appear, so enter the amount you want to donate in the "Please set a fair price" field on the right side of the screen, and click the green "I want this!" button below.
Open Gumroad's
Lily Texture Packer page
.
A screen like this will appear, so enter the amount you want to donate in the "Please set a fair price" field on the right side of the screen, and click the green "I want this!" button below.
Lily Texture Packer (Gumroad)
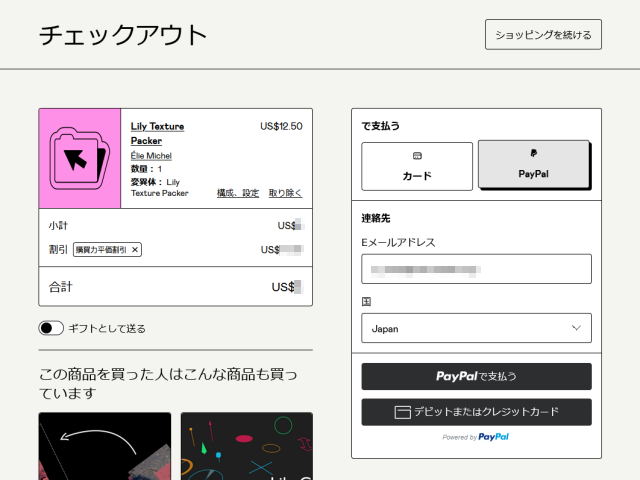 You will then be redirected to the payment screen.
You can pay by credit card or PayPal.
You will then be redirected to the payment screen.
You can pay by credit card or PayPal.
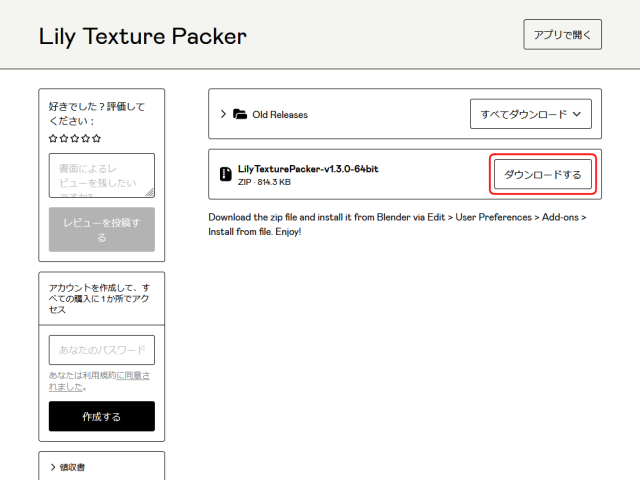 After completing the payment procedure, you will see a screen like this.
Click the "Download" button to download a file with a file name such as "LilyTexturePacker-v1.3.0-64bit.zip".
This file is 815KB in size and downloads instantly.
After completing the payment procedure, you will see a screen like this.
Click the "Download" button to download a file with a file name such as "LilyTexturePacker-v1.3.0-64bit.zip".
This file is 815KB in size and downloads instantly.
You can also download past versions all at once by clicking the "Download All" button above. You can download the file "Old_Releases.zip".
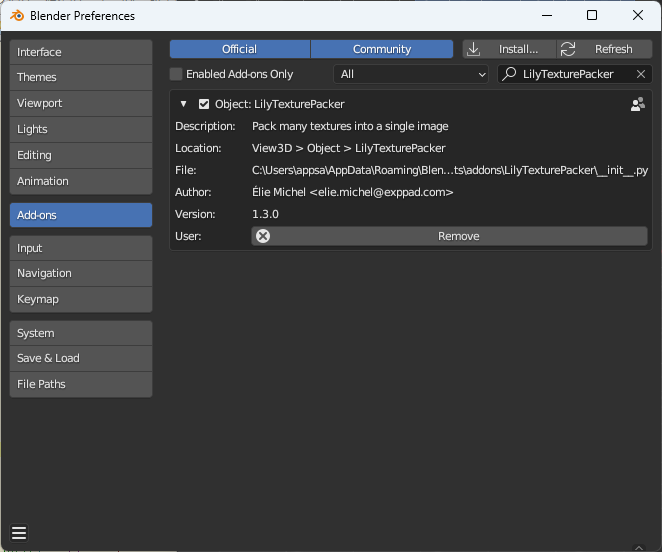 The installation method is the same as
How to install exporter/importer plugin between Blender and MSFS
shown above.
The installation method is the same as
How to install exporter/importer plugin between Blender and MSFS
shown above.
In other words, start Blender, select [Edit]-[Preferences] from the menu, open the [Add-ons] screen, and click [Install an add-on]. Activate this plugin by clicking the checkbox to the left of the plugin's name.